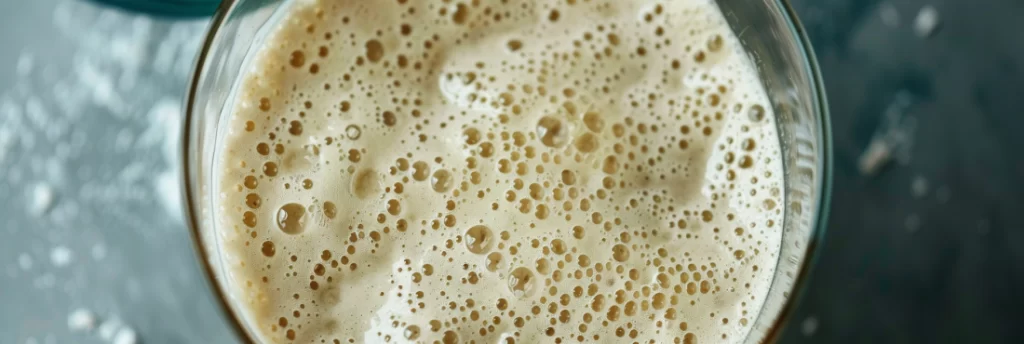
Sourdough baking has witnessed a remarkable resurgence, captivating the hearts of culinary enthusiasts worldwide. Amid the nurturing and feeding of sourdough starters, a common question arises: what to do with the discard? Fortunately, the versatility of sourdough discard opens up a world of culinary possibilities, especially for breakfast, transforming what might seem like waste into gastronomic treasures. Let’s dive into the sustainable and flavourful world of sourdough discard recipes, answering key questions along the way.
What to Make with Discarded Sourdough Starter?
The beauty of sourdough discard lies in its flexibility. Whether you’re a novice baker or a seasoned pro, incorporating sourdough discard into your recipes can add depth, flavour, and texture. From the tangy richness of English Muffins and the crisp, savoury delight of Crackers to the fluffy, comforting Pancakes, sourdough discard can be the star ingredient in a variety of dishes, proving its worth beyond traditional bread baking.
How to Add Sourdough Discard to Any Recipe
Incorporating sourdough discard into recipes is simpler than one might think. It can often be used as a substitute for some of the flour and water in a recipe, thanks to its composition. The key is to balance the liquid and dry ingredients. For every cup of discard used, reduce the recipe’s flour by half a cup and the liquid by a quarter cup. This guideline can help maintain the recipe’s original texture and consistency while imbuing it with the unique characteristics of sourdough.
Are Sourdough Discard Recipes Healthy?
Sourdough discard recipes not only reduce waste but also offer health benefits, making them a wonderful addition to a balanced diet. The fermentation process of the sourdough starter increases the availability of certain nutrients and can help improve digestion. Using the discard in various recipes can add a nutritional boost, especially when combined with whole grains and other healthful ingredients.
What Does Sourdough Discard Do in Recipes?
Sourdough discard introduces a mild tanginess and depth of flavour to recipes, distinguishing them from their non-sourdough counterparts. Its natural fermentation process can also contribute to a lighter, more tender texture in baked goods. Moreover, the lactic acid bacteria present in the discard act as a natural preservative, extending the shelf-life of the final product.
Featured Sourdough Discard Recipes
Sourdough Discard Pancakes
This recipe is a fantastic way to use up that extra sourdough starter discard. The pancakes come out incredibly fluffy and have a slight tang from the sourdough, making them irresistibly delicious.
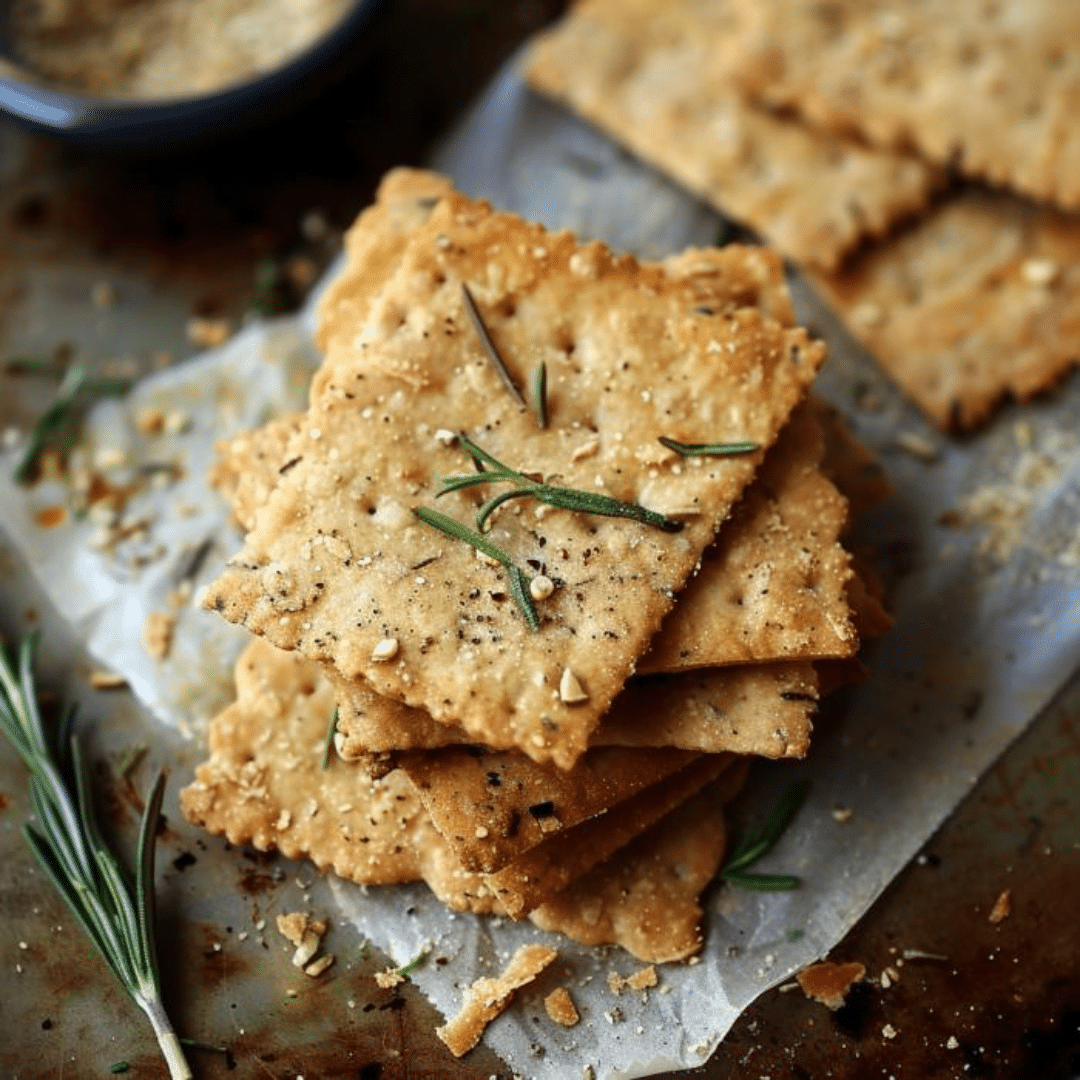
These sourdough discard crackers are thin, crispy, and full of flavor. They are perfect for snacking, serving with cheese, or as a base for canapés. This recipe is an excellent way to put your discarded sourdough starter to good use.
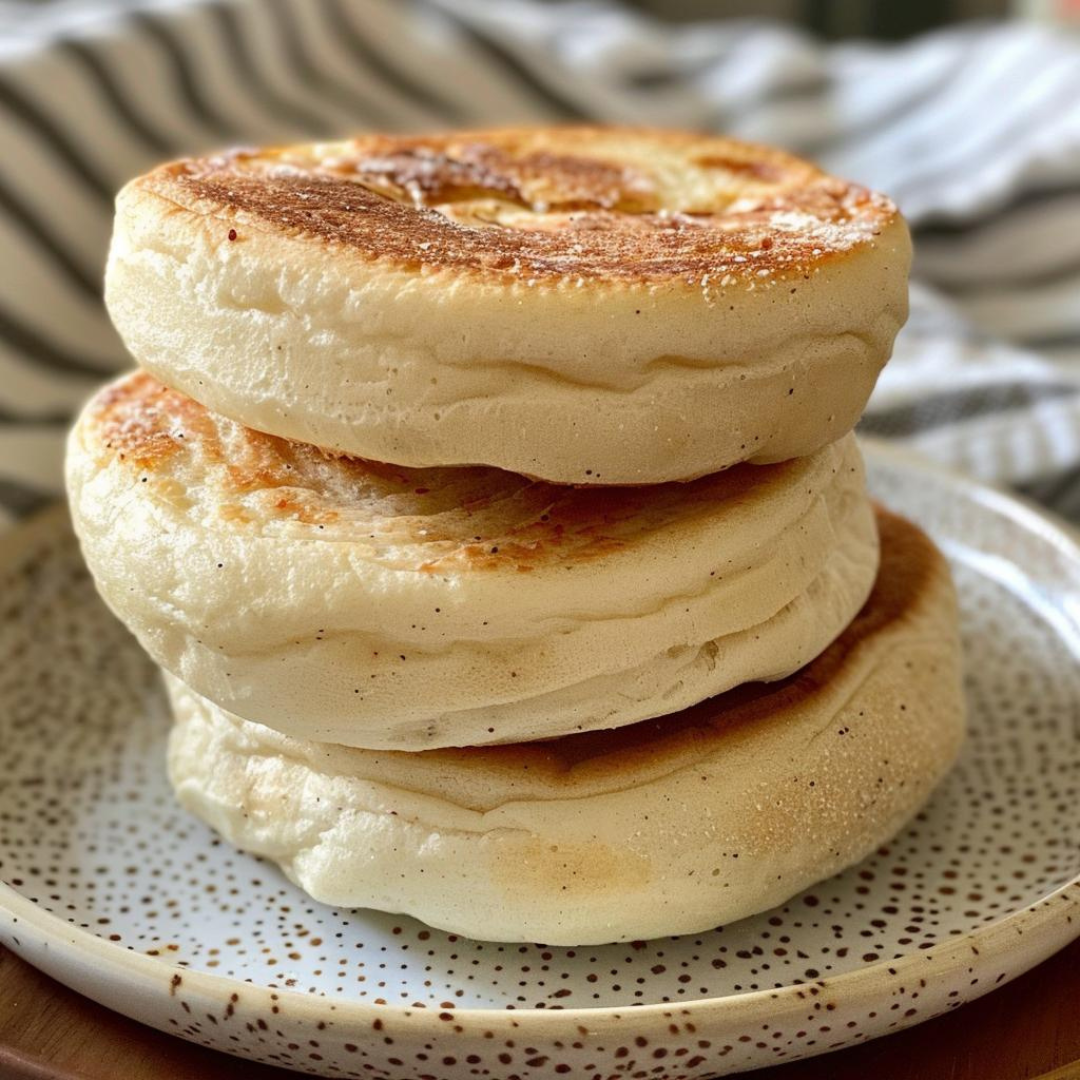
These sourdough discard English muffins are wonderfully tangy and have that perfect nook-and-cranny texture. They're ideal for breakfast sandwiches or simply toasted with butter and jam.
In conclusion, sourdough discard is a versatile, flavourful, and healthy ingredient that can enhance a wide range of recipes. By incorporating it into your cooking, you not only reduce food waste but also elevate the taste and nutritional value of your meals. Whether you’re whipping up breakfast or snacks, sourdough discard recipes are a testament to the creativity and sustainability possible in modern baking and cooking.
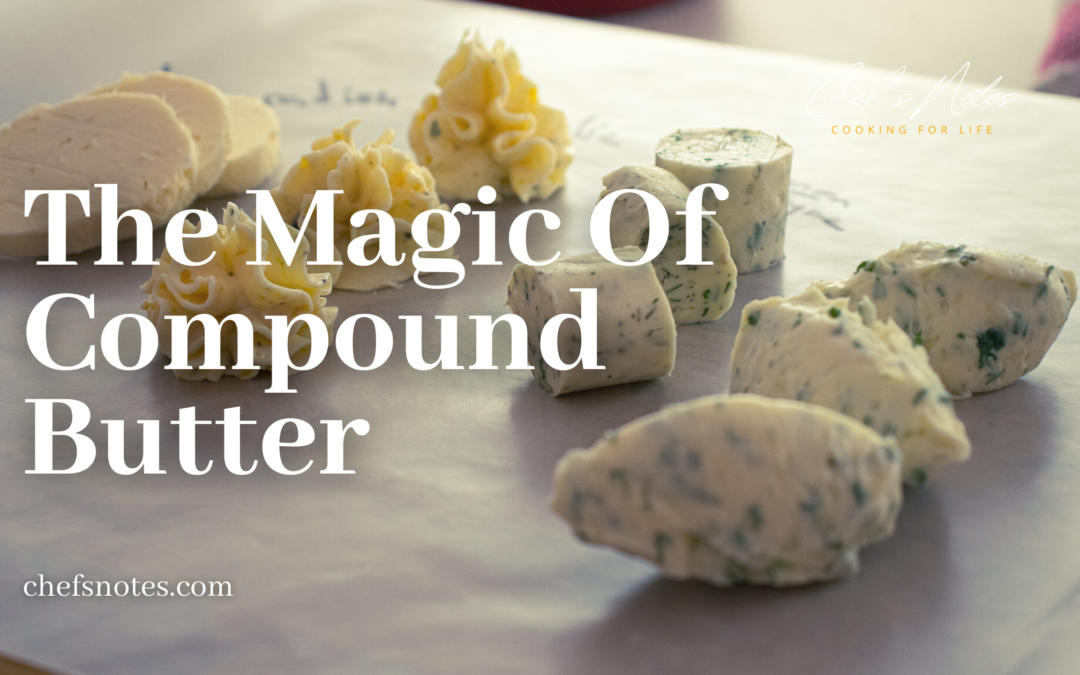
Compound Butter may seem intimidating. Especially when the name suggests something complex and when butter is $7.00 a pound. You don’t want to mess it up. However, compound butter is just a fancy name for butter with other ingredients mixed in. You’ll see in this post that making compound butter is easy, and it’s a great way to add flavour to your butter and stretch your butter a little further. This post has four recipes for compound butter. They are horseradish butter, lemon-thyme butter, herb butter, and finally, the best ever garlic butter. You will learn four ways to forum compound butter, store it, and, even more importantly, use it. So, are you ready? Good! Let’s get to it.
The Basics Of Compound Butter
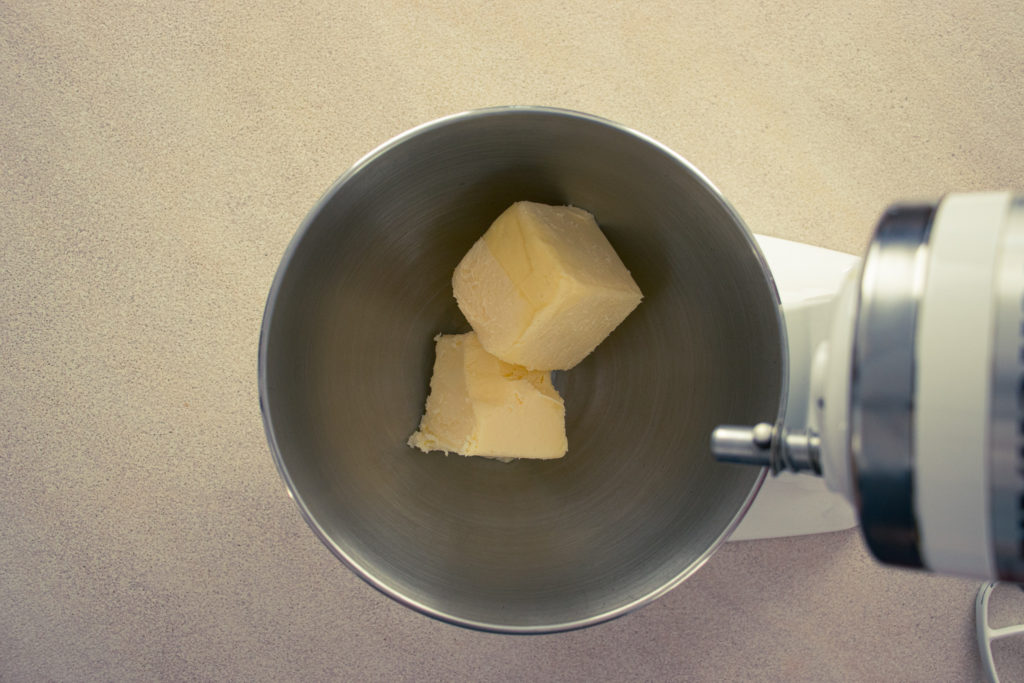
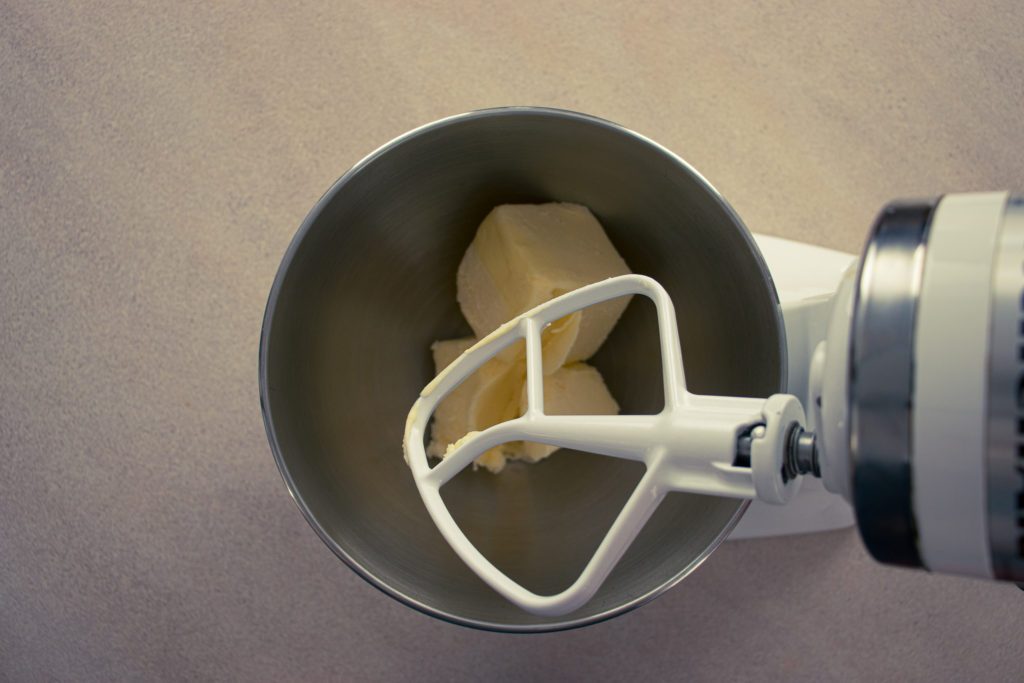
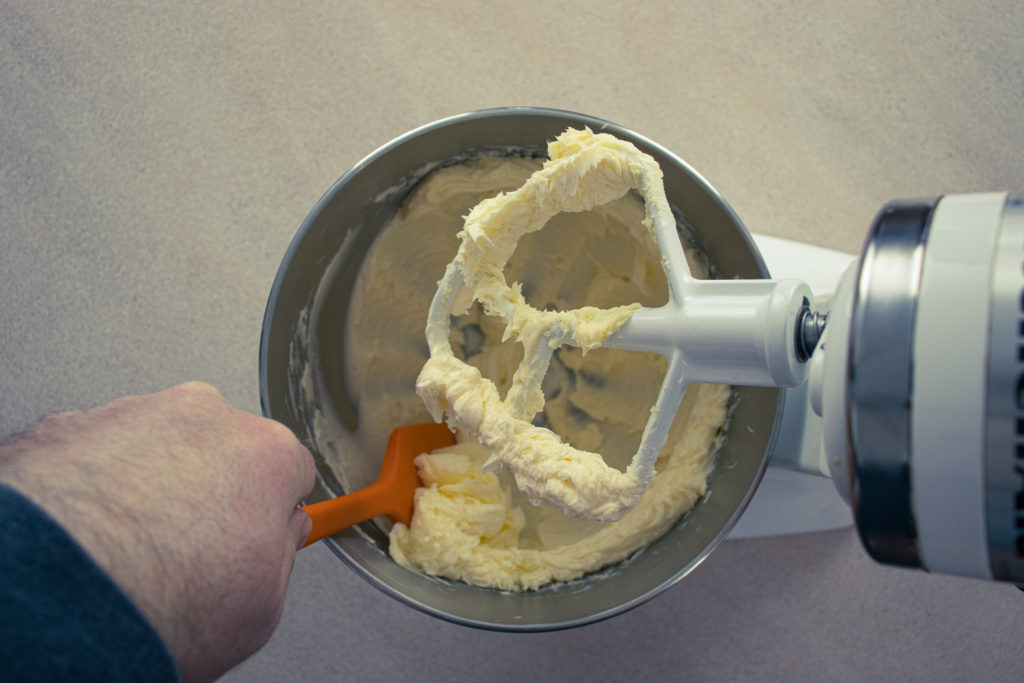
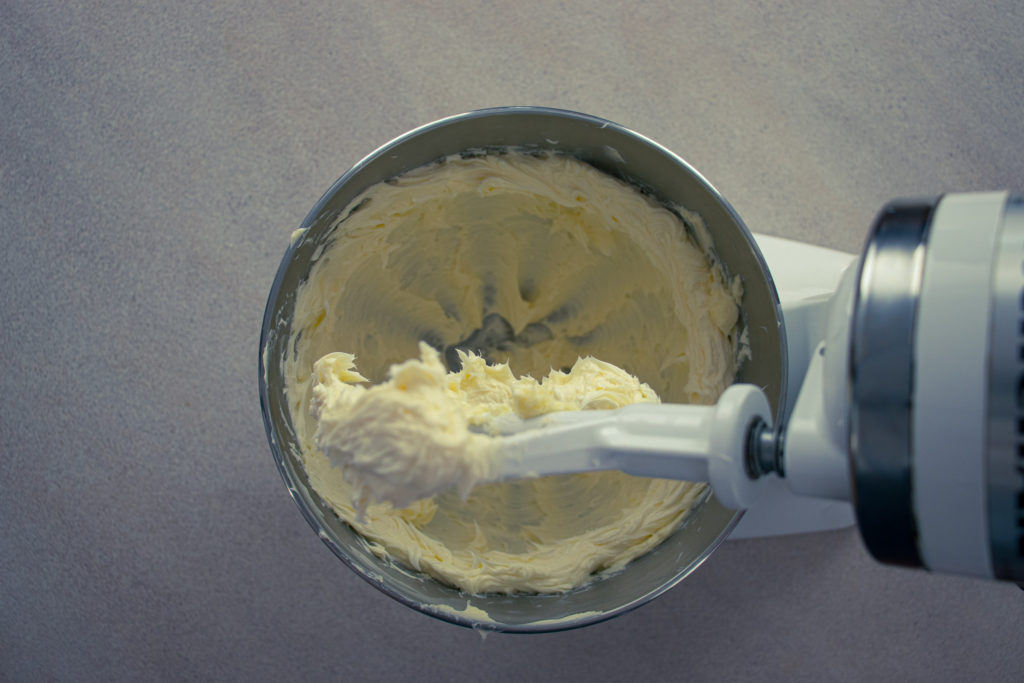
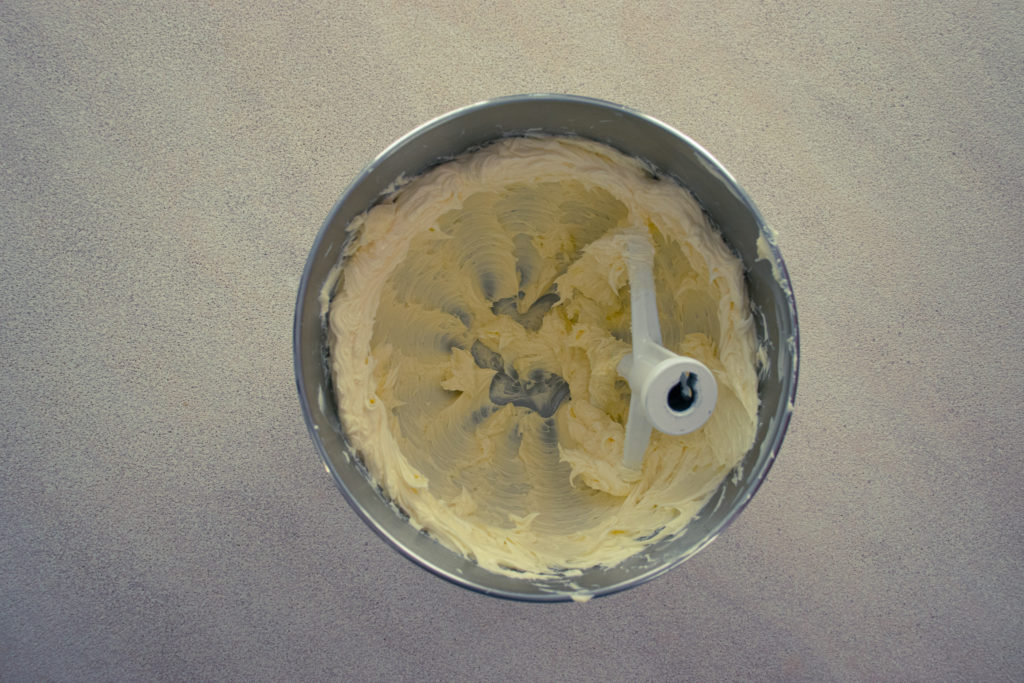
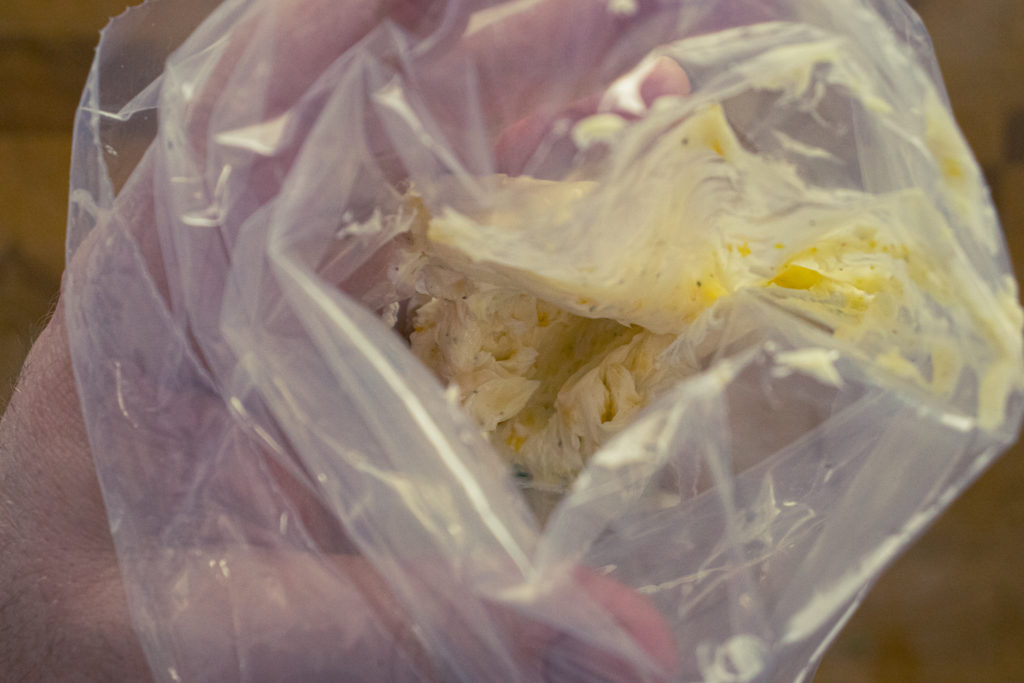
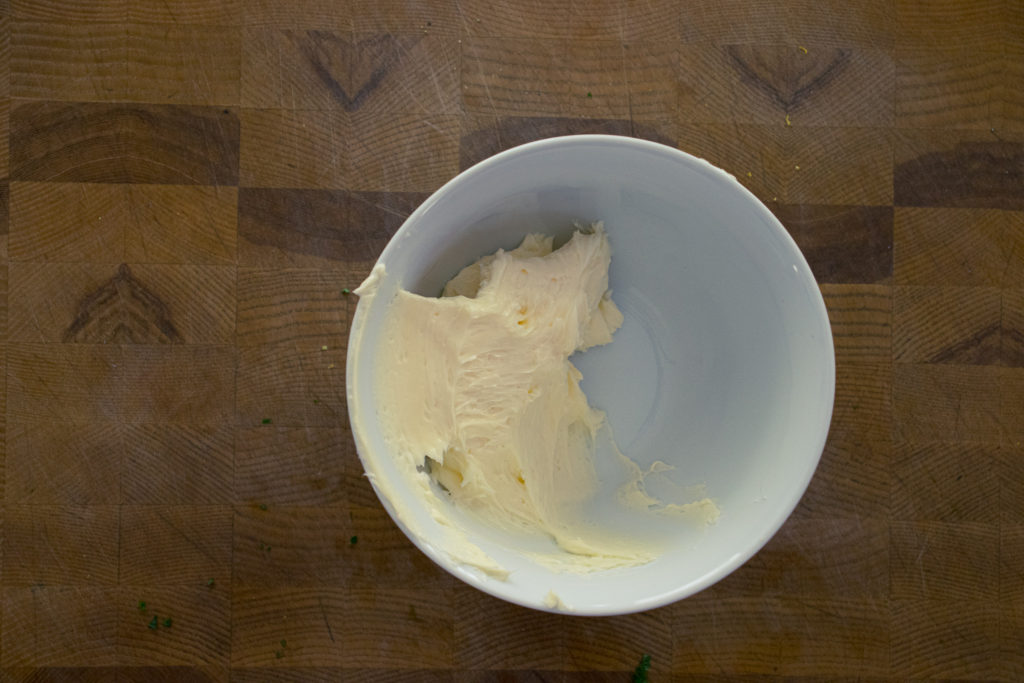
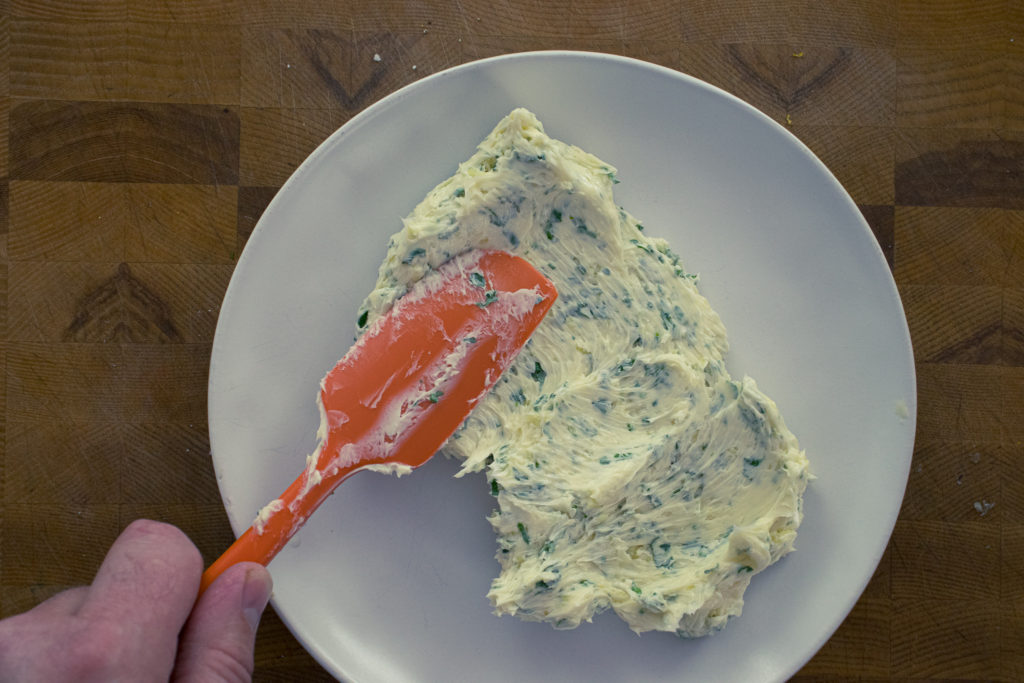
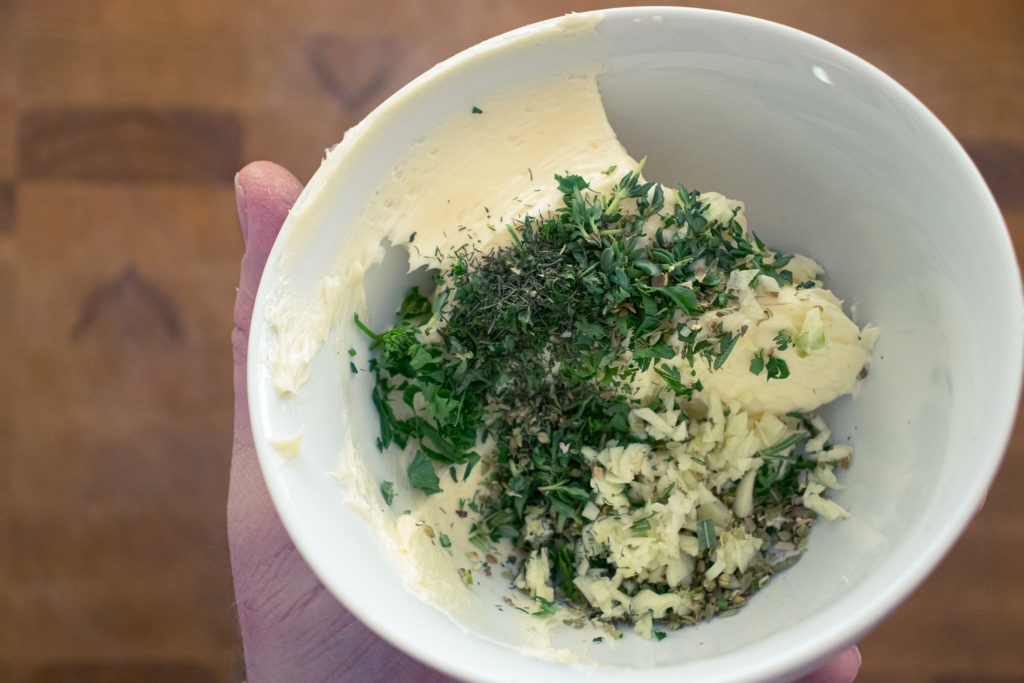
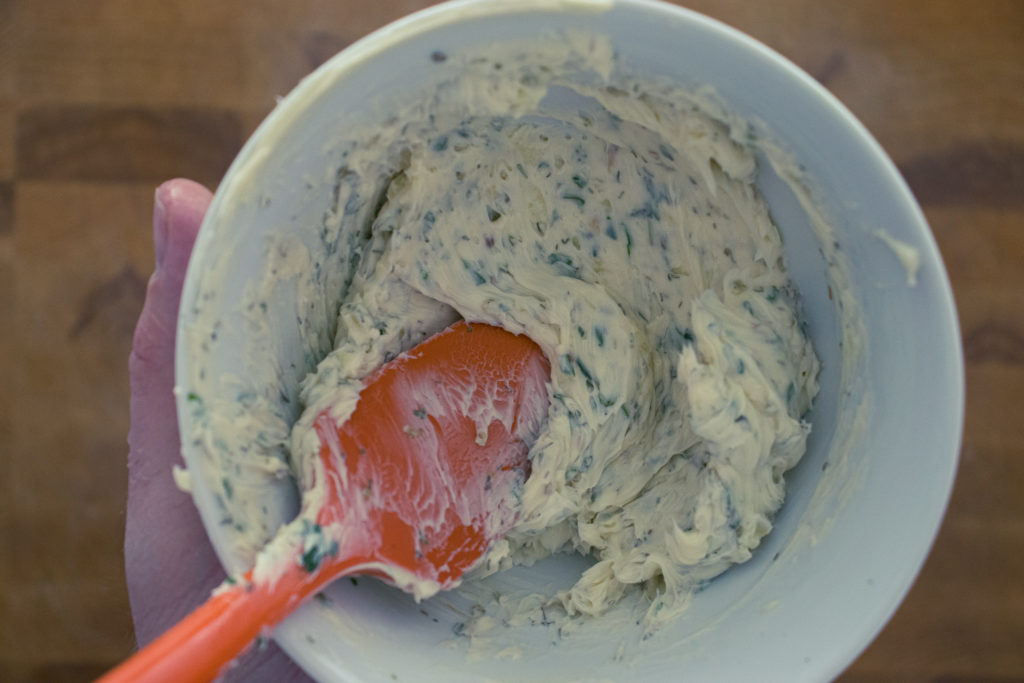
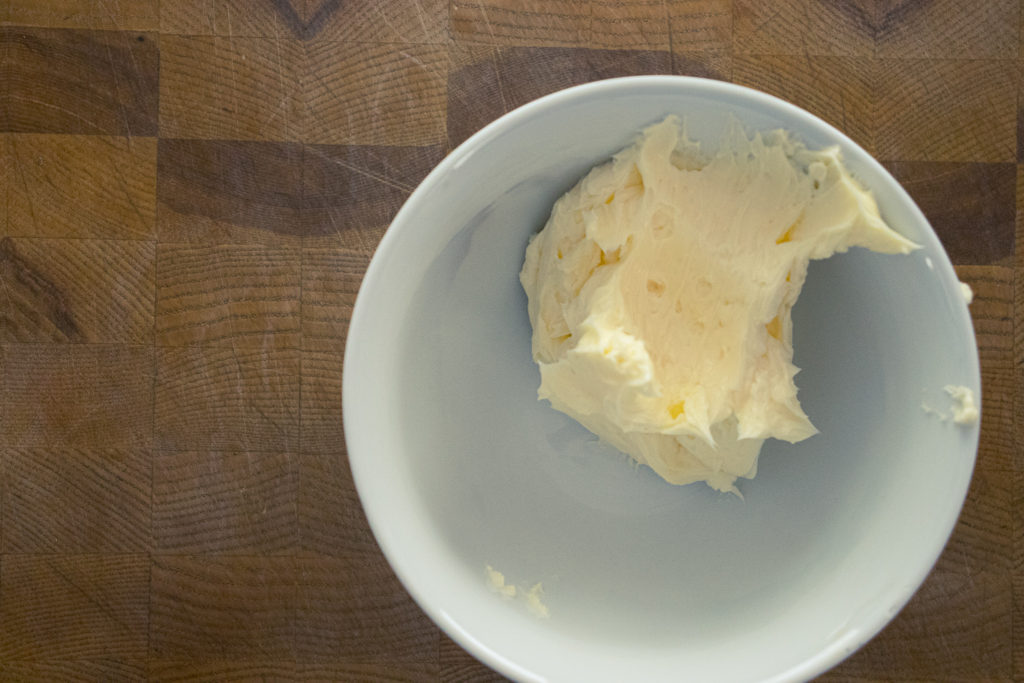
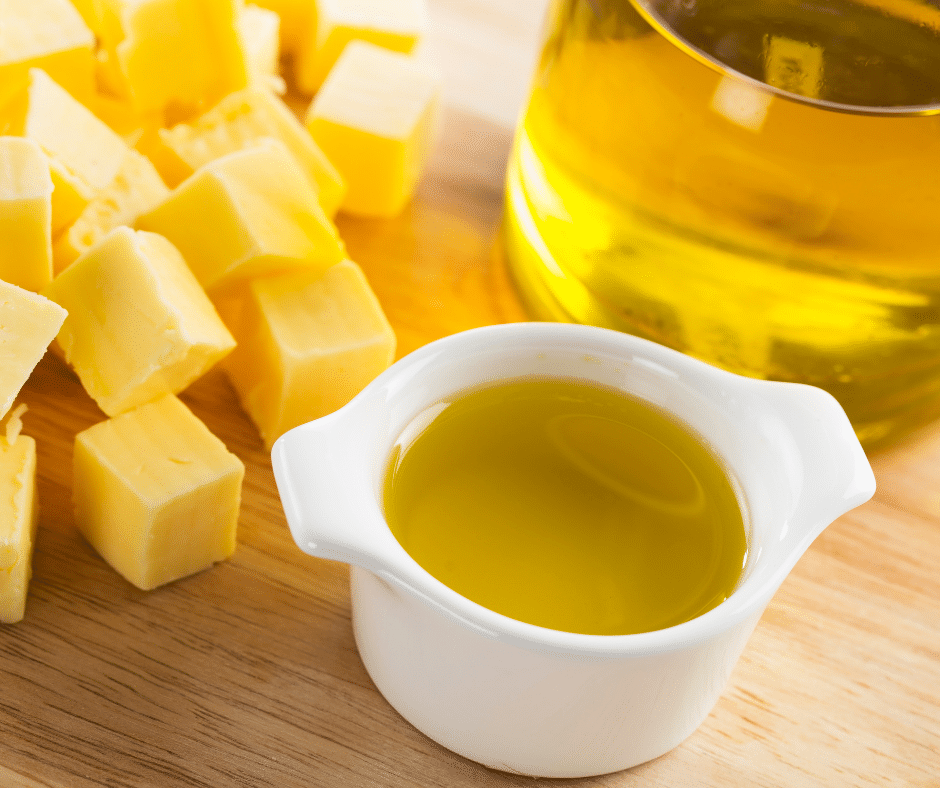
Compound butter unsurprisingly starts with butter. You can use unsalted butter or salted butter to make compound butter. I prefer to use salted butter. When using salted butter, you know how much salt is in there. You don’t need to add any more, limiting the chance of the final compound butter being under or over seasoned. The butter has to be soft when making compound butter. Take it out of the fridge a few hours before you’re ready to use it to get it to room temperature. Then, beat the butter in an electric mixer with the paddle attachment on medium-high speed. Beat the butter for 7 to 8 minutes, stopping to scrape down the sides of the mixing bowl at least once or twice. The butter should be light and airy. If I were only making one type of compound butter, I would add the ingredients to the beaten butter and mix it with the electric mixer for a minute. However, because I made four kinds of compound butter for this post, I divided my butter into smaller portions and mixed the ingredients in by hand.
How To Store Compound Butter
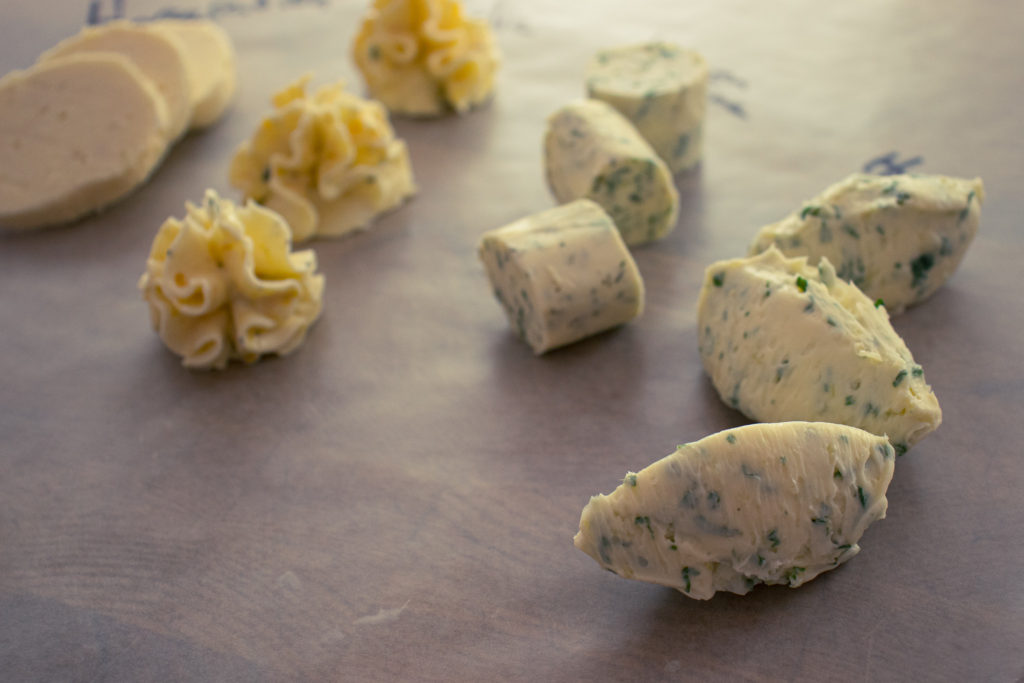
You should store compound butter in the fridge or freezer in an airtight container. Depending on the ingredients you’ve added to the butter, it should last in the refrigerator for one week and a maximum of one month. In the freezer, compound butter will last for months. As you’ll see below, there are many different ways to form your butter to make it easy to use. The shape you use for your butter doesn’t matter. There’s no rule saying this kind of butter needs to be this shape, used for this, or has to look like this. Form the butter however you want.
Forming Compound Butter
There are four main ways to form compound butter. The first is by far the easiest. That’s to put the butter in a ramekin or small dish. The problem with this method is that if you’re storing the butter in the fridge or freezer, it will be difficult to use. You’ll have to soften it every time you want to use it. So, let’s forget about that method.
Rolling Compound Butter
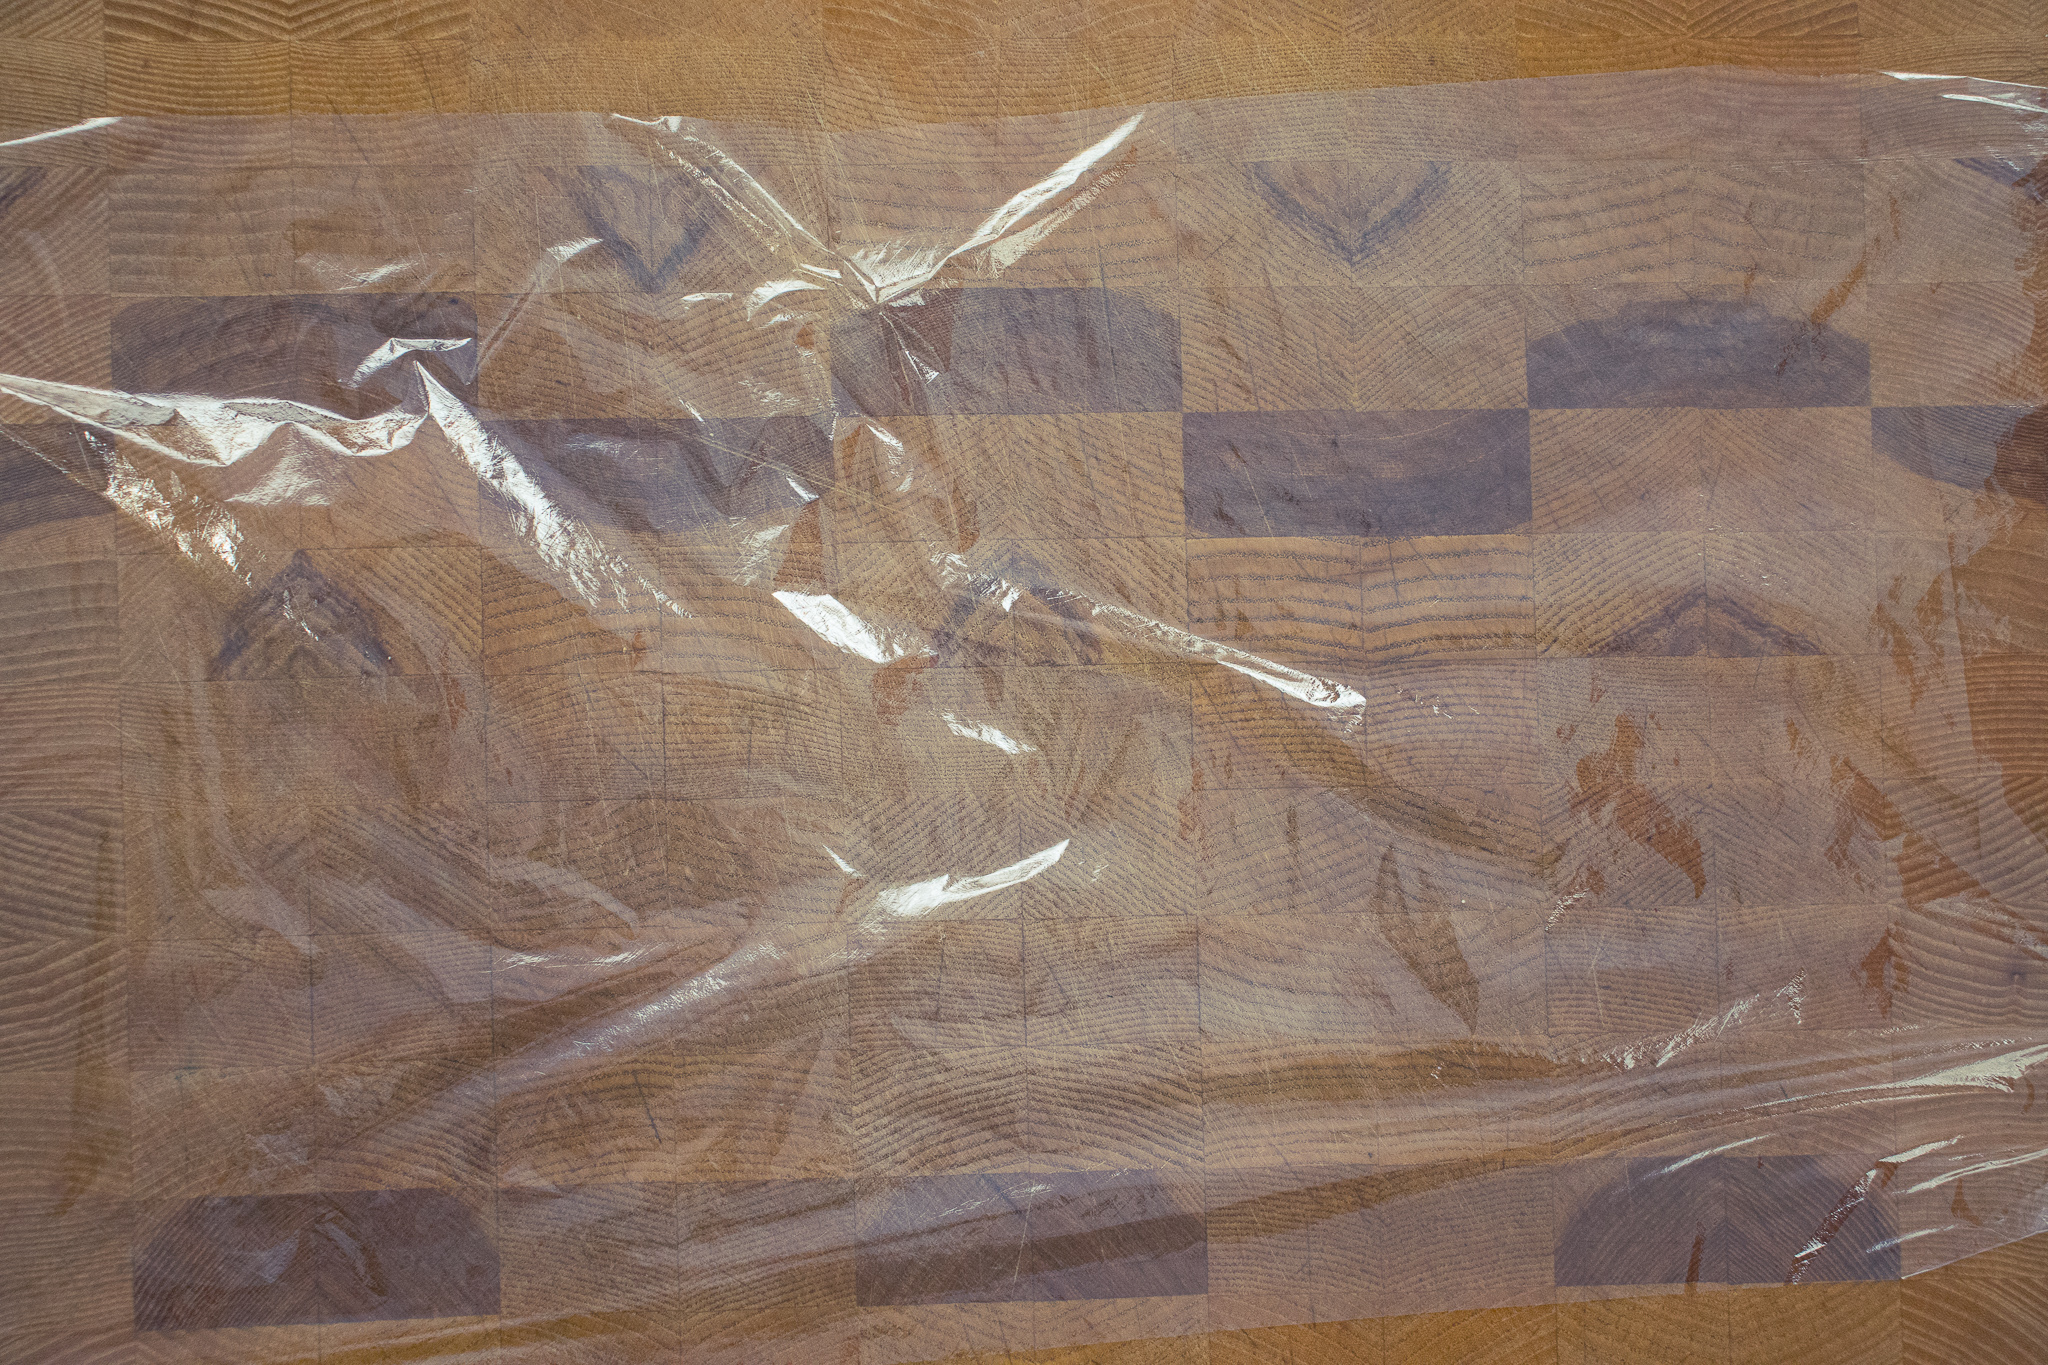
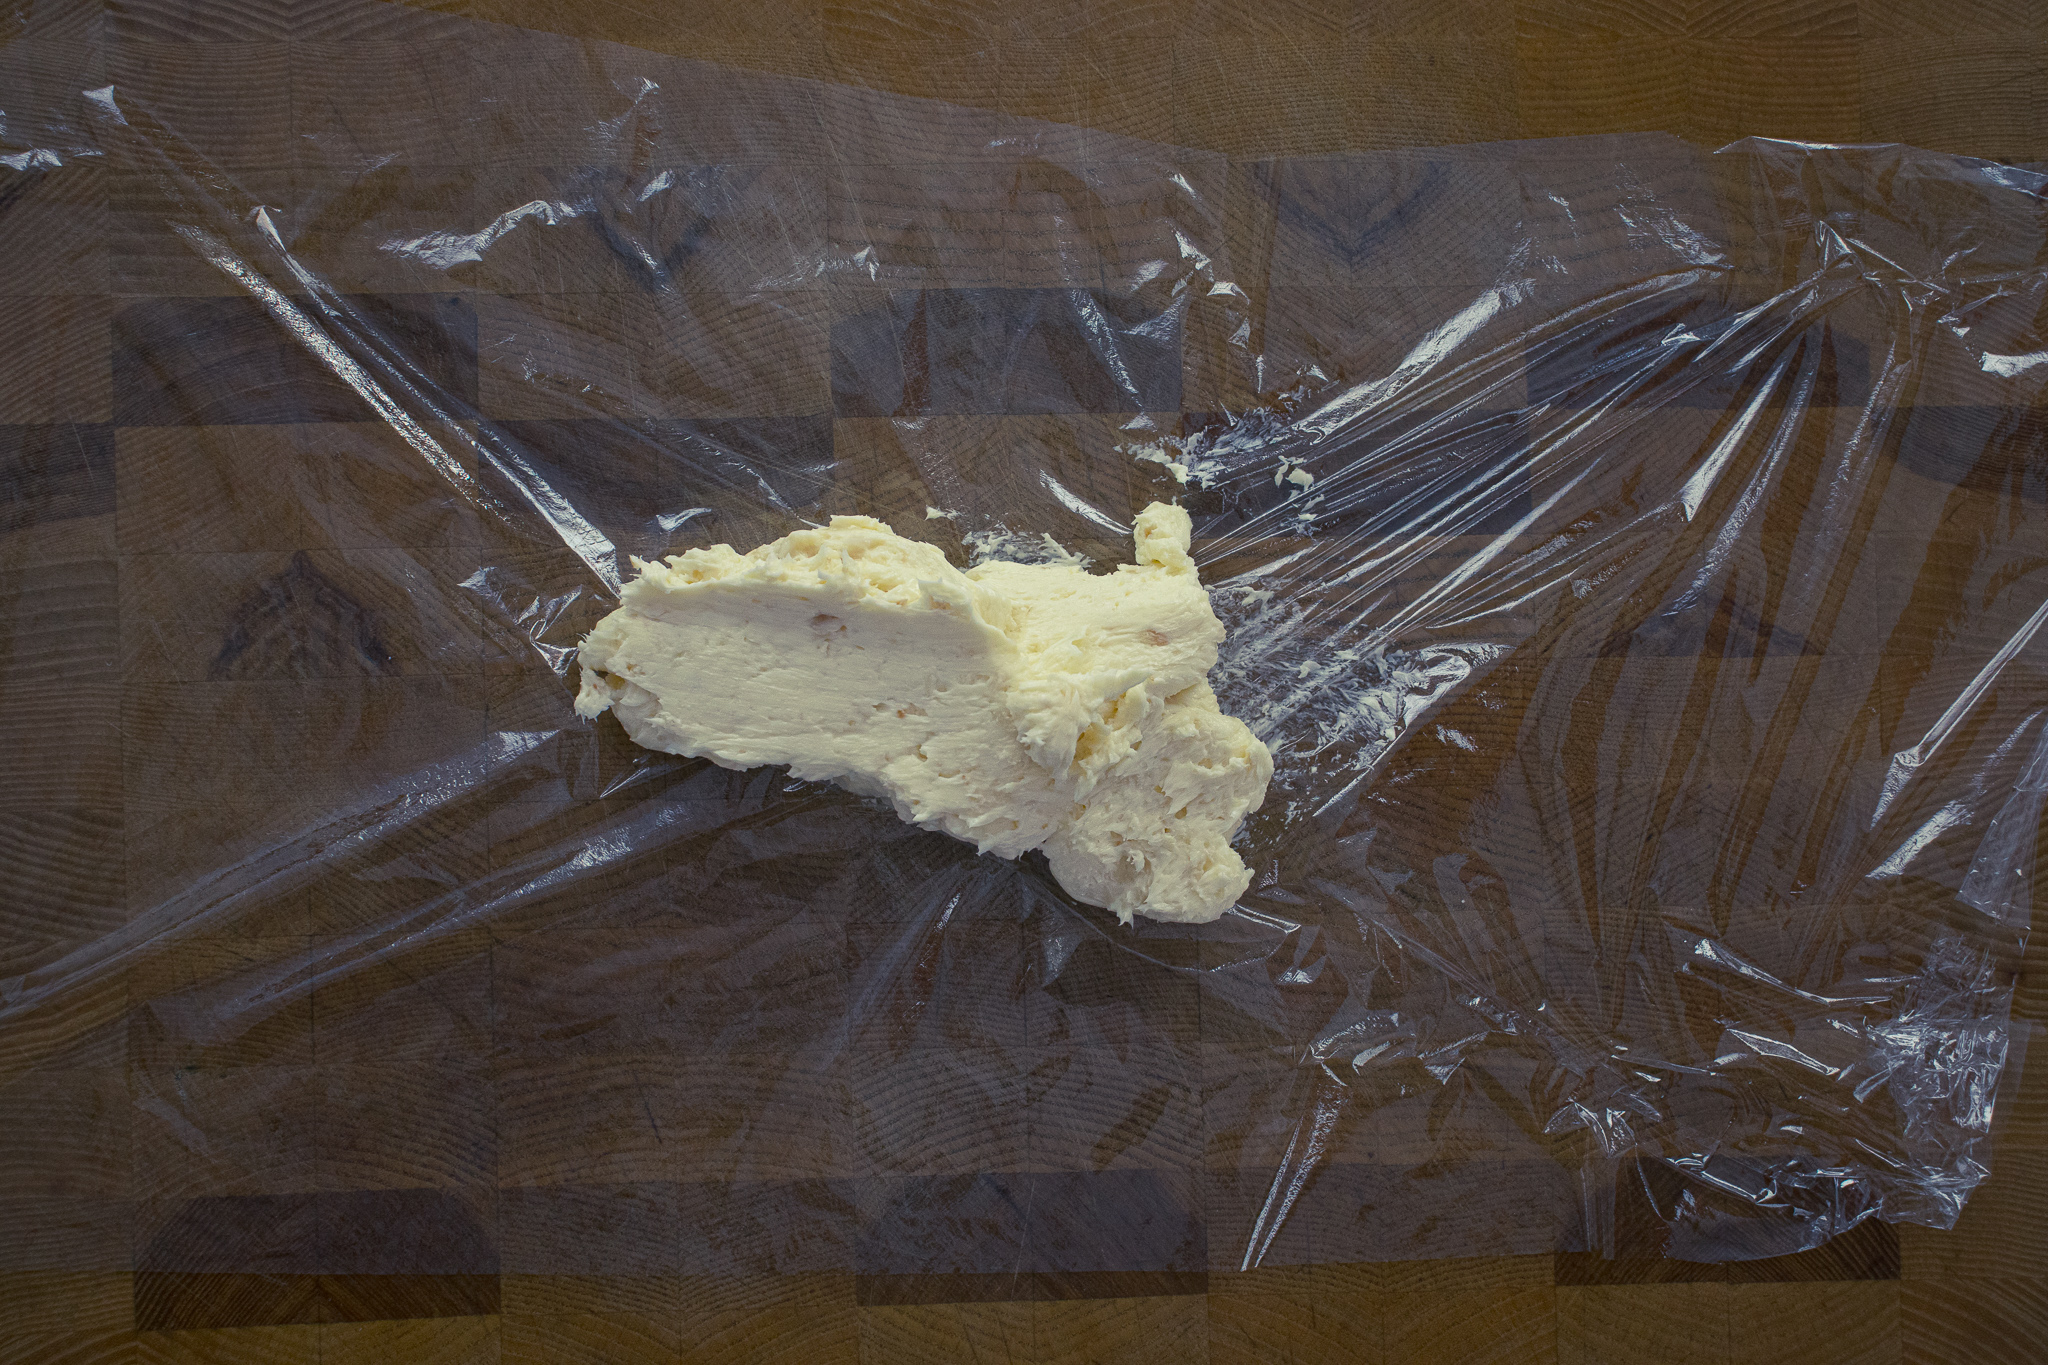
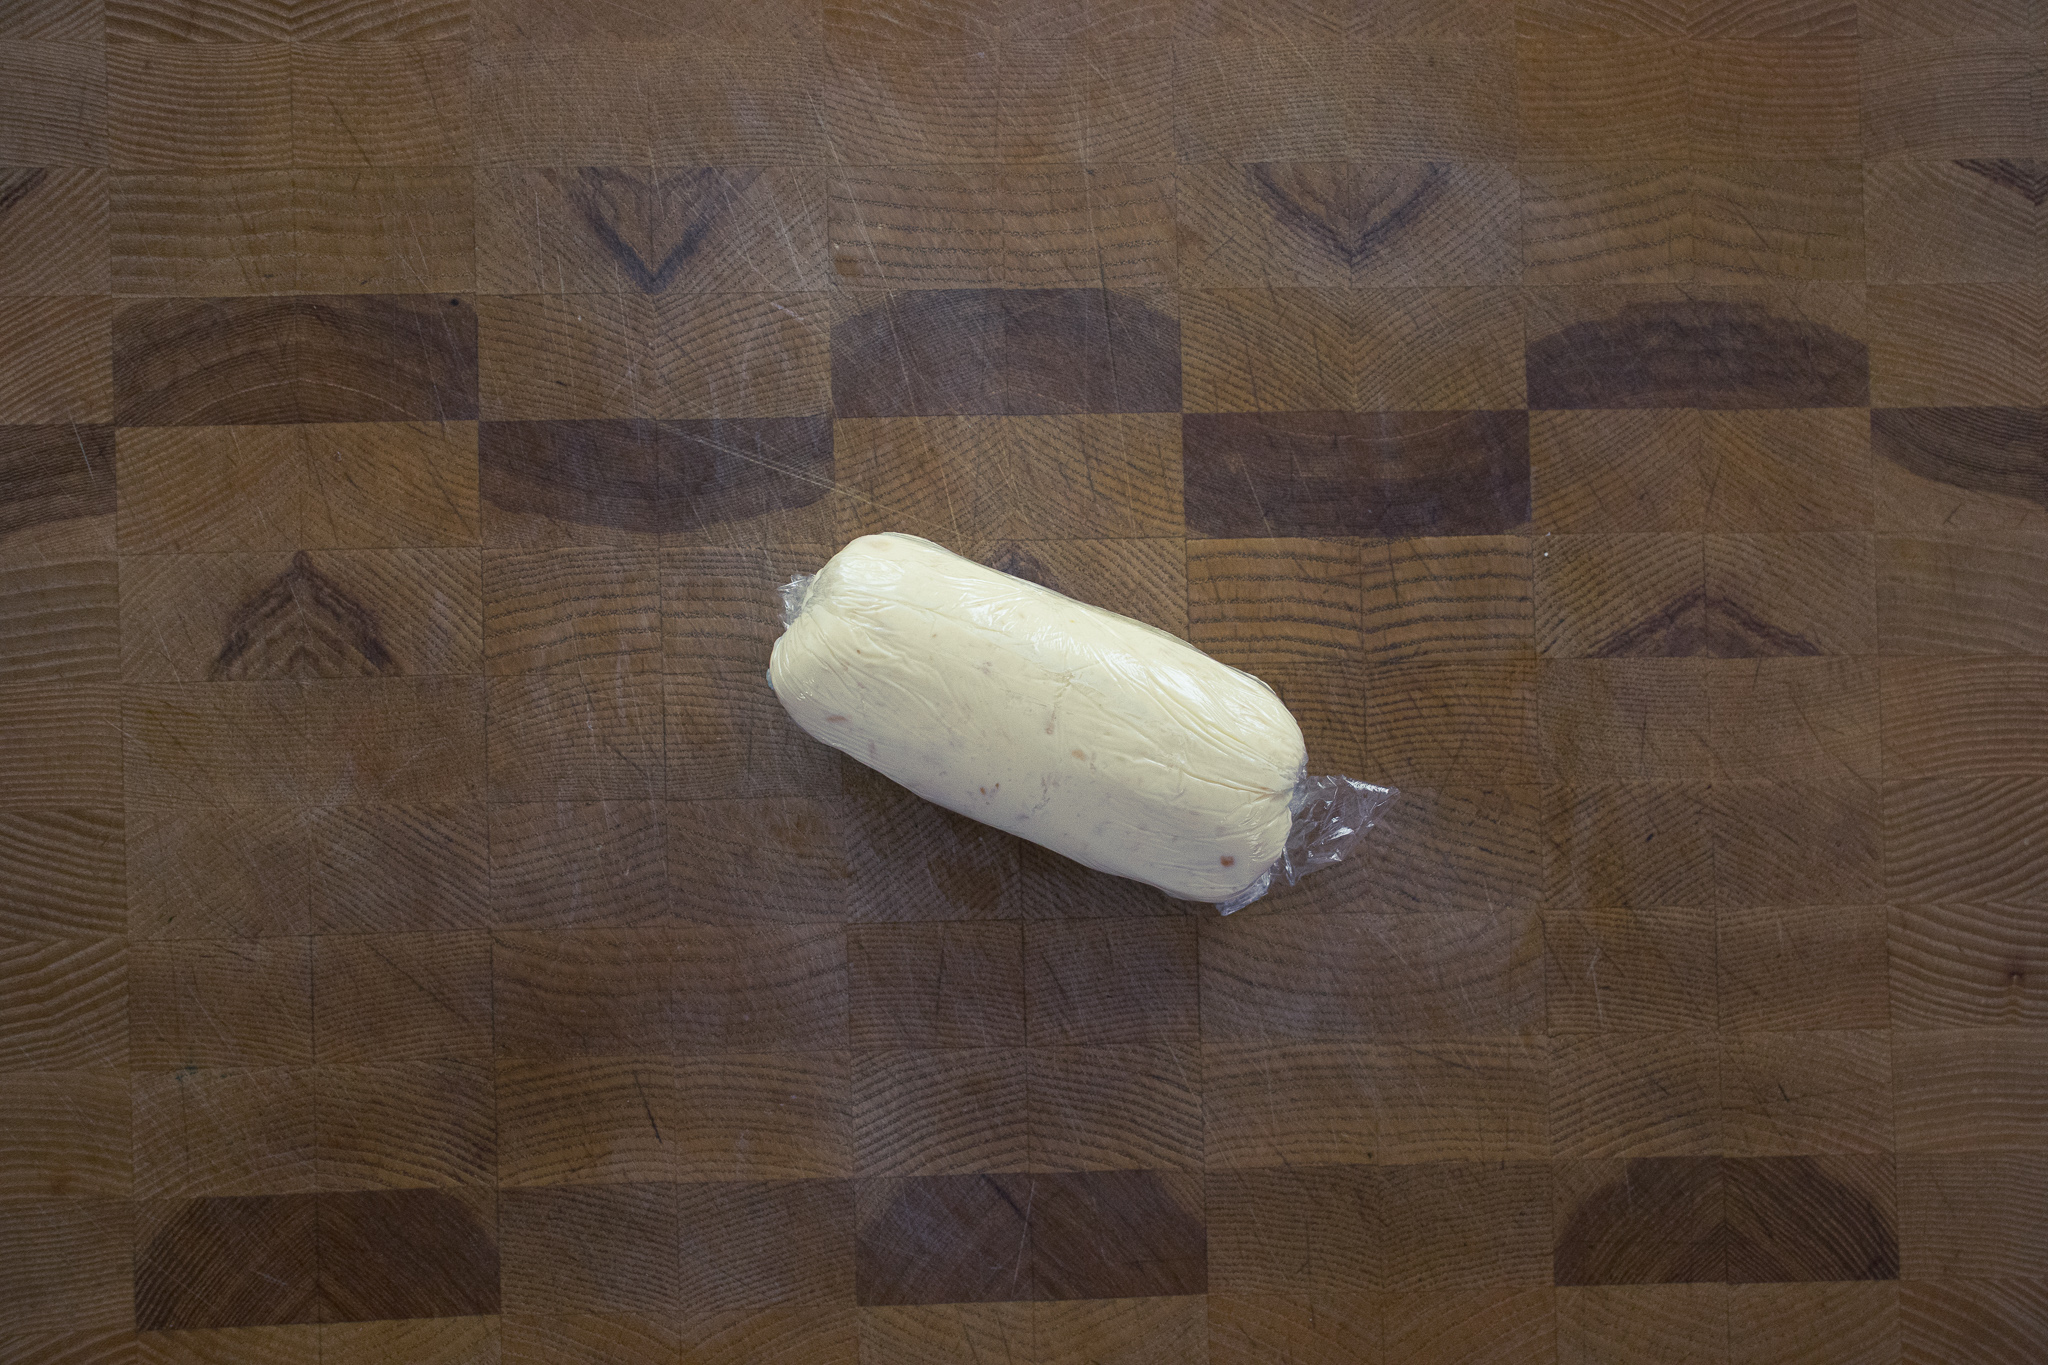
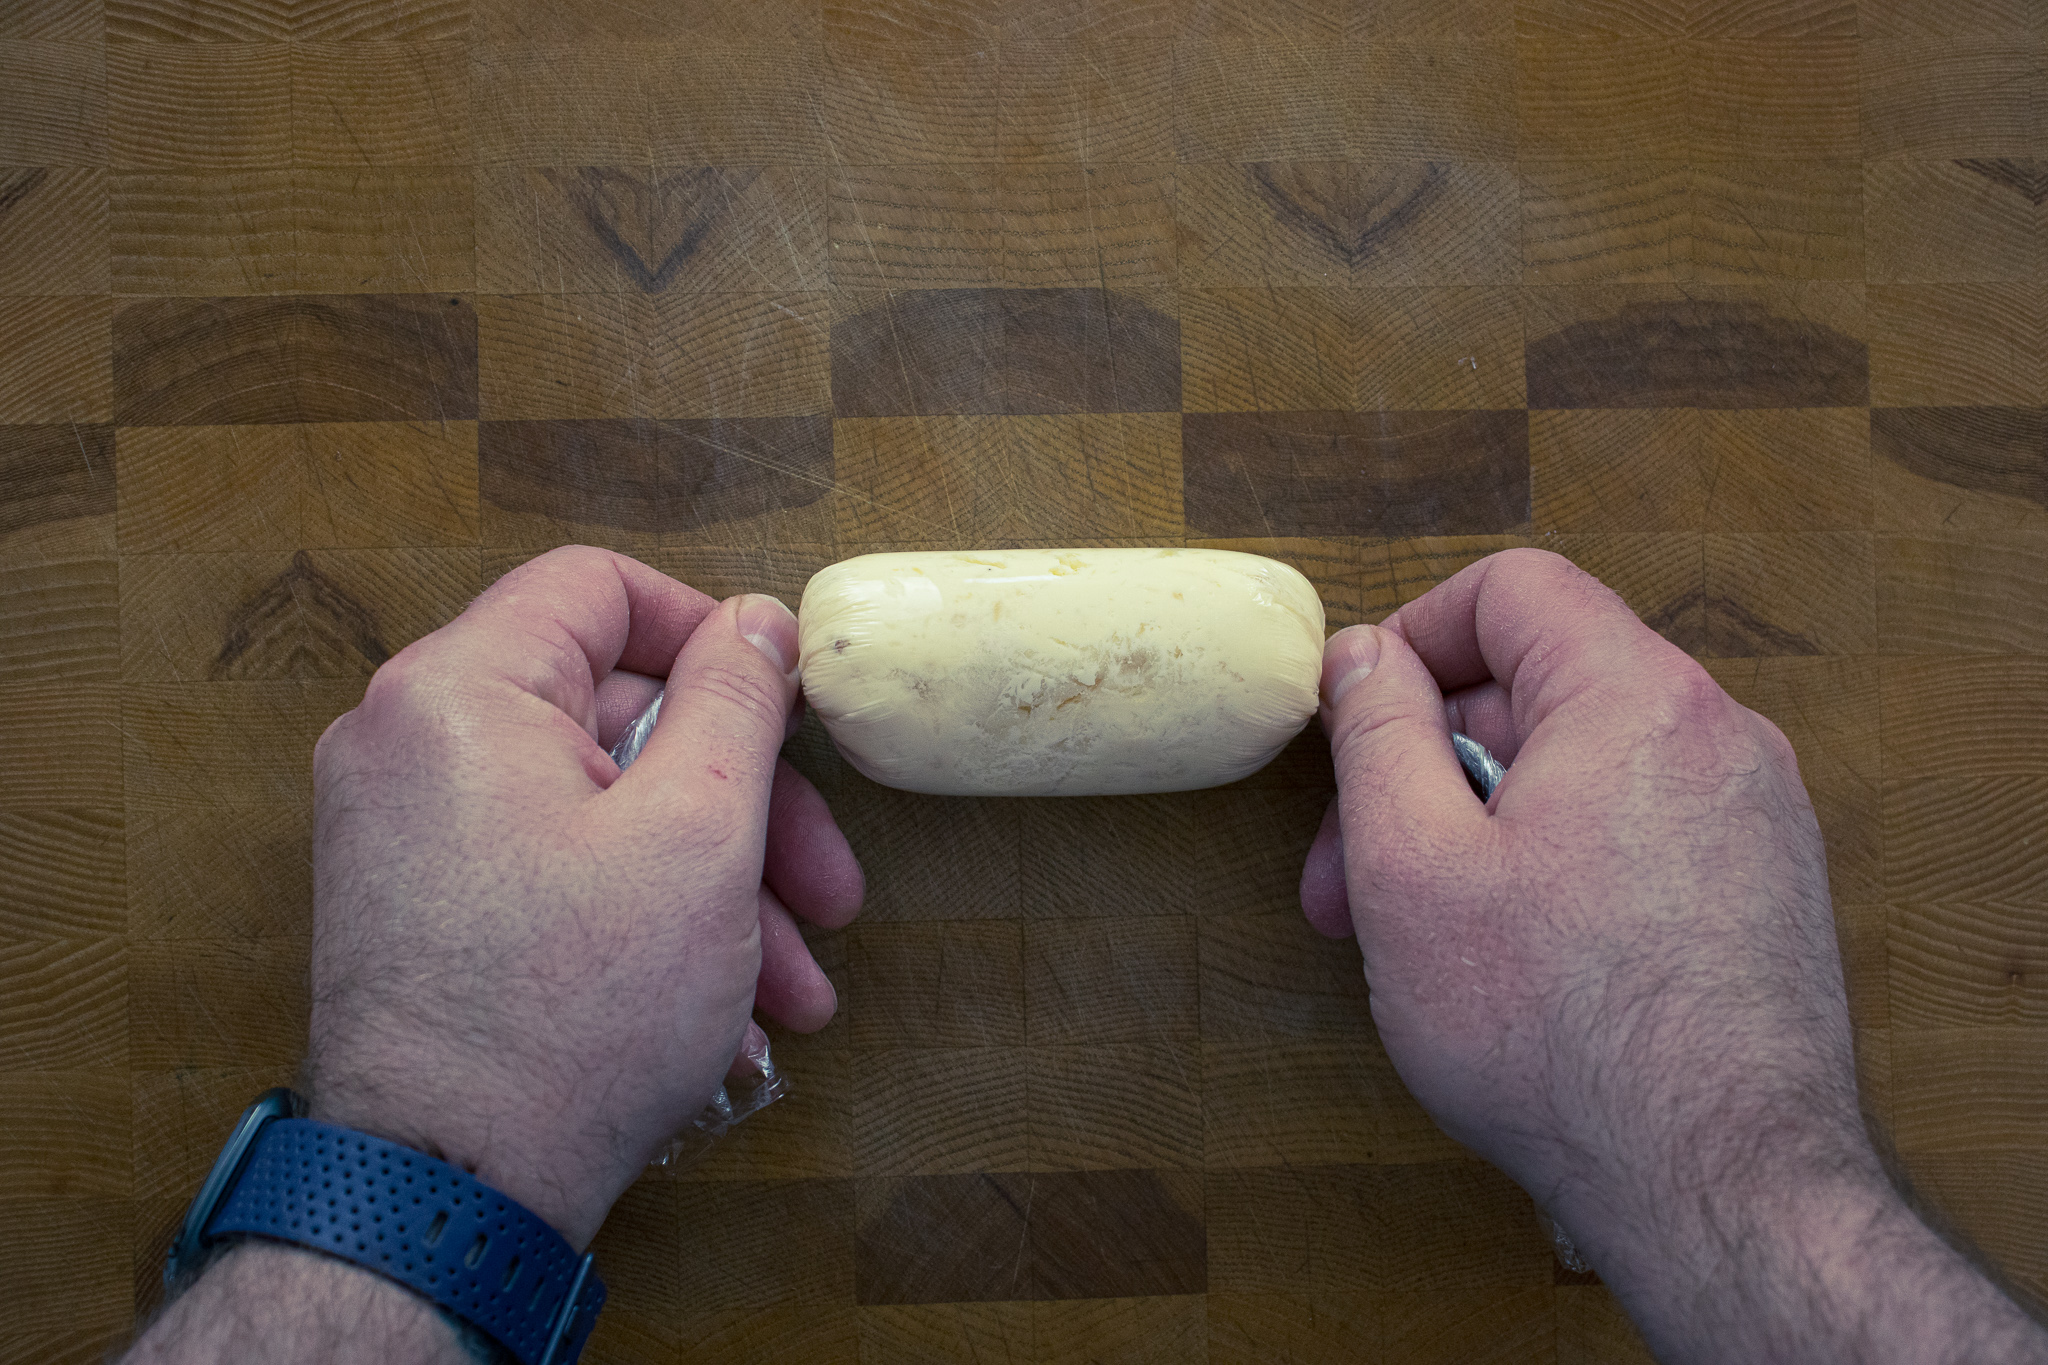
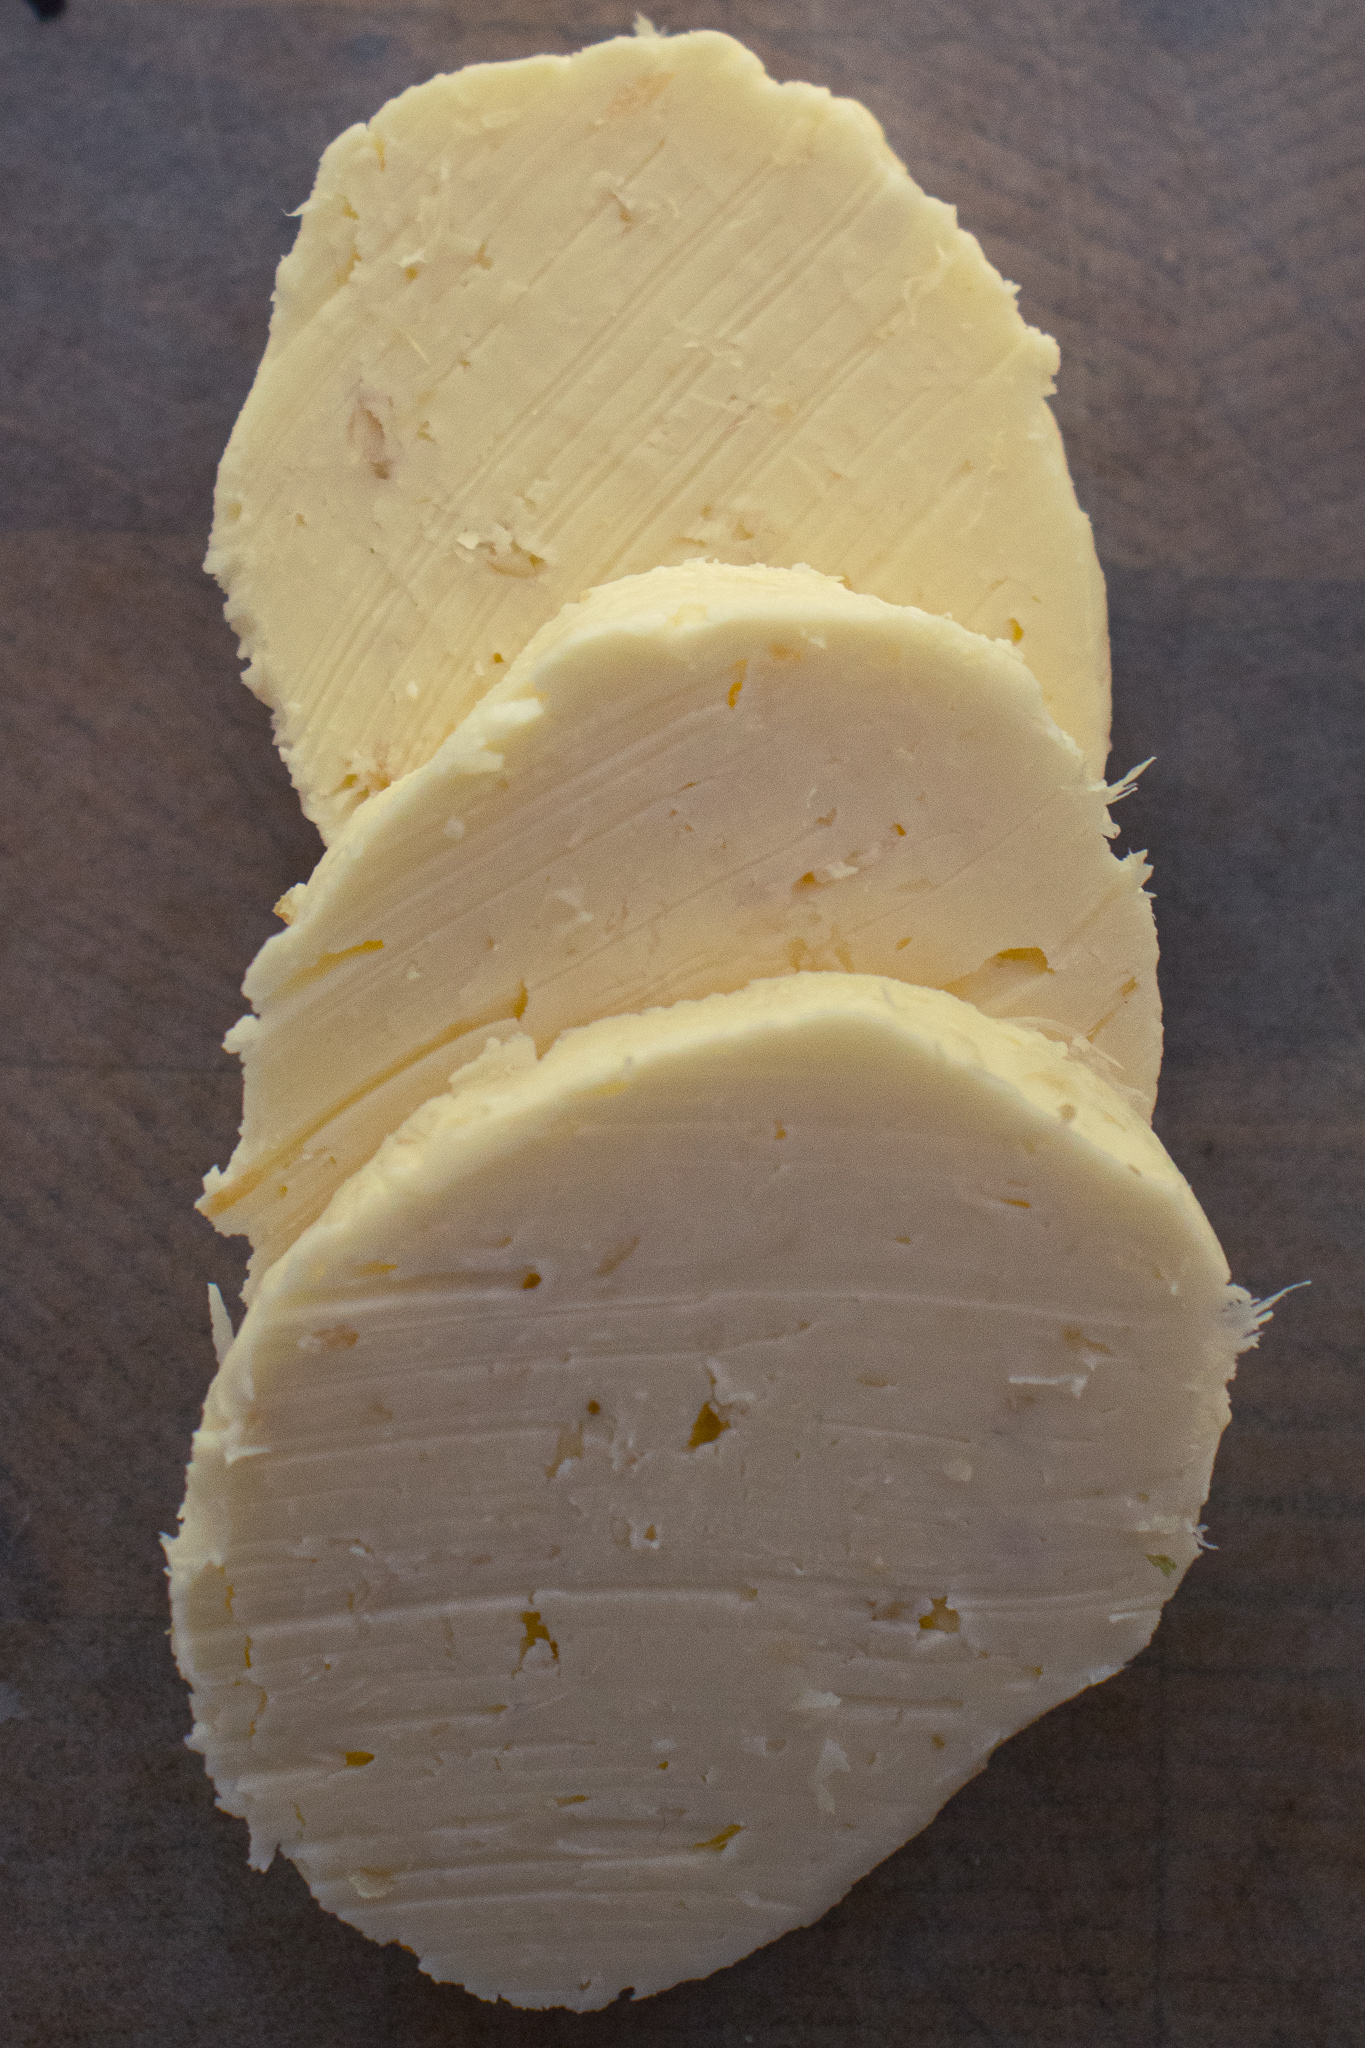
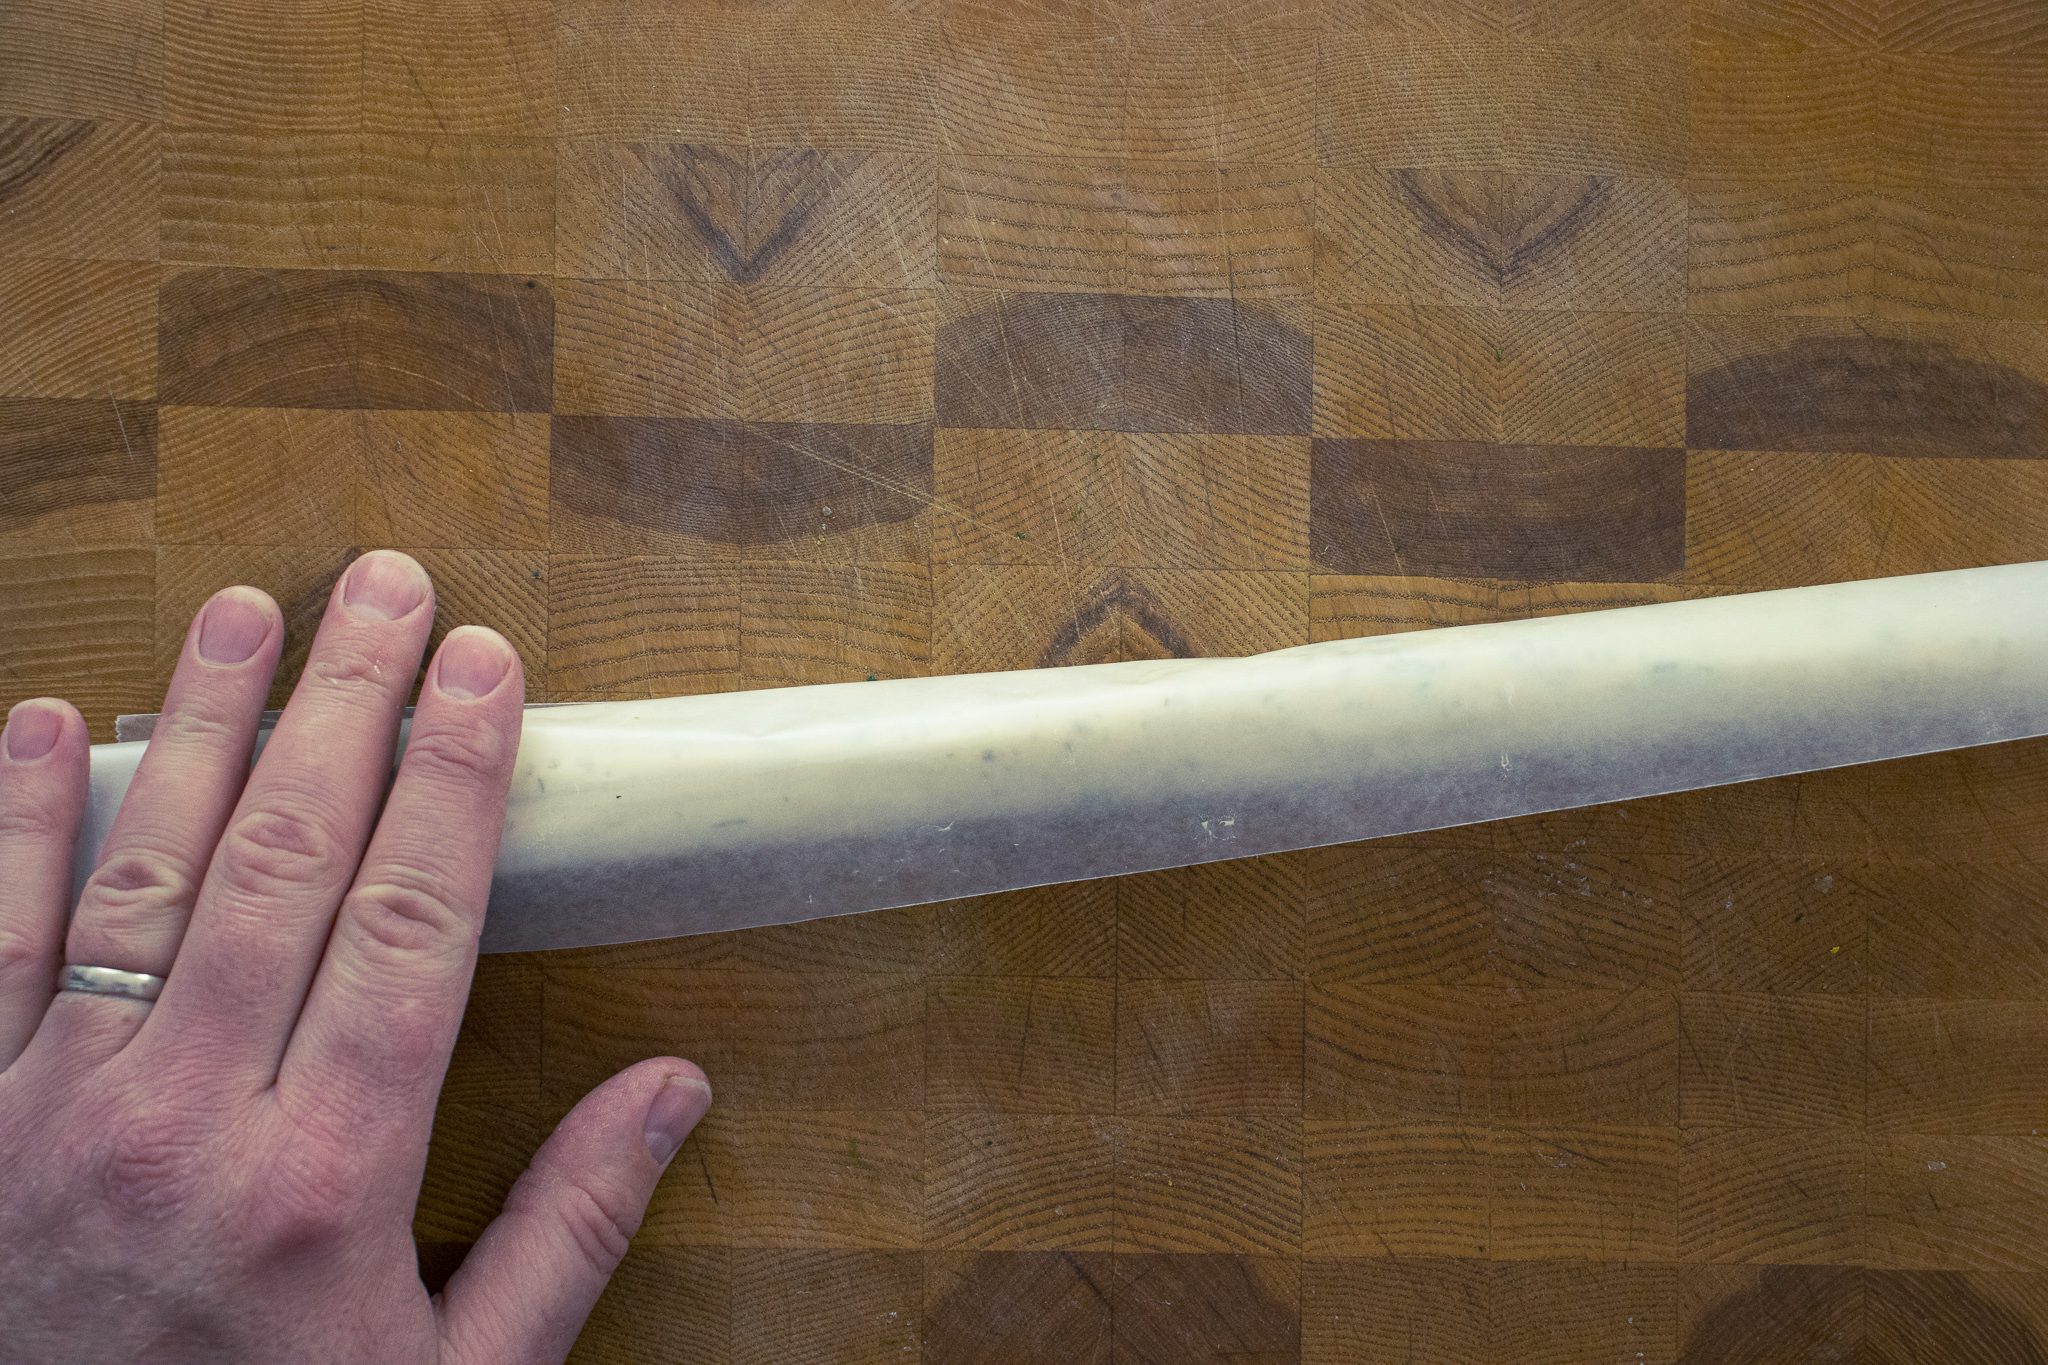
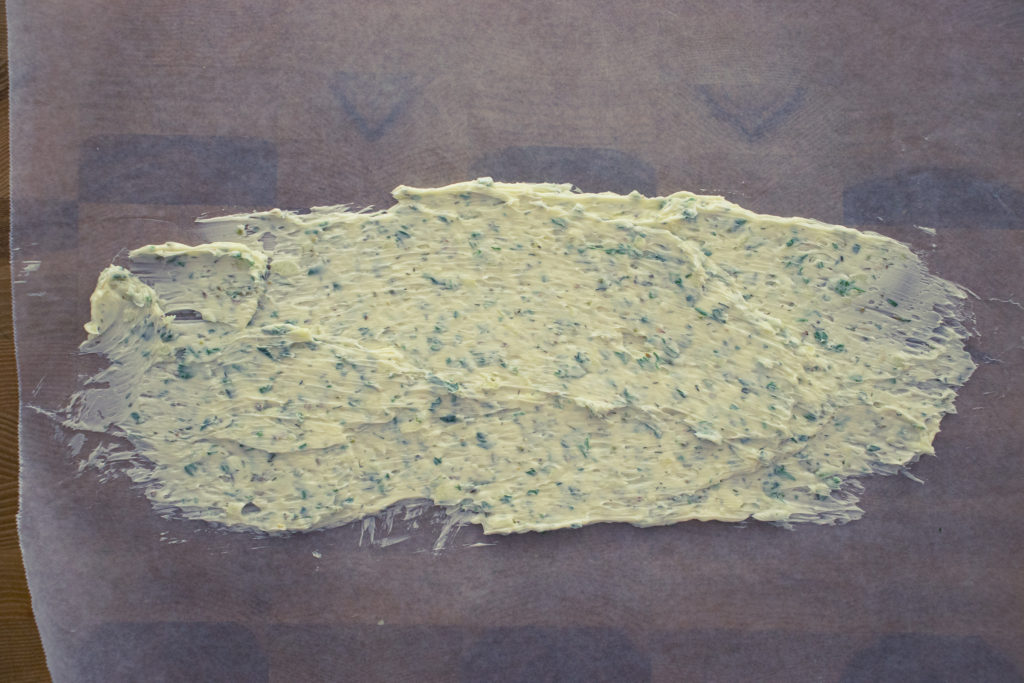
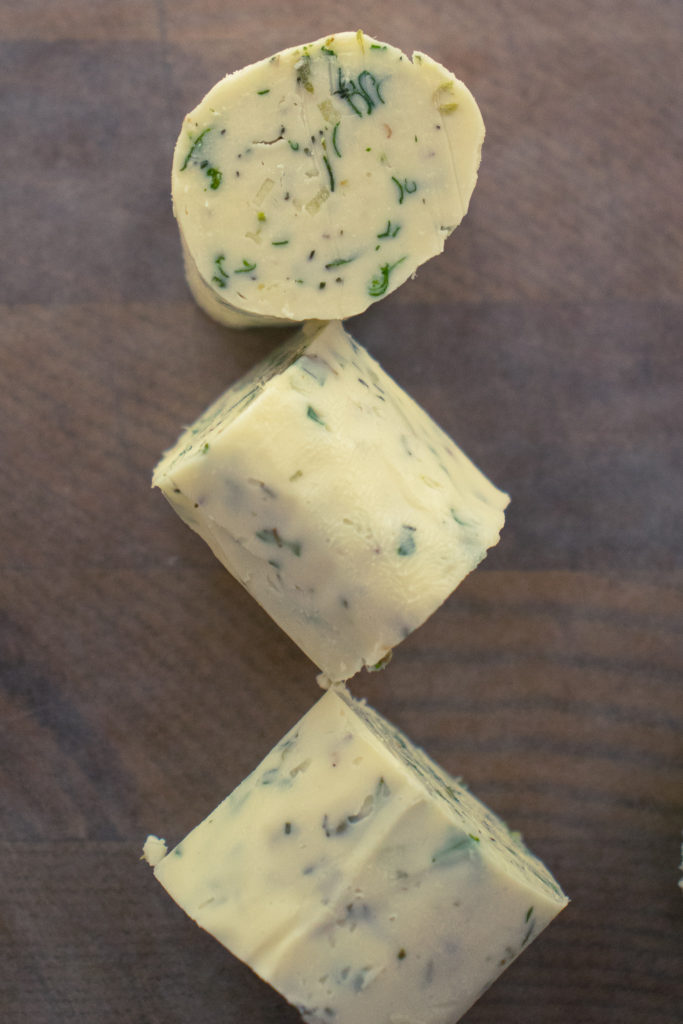
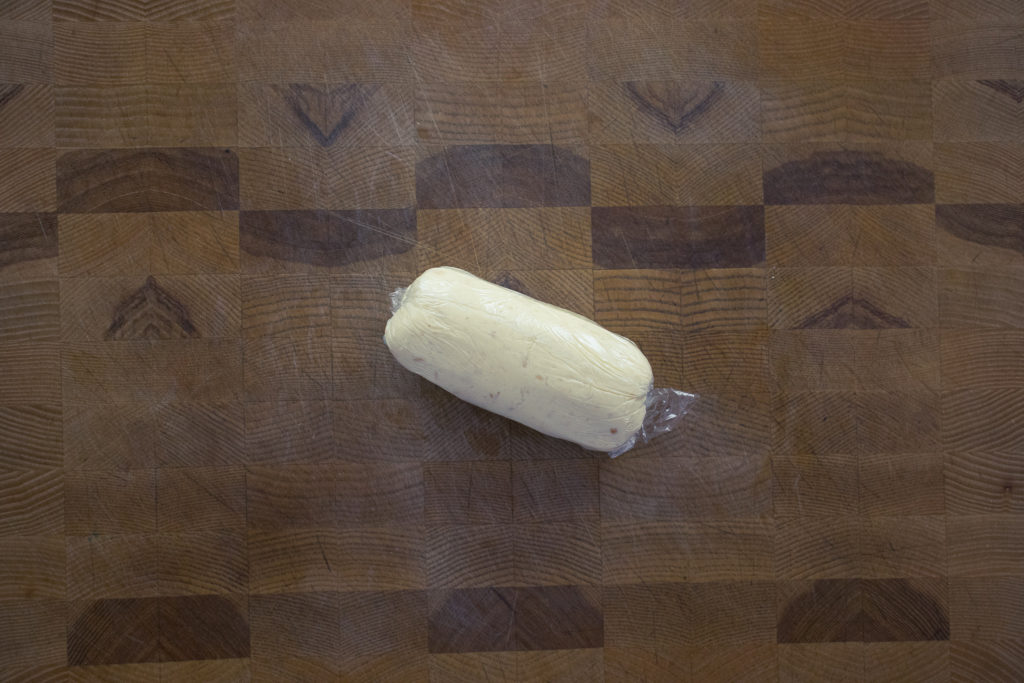
The second easiest way to form compound butter is to roll it. To roll your butter, you can use plastic wrap, parchment, foil, or even waxed paper. For getting a nice tight roll, I prefer plastic wrap. For this method, lay a piece of wrapping flat on your work surface. Spread the butter in a line about two-thirds down the wrapping, then roll. If using plastic wrap, twist the ends until tight. You can store butter wrapped like this in the fridge or freezer. You can unwrap it and cut pieces as needed. Alternatively, you can chill the butter in the refrigerator for two hours, cut it into coins, and store those coins in an airtight container in the freezer.
Small Butter Rolls
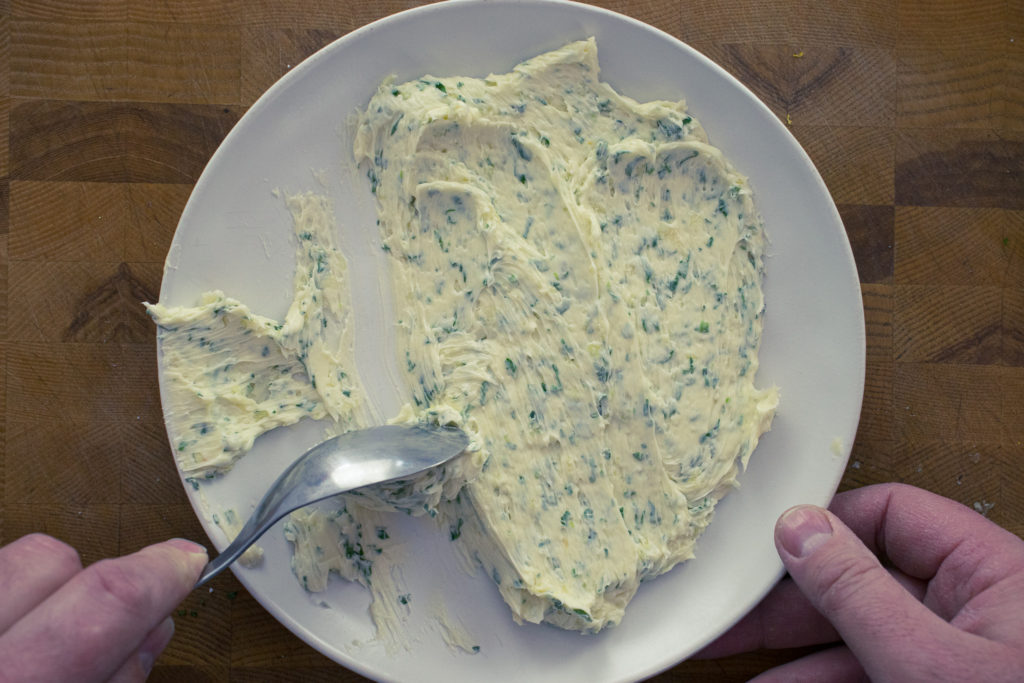
Rather than making a large roll of butter, you can make a small roll. This method is excellent if you sprinkle herbs, seasonings, or even edible flowers into the butter. This works best with parchments or waxed paper. For this method, spread the butter out into a thin rectangle, sprinkle whatever ingredients you want over the butter, then roll it up and pull the paper back as you roll forward. You may find it easiest to chill the butter for 5 to 10 minutes before rolling to help it loosen from the paper. Once chilled, you can cut the butter into little nubs showing the rolled-in ingredients. I didn’t actually roll any additional ingredients into my butter, but you can see how it works below.
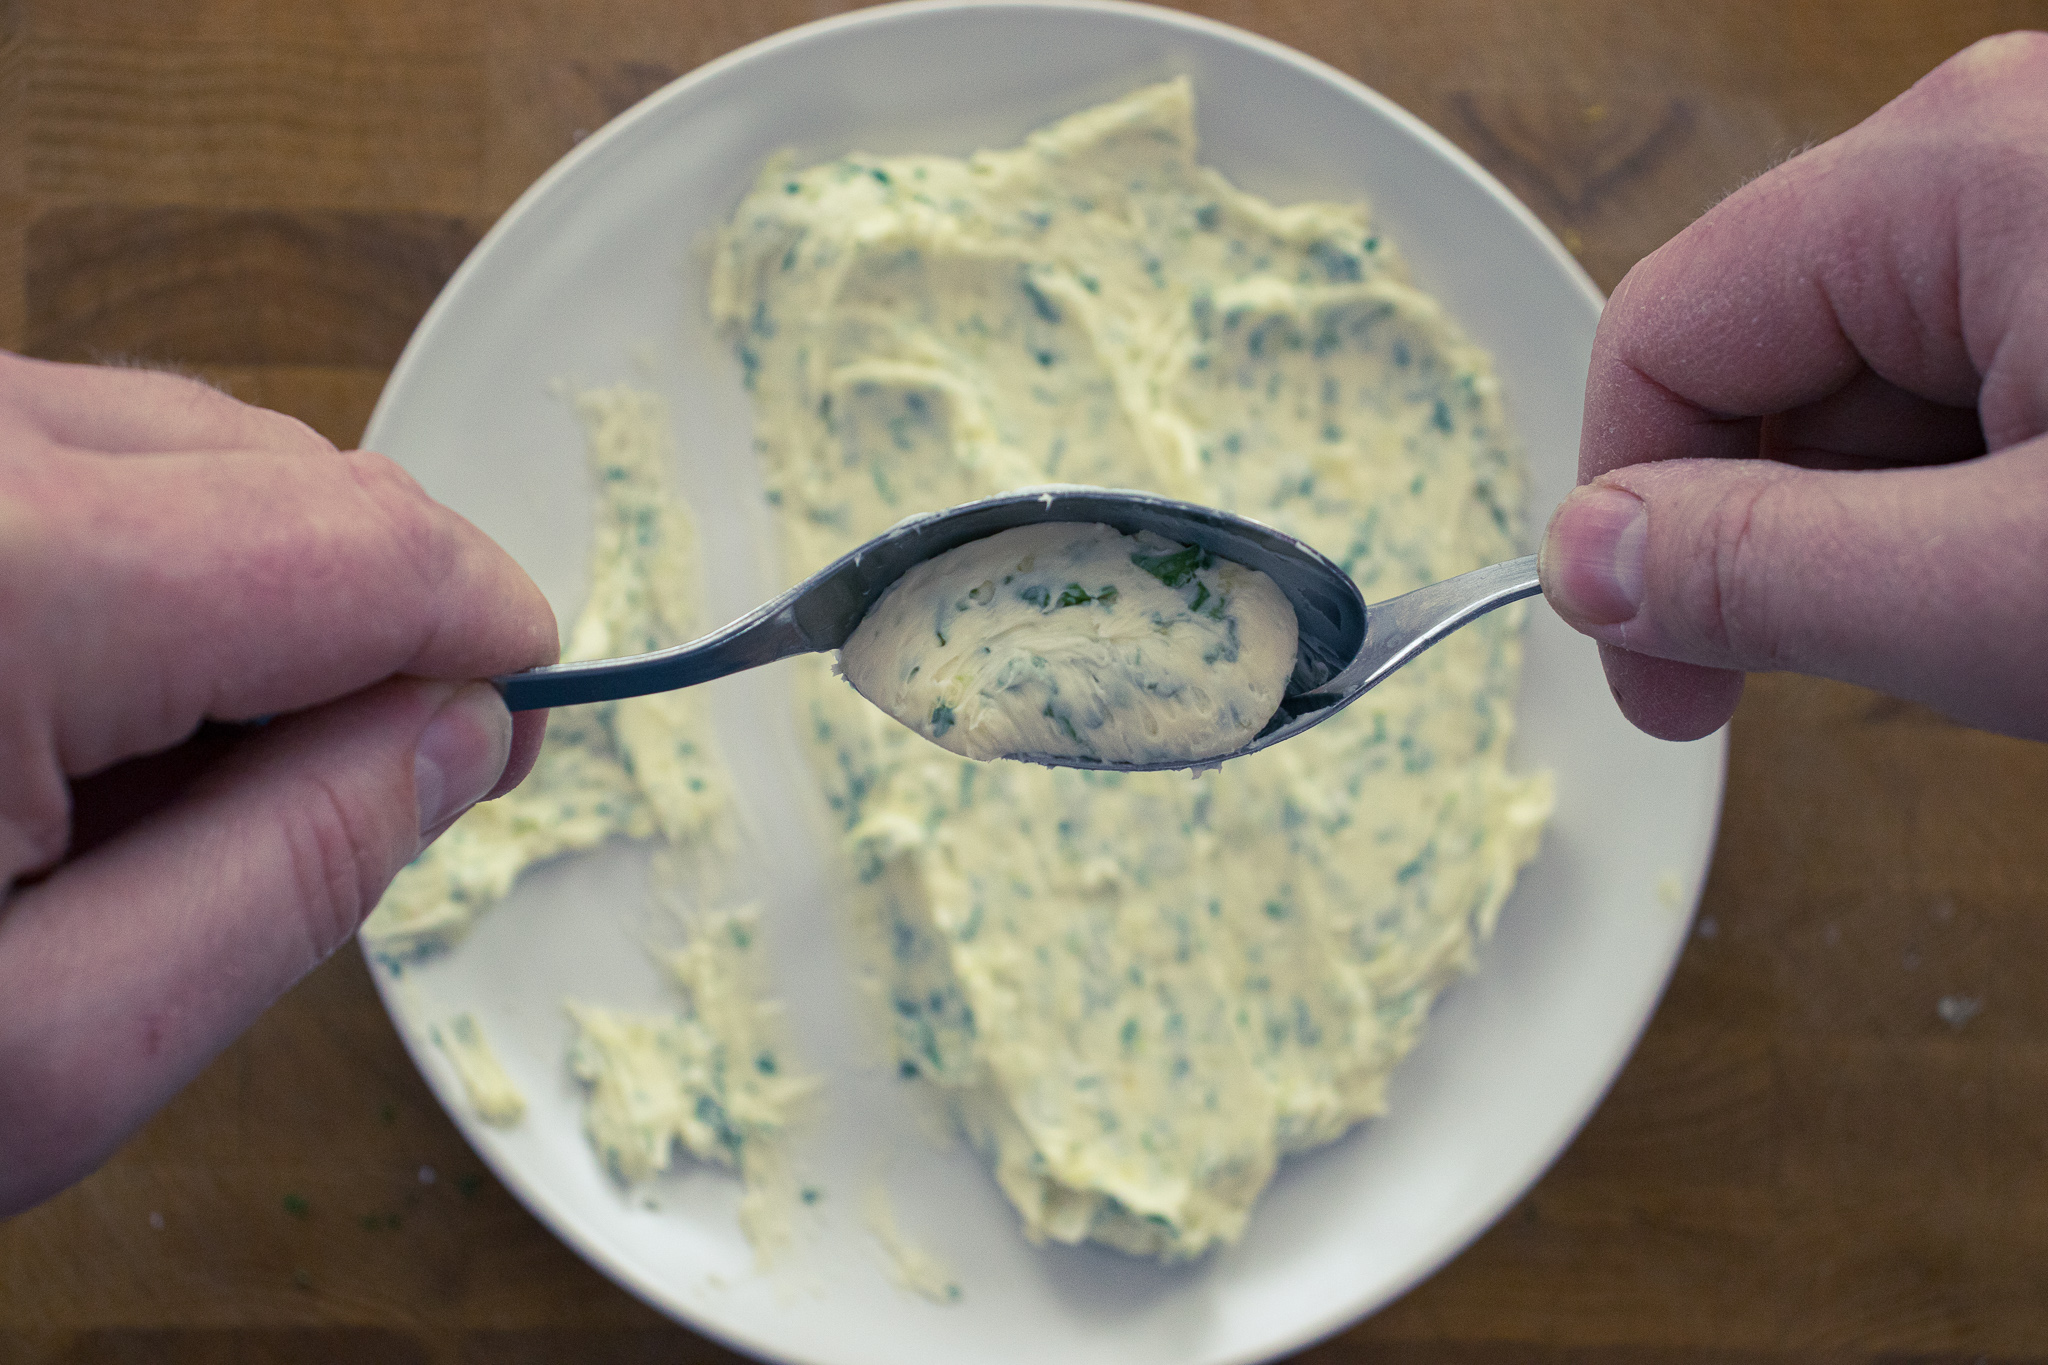
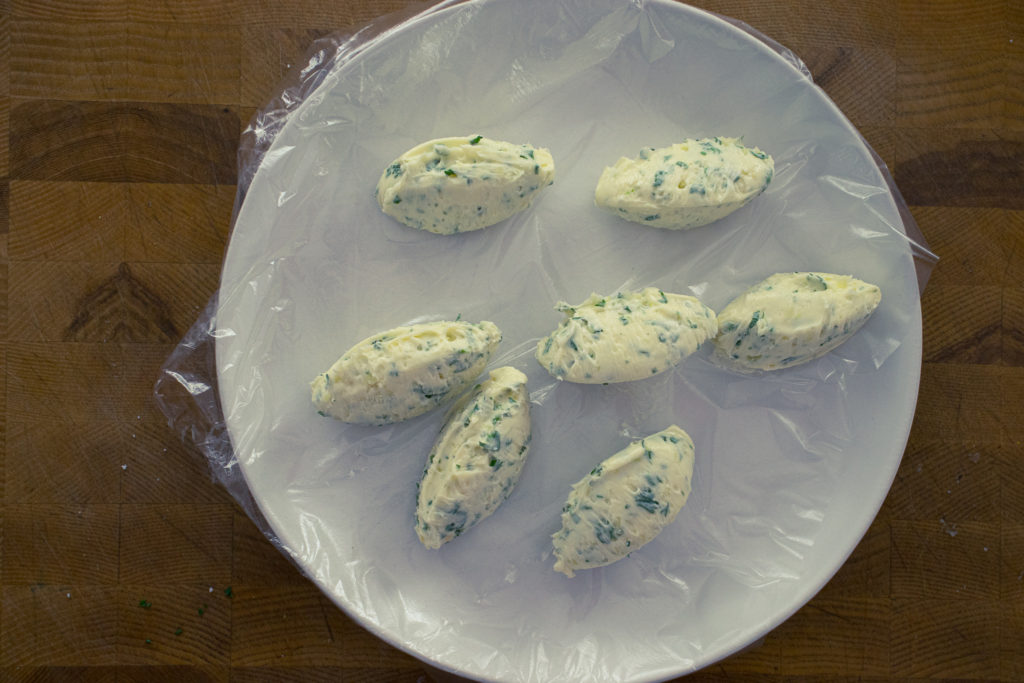
Quenelleing Butter
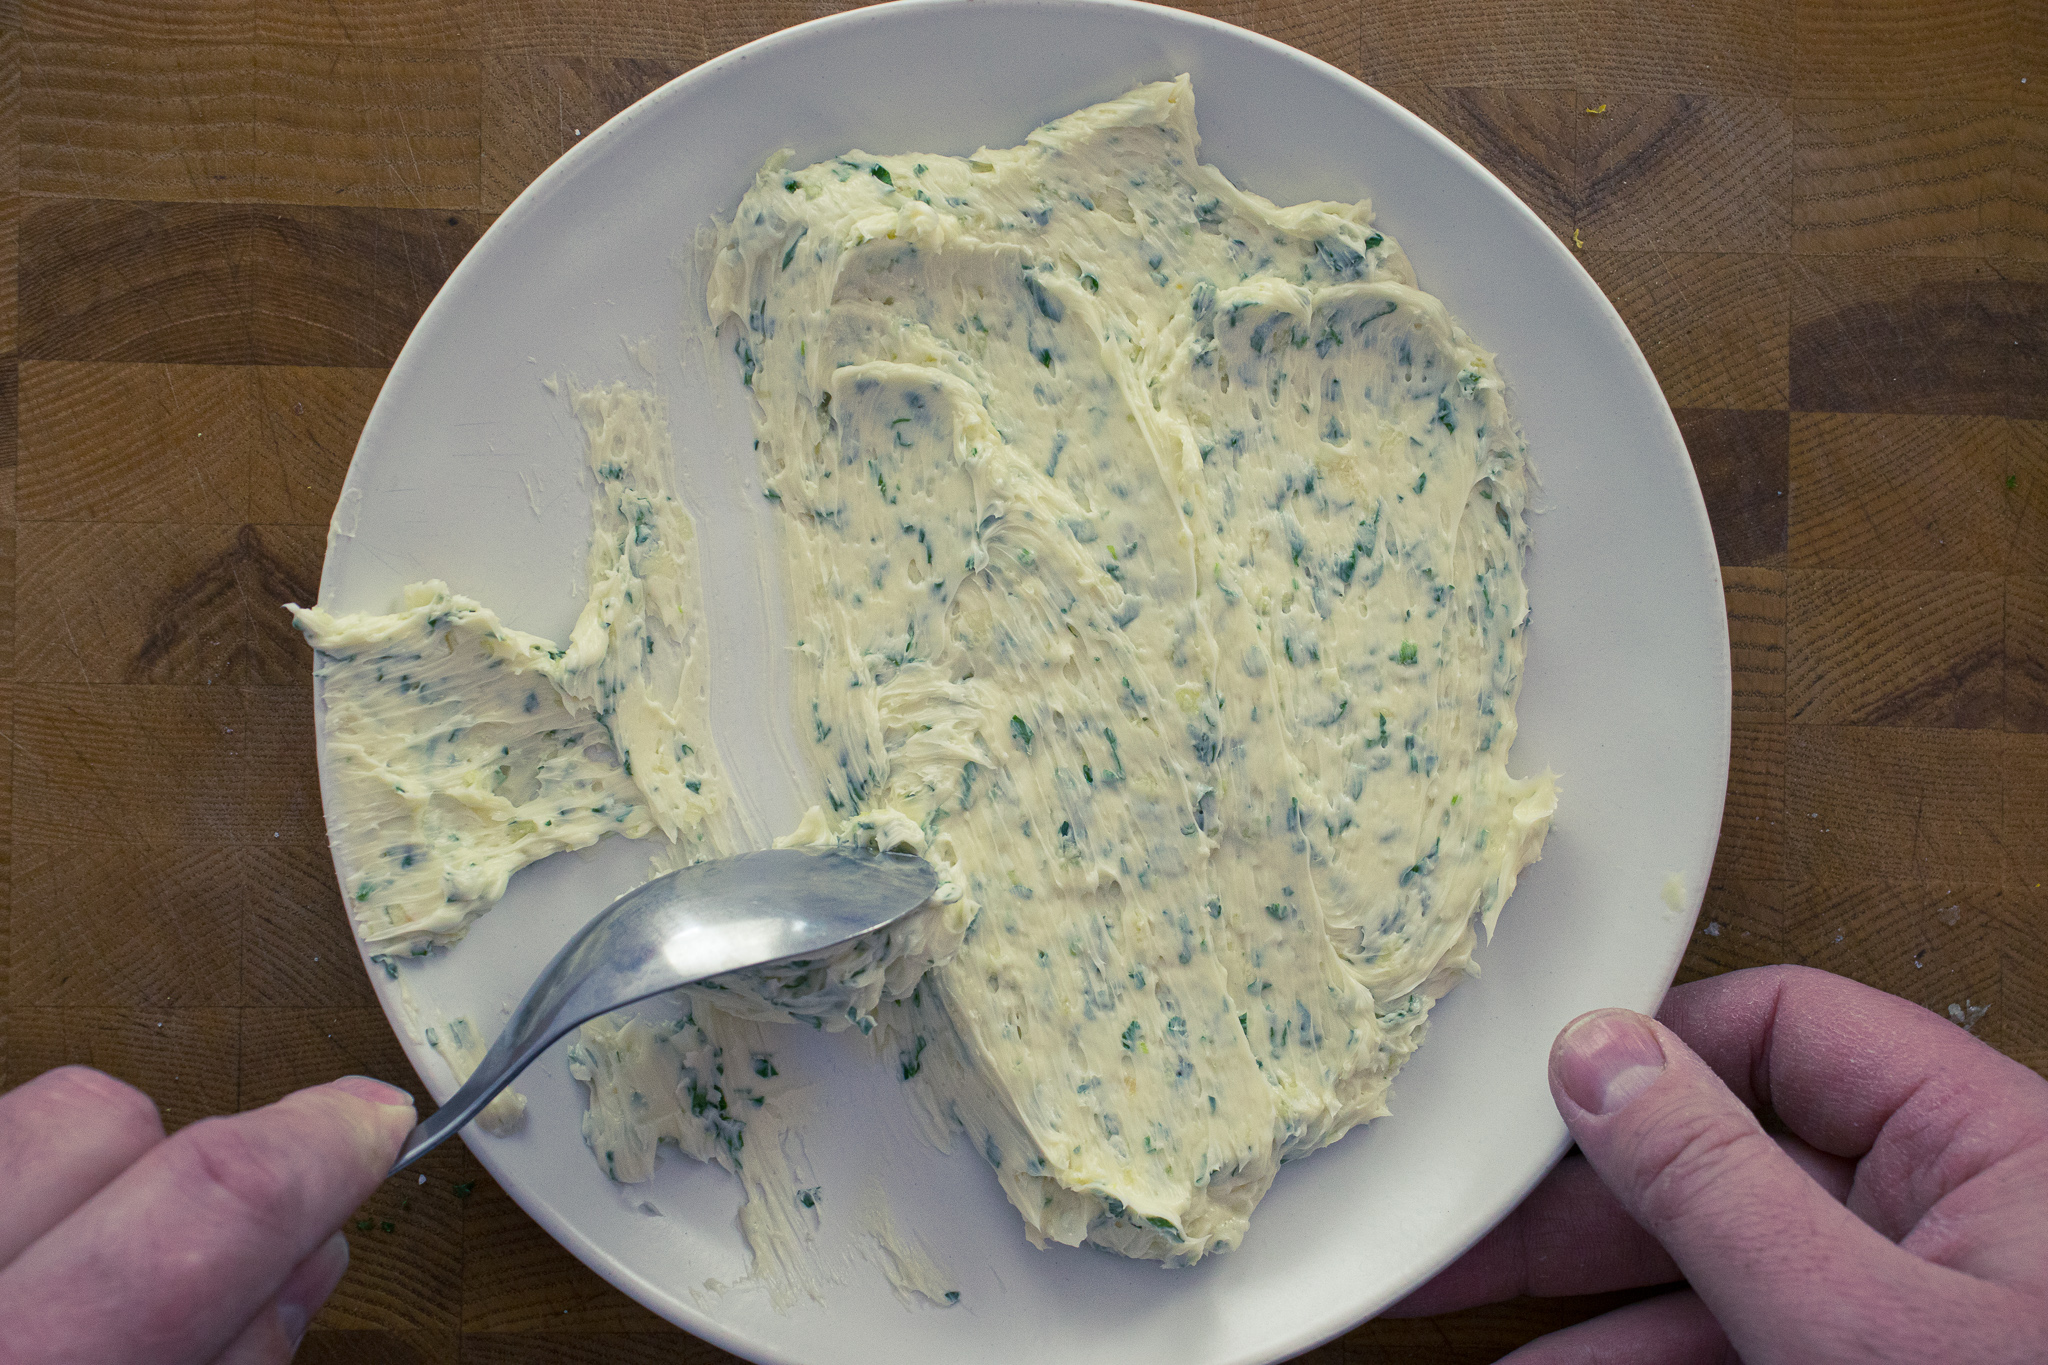
A quenelle is a fancy thing in cooking where we take two identical spoons and pass food between them, forming the food into a quenelle or football shape. It’s easiest to look at the pictures below rather than trying to read a description of the process. This takes practice, but it’s pretty easy once you get the hang of it. It’s a great way to form butter, as you can see below, but also mousse, ice cream, gelato, and even whipped cream. If you dip your spoons in hot water, you will get smooth edges on the butter, but you will also waste a little due to melting. Butter formed like this should be chilled or frozen in a single layer on a baking sheet. Once chilled or frozen, the butter quenelles can be stored together in an airtight container.
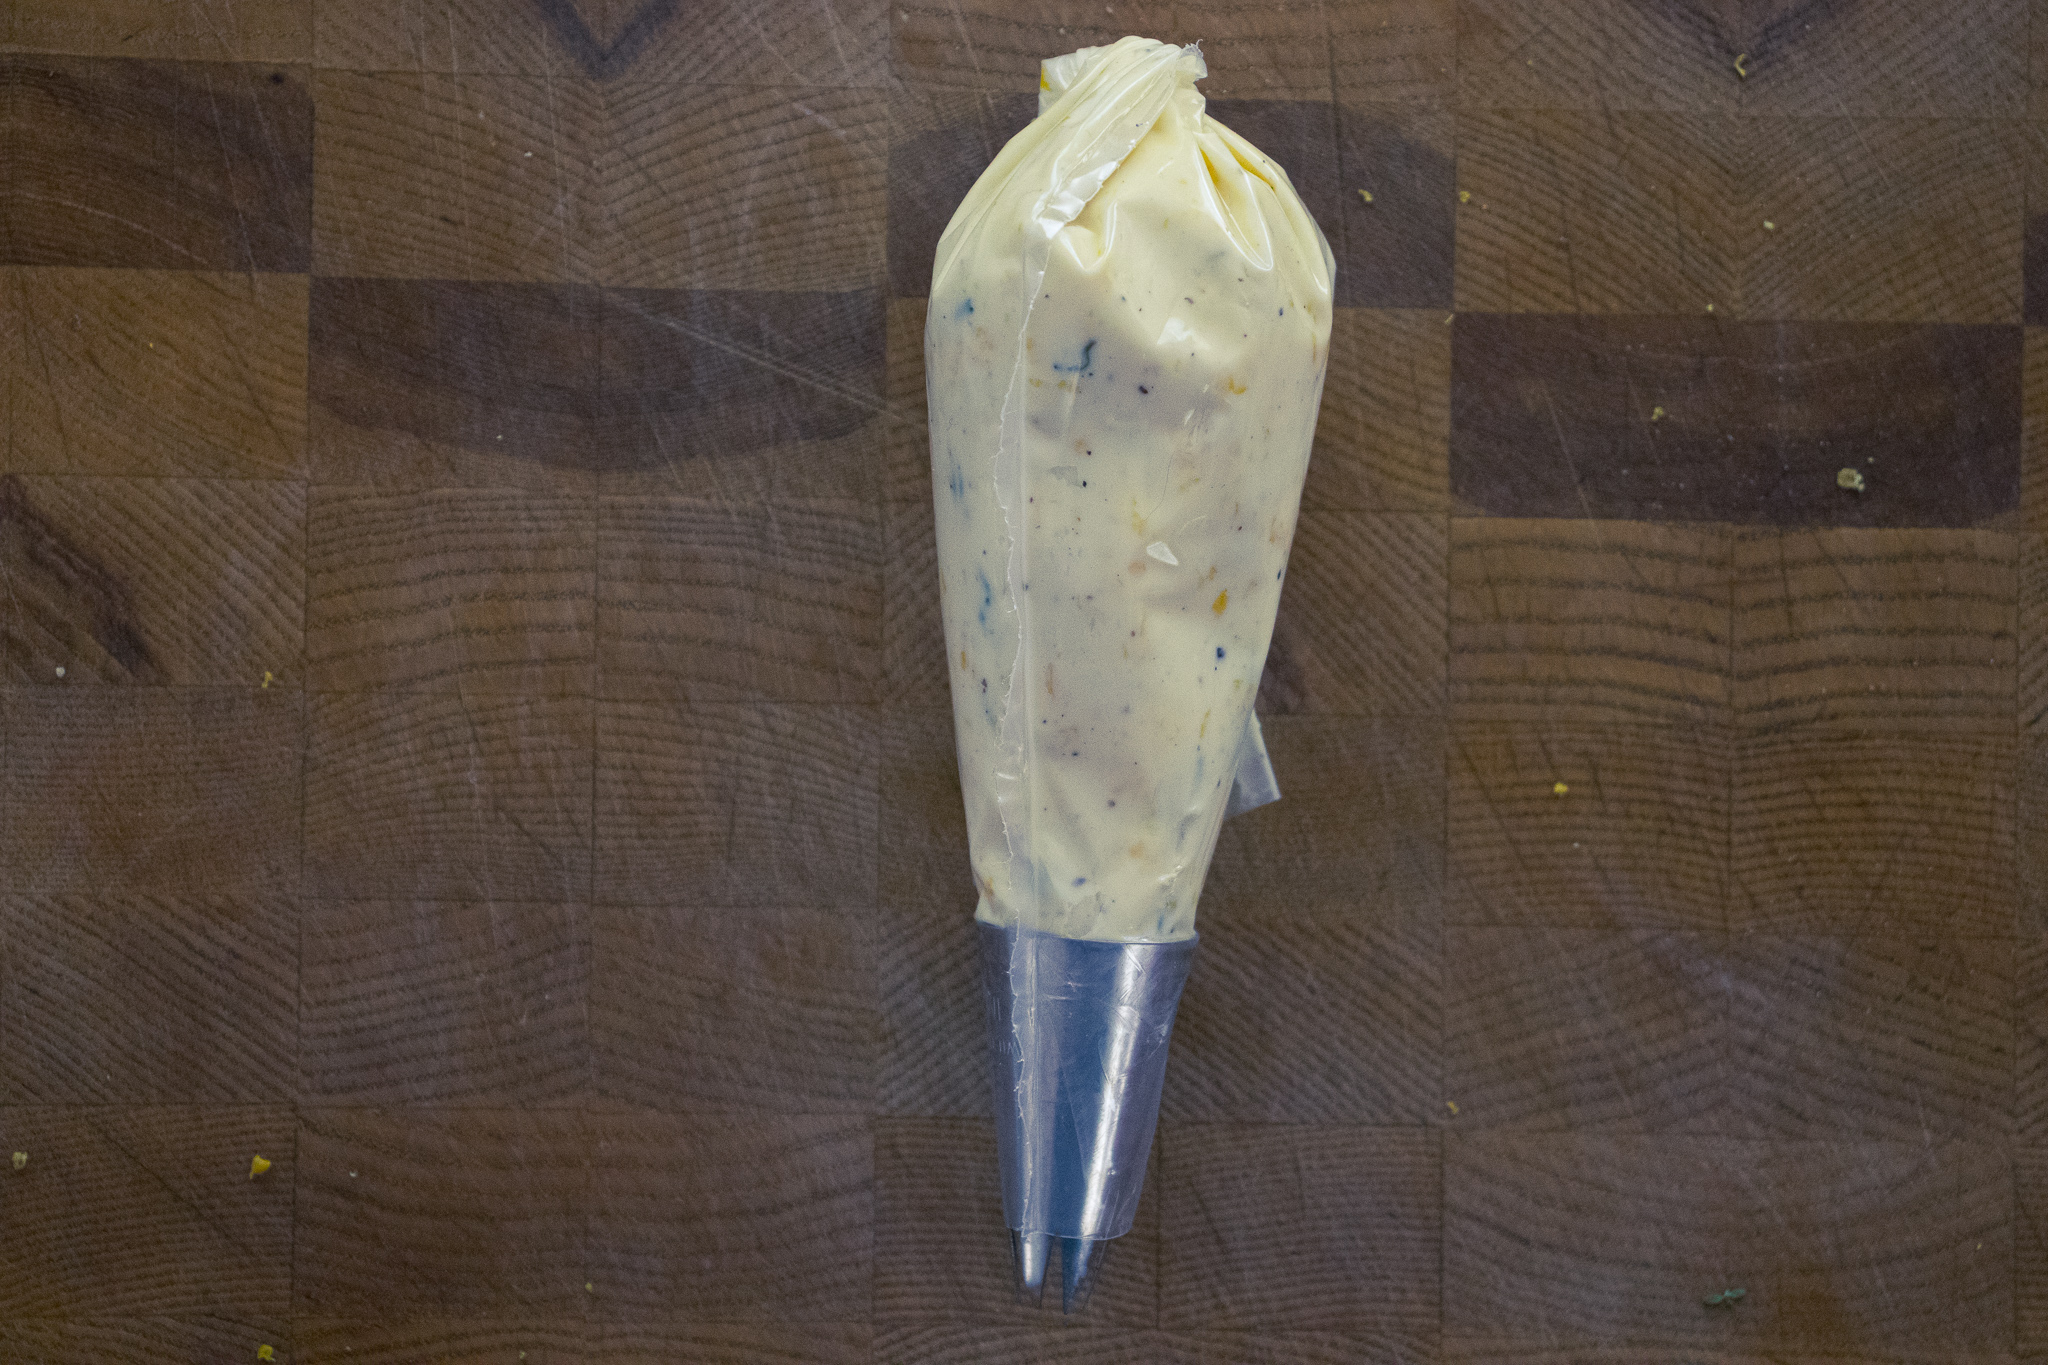
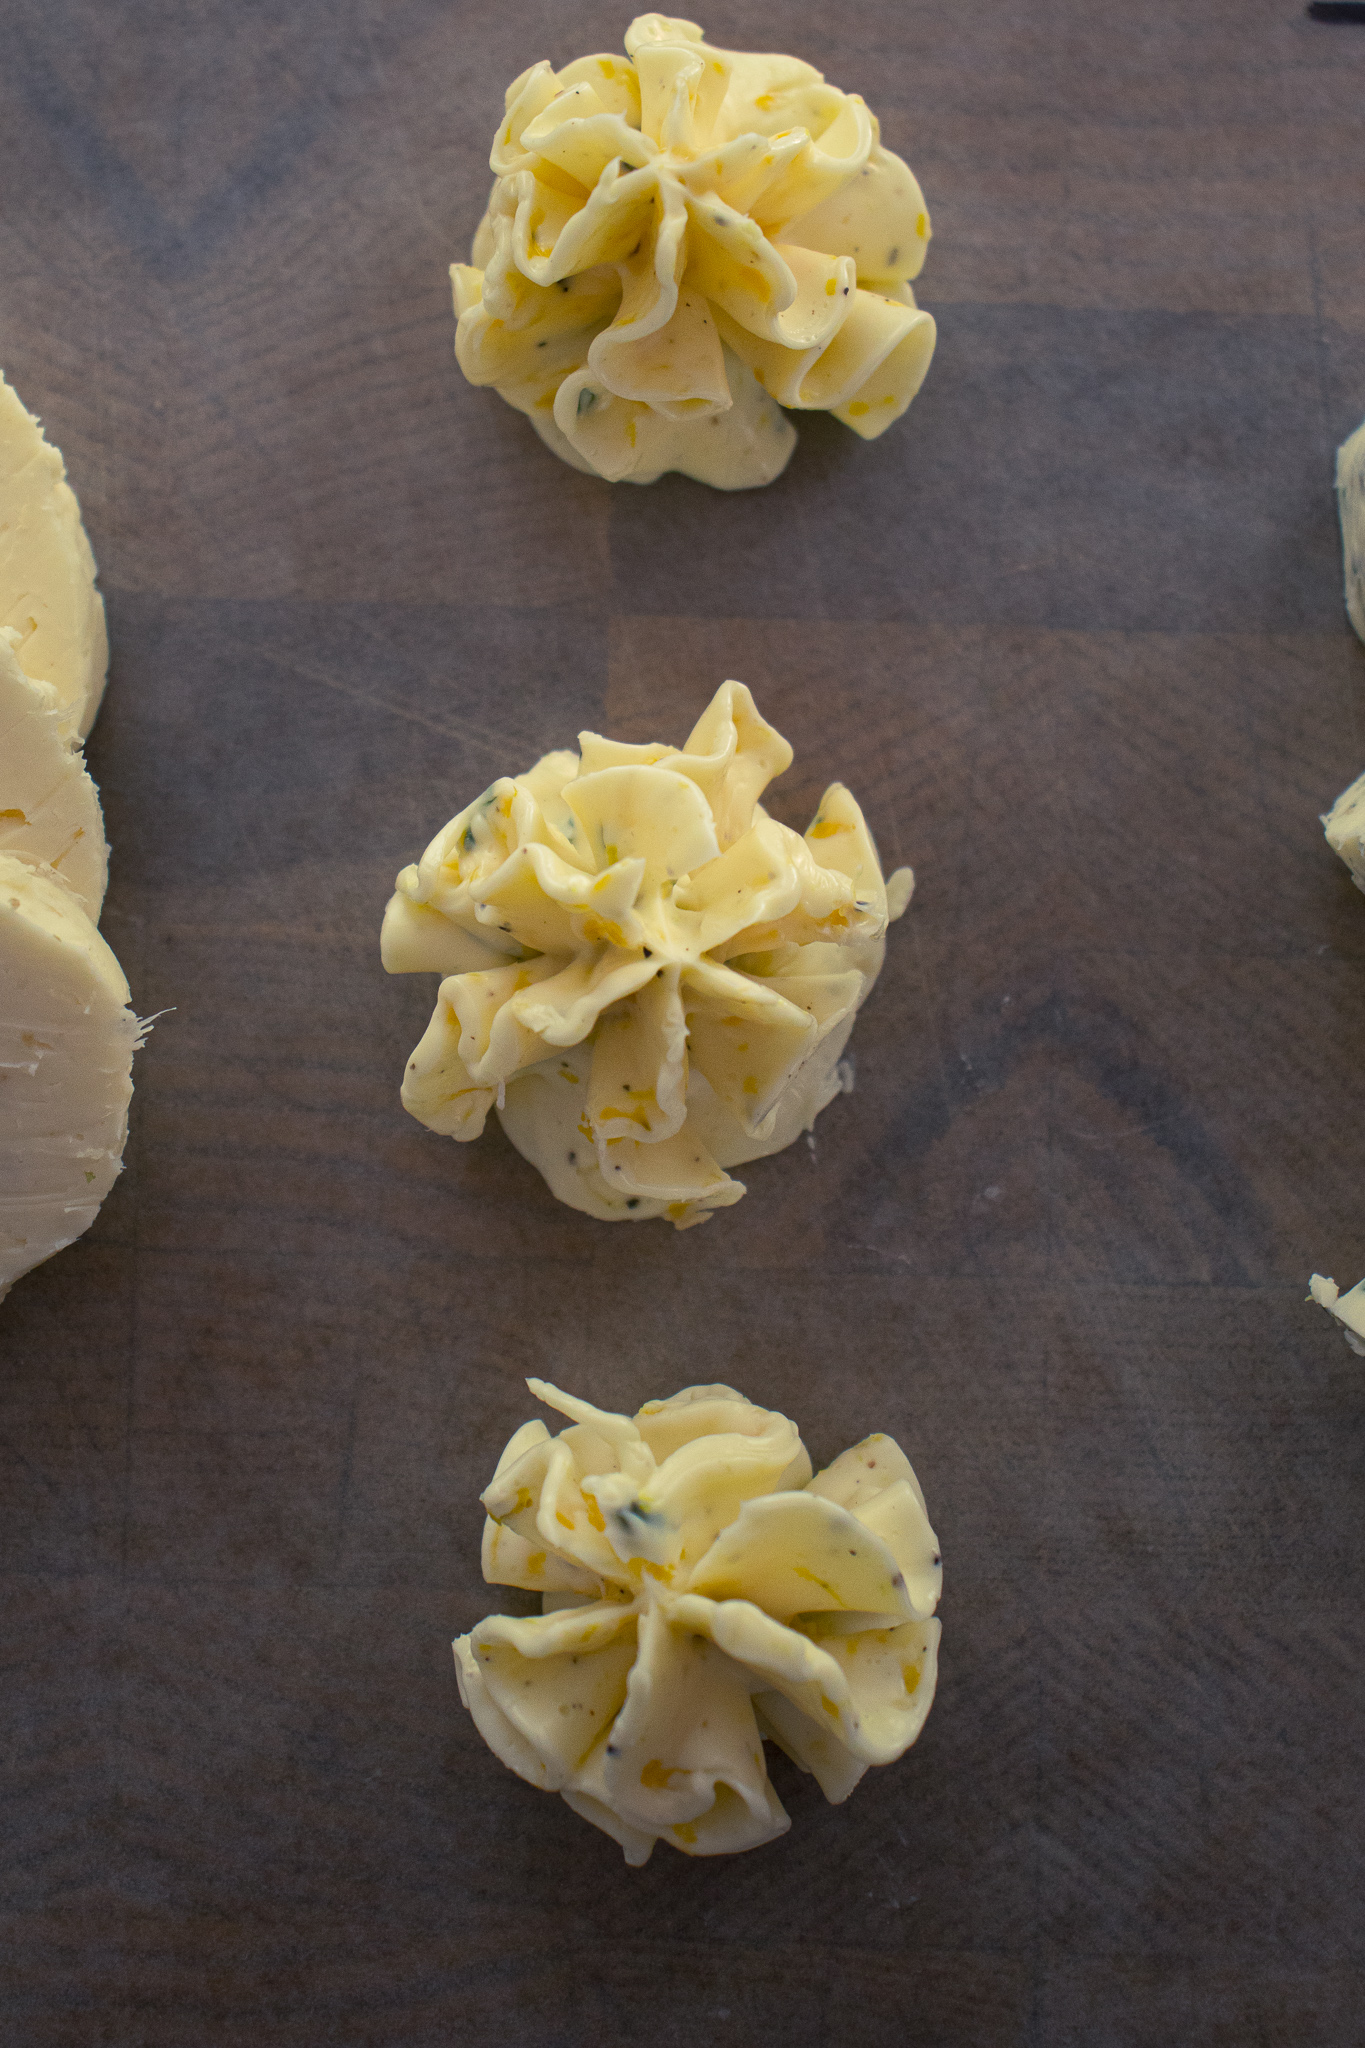
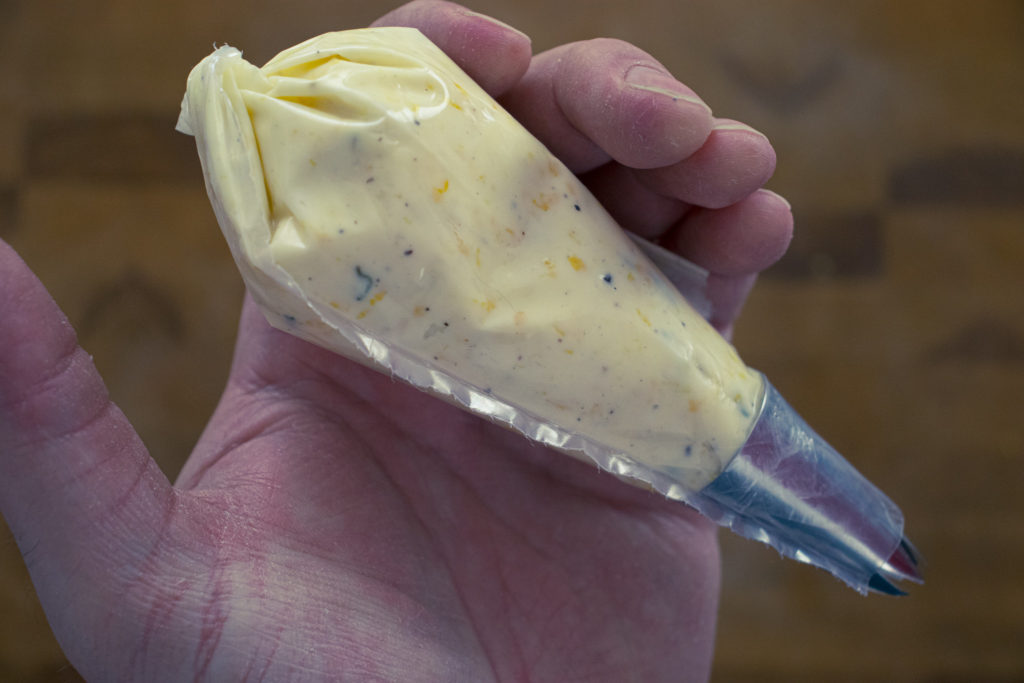
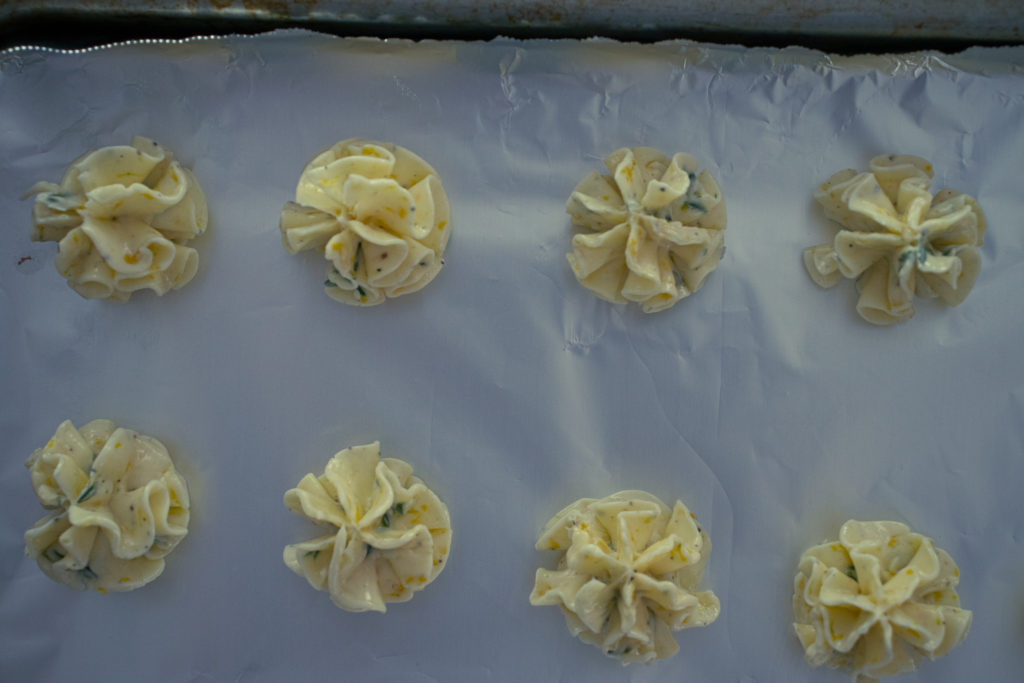
Piping Butter
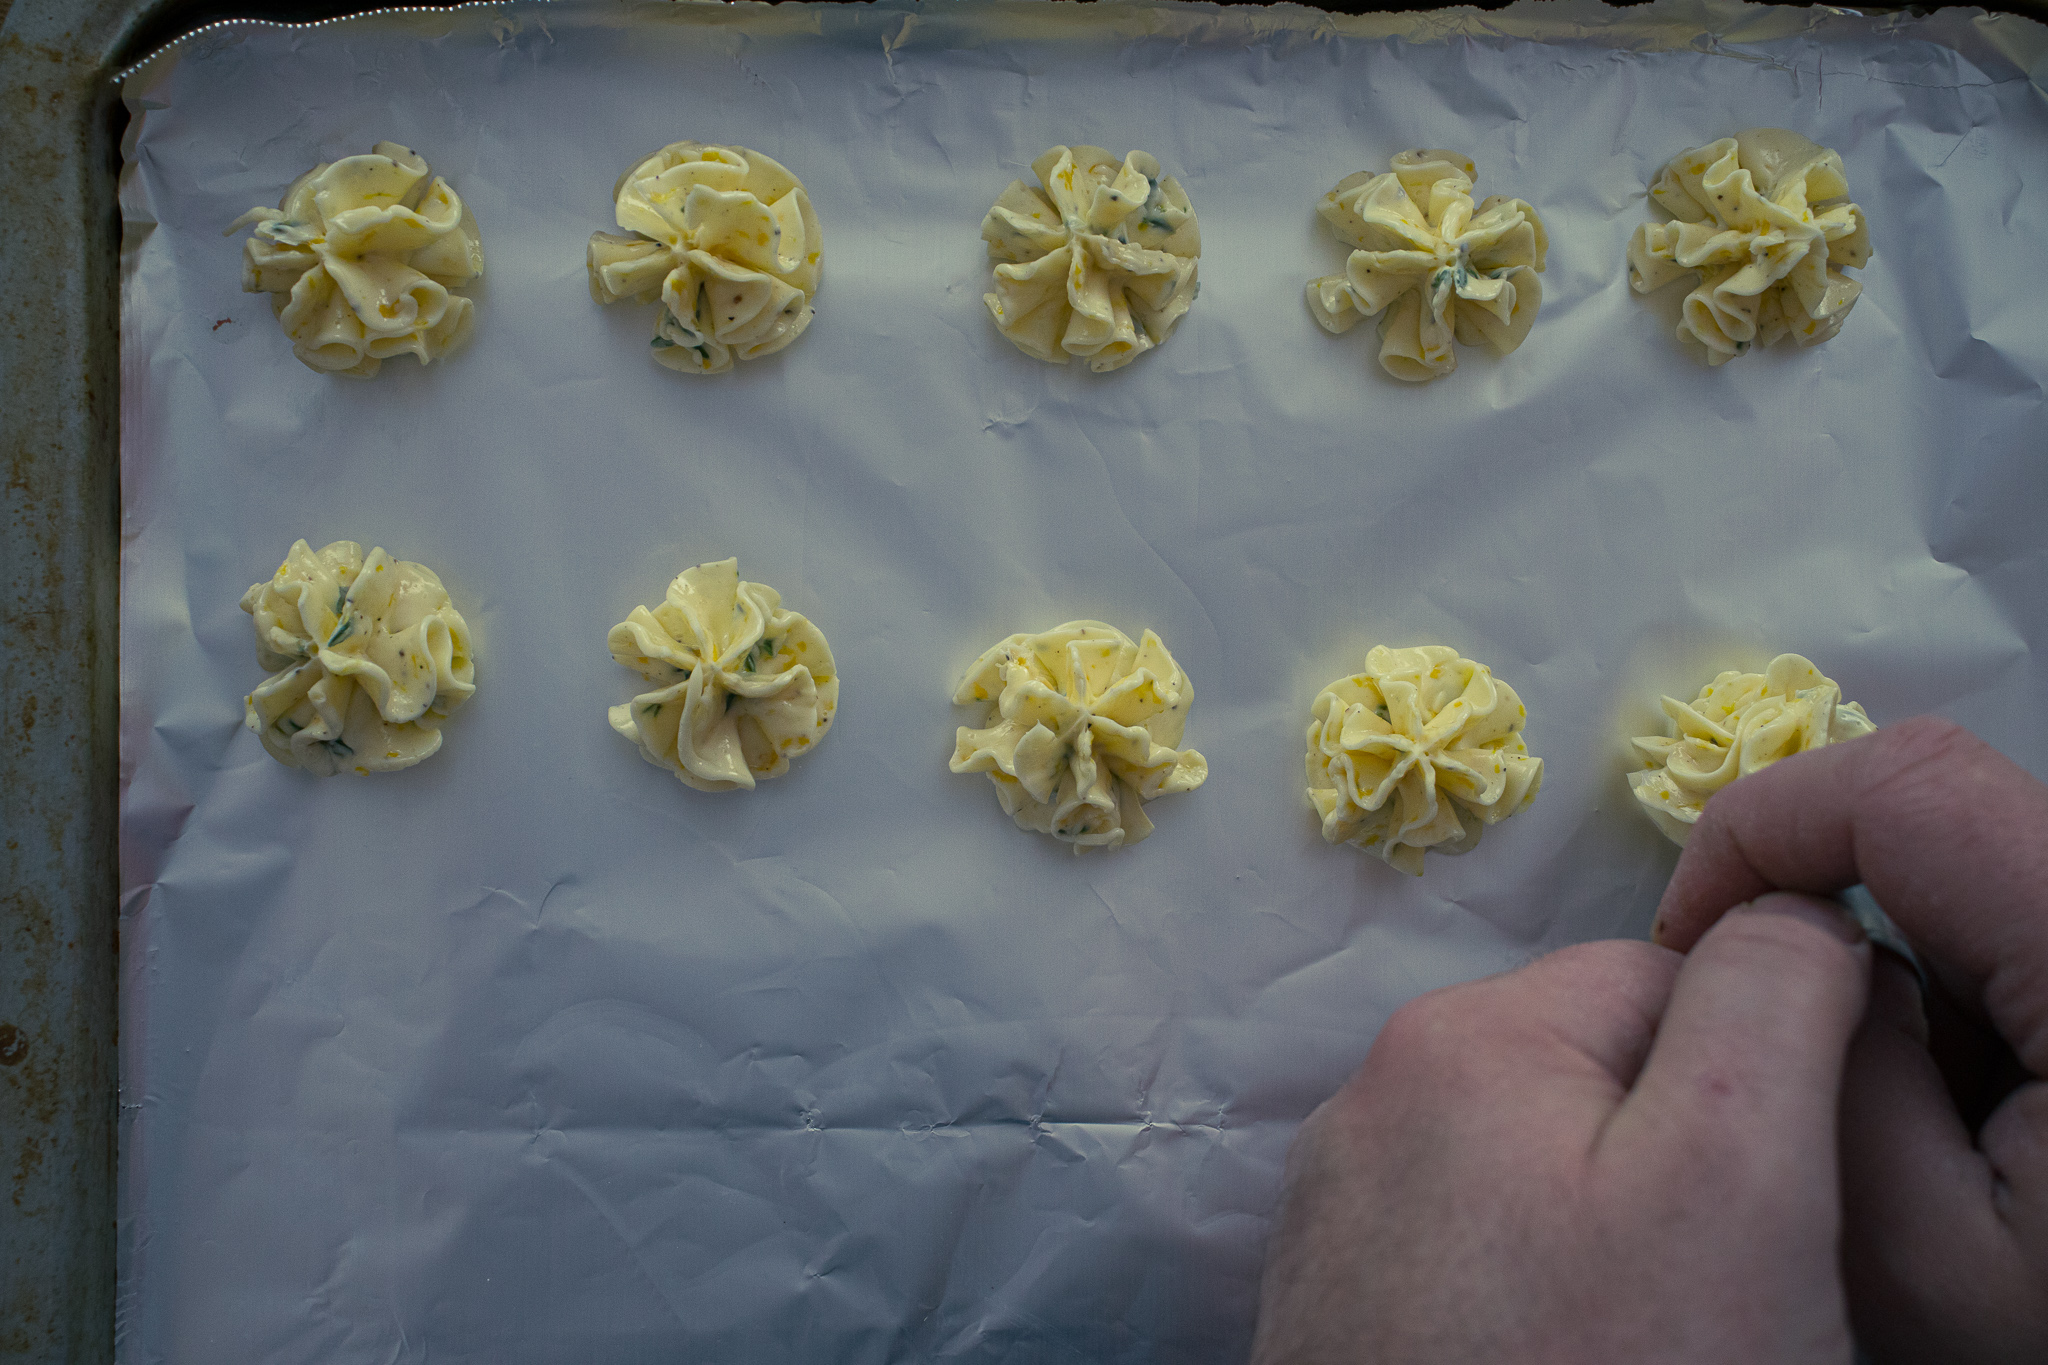
The prettiest way to form compound butter is to pipe it through a star tip. If you’ve ever piped icing, it’s the same. Put the piping tip into the bag, add the butter, and pipe it into little rosettes or whatever shape you’d like. Next, chill or freeze the butter in a single layer on a parchment or waxed paper-lined baking sheet. Once chilled, You may store the piped butter in the fridge or freezer in an airtight container. Butter shaped like this is great to have on hand if you regularly have people over. Whether serving dinner or a light lunch, serving butter like this elevates the meal.
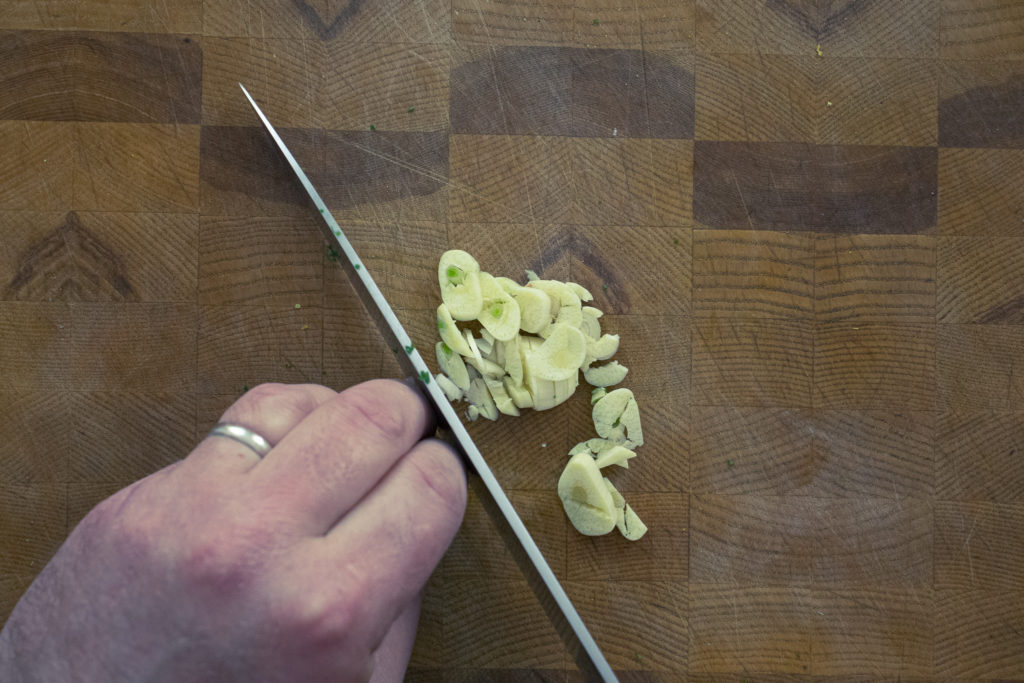
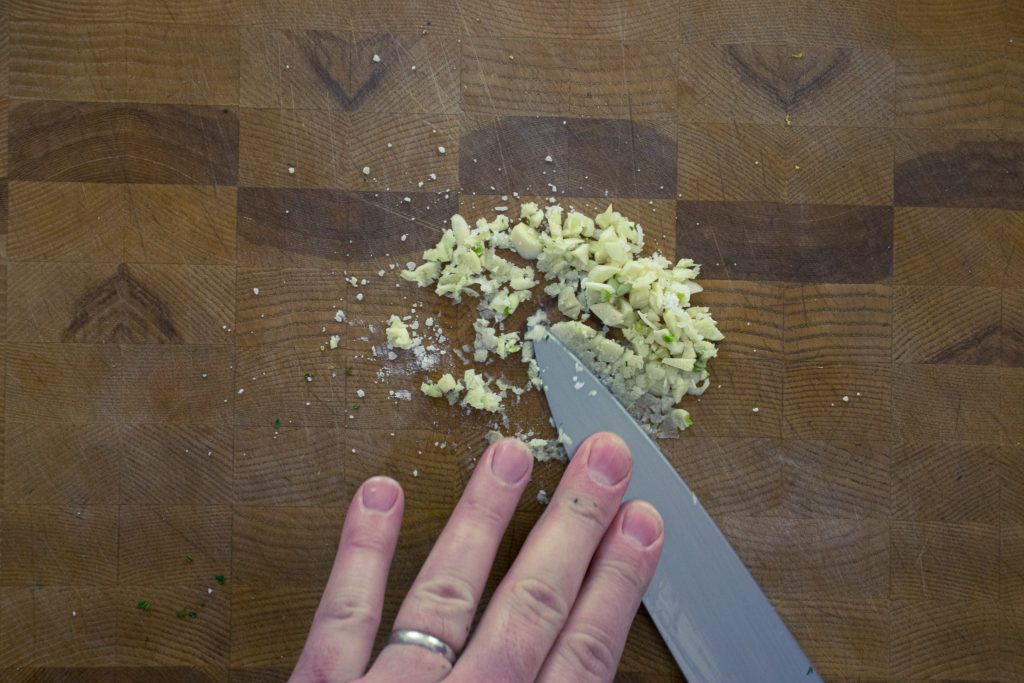
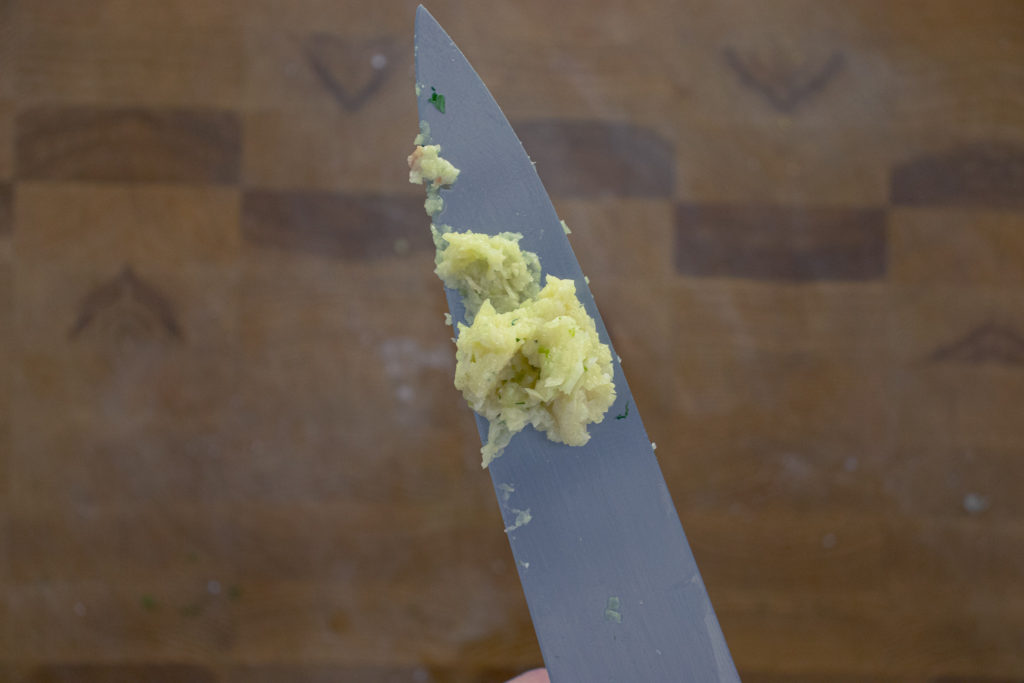
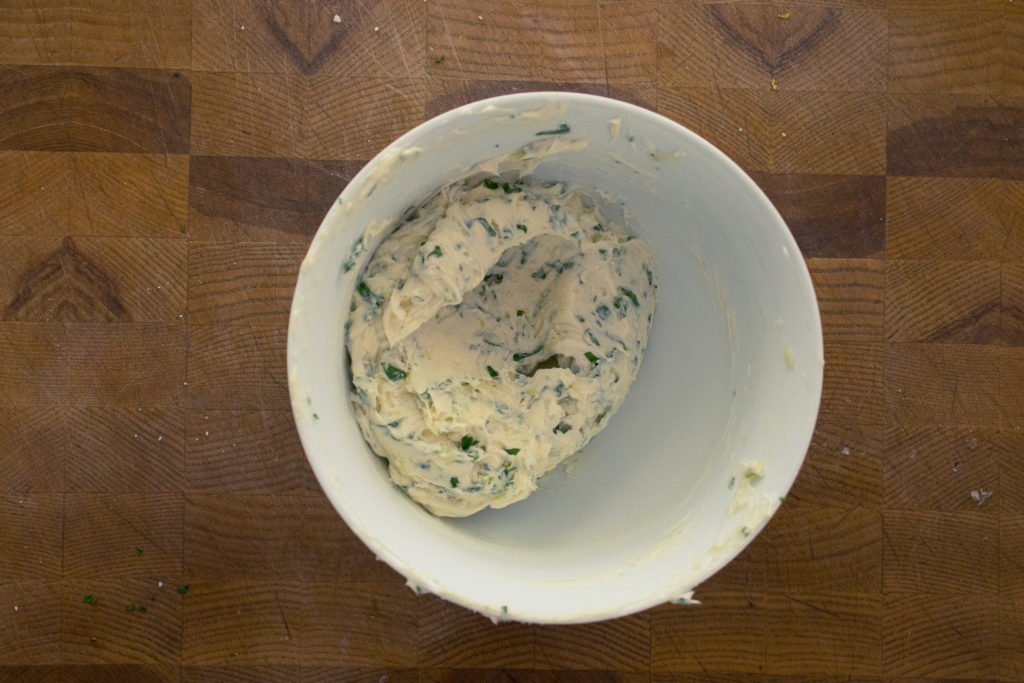
Best Ever Garlic Butter
Arguably, the most common compound butter is garlic butter. You can buy it, though store-bought garlic butter is generally margarine instead of butter and would have garlic powder and dried parsley. I’m trying to say that the store-bought stuff isn’t good, especially after trying the recipe below. The garlic butter in this recipe is made of butter, fresh garlic, fresh parsley, and a little bit of brandy to tie it all together. You can omit the brandy, but I suggest keeping it in. You can buy a small bottle of brandy for under $15 and use it in cooking. Its sweetness adds a lot to pork, chicken, or fish dishes. Use brandy in place of wine in almost any recipe.
I don’t think I need to run through the common uses of garlic butter because we’re all pretty familiar with it. But I might as well share some of my favourite uses that aren’t so common. For example, I like to add it to steaks while resting. The butter sits on the steaks, melts, and adds lots of flavours. It’s also great to throw a tablespoon or two of garlic butter into a tomato-based pasta to finish it. So, imagine your sauce is all done, you’ve added the pasta, now toss in a bit of garlic butter, stir it until it melts, then serve. You won’t believe how much flavour that little bit of garlic butter adds to the pasta.
Best Ever Garlic Butter
Garlic butter is not only for garlic bread. Add it as a finishing ingredient to tomato-based pasta, and use it to top a resting steak.
Put the softened butter in the bowl of a mixer and beat with the paddle attachment on medium-high speed until the butter is light and airy. Scrape the sides of the bowl down at least once to ensure an even mix.
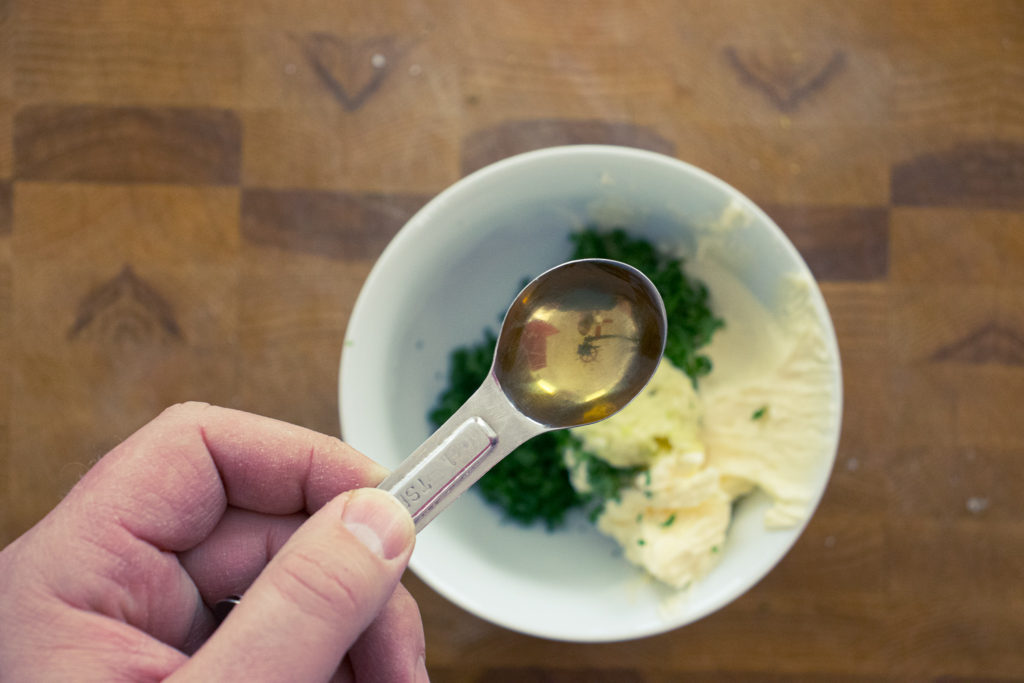
Add the garlic and parsley and beat on medium for two a minute.
While the mixer is running, pour the brandy into the butter and mix just until it's incorporated.
Stop the mixer and remove the bowl. Line a baking sheet with waxed paper or parchment paper.
Dip two spoons in hot water, then scoop up 1 tbsp of butter with one spoon. Pass the butter between the two spoons until the butter is a football shape.
Put the formed butter on the sheet pan and chill in the fridge for two hours or freeze. Once chilled or frozen, put the butter in an airtight container and store it in the fridge for up to a week, or in the freezer for up to three months.
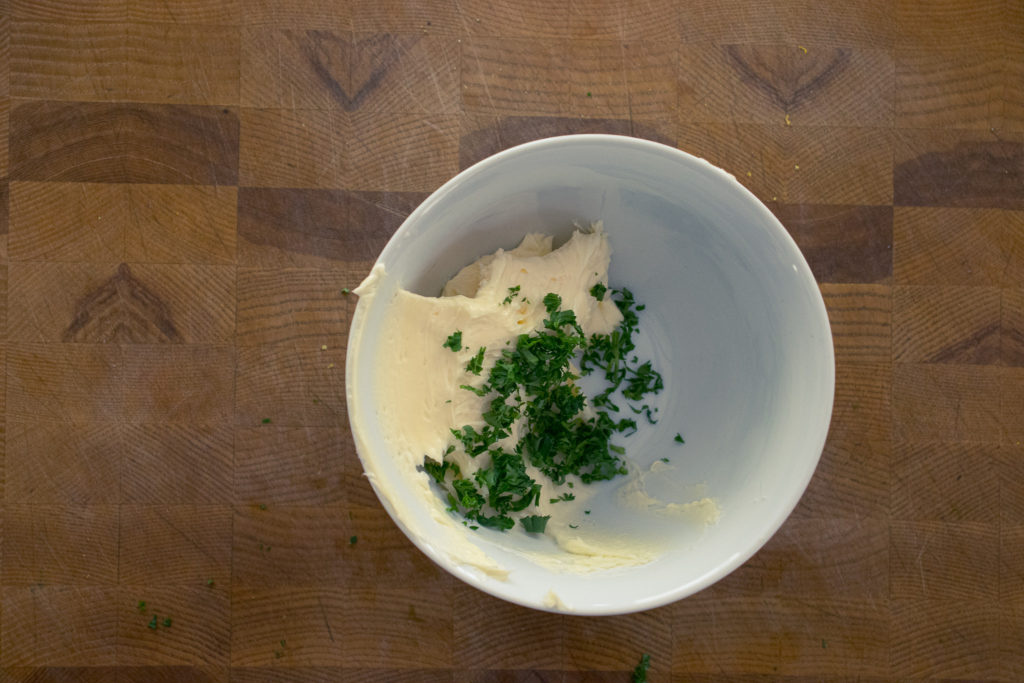
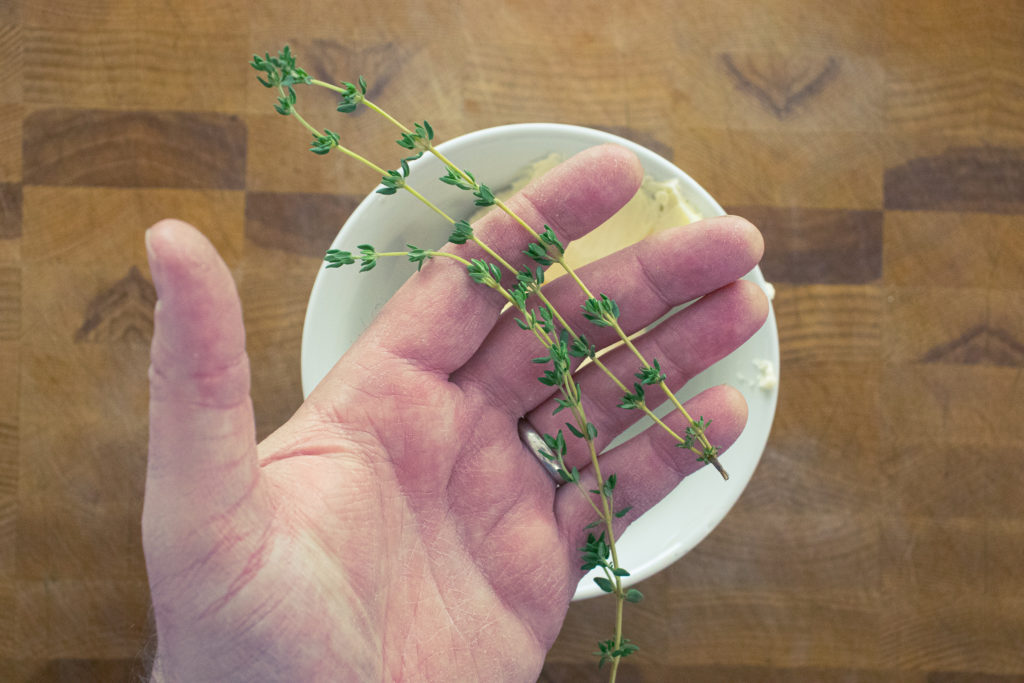
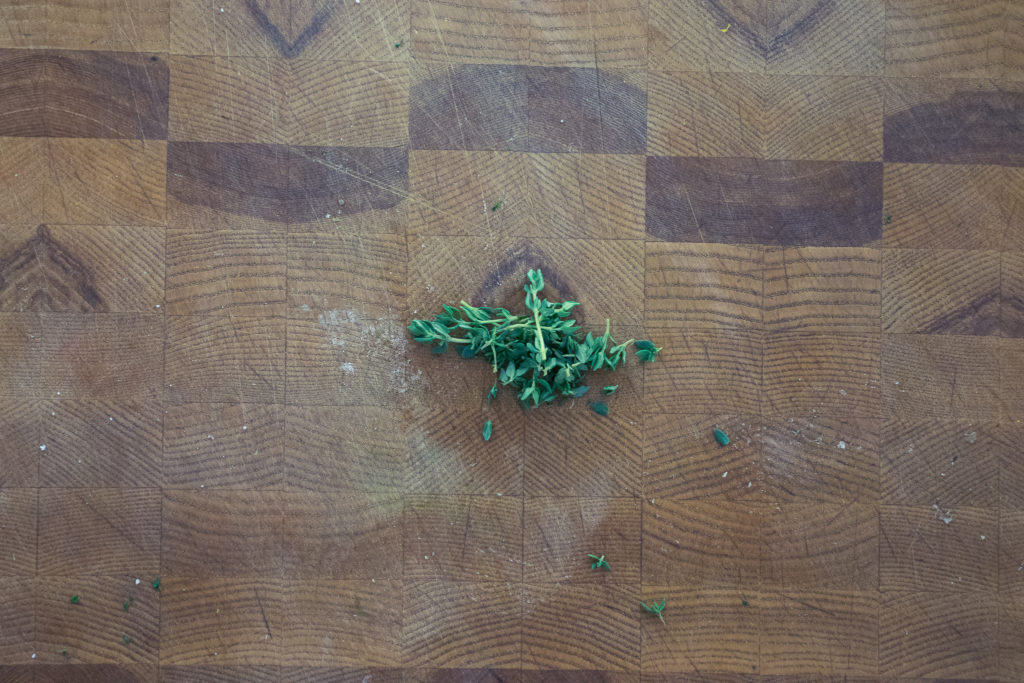
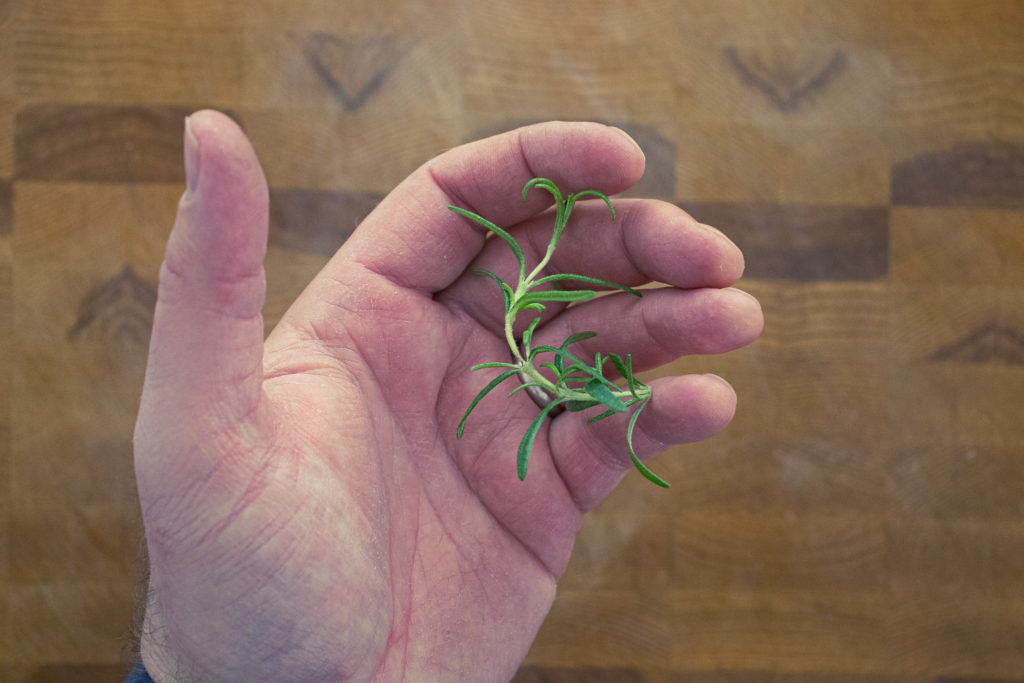
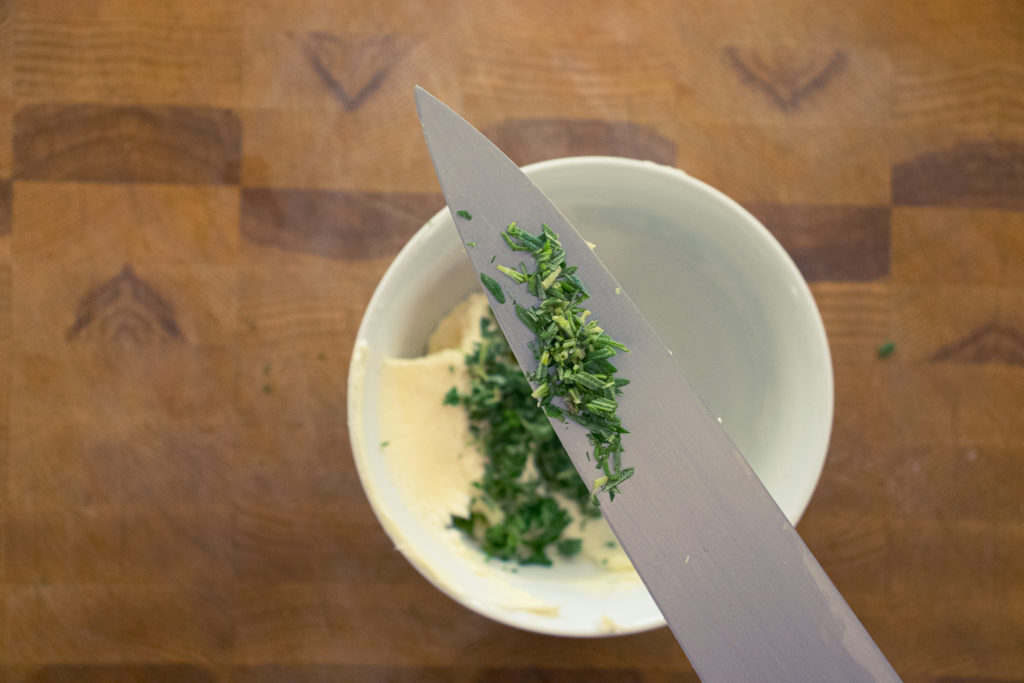
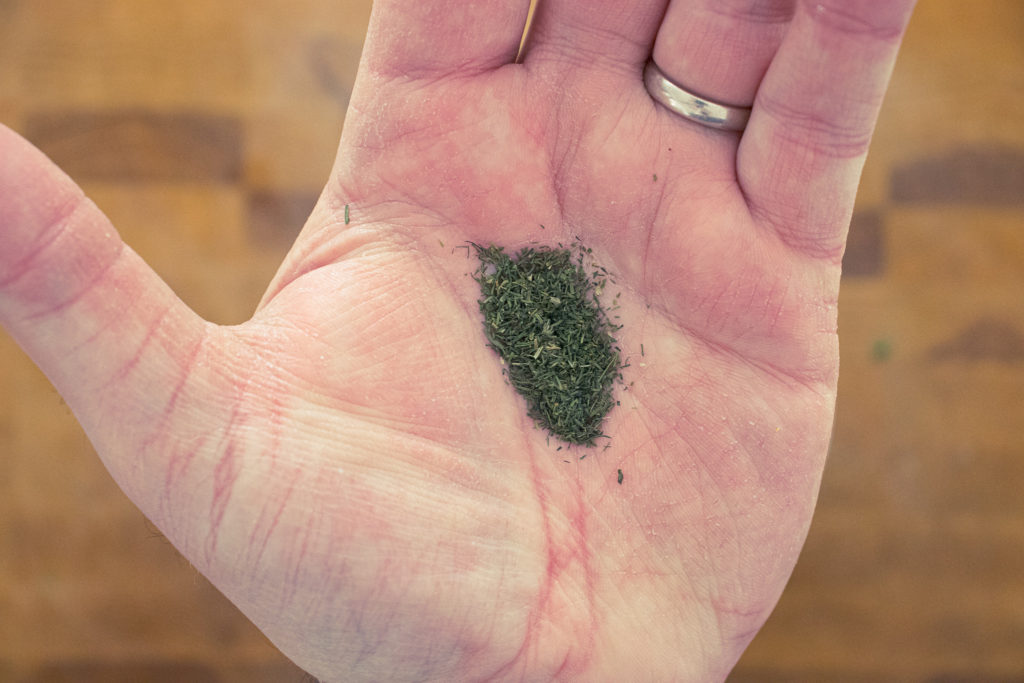
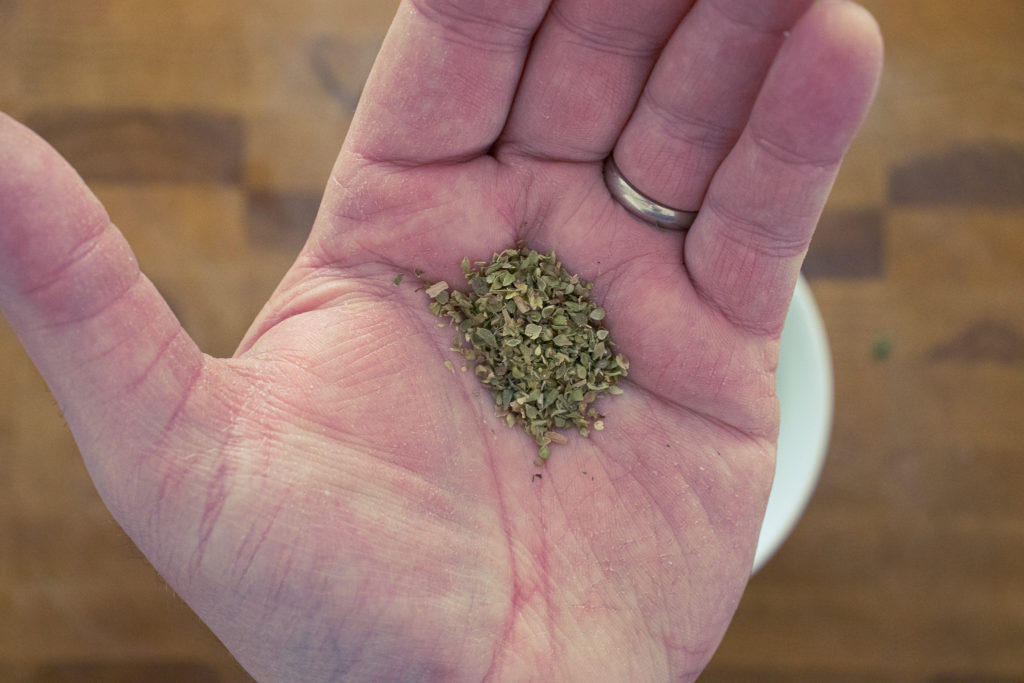
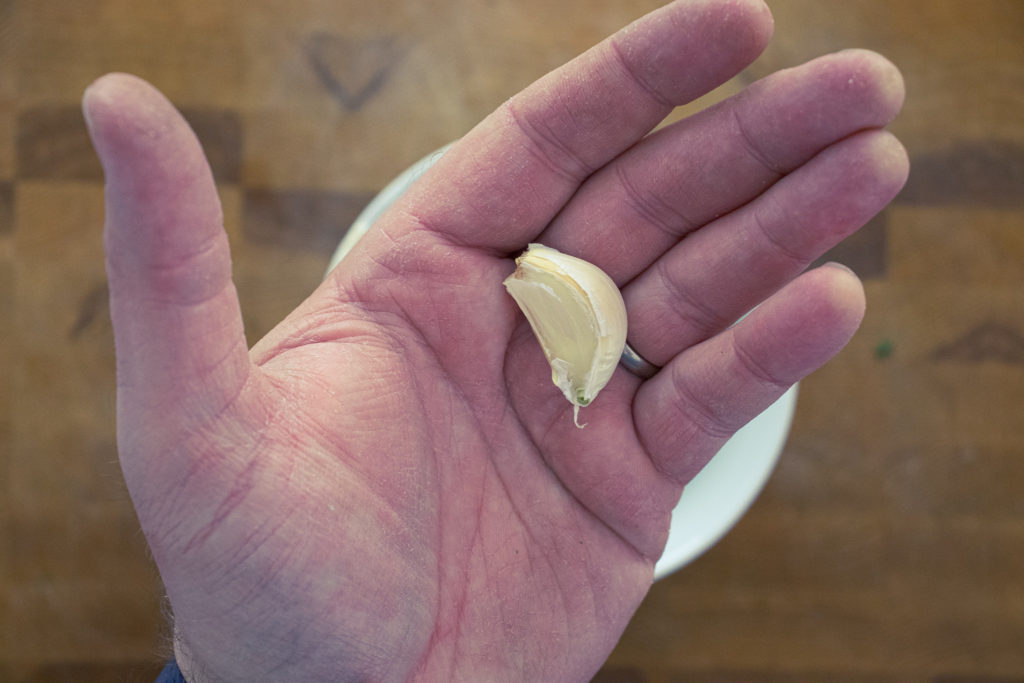
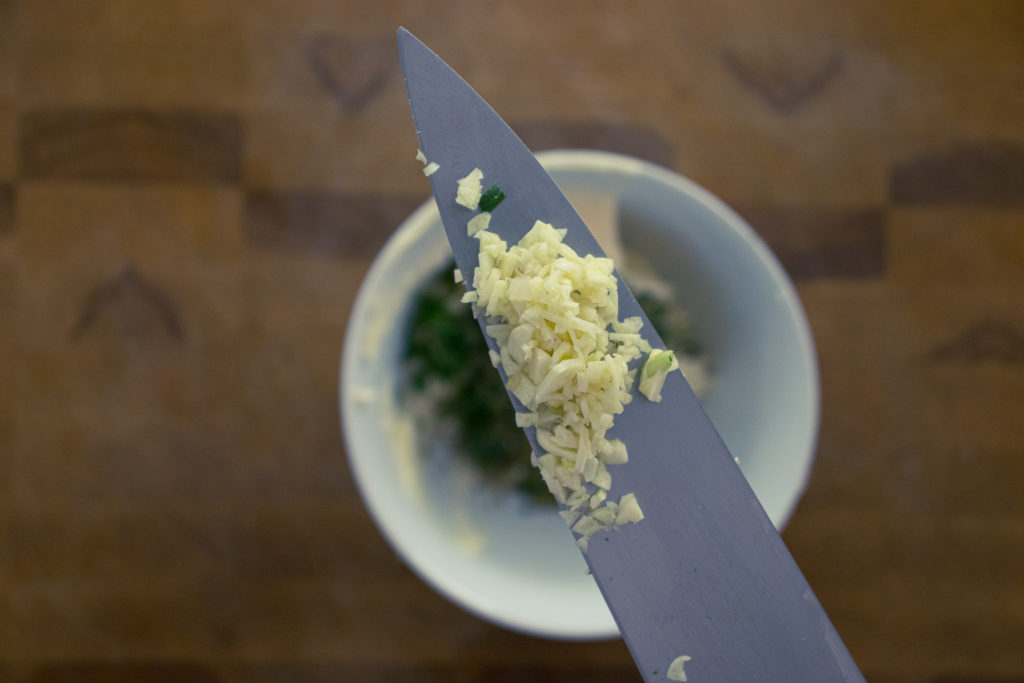
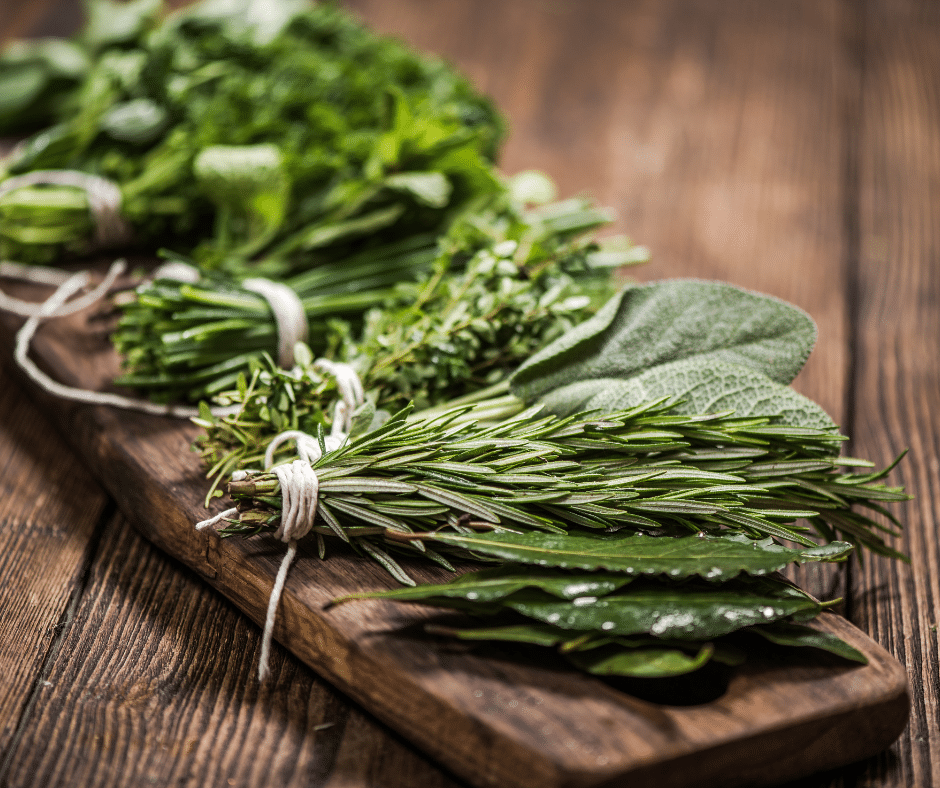
If you’d like an excellent table butter, meaning a butter you put on the table for dinner, you can’t go wrong with a herb compound butter. If using it as a table butter, I suggest piping it, but I did a flat roll with it here. This herb butter has parsley, thyme, rosemary, dill, oregano, and garlic. Herb butter is great for adding to soups or sauces. It also makes a great finishing butter for chicken or fish.
Herb Butter
Herb butter makes a great addition to fish, mashed potatoes, pasta, or sauces. It also makes a great table butter.
Put the softened butter in the mixer bowl and beat with the paddle attachment on medium-high speed until the butter is light and airy. Scrape the sides of the bowl down at least once to ensure an even mix.
Add the parsley, dill, oregano, thyme, rosemary, and garlic to the mixer and beat for 1 minute or until mixd.
Spread the butter out onto a 12-inch piece of parchment. Roll the butter into a thin log. Chill the butter for 30 minutes, remove the parchment and cut the butter into thumb-width pieces.
Put the formed butter on the sheet pan and chill in the fridge for two hours or freeze. Once chilled or frozen, put the butter in an airtight container and store it in the fridge for up to a week, or in the freezer for up to three months.
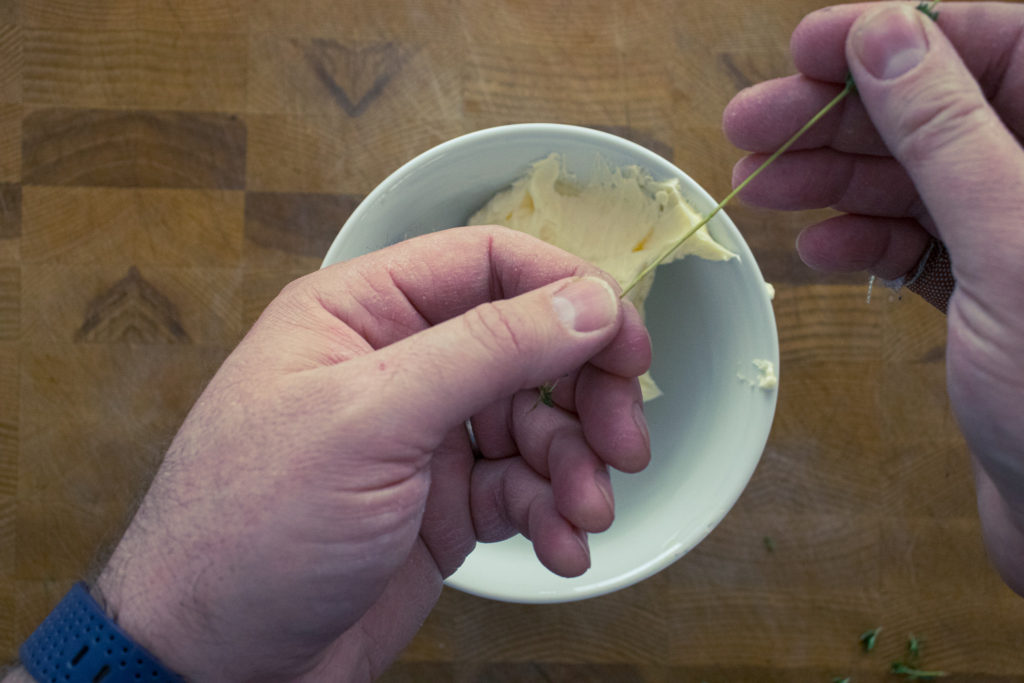
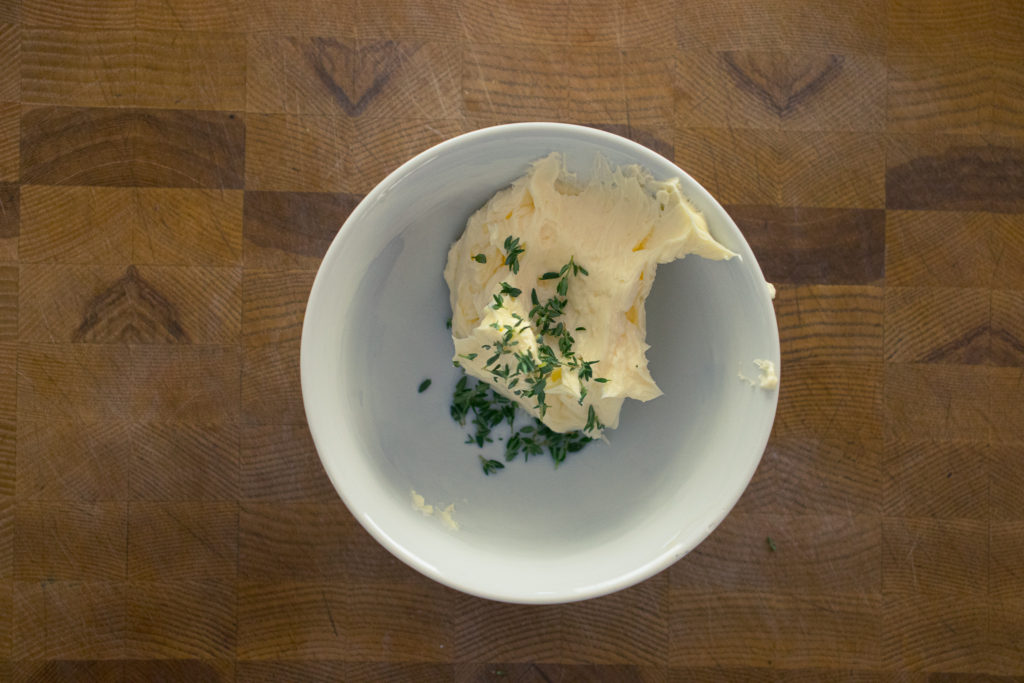
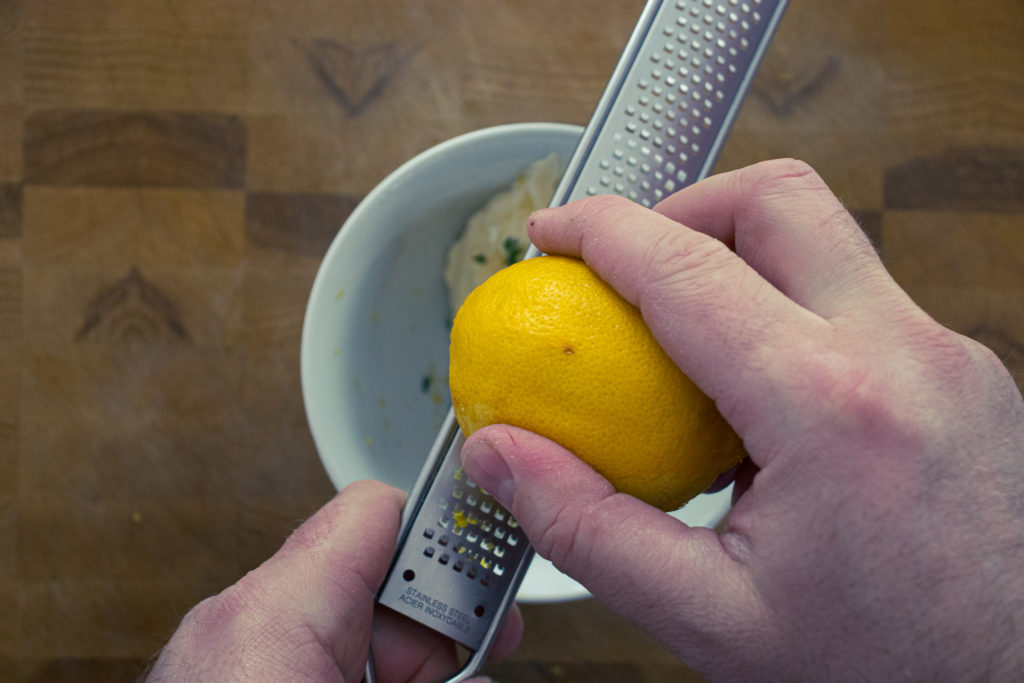
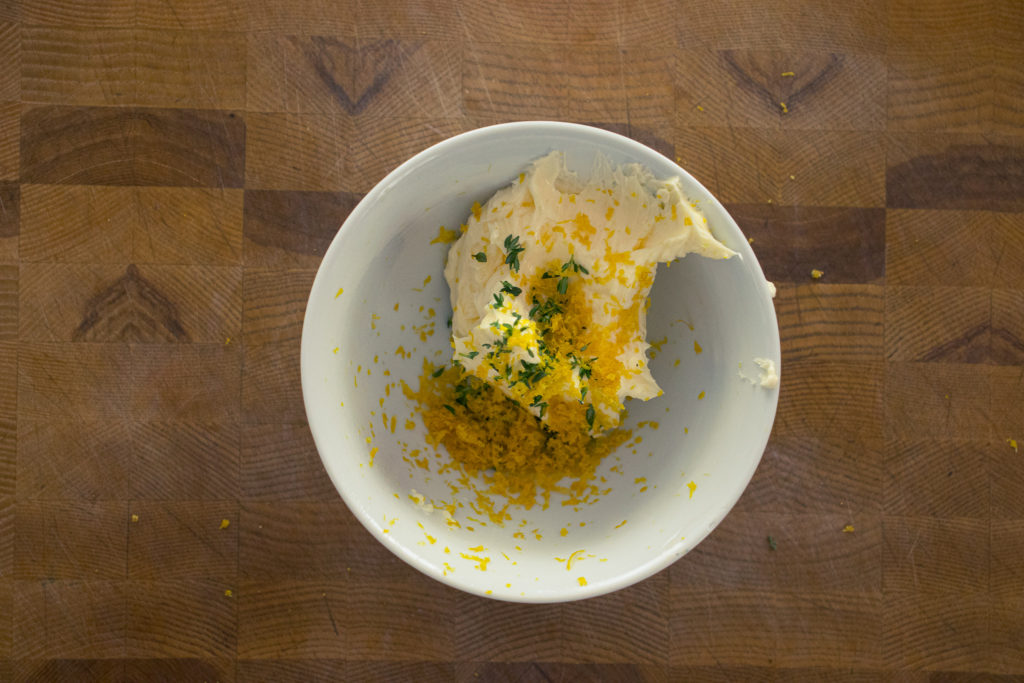
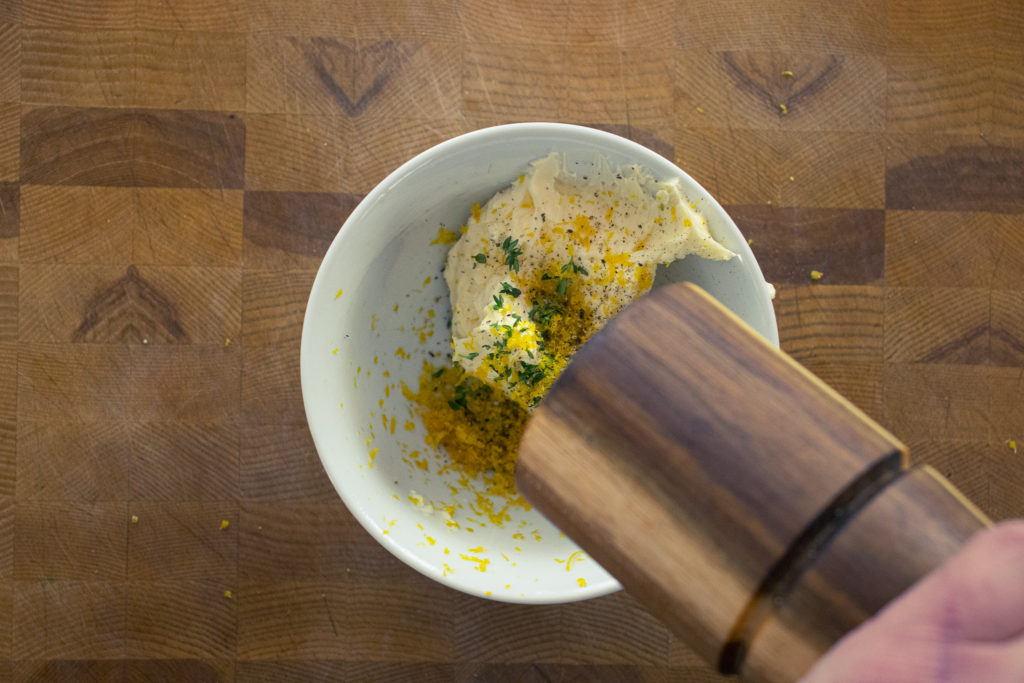
Lemon-Thyme Butter is fantastic with chicken or fish, especially white fish like haddock or cod. You can put it on the fish before or after cooking. Either way, it is delicious. The ingredients are all pretty much there in the name, except black pepper. You can substitute the thyme for dill and get an equally delicious butter if you’d like.
Lemon-Thyme Butter
Lemon-Thyme Butter is great on fish, scones, or even chicken.
Put the softened butter in the mixer bowl and beat with the paddle attachment on medium-high speed until the butter is light and airy. Scrape the sides of the bowl down at least once to ensure an even mix.
Add the lemon zest, thyme and pepper. Mix for 1 minute.
Put the butter in a piping bag fitted with a large star tip.
Pipe the butter onto a parchment-lined sheet pan.
Put the formed butter on the sheet pan and chill in the fridge for two hours or freeze. Once chilled or frozen, put the butter in an airtight container and store it in the refrigerator for up to a week or in the freezer for up to three months.
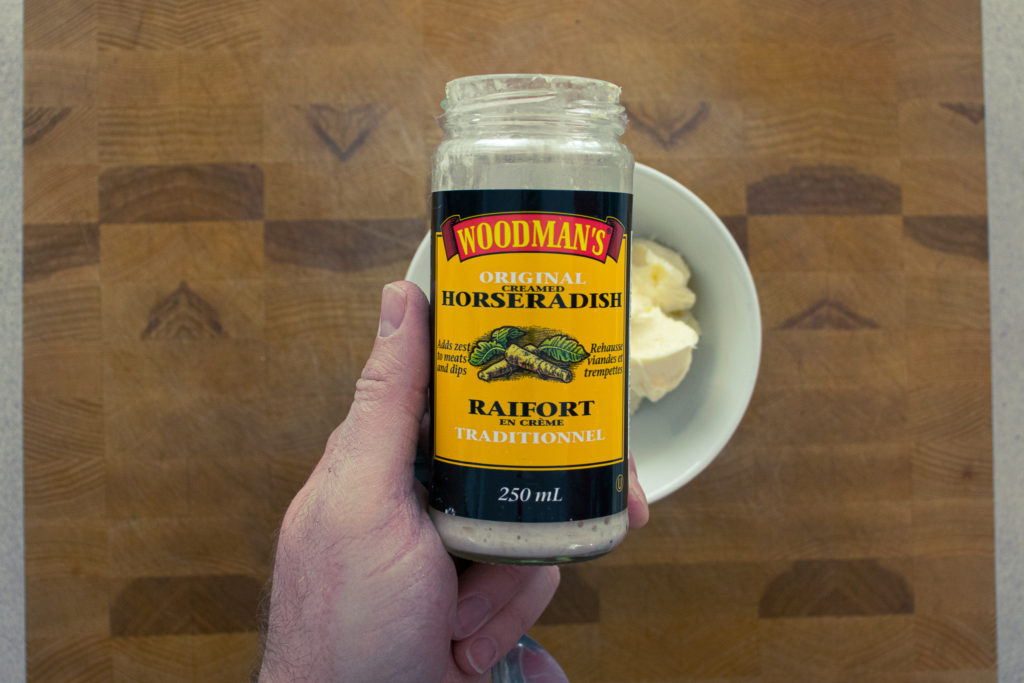
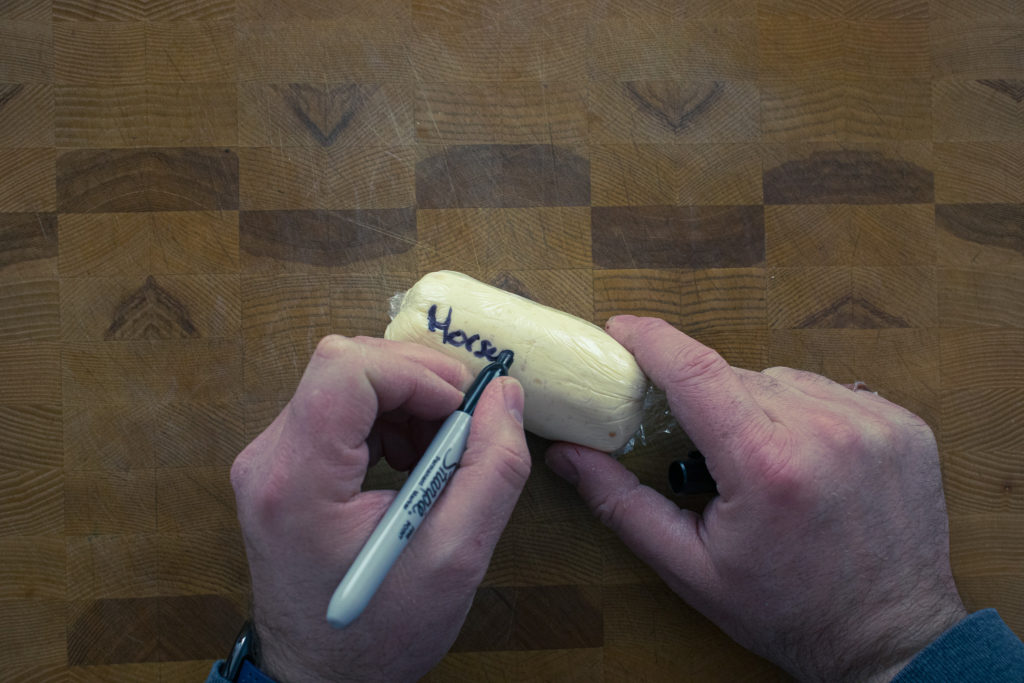
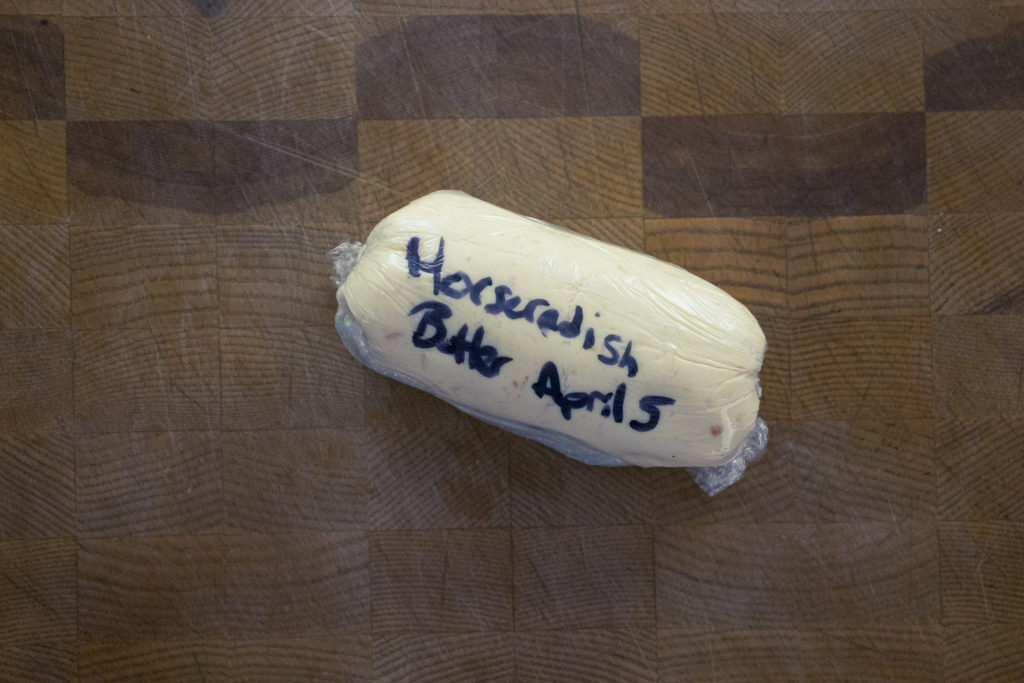
Making horseradish butter is as simple as mixing prepared store-bought horseradish with softened, beaten butter. Horseradish butter is fantastic on a steak, salmon, or even a burger. Like any other compound butter mentioned in this post, You may use horseradish butter before or after cooking. For example, you can put room-temperature horseradish butter on a piece of salmon when it comes out of the oven or off the grill. The butter will melt over the salmon and add flavour. The butter also adds a nice glazed appearance. Alternatively, you can put cold horseradish butter on a piece of salmon, then roast or broil it. This will give the salmon a nutty flavour and a darker appearance.
Horseradish Butter
Horseradish Butter makes a great addition to salmon, steak, or even burgers.
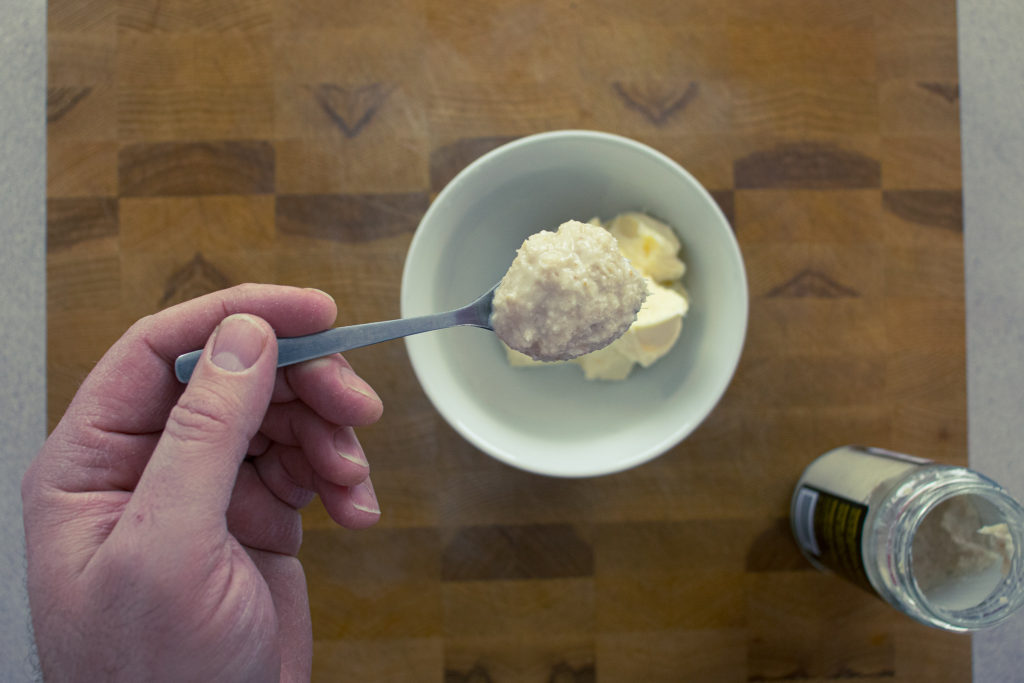
Put the softened butter in the mixer bowl and beat with the paddle attachment on medium-high speed until the butter is light and airy. Scrape the sides of the bowl down at least once to ensure an even mix.
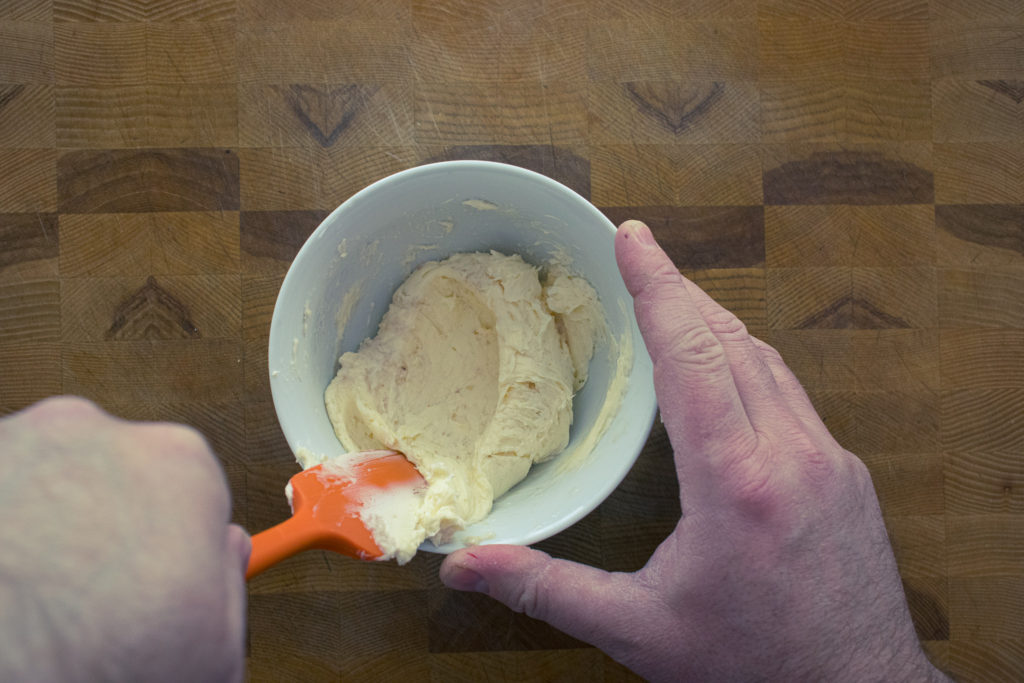
Add the horseradish to the butter, and beat for 1 minute or until mixed.
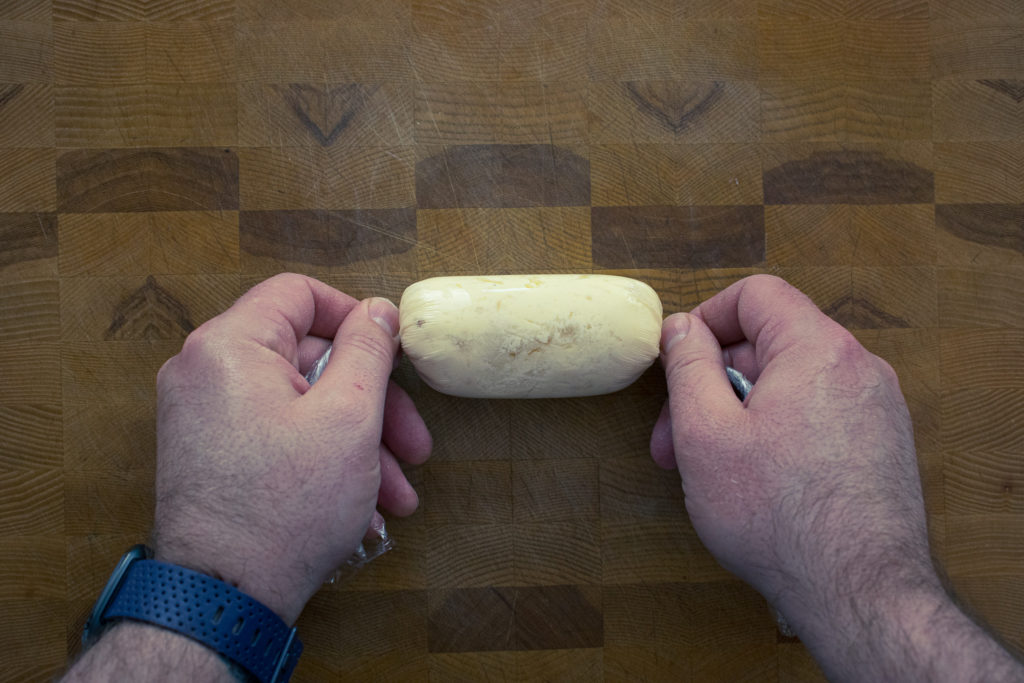
Place a 12-inch long piece of plastic wrap flat on your work surface.
Put the butter in a long mound on the plastic wrap.
Fold the bottom of the plastic wrap up and over the butter, rolling forward to seal. Twist the end of the wrap to tighten the roll.
Chill the butter and leave it as is until you're ready to use it, or remove the plastic, cut the butter into medallions and store it in an air-tight container in the fridge for up to two weeks or in the freezer for up to four months.
This list of compound butter is in no way definitive. The only limit to the possible flavours of compound butter is the human imagination. Hopefully, this post has sparked your imagination, and you’re thinking of all the other ingredients you could mix into your butter to add extra flavour and appearance. Try the ones I’ve listed, then create your own. When you make your own, I’d love for you to share them as they may inspire other people.
Thanks for reading! Remember that sharing is caring, so share this with your friends and leave a comment below to tell me what you think. Have a great day! I’ll see you back here next Thursday.
Have you signed up for the Chef’s Notes Monthly Newsletter? No? Why Not? Don’t miss exclusive recipes, cooking tips, and behind-the-scenes pictures and stories. Sign up below.
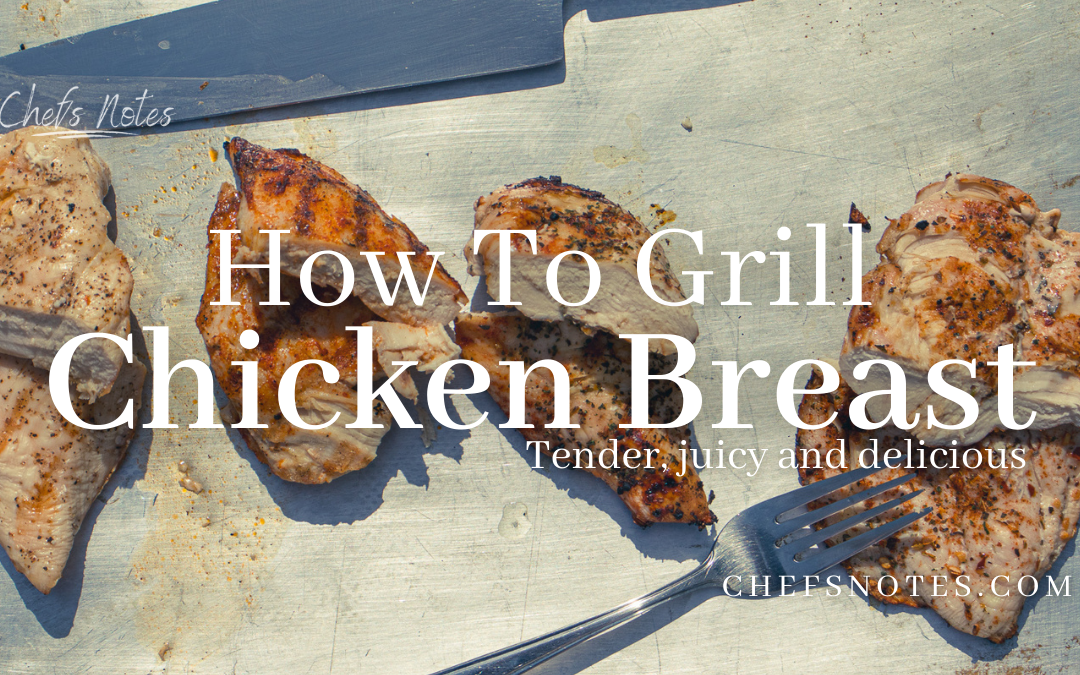
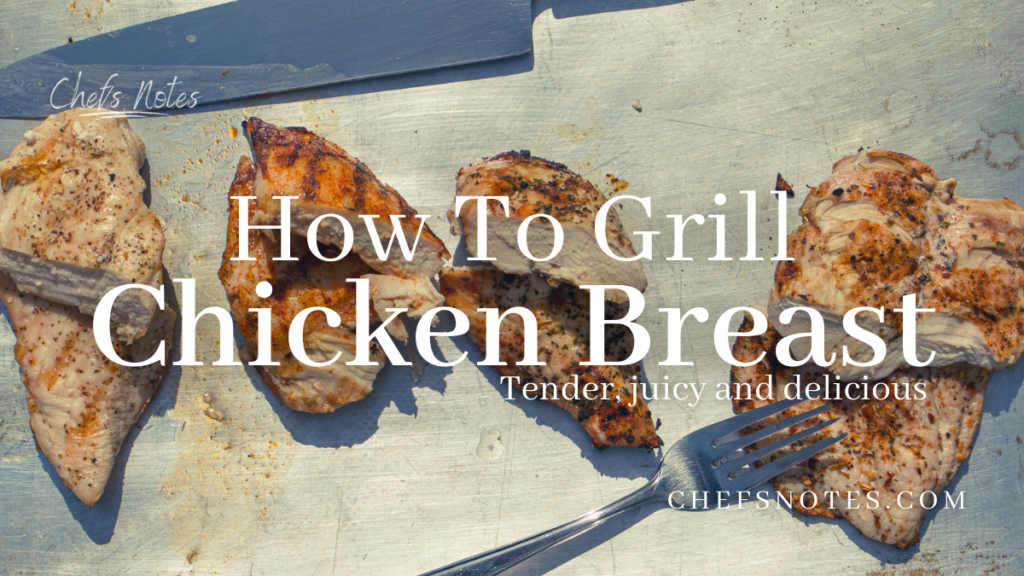
People love chicken breast. I don’t really know why. It is the fifth-best part of a chicken, and chickens don’t really have more than five parts. But, despite how I feel about them, you will probably be throwing them on your grill this year. Since you’ll be grilling them anyway, why not grill them as well as possible? What I’m about to share with you is a foolproof method for cooking chicken breast, or anything for that matter, perfectly on the grill. You don’t even need to read the whole post. I’ll tell you the secret right now. Are you ready? Okay, here it is. Don’t overcook it. I know. Mind blown. That really is basically what I’m about to tell you. Of course, there’s more to it, but that’s the short version. If you love chicken breast and are planning on grilling some, keep reading. Let’s get to it.
Why Chicken Breast Sucks
Chicken breast sucks and is easy to ruin for the same reason that so many people like it. It is extremely lean. In a 3 oz (85 g) portion of skinless chicken breast, there are 140 calories. Of those 140 calories, only 3 grams are fat. That’s a pretty good ratio if your only focus is eating lean. However, whether you like it or not, fat equals flavour and juiciness. Lean meat tends to be dry and flavourless. They are also much less forgiving when even slightly overcooked. So, the two big questions that we need to answer are; How do you keep your chicken breast juicy? And, how do you impart as much flavour as possible?
Prepping The Chicken
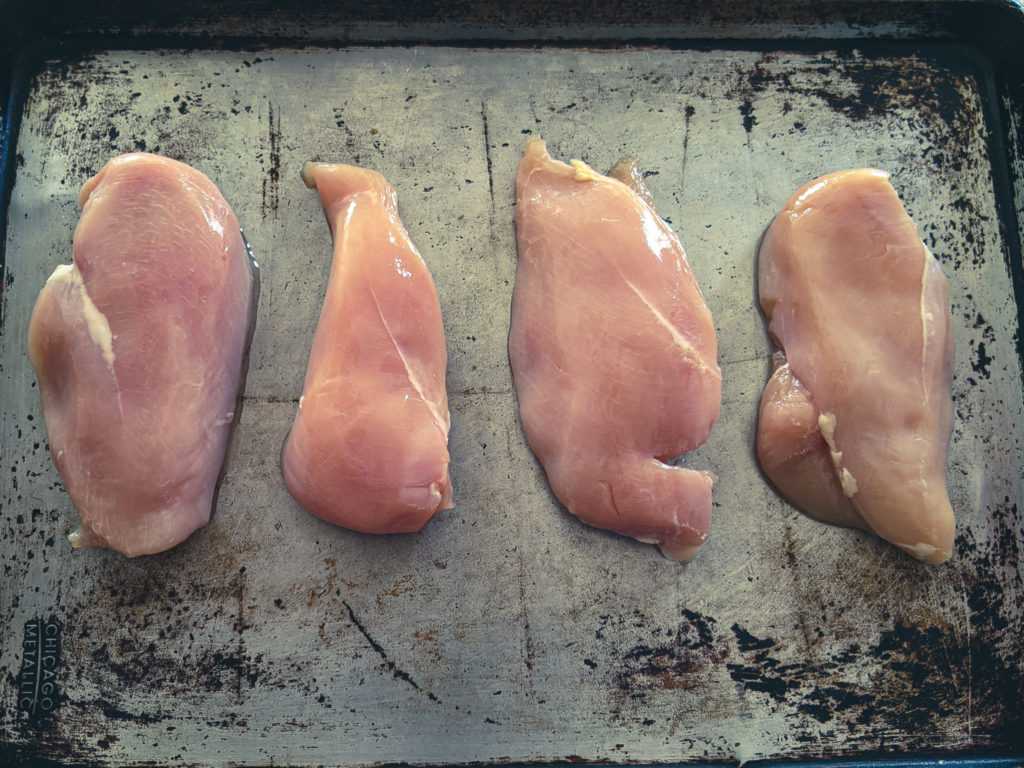
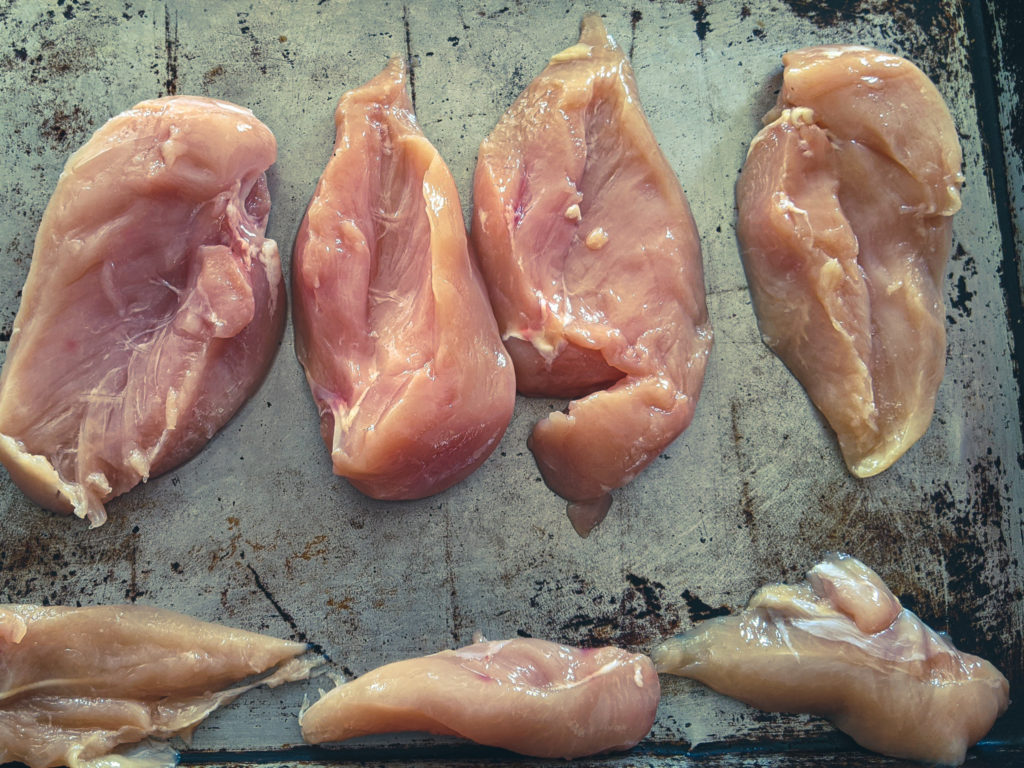
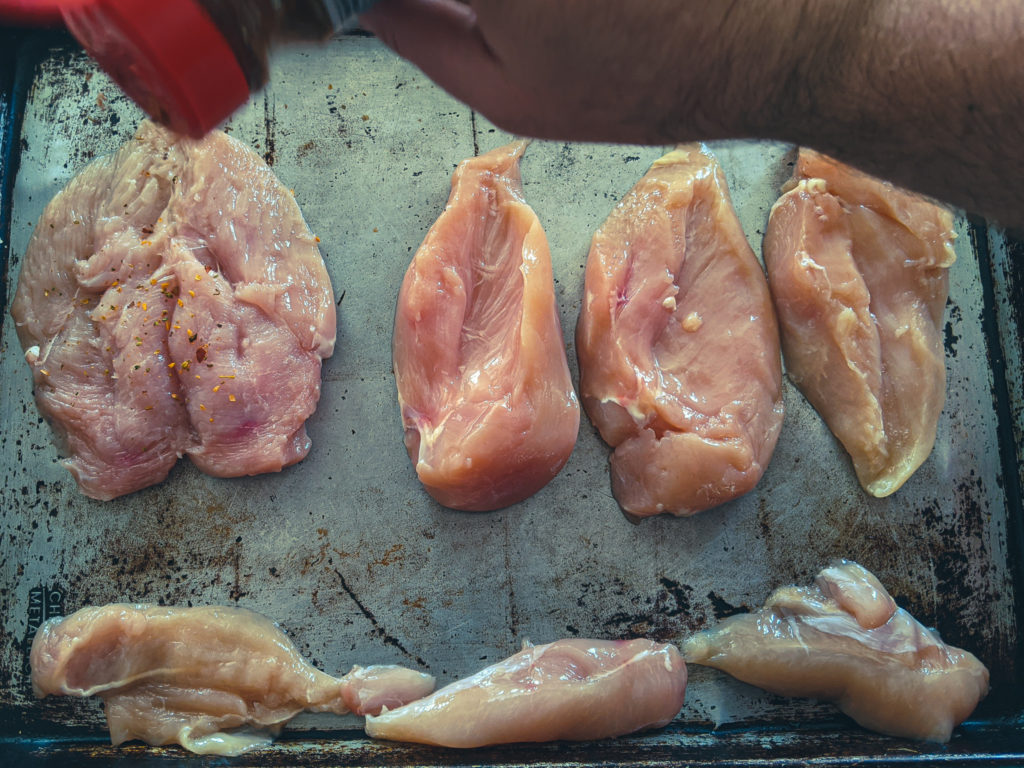
I’ve seen a lot of people standing in front of their grill with a package of boneless, skinless chicken breast. They take the chicken right from the package to the grill. No seasoning, no nothing. I’m here to tell you, if you don’t already know, don’t do that. First of all, where is the flavour? Secondly, there is a little prep that you should do to help your chicken breast cook evenly.
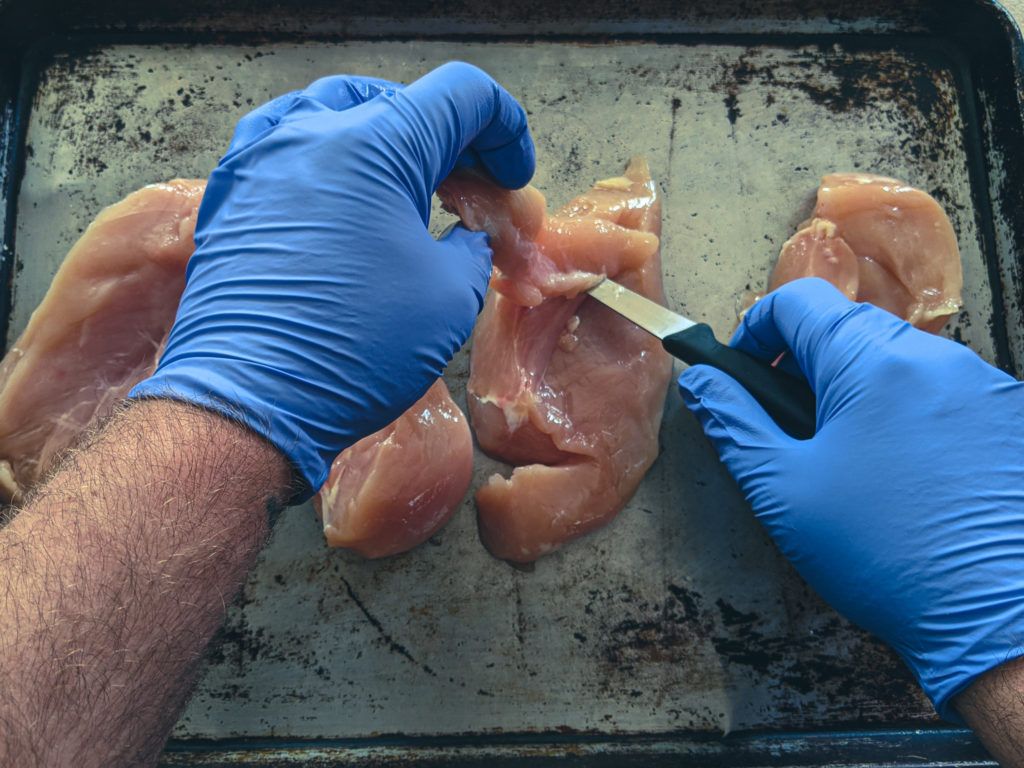
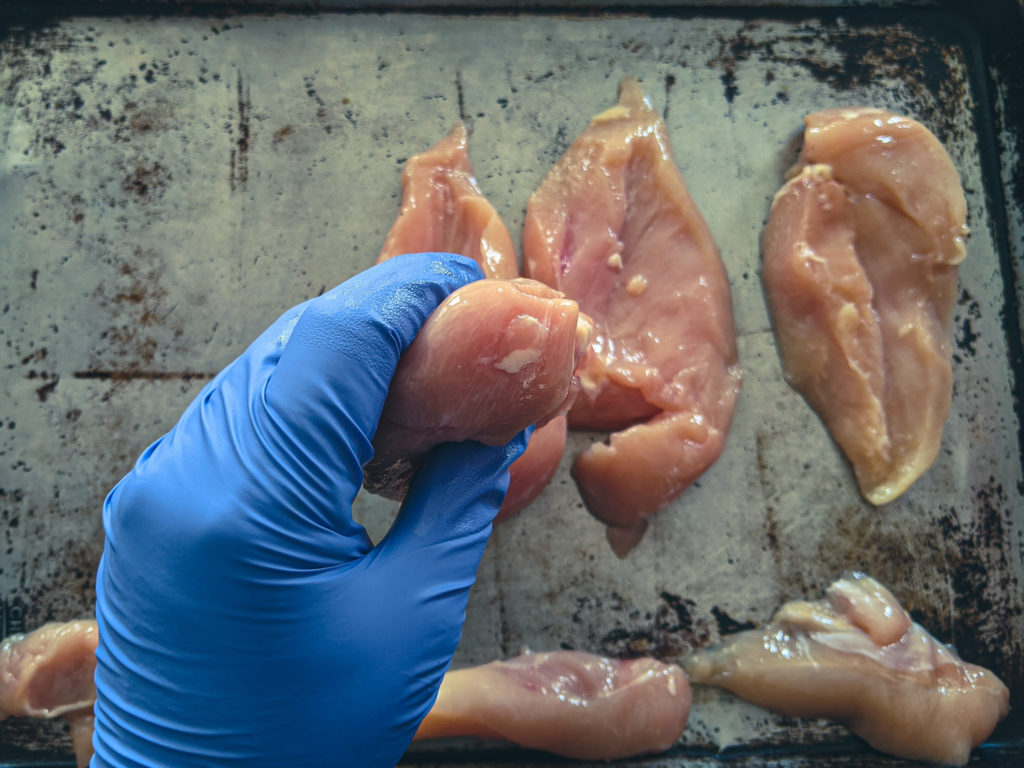
Removing the tender
If you flip over a chicken breast, you will see what is known as the “tender.” The tender (yes, that’s what breaded chicken tenders are made of) is a little flap of meat that hangs off the bottom of the chicken breast. You don’t have to go hunting for it; it’ll be pretty obvious. Using a sharp knife, cut the tender off. Why? Because the tender will create a little pocket between itself and the rest of the breast that will take a long time to cook. By the time this pocket is cooked, the rest of the breast will be overcooked.
What do you do with the tender?
Don’t throw the tender away! If you want to, you can throw it on the grill and cook it alongside your breasts. They only take a few minutes to cook and make a great addition to salads. You can also freeze them. Once you get a stockpile in your freezer, thaw them and make a big batch of homemade chicken fingers. You can substitute the turkey in the Turkey Tender Recipe below with the chicken tenders. Chicken tenders also make a great ingredient for a stir-fry or soup.
Oven-Baked Turkey Tenders
These Turkey Tenders will not only become an entertaining staple but you will want to eat them every day of the week. Pair them with the cranberry sweet and sour sauce and you have a real winner.
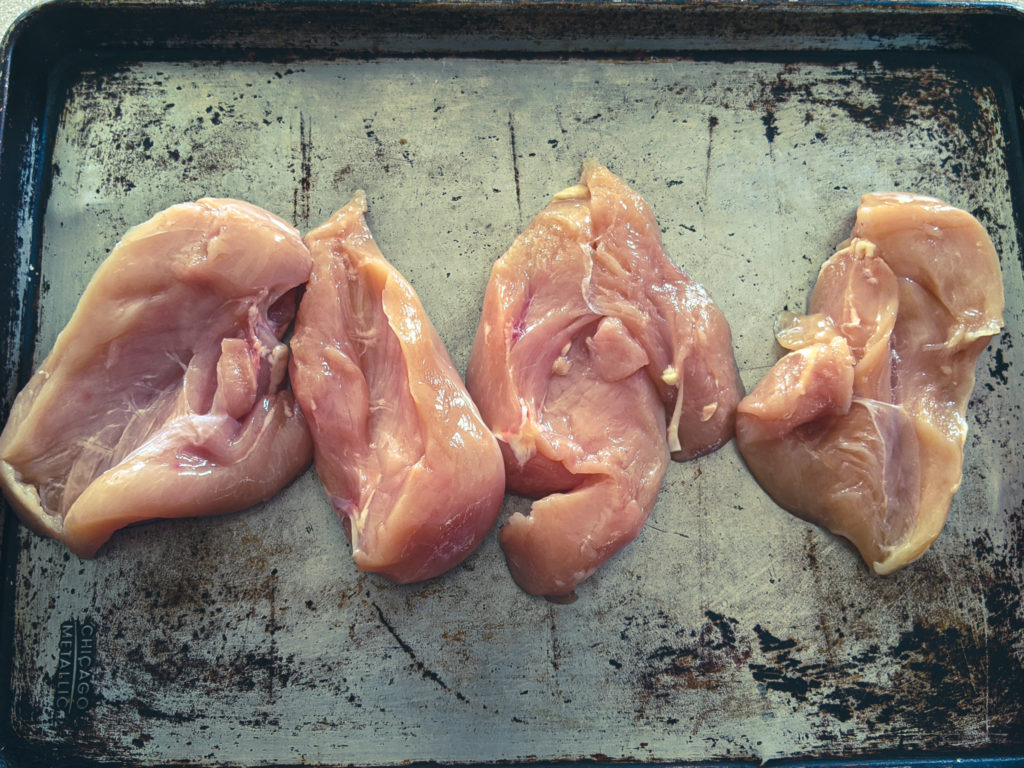
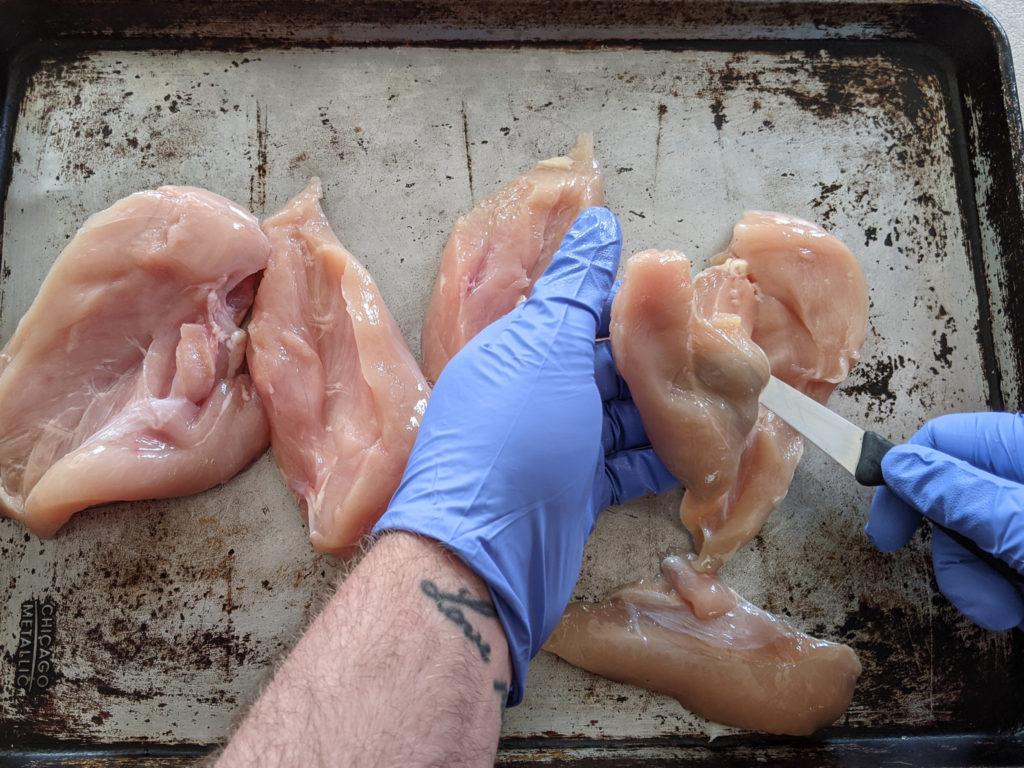
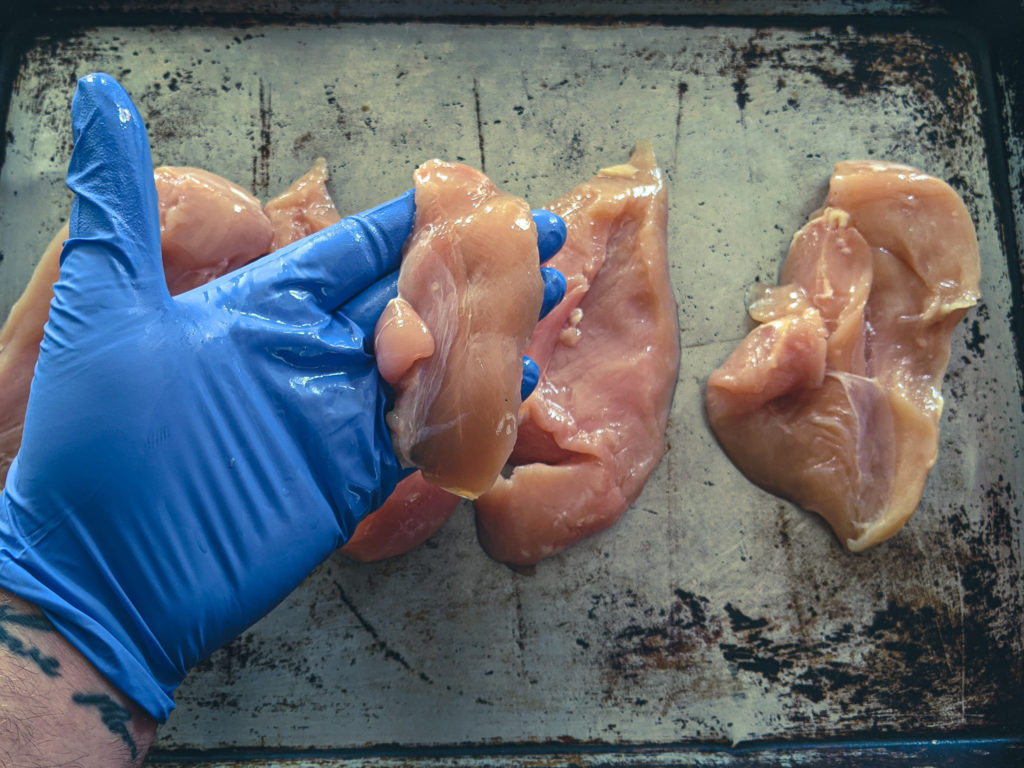
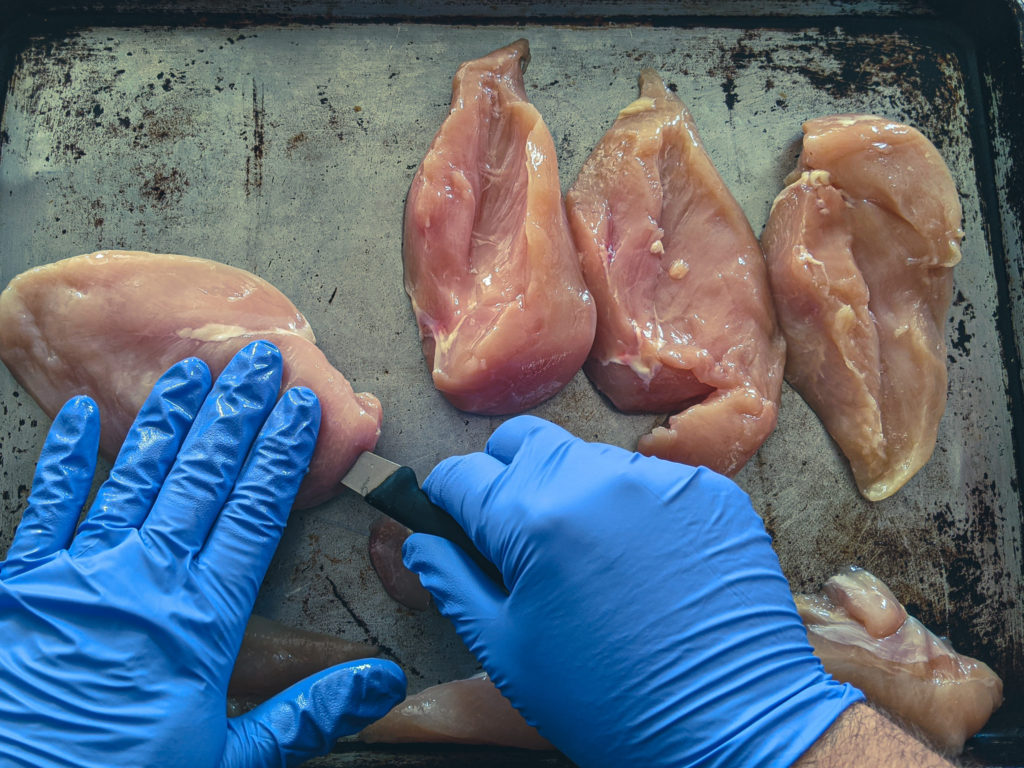
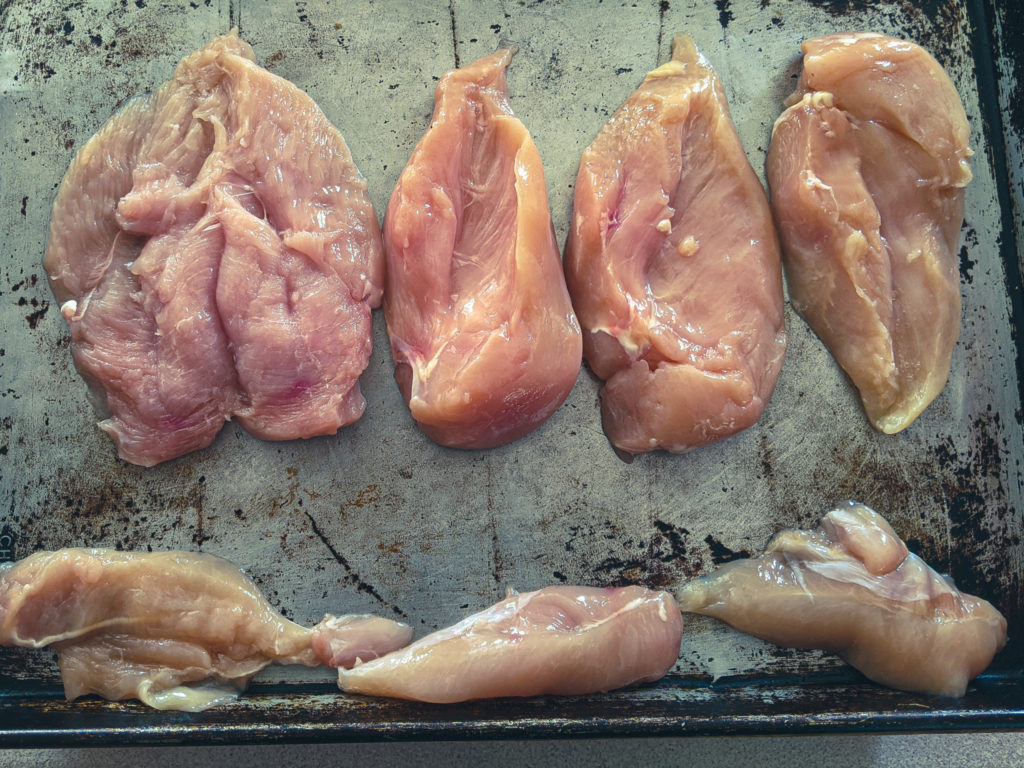
Taking the tender off will help the breast cook more evenly. But, if you have an especially thick chicken breast, you may want to butterfly it. Butterflying will give you a thinner chicken breast with a larger overall surface area. This means that the breast will cook much quicker than if it was left whole, and it will have more of that delicious grilled flavour and more room for seasoning.
How to butterfly a chicken breast
To butterfly a chicken breast, remove the tender as described above, then place the chicken breast flat on your cutting board. Using a sharp knife, cut halfway up the height of the breast. Keep cutting in long even strokes until you’ve cut about 80% of the way through the chicken breast. You should no be able to open the the breast like a book. That’s all there is to it. Just try your best to keep your knife as even as possible otherwise, you may cut through the top or bottom of the breast. This won’t hurt it, but it won’t be as pretty.
Note: I did not do a very good job butterflying my breast. I was too preoccupied with taking pictures. I should have grabbed a better knife. But never fear; I make mistakes, so you don’t have to. Yeah, that’s why I do it.
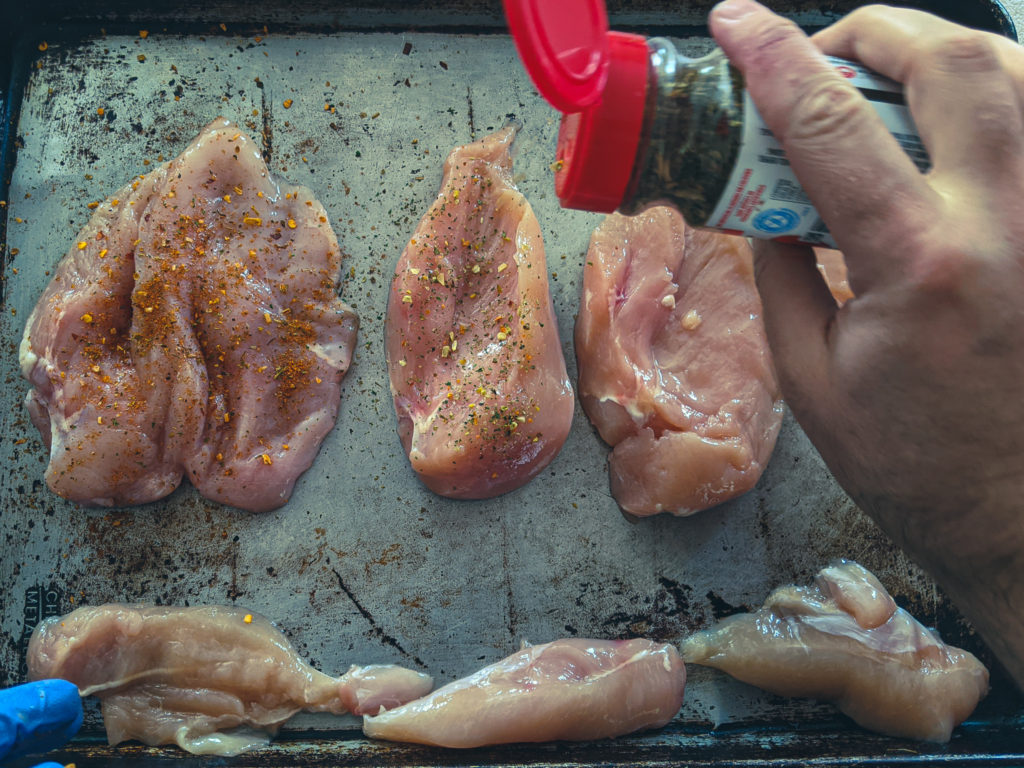
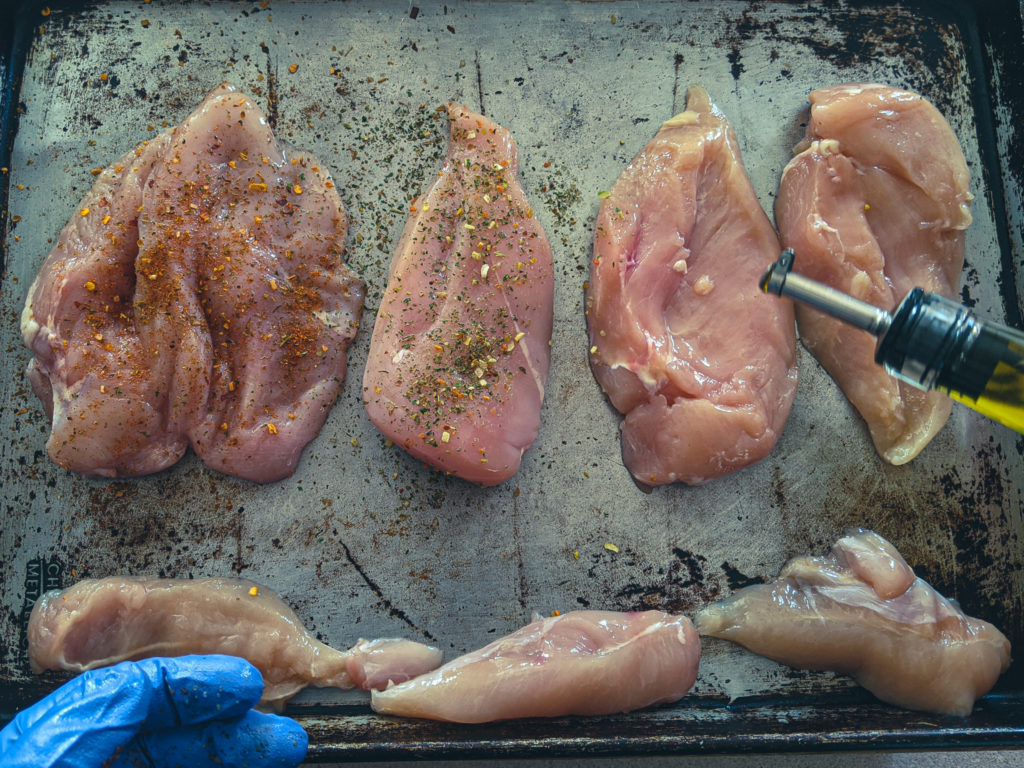
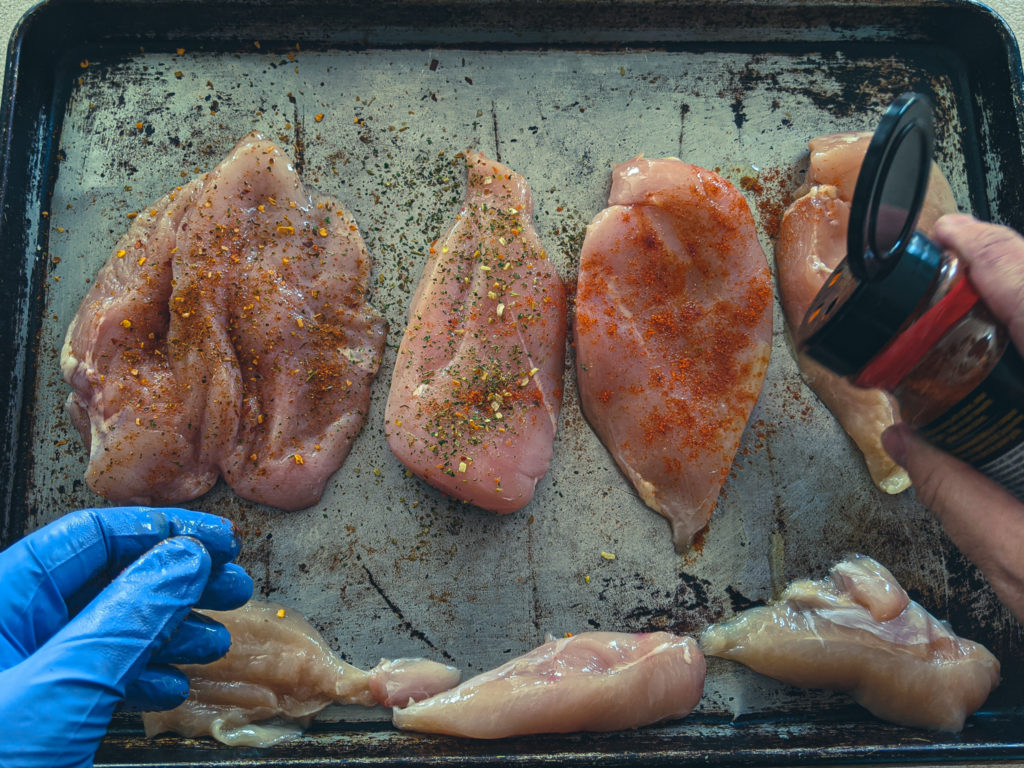
Seasoning the chicken breast
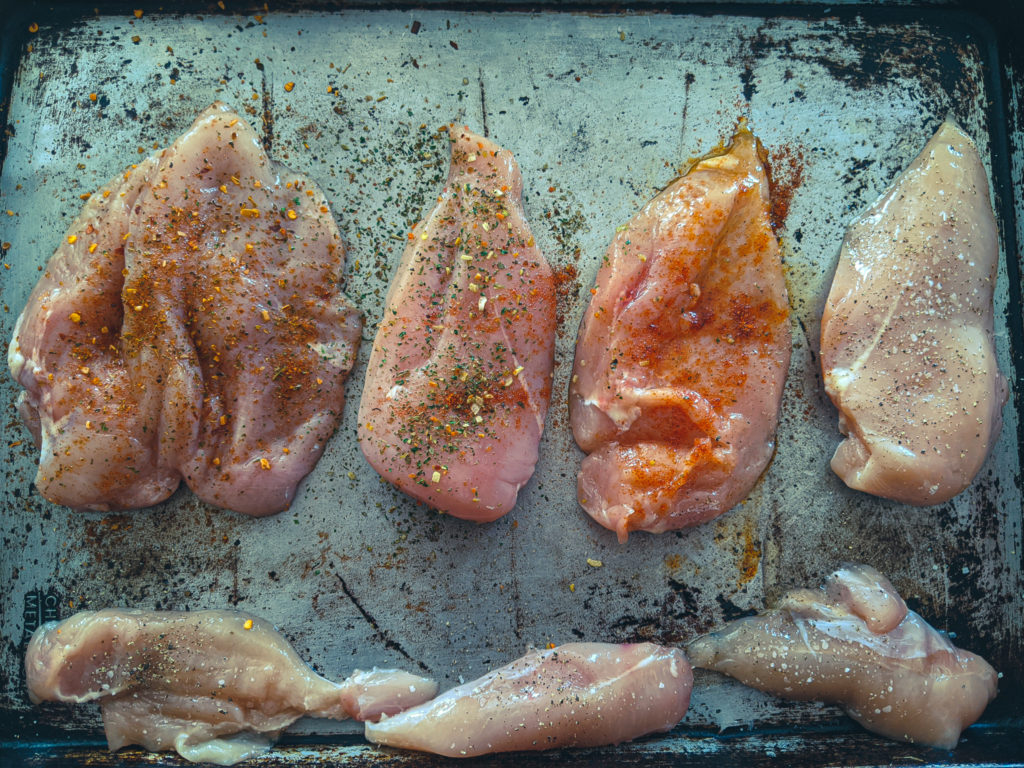
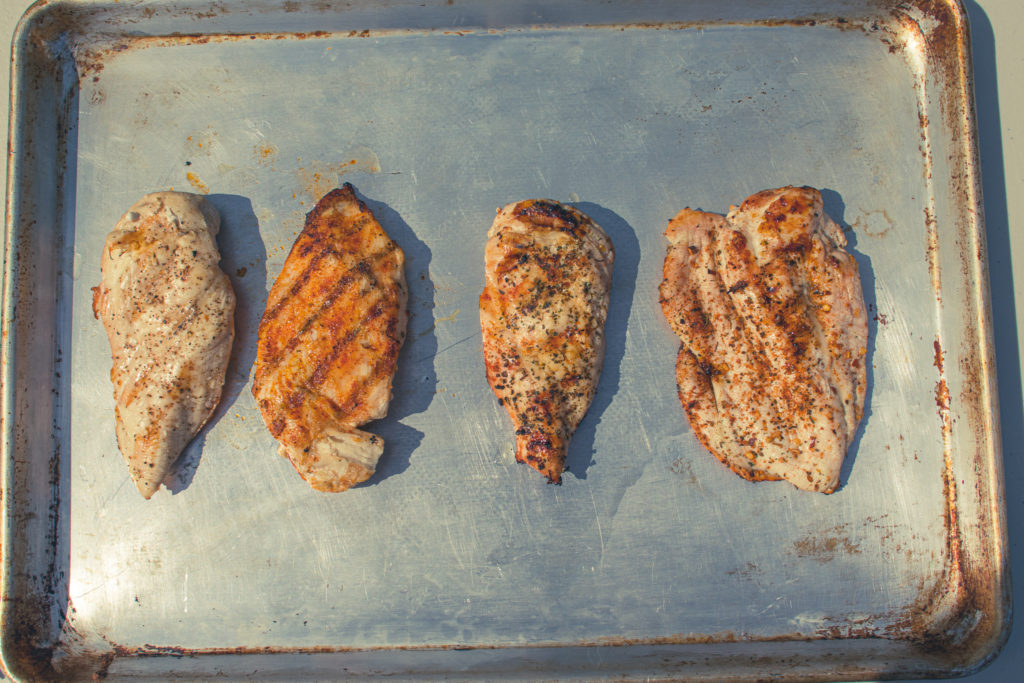
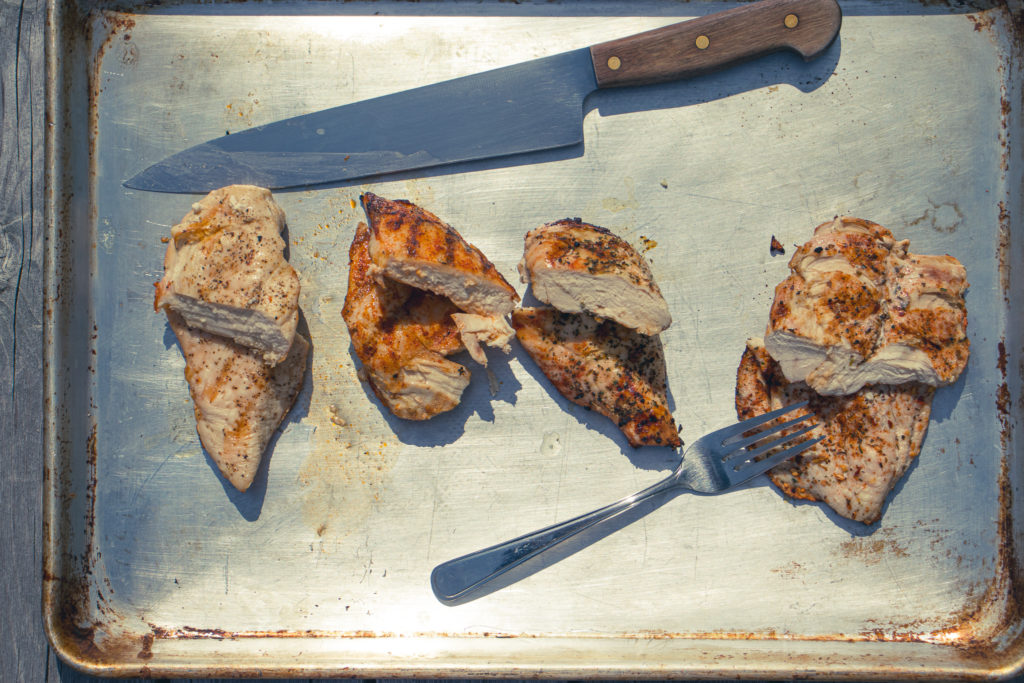
Okay, your chicken breast has had the tender removed, and the larger ones have been butterflied. It’s time to go to the grill, right? That was a test. If you said yes, you failed. It’s flavour time, not grill time. At this point, you can marinate your chicken breasts if you want, or you can season them with any number of seasonings. To make my point about seasoning, I flavoured all four of my chicken breasts differently. One is seasoned with a store-bought BBQ chicken seasoning. One has Italian seasoning. Another has Cajun seasoning. The final breast just has salt and pepper on it.
To oil or not to oil?
You may have noticed in the images above that I only oiled one breast. I know that many people, when grilling, tend to oil their food and their grill. If you are eating chicken breast becasue it is lean meat, adding a pile of oil to it kind of defeats the purpose. It is also unnecessary and is likely to cause flareups. Don’t believe me? It’s okay, you’ll see in a few minutes. If you want to add all that extra oil, go for it. I’m not going to tell you how to live your life, but again, it is not needed.
Prepping Your Grill
Do you want to know the big secret to grilling? Here it is. Turn your grill on high. Leave it alone with the lid down for 10 to 15 minutes. Next, clean your grill with a grill brush or whatever new fangled grill cleaning tool you have. Put the lid back down, and leave it alone for another 5 minutes. Then, and only then, grill your food.
The secret to a non-stick grill
No matter what your grill is made of, it has the capacity to be non-stick. But, it comes down to you. The hotter your grill is when you add food to it, the less likely it is that food will stick. Also, the more you use your grill, the more grease from your food will build up and bake onto it. This will “season” your grill, just like a castiron pan. Seasoning the grill will also help it be nonstick. So don’t wipe the grill down with soap and water. Just get it hot and brush it off with your grill cleaning tool of preference.
Why your food sticks
Maybe you’re saying to yourself, “But Ben, come on. I use my grill all the time. I let it heat up and I clean it with a grill brush. But everything still sticks.” Well, to that I have to say, it’s your fault. Harsh, I know, but hear me out. There are three main reasons your food, chicken breast or otherwise, is sticking to your grill.
You didn’t let your grill get hot enough, or you keep opening the lid and cooling the grill down too much. Or, you let your grill heat up but then turned the heat way down before you put your food on. We’ll talk about this in a minute.
You didn’t brush your grill off well enough, so the food you’re cooking is sticking to old bits of dried-on food.
Or, the most common reason, you are trying to flip your food before it’s ready to be flipped.
The Maillard Reaction and Grilling
We’ve talked before about the Maillard reaction in other posts. I’m not going to get too deep into the science here, but you can check out this Wikipedia article about it if you are interested. The short version is that the Maillard reaction is the process that causes food to brown. Think about the cheese and crust of a pizza. The Maillard reaction causes the golden brown colour. It’s the same with a perfect brown crust on a nicely seared steak. Well, that browning, the Maillard reaction, is vitally important when cooking on a grill.
When to flip your food
When your food hits the grill, it is being cooked by the heat transfer from the flames, the heat in the air, and the heat stored in the grill’s metal. Metal is a better conductor of heat than air, but it takes a while to absorb enough heat to maintain its temperature. So, the metal will be much hotter than the air, ideally. That’s why you get grill marks on your food. Those grill marks are more than just pretty. They are the key to your food not sticking. As the Maillard reaction happens, the food touching the grill will brown. As the food browns, it will release from the grill. But, this takes time. So, if you are concerned about your chicken breast, or other foods, burning, turn down the flames a little bit, but don’t force the food to flip. Once it is ready to flip, it will release from the grill easily. That’s why it is so important to pre-heat your grill.
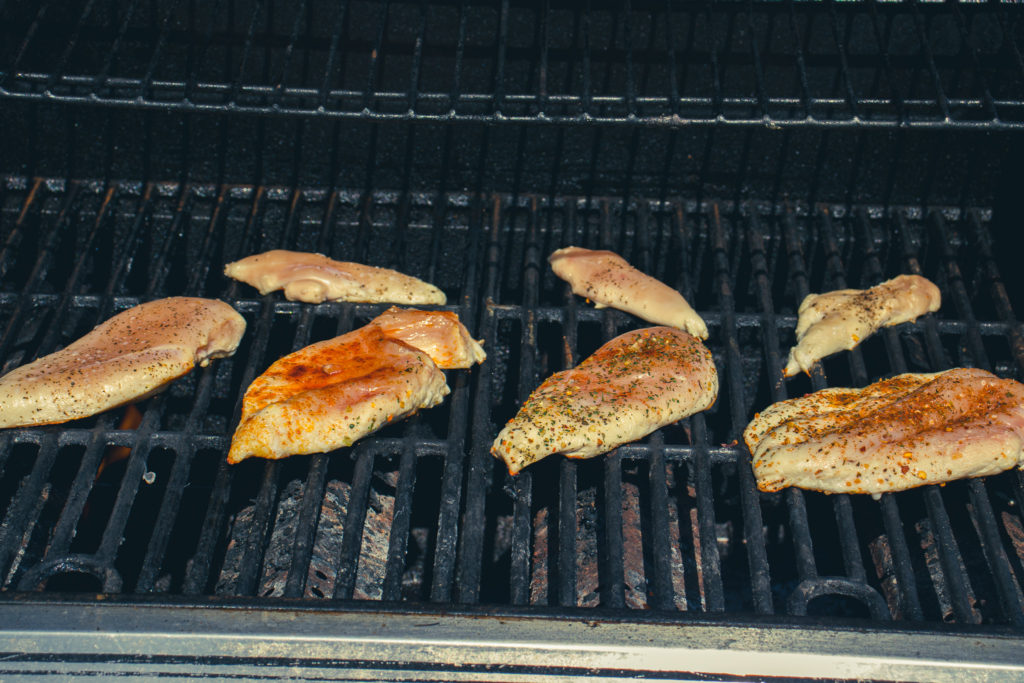
How to grill chicken breast
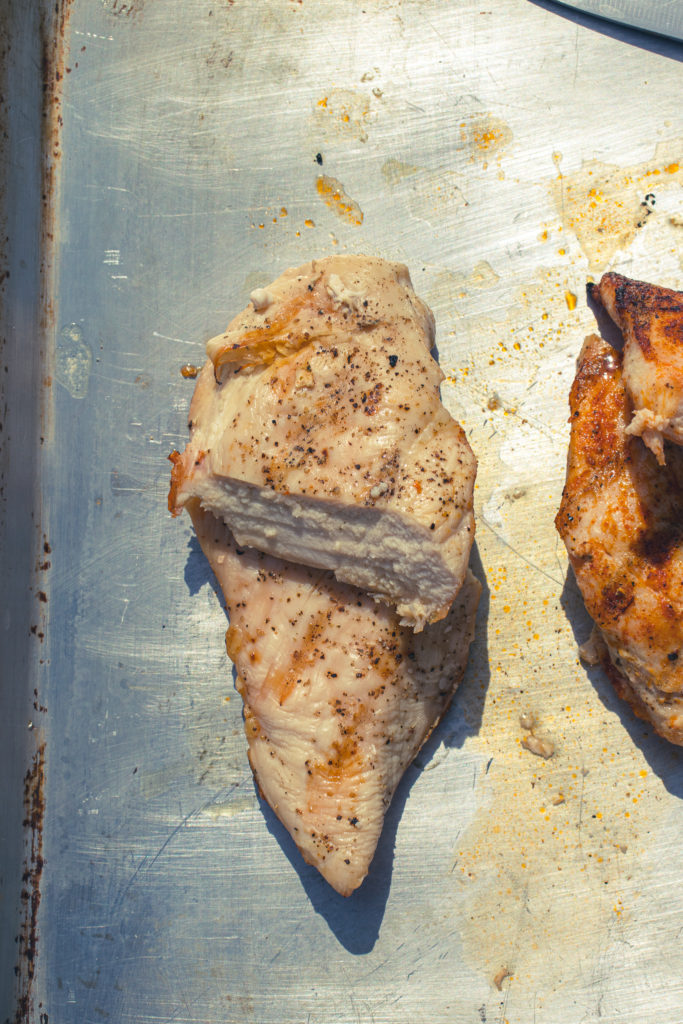
Okay, we’ve covered a lot. But I think it’s important to know all of this before we get to actually cooking. At this point, your breasts should have the tenders removed. The larger breasts should be butterflied. All the chicken should be seasoned on both sides, and your grill should be nice and hot. Now, put the chicken breast on the grill, close the lid, and leave it alone for about 5 to 6 minutes. Before the chicken goes on the grill, the gas should be on a high. Once the chicken goes on and the lid is closed, wait until the thermometer comes back to about 400°f then turn the gas to medium. If you leave the gas on high, you risk burning the chicken. If you turn the gas down before the chicken is on the grill or before the grill comes back to temperature, you risk the metal cooling down too much and the chicken sticking.
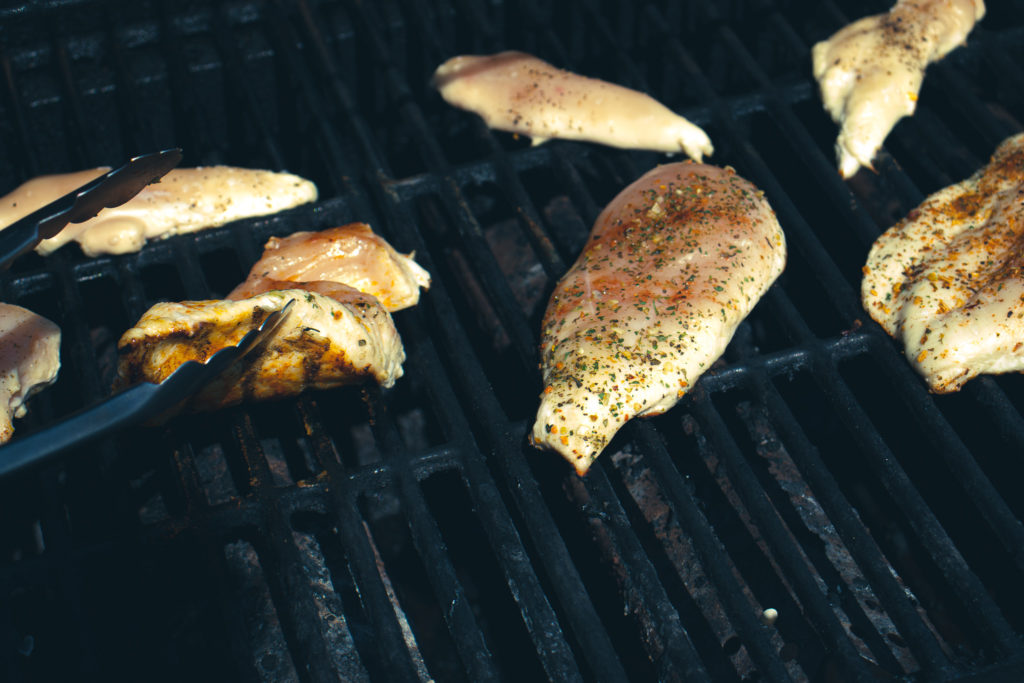
How do you know when to flip the chicken?
After 5 minutes, open the lid and gently lift the chicken breasts. If they are sticking, close the lid and leave them alone for another minute or two. Once the breasts easily pull away from the grill (notice I said pull away and not lift away), flip them, close the lid and leave them alone for another 4 to 5 minutes.
Even though the breasts shouldn’t stick to the grill, they likely aren’t going to lift off like they are being cooked in a non-stick pan, either. So you may need to pull them a little bit, but there should be no tearing, and there shouldn’t be any chicken left on the grill either.
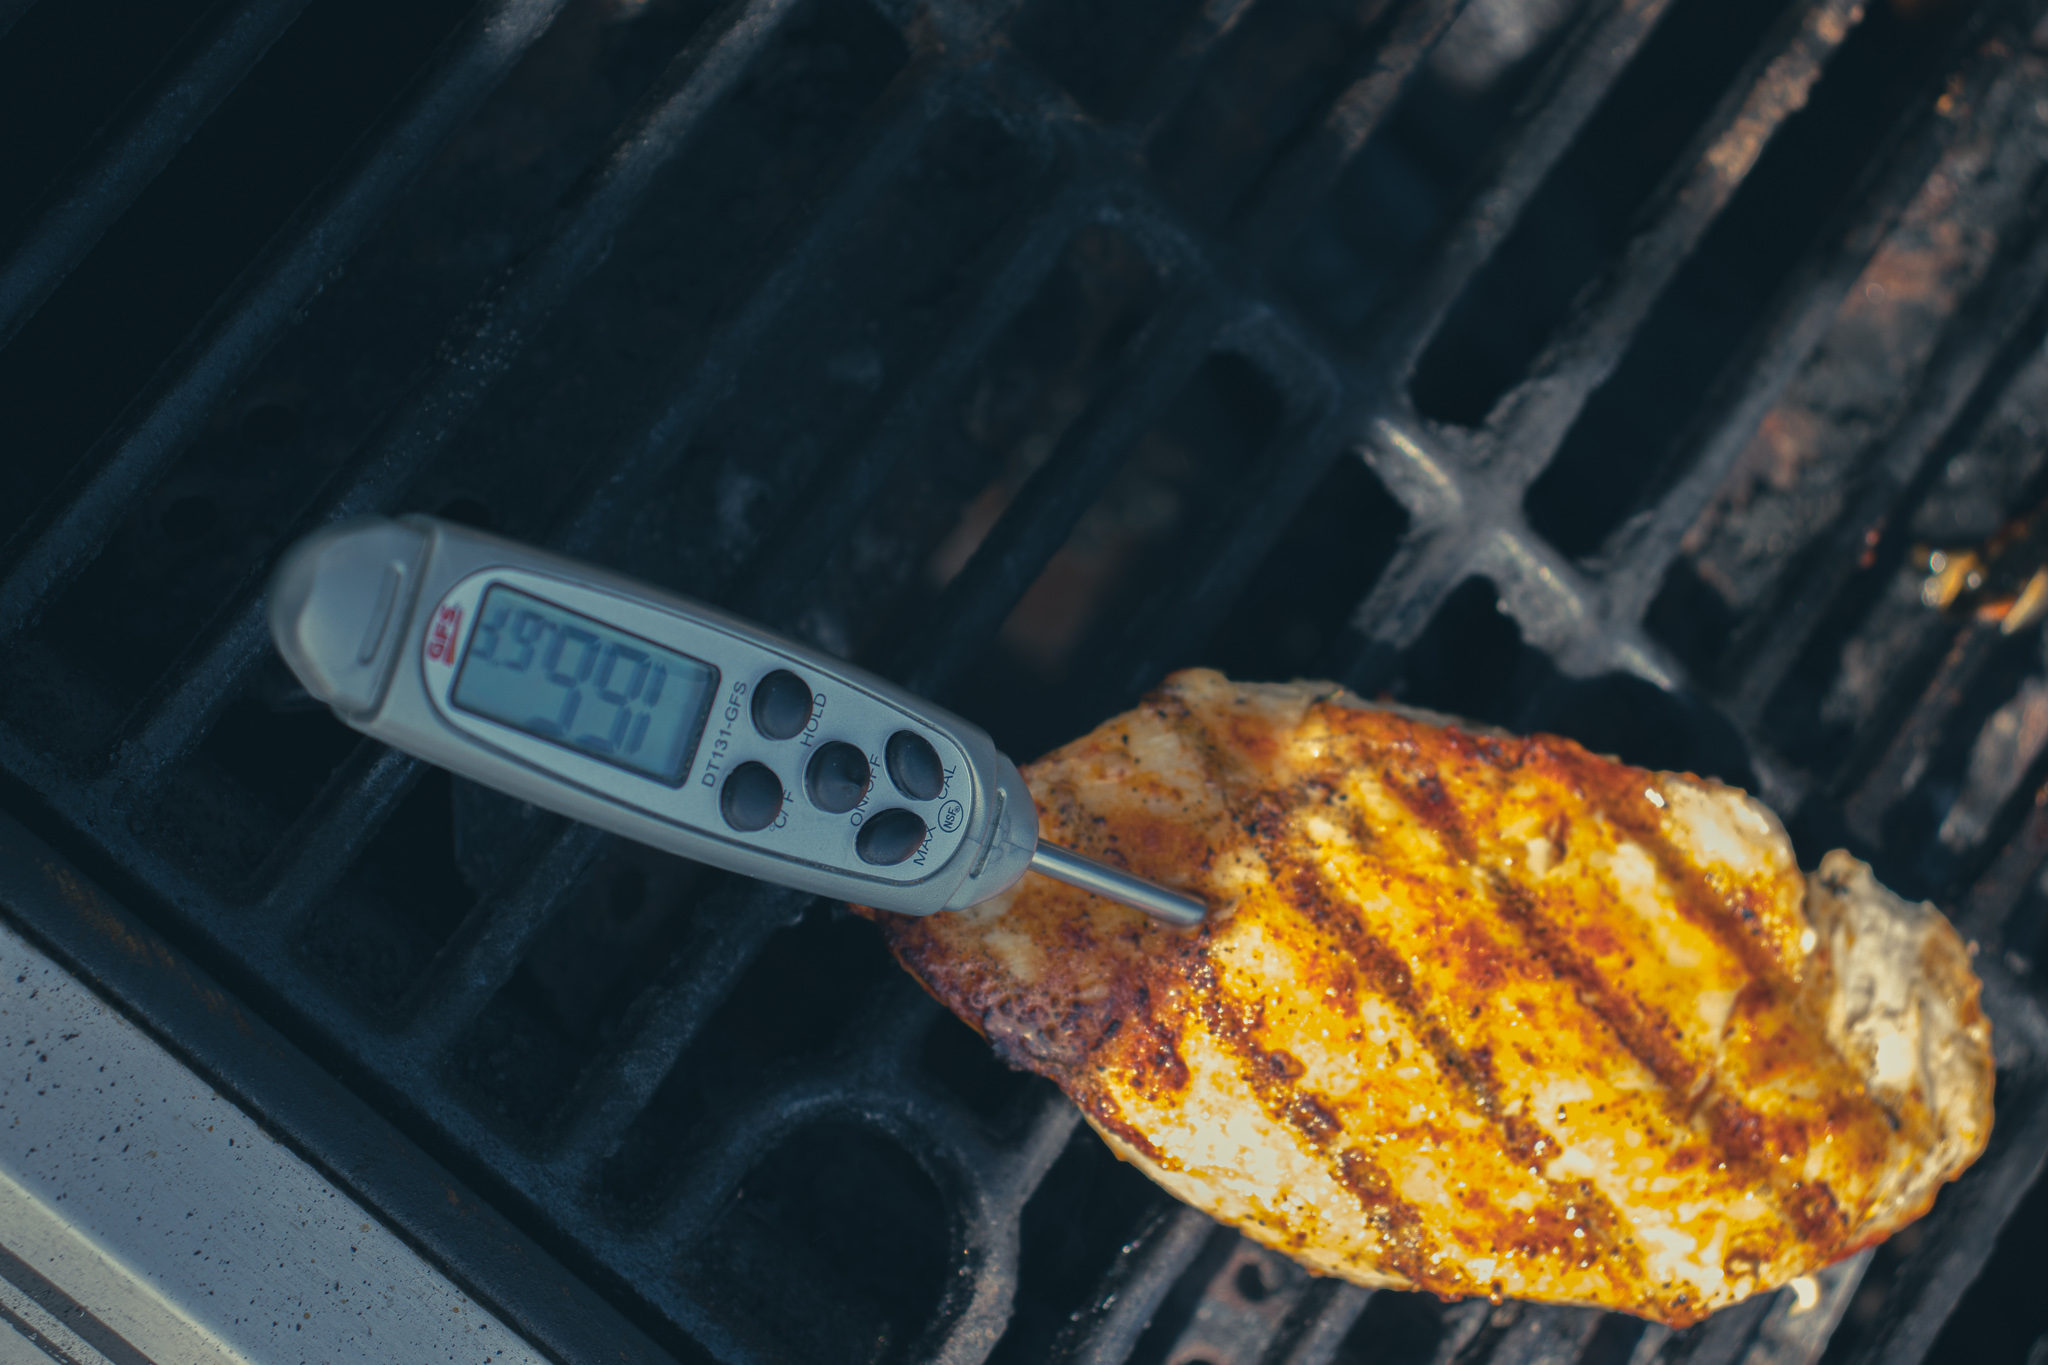
How to tell when the chicken is cooked?
There is only really one foolproof way to ensure that your chicken breast has reached a safe temperature but isn’t overcooked. That is to use an instant-read probe thermometer. These cost between $10 and $30 and are worth every penny. You can find them on amazon, at most grocery stores, and all kitchen supply stores. If you’re the type of person that cuts into your chicken breast to see if it is cooked, stop. Two things. Colour is not a reliable indicator of whether or not chicken has reached a safe temperature (165°f for breast 170°f for thighs and whole birds). Secondly, when you cut into a piece of meat straight after cooking or while cooking, all the juice runs out, leaving it dry and flavourless. So, stop cutting into your chicken to see if it’s cooked. Spen the $20 and get a thermometer.
How Long Should I Cook The Chicken Breast Per Side?
A minute ago, I said to cook your breast for 5 to 6 minutes, then flip and cook for another 4 to 5 minutes. This is a good rough guide, but many factors determine how long it will take to grill your chicken breasts. Things like how thick your chicken is, the temperature of the chicken when it goes on the grill. How far away from the flames your grill is, how much air circulation does your barbecue have, what the temperature outside is and if it is windy or not? So, don’t try to tell the chicken breast when it is ready to flip or when it’s cooked. Let it tell you.
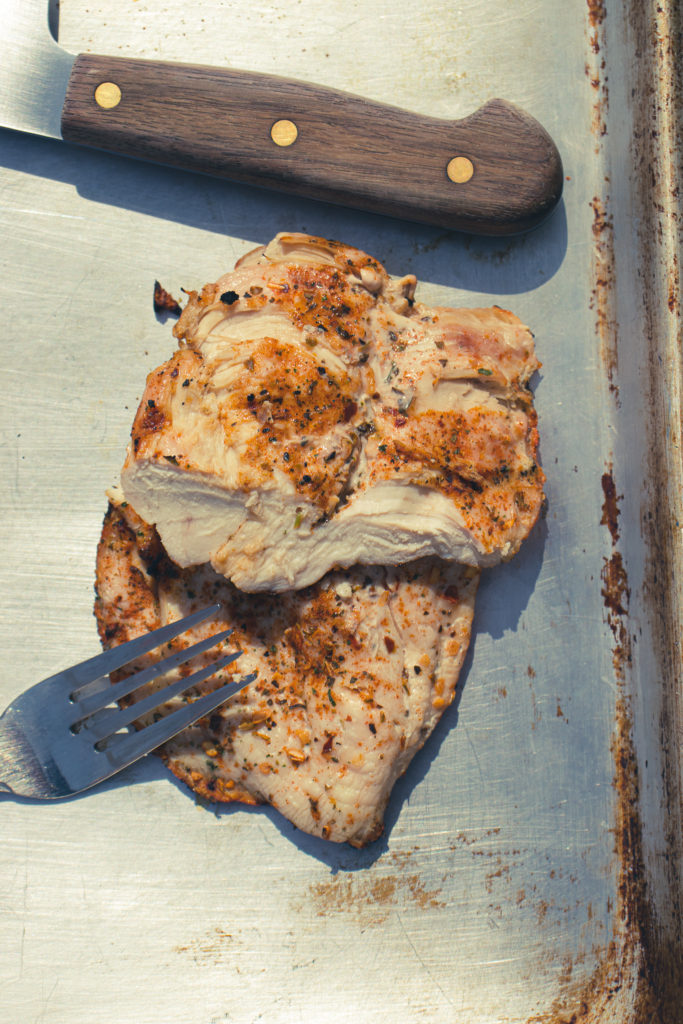
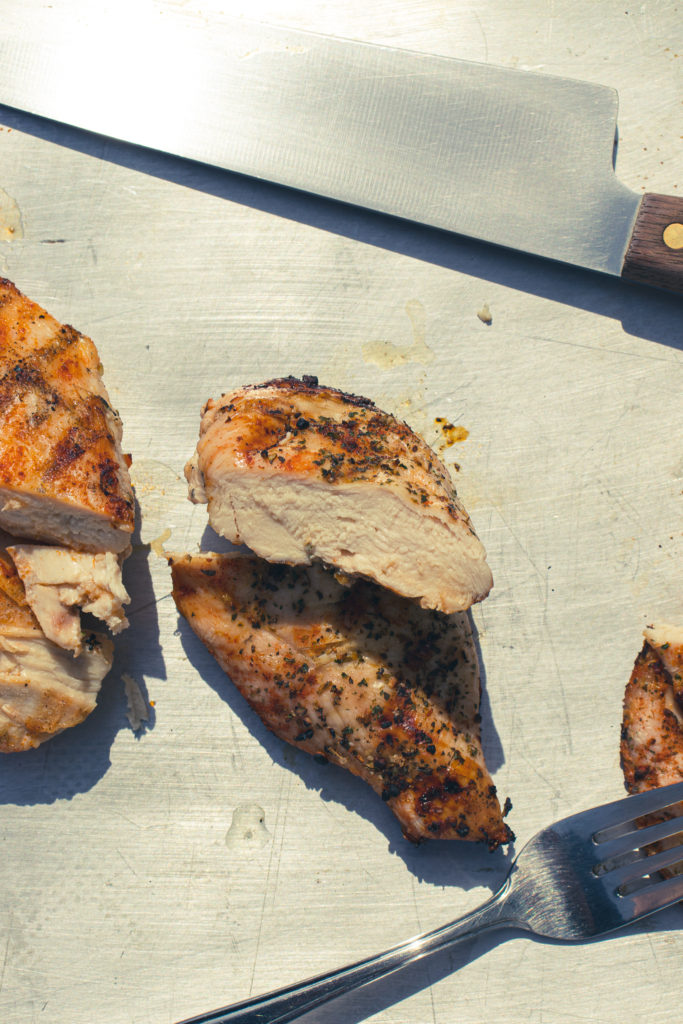
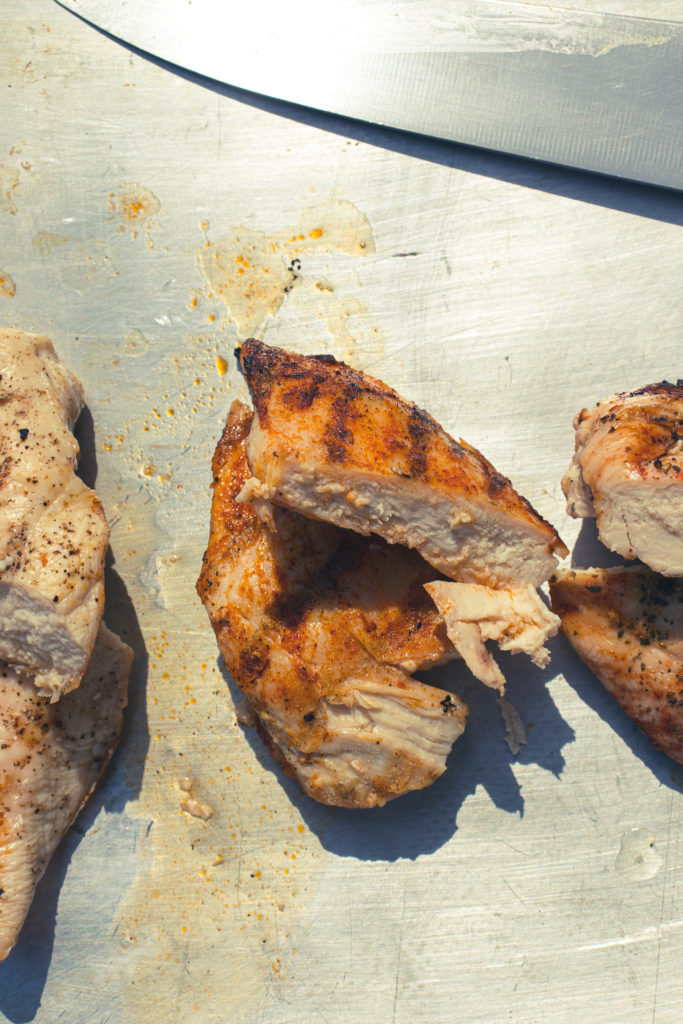
To keep it juicy let it rest.
The final step in ensuring your chicken is juicy and tender is to let it rest for at least 5 minutes before cutting it or serving it. We all know that we have to let steaks rest, but most people don’t think about resting chicken or pork. All meat needs to rest after cooking to allow the internal juices time to redistribute throughout the meat after being superheated. I know it can be hard to wait—your hungry. You’ve been working hard for this meal, but don’t ruin it by rushing. Take 5 minutes, set the table, pour yourself a drink, give your partner a few shoulder squeezes. Whatever it takes, don’t touch that chicken for 5 minutes.
Grilled Chicken Breast
The finished chicken should have grill marks but not be burnt. When you cut into it (after waiting 5 minutes), you should be able to see how juicy it is. If you cut a piece and squeeze it, juice should run out, and it should feel tender. Congratulations! You just grilled the perfect chicken breast, and you didn’t even oil it. Oh, and I should mention, the breast I did oil, cooked just as well as the others and came off the grill just as well. There really wasn’t a difference. So, why add the oil at all?
The Wrap Up
Okay, I know that this was a lot of information. This post is quite a bit longer than I intended it to be, but I think it is important to understand the why just as much as the how. If you enjoyed this post, please share it on Facebook, Pinterest, or Twitter. Also, remember to subscribe to Chef’s Notes below, so you never miss a post. And, if you want to help support the site, hit the donate button at the bottom of the page.
Thank you everyone, have a great week! I’ll see you right back here next Wednesday.
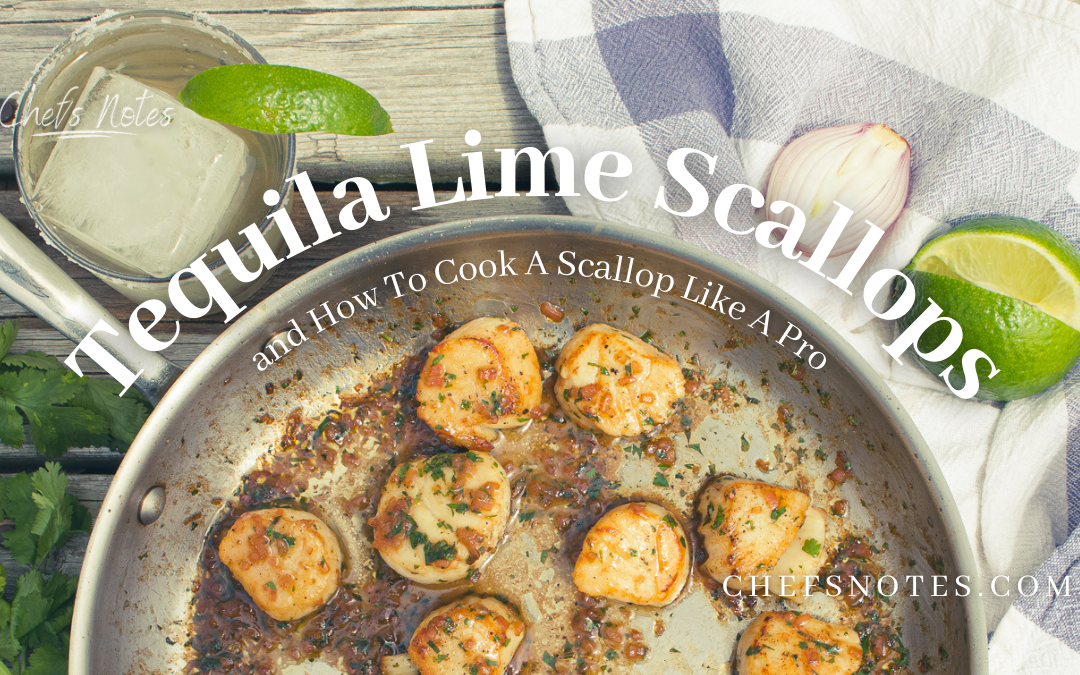
Well-cooked scallops are like little tender morsels of ocean candy. But, poorly cooked scallops are like bland little rubber bullets. Unfortunately, the line between a well-prepared and a poorly prepared scallop is pretty thin. Today you’ll learn how to make one of my favourite scallops dishes; Tequila Lime Scallops. But, more importantly, you’ll learn how to prepare and cook scallops like a chef so that you can have tender morsels of ocean candy whenever you want. Let’s get to it.
How To Buy Scallops
The best way to ensure that you end up with great scallops is to start with great scallops. Buy fresh whenever you can. If you are buying fresh, make sure they are actually fresh. The scallops at the seafood counter in your local grocery store probably aren’t fresh even though they aren’t frozen. They are likely previously frozen. Ask if the scallops have been frozen or not before you pay a premium for “fresh scallops.”
There are two big differences between fresh and frozen scallops. First of all, fresh scallops are more tender and have a better texture. Frozen scallops tend to be slightly chewier. Frozen scallops also release a lot more liquid than fresh scallops when cooked. This makes it more difficult to get a nice sear on the scallops, and that sear is important for flavour development. If you aren’t sure if your scallops are fresh or previously frozen, cook one up, put it on a plate, and wait two minutes. With a fresh scallop, there will be little to no liquid on the plate after 2 minutes. If the scallops are previously frozen, there will be a white milky liquid on the plate after two minutes.
Size matters.
Usually, when you buy scallops, they come as either tiny bay scallops or sea scallops, which are large. However, a rating scale for scallops (and shrimp) is measured by a “U” followed by a number. For example, U10 or U20-30. The “U” stands for “under a pound,” and the number is how many scallops there should in a pound. So, the lower the number that follows the “U,” the bigger the scallops. If you buy U10 scallops, you can expect there to be 10 or less in a pound. Those are good-sized scallops. More often than not, the scallops you buy at the store are U20 to 30, so there are 20 to 30 scallops in a pound. These are a good medium-sized scallop. But, if you want large ones, ask for the U10s, especially if you are talking to a specialty seafood purveyor. To learn more about sizing and other scallop cooking tips, check out this post I did back in 2019.
It’s okay to buy frozen.
If all you can get are frozen scallops, it’s okay. They can still be delicious. You’ll have to be a little more diligent with them. For starters, you must give the scallops enough time to defrost properly. This means that you will have to transfer them from the freezer to the fridge at least 24 to 48 hours before you want to cook them. Never put them in the microwave to defrost them and never submerge them in water. The microwave will make them rubbery. Submerging them in water will cause them to absorb loads of extra water.
Defrosting Scallops
When defrosting scallops, remove them from their original package and place them on a plate or a sheet pan lined with a paper towel or a kitchen towel. Make sure the scallops have a little space between each one. This space will help them defrost. It’s best not to cover the scallops when they go in the fridge, but if you do need to cover them, do it with a paper towel or kitchen towel rather than a plastic wrap. The towels would be changed in an ideal world after about 12 hours, but you don’t have to do this. Changing the towel will help dry the scallops.
If you need frozen scallops in a hurry.
If for some reason, you need scallops in a hurry and they are frozen, you can quickly defrost them in cold running water. “But wait, you said not to submerge them in water.” Yes, I did say that, and I meant it. If you quickly defrost scallops under cold running water, the scallops must be in a sealed bag. Either the bag they came in or a zip-top bag. Put the bag of frozen scallops in a deep container, put the container in your sink (make sure the sink isn’t plugged) and run cold water over the bag in a slow, steady stream. Defrosting the scallops this way will take about an hour, give or take. It is important to keep the water running to maintain a safe temperature and so that the water doesn’t get too cold.
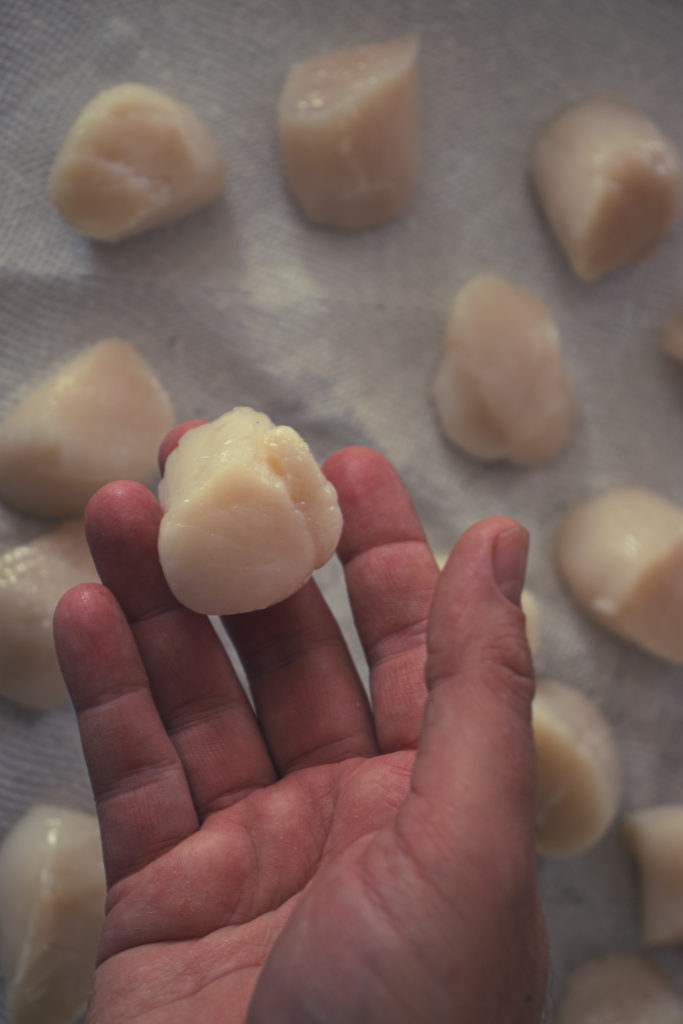
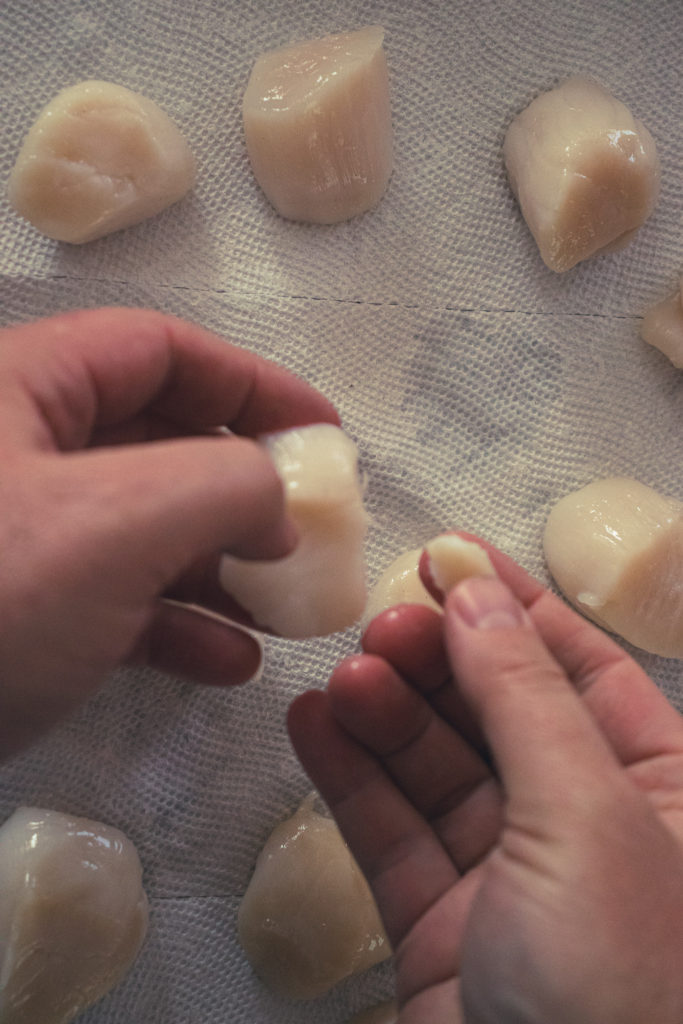
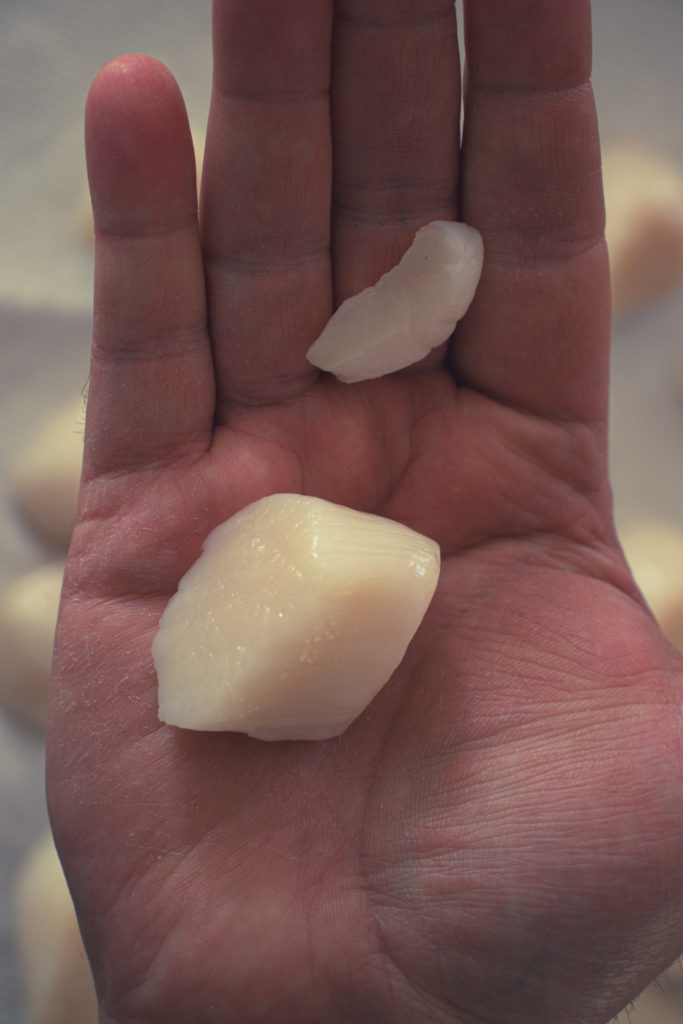
How To Prepare Scallops For Cooking
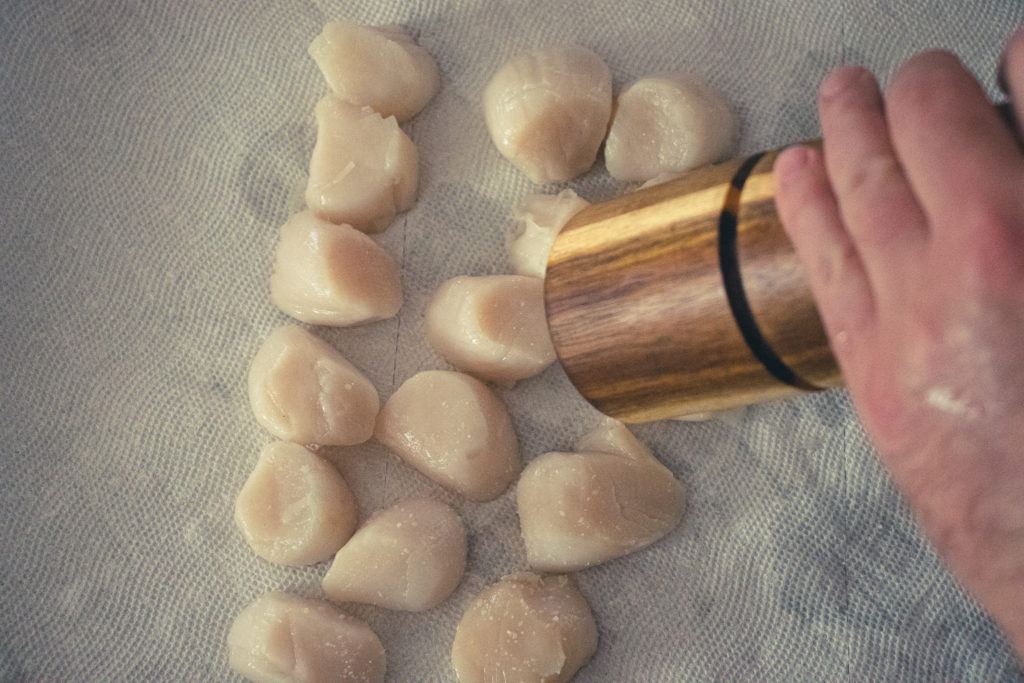
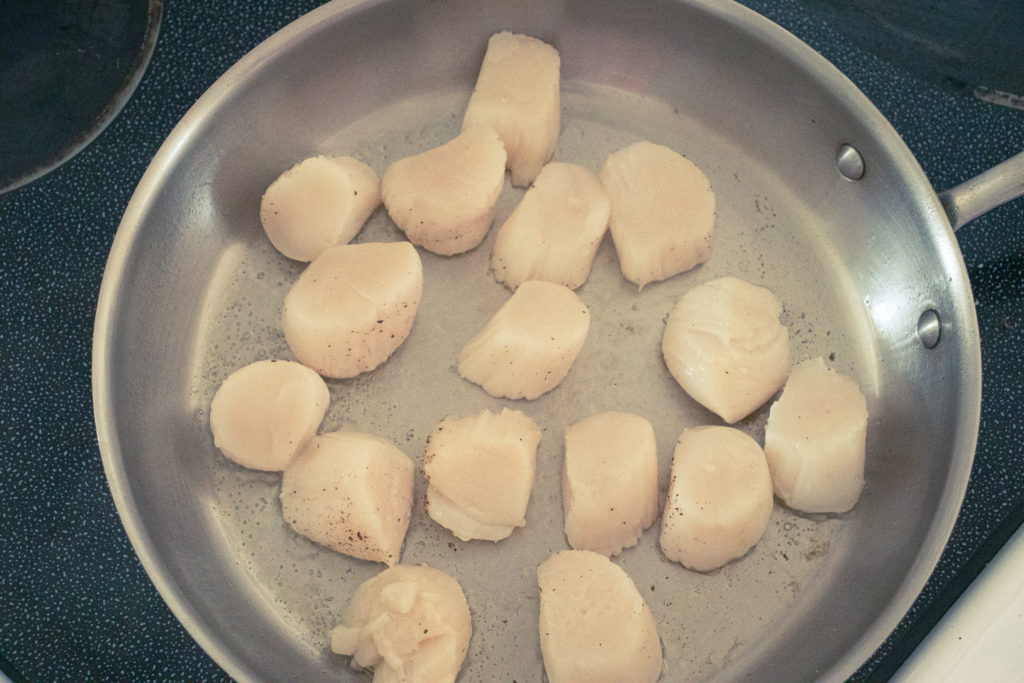
Whether you use fresh or defrosted scallops, they will be prepared for cooking the same way. First of all, remove the foot (it isn’t actually a foot, but that’s what people call it). The foot is the little piece of white meat that hangs off the side of the scallops. It is edible, but it gets very chewy when cooked, so it’s always best to remove it. Once that’s done, pat the scallops dry on both sides with a clean kitchen towel or paper towel. Again, the surface of the scallops must be as dry as possible to get that perfect sear.
How To Cook Scallops
Choosing the right pan for cooking scallops
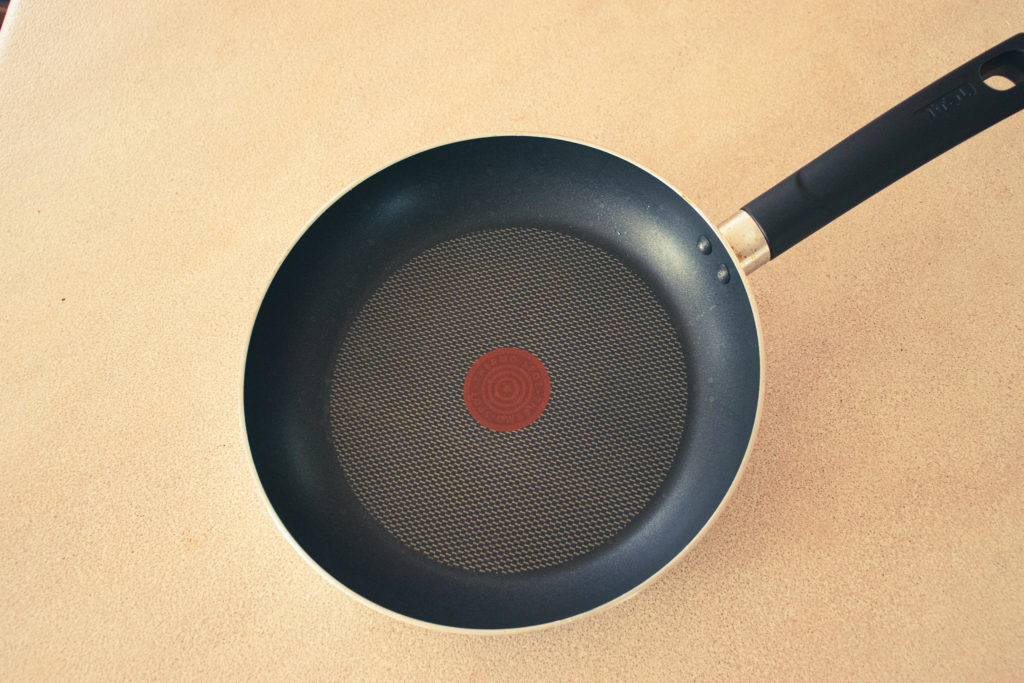
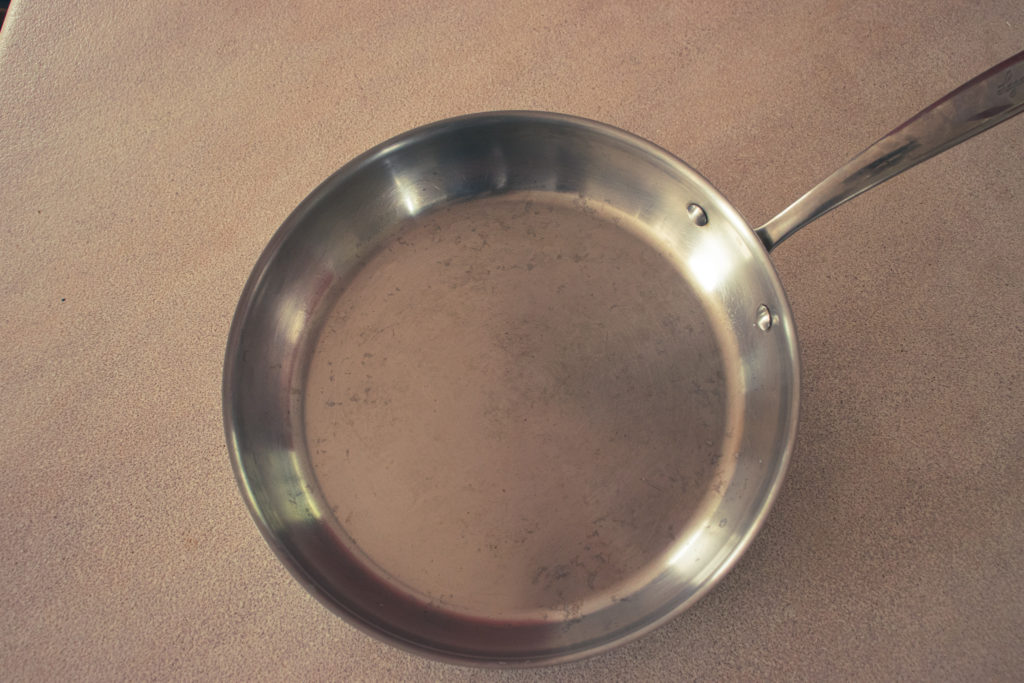
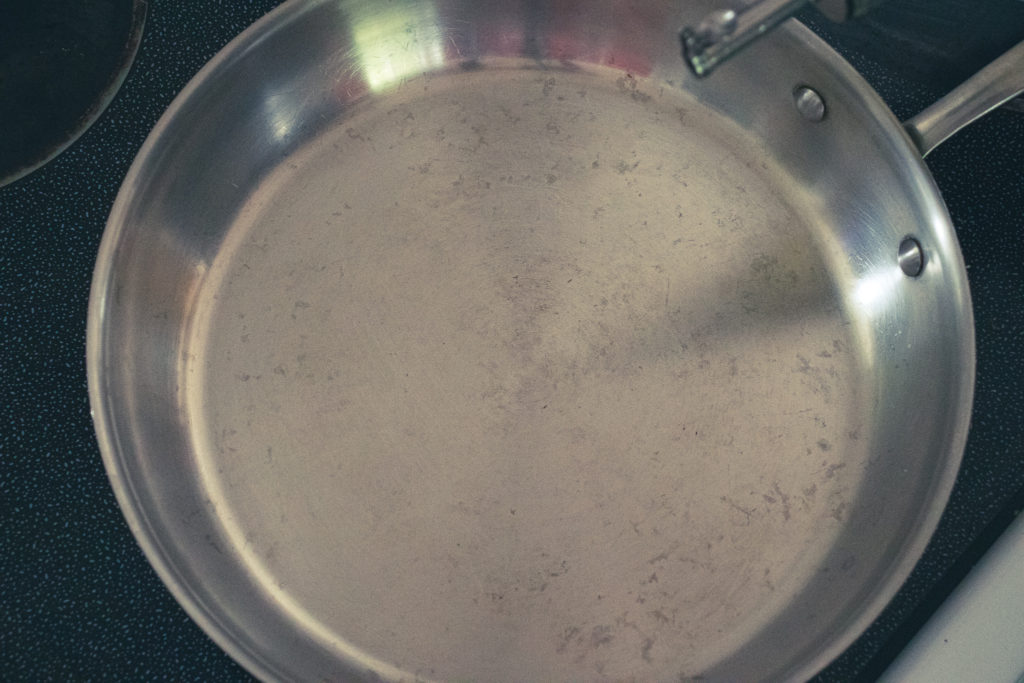
Scallops are very quick and easy to cook once you know how. The key is to get your pan very, very hot. I know that a lot of people don’t like to cook on high heat. I get it. But, with scallops, if you want that nice sear and rich flavour, high heat is vital. The pan you use should be either a heavy-duty non-stick pan, a very heavy-duty stainless steel pan, or a cast-iron skillet. My preference is cast iron becasue you can get it really hot. But, becasue of the sauce we’re making for the scallop recipe today, a non-stick or stainless pan is best. Again get the pan very hot. If your burner goes to 10, turn it on to 8 or 9 and leave it alone for 2 to 3 minutes.
Cooking the scallops
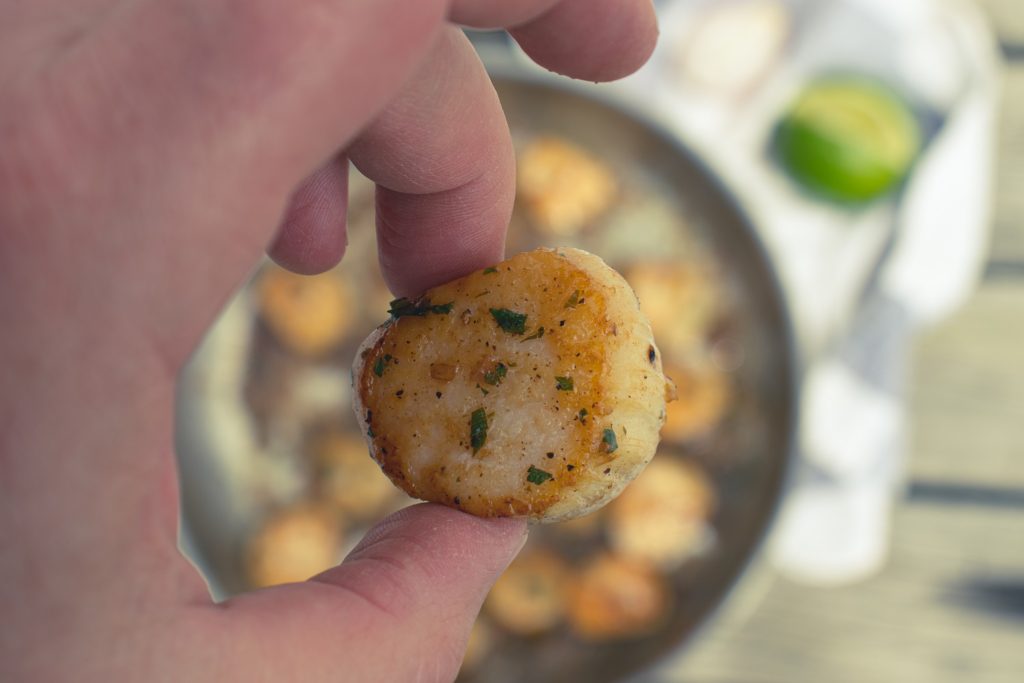
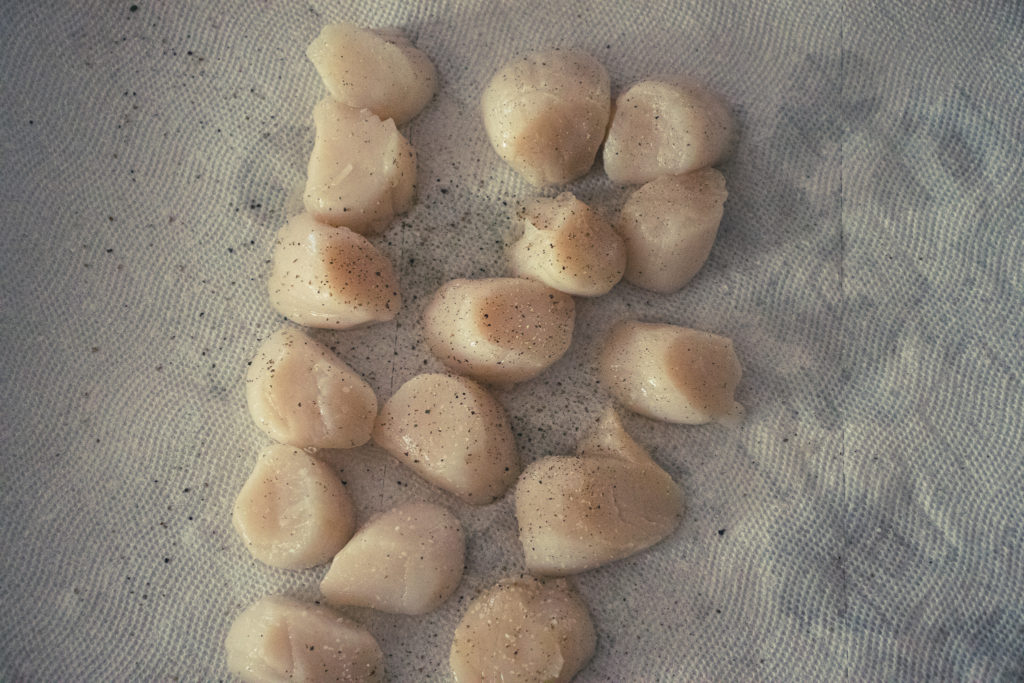
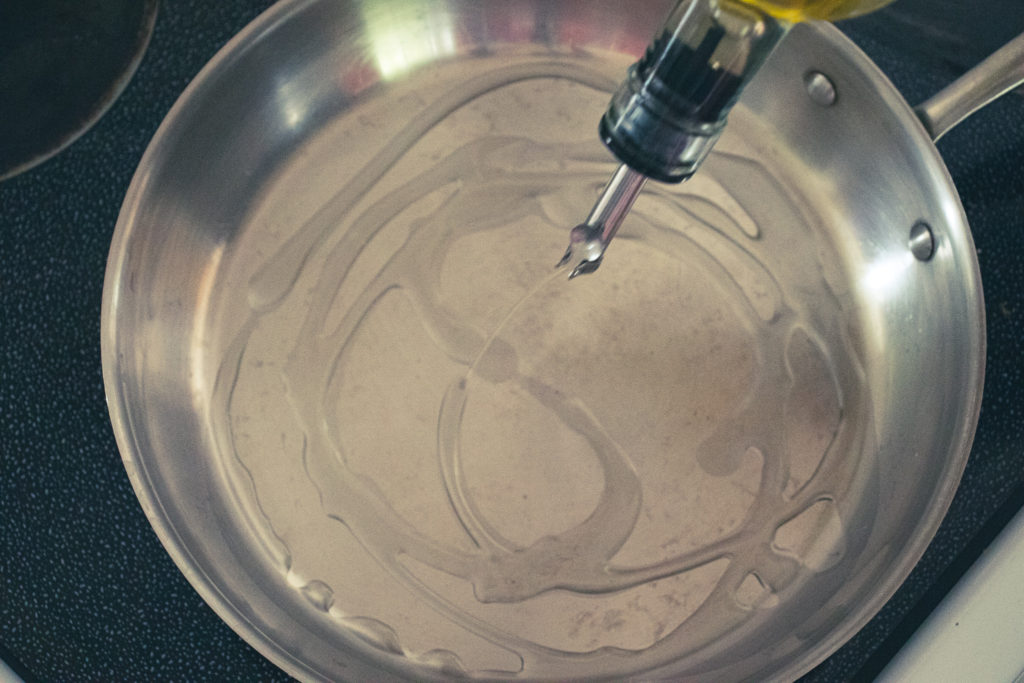
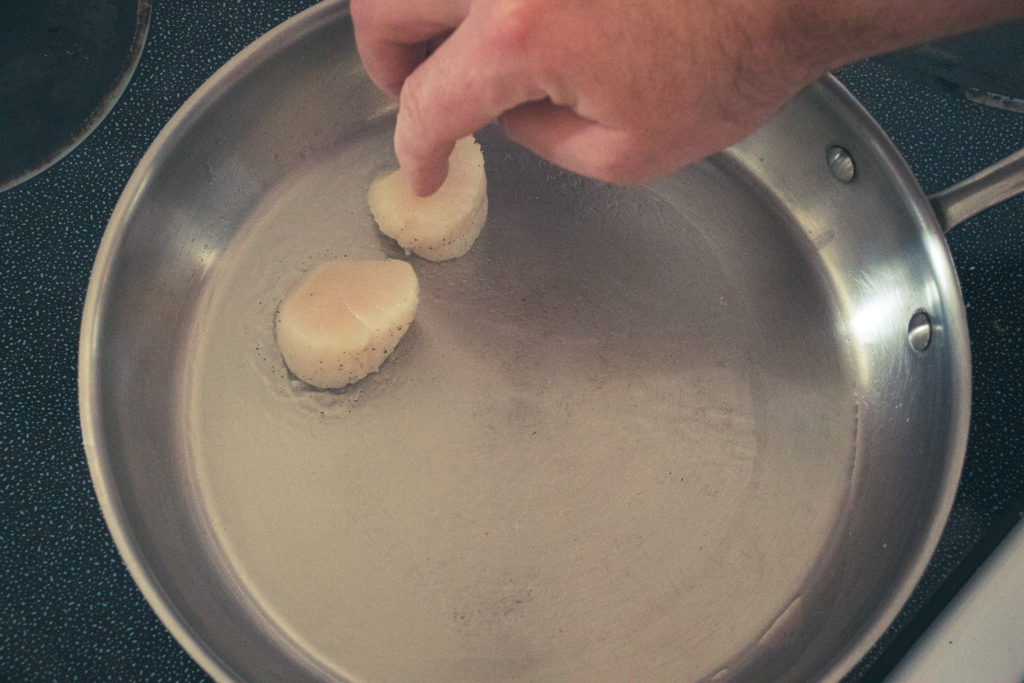
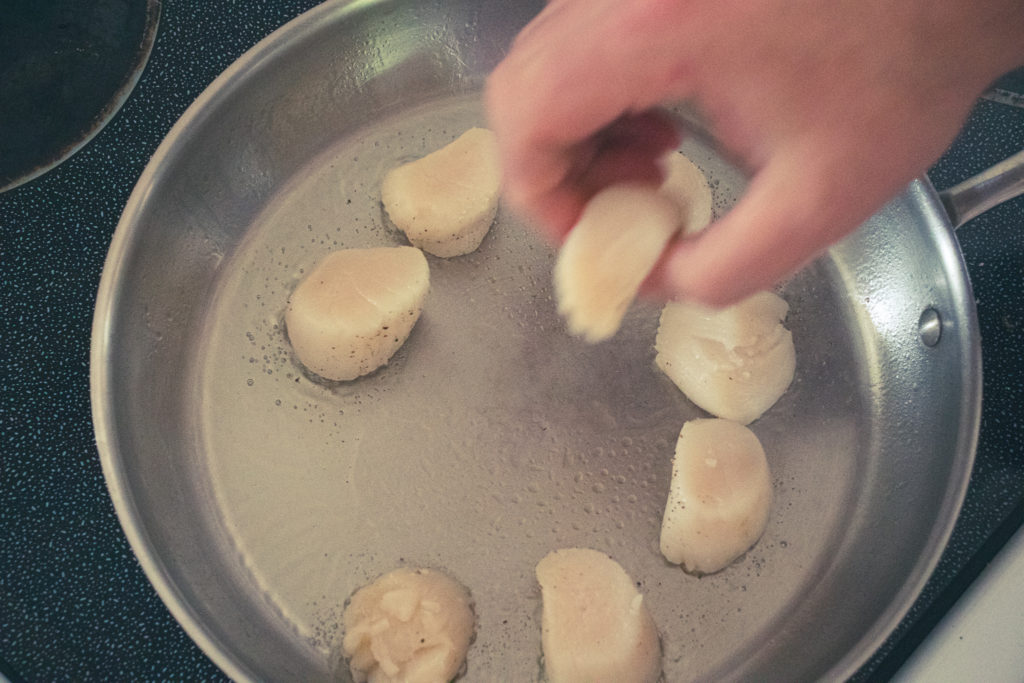
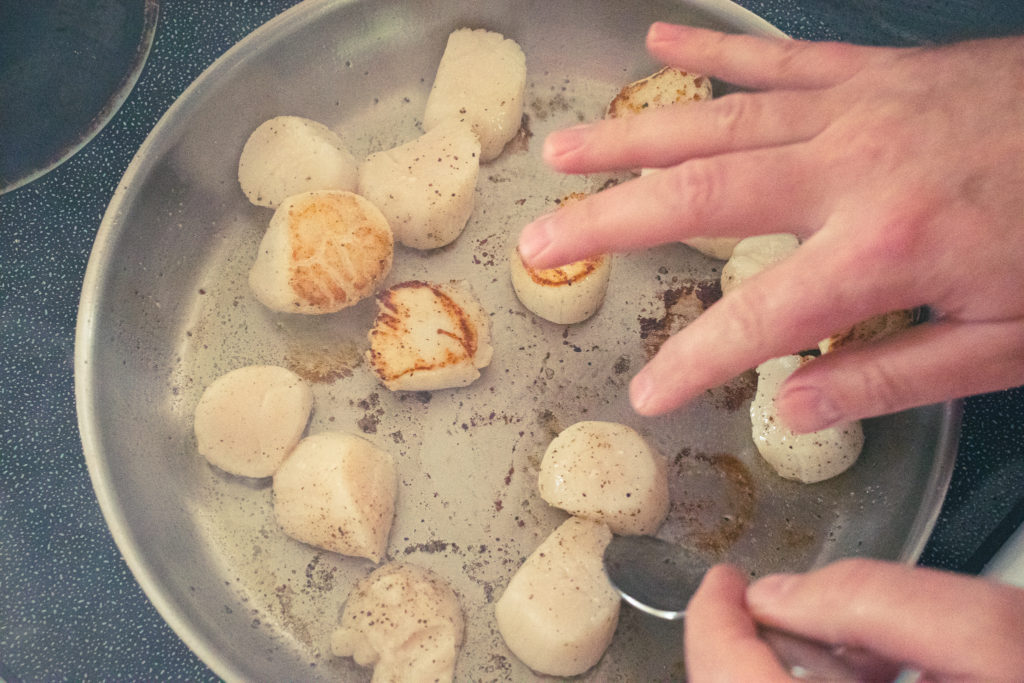
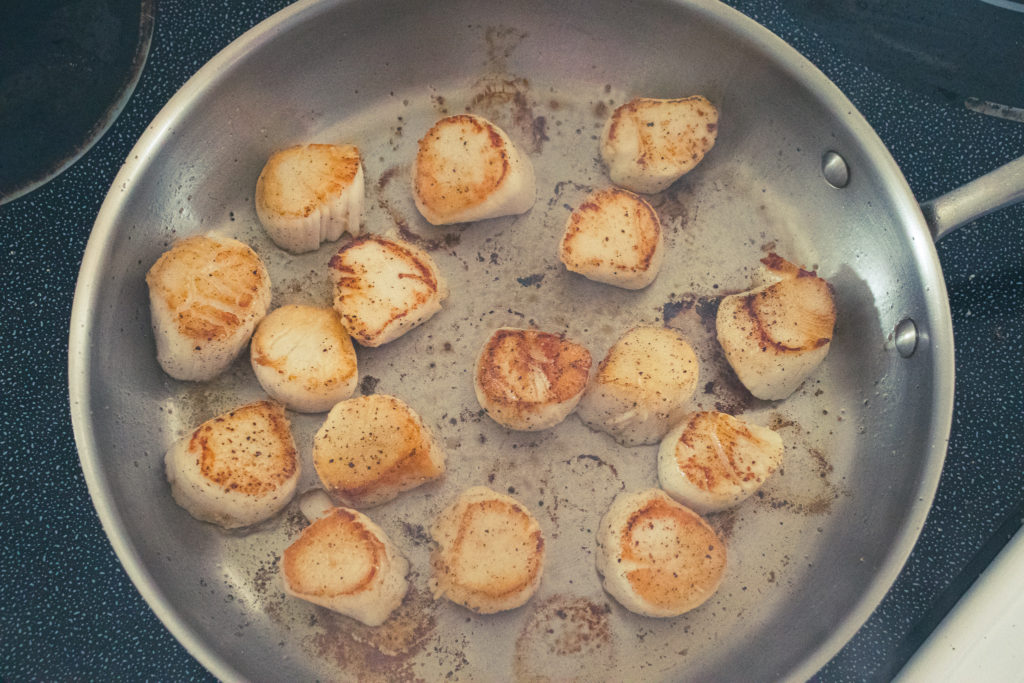
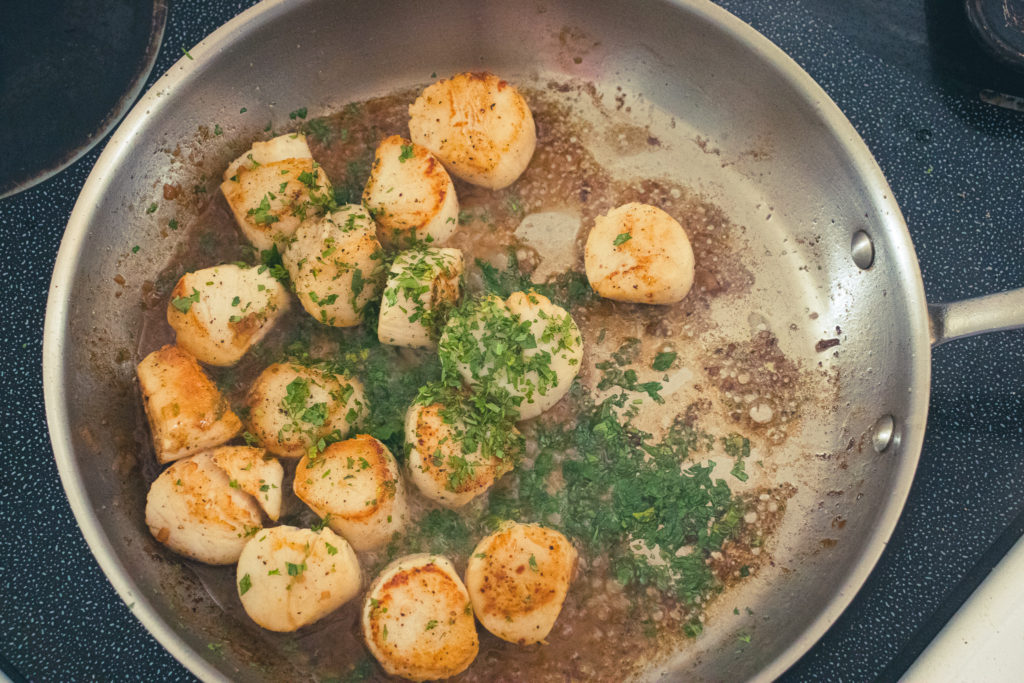
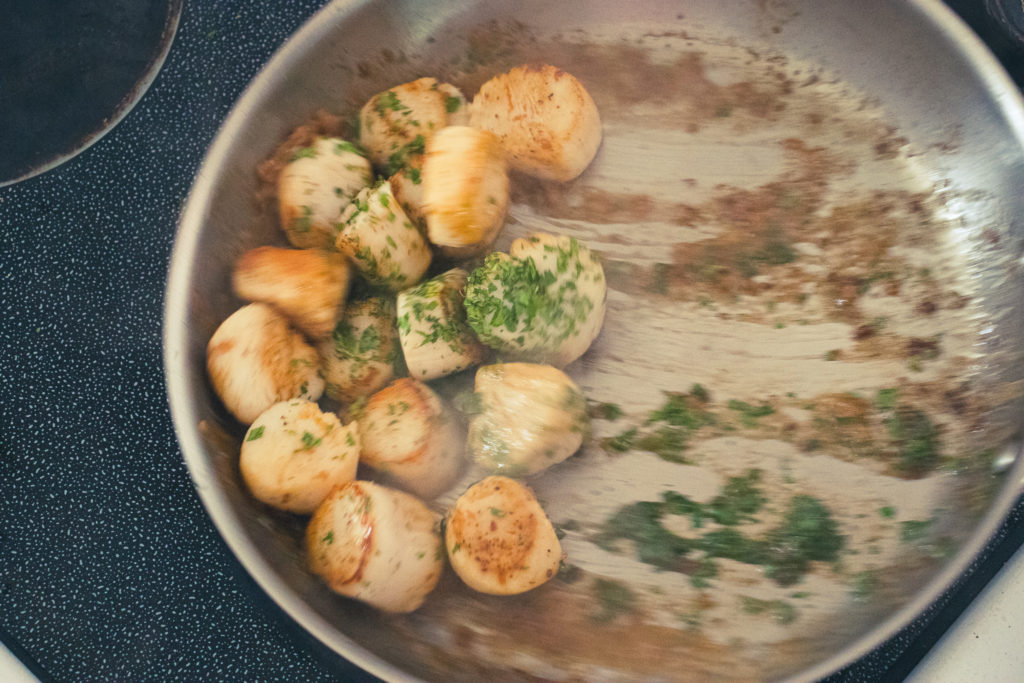
Once your pan is very hot, add just enough oil to cover the pan’s surface. Don’t use olive oil for this because it will burn and smoke. Instead, use an oil with a high smoke point like canola, peanut, or grapeseed oil. Season the scallops lightly with salt and pepper, then gently place them in the pan one at a time, leaving space between each scallop. When placing the scallops in the pan, start by placing them around the outside edge of the pan, then work your way in. Once you get the last scallop in the pan, go back and check the first one to see how well its colour is developing. Once the first scallop develops a deep caramel brown colour (about 90 seconds of cooking), flip it. Next, go around the pan and flip each scallop in the order they entered the pan and as they colour. Once the last scallop is flipped, go back and recheck the first one. Once the bottom is browned, take it out of the pan and place it on a plate lined with a paper towel. Repeat until all the scallops are brown on both sides and are out of the pan.
Don’t crowd the pan!
Wheater using fresh or frozen scallops, you can’t crowd your pan. You need to leave about 20% of the surface of the pan uncovered. This helps the pan maintain its heat. If the pan’s temperature drops too much from overcrowding or becasue it wasn’t hot enough to start with, the liquid will escape the scallops, pool in the bottom of the pan, and boil your scallops instead of searing them. Though this will happen with fresh scallops, it will be much more extreme with previously frozen ones.
Tequila Lime Sauce
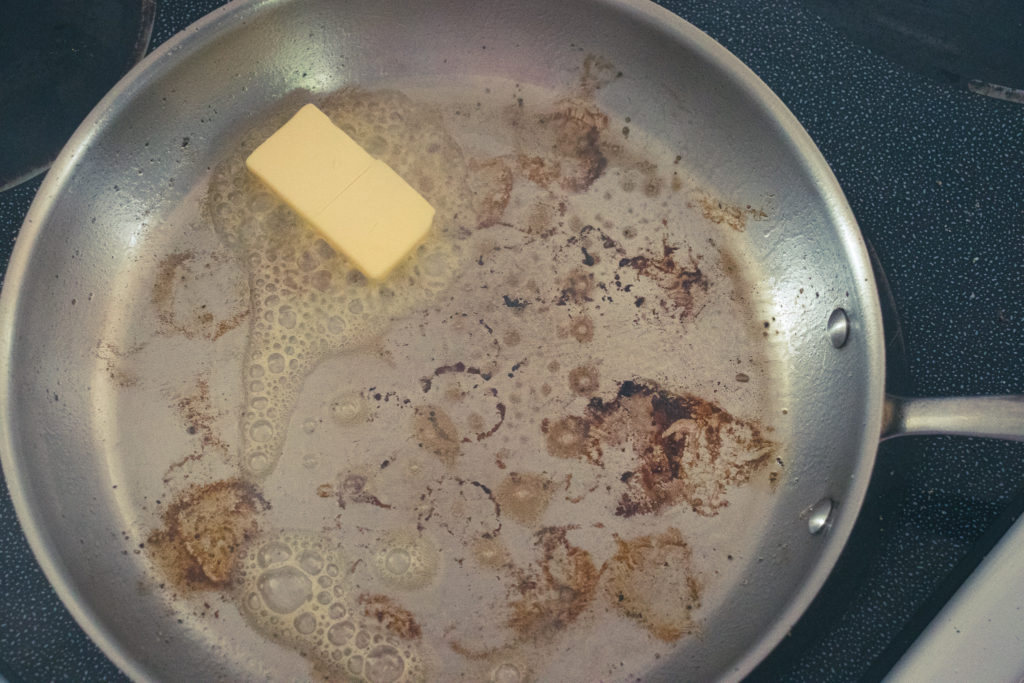
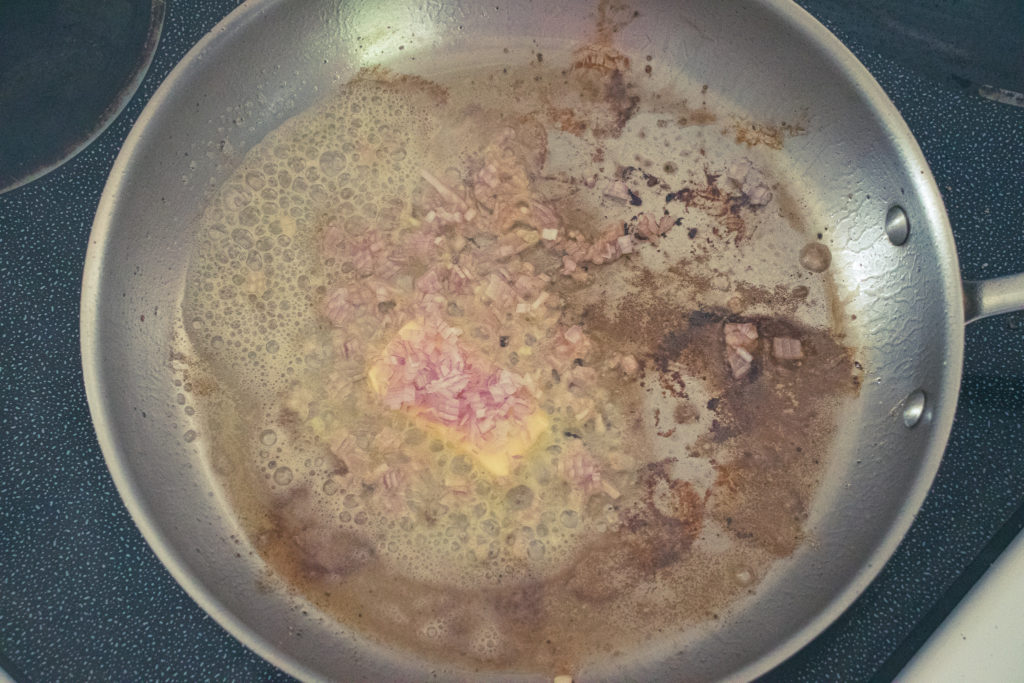
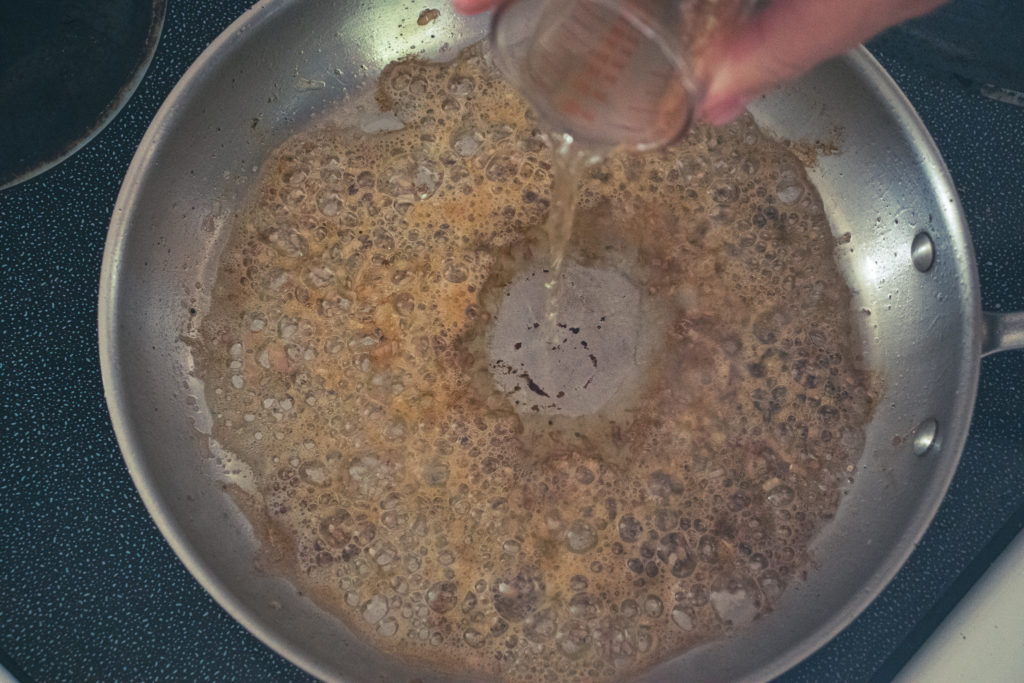
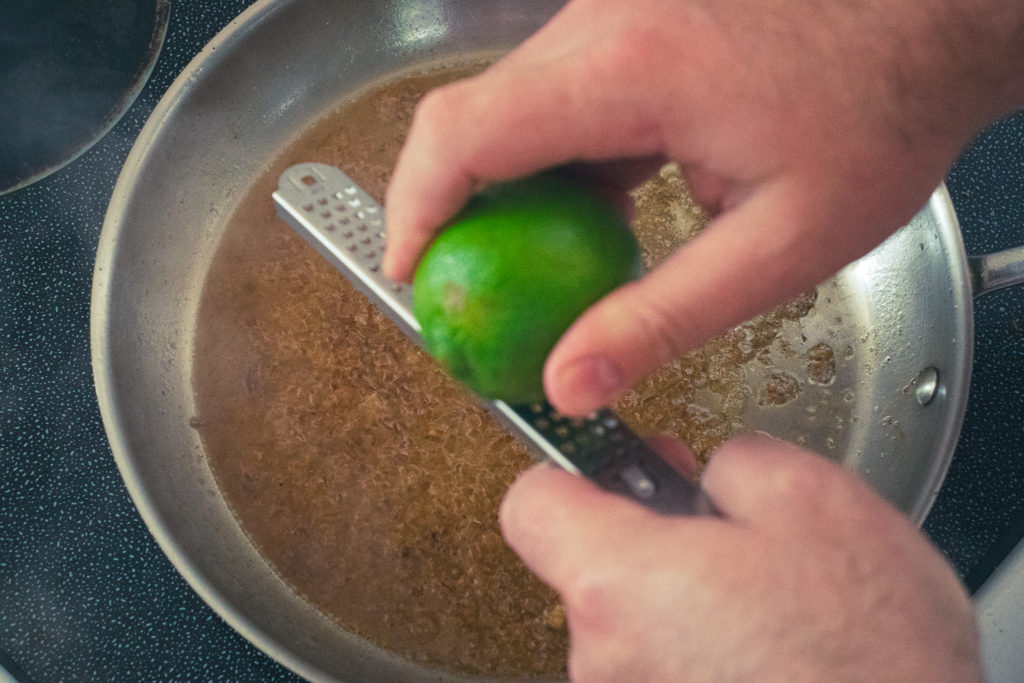
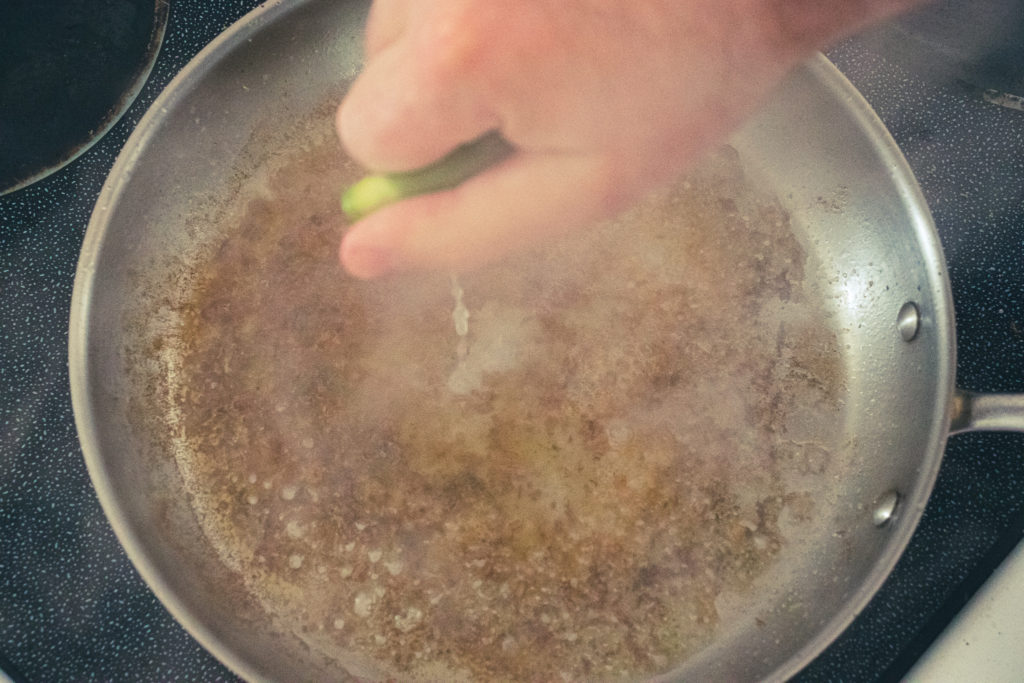
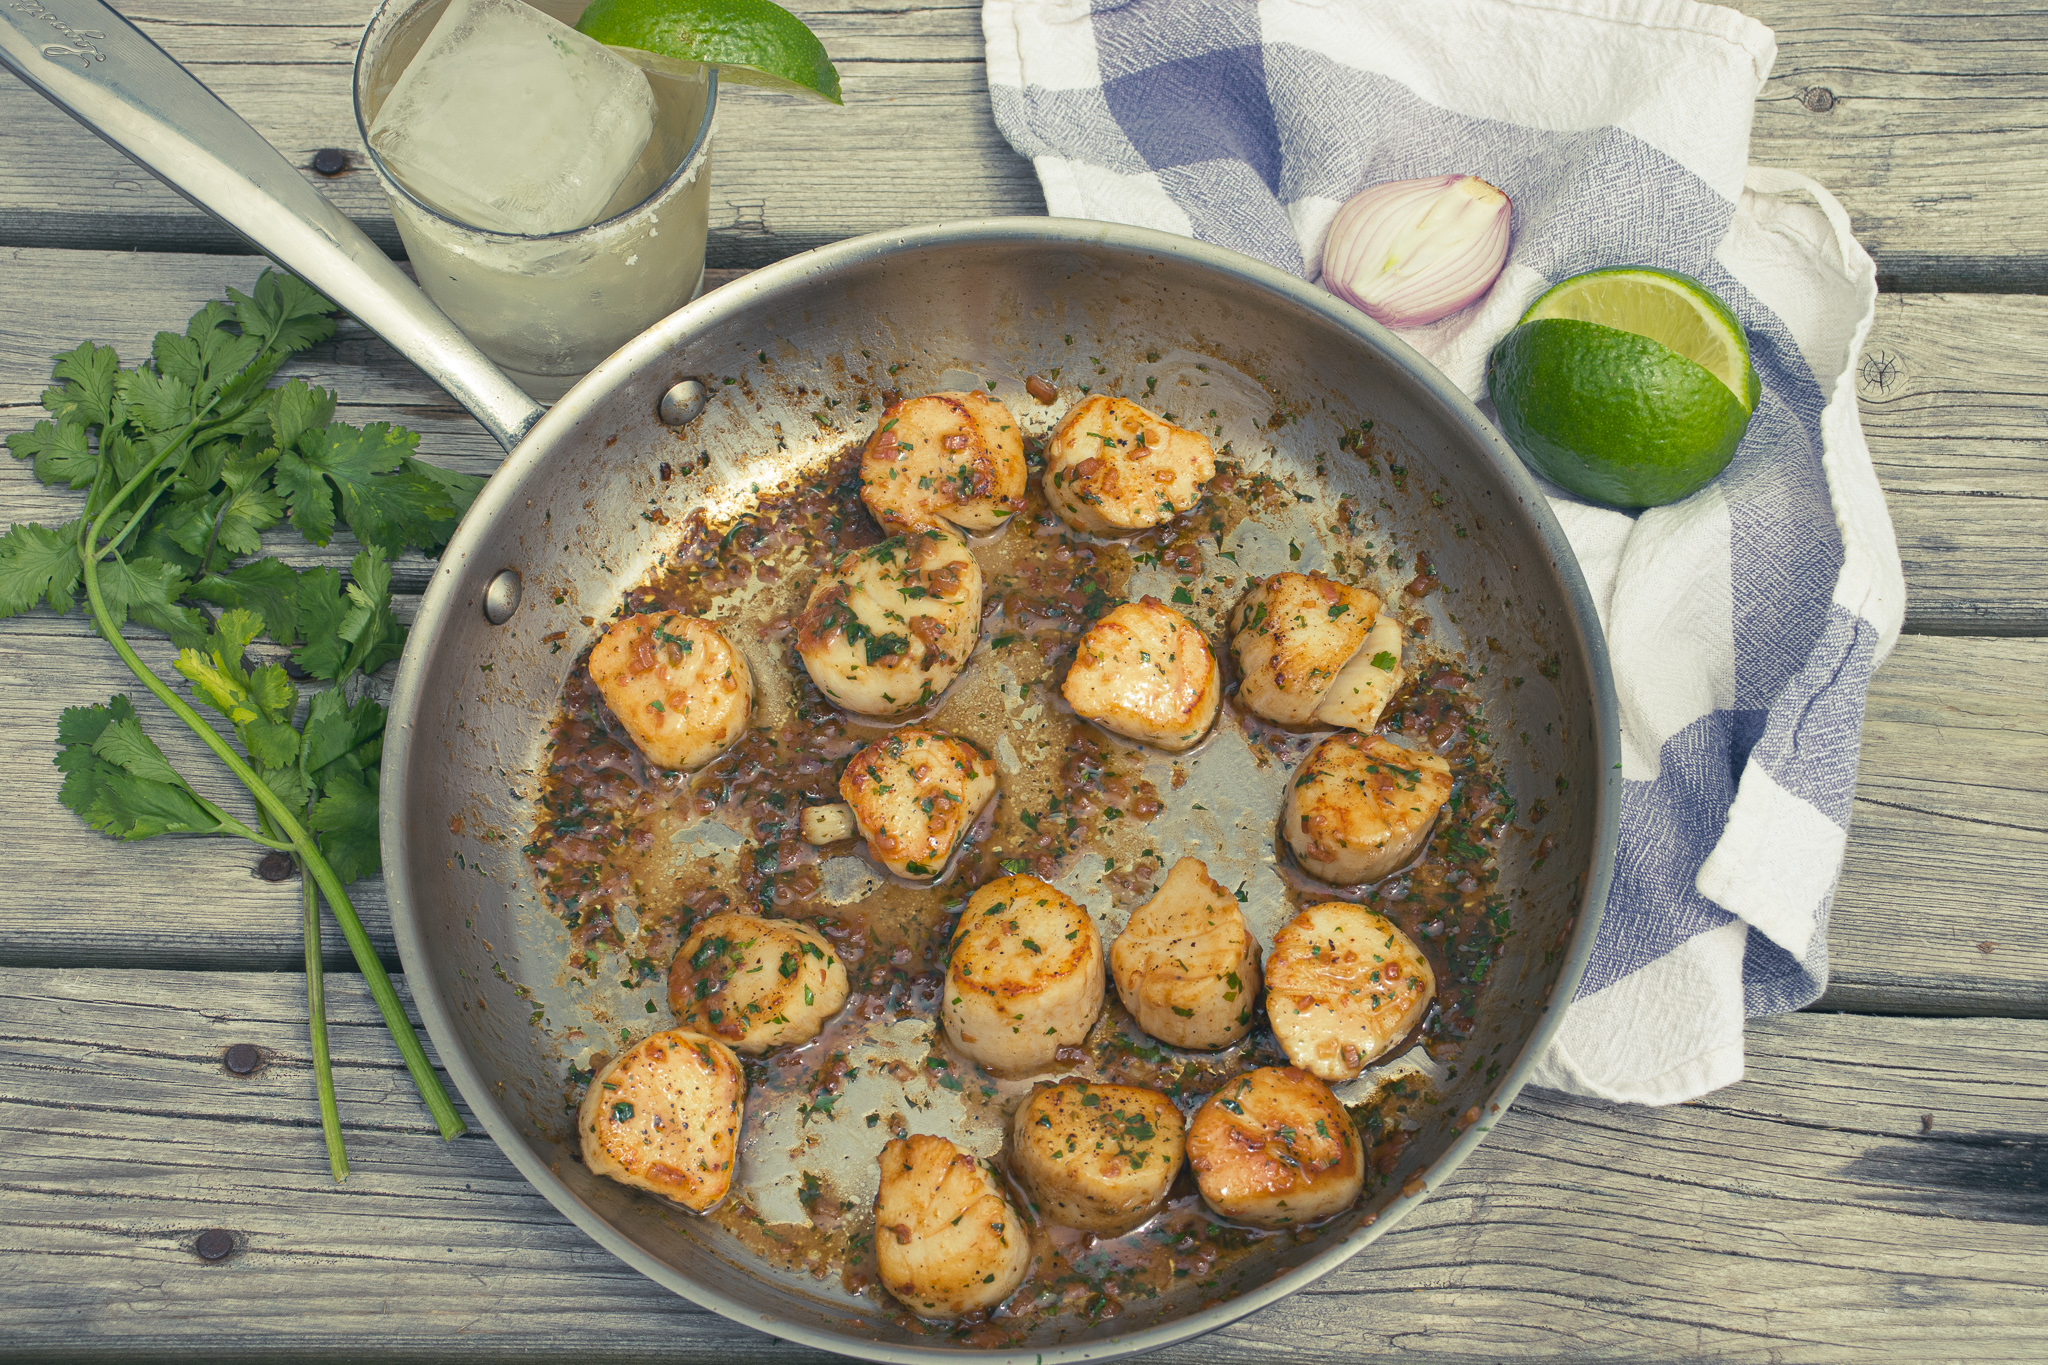
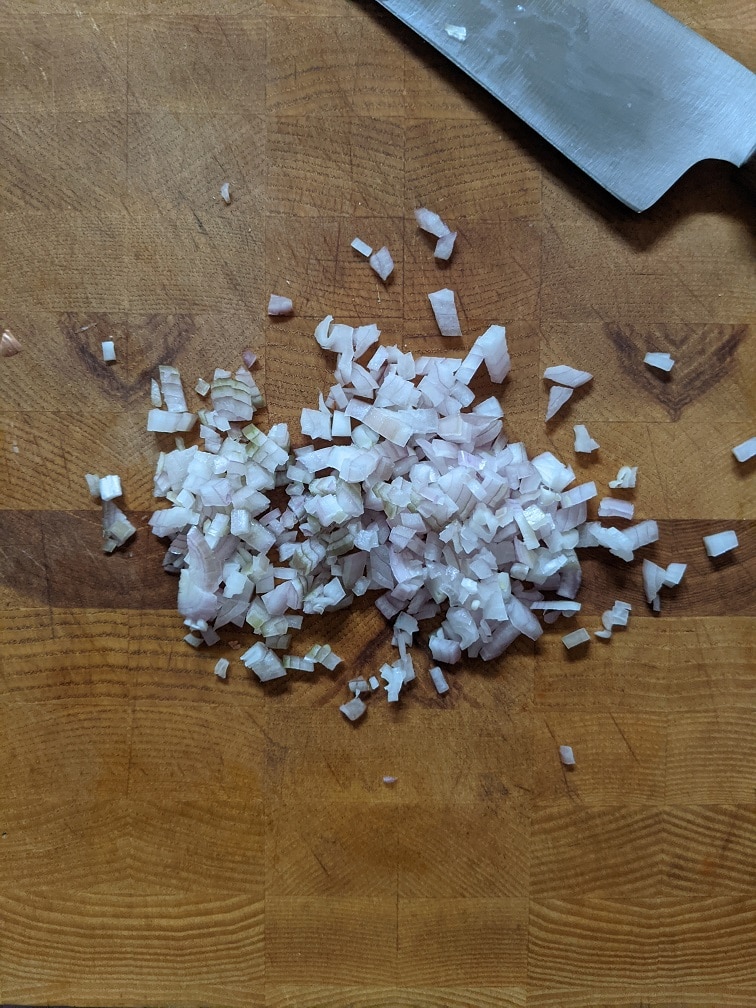
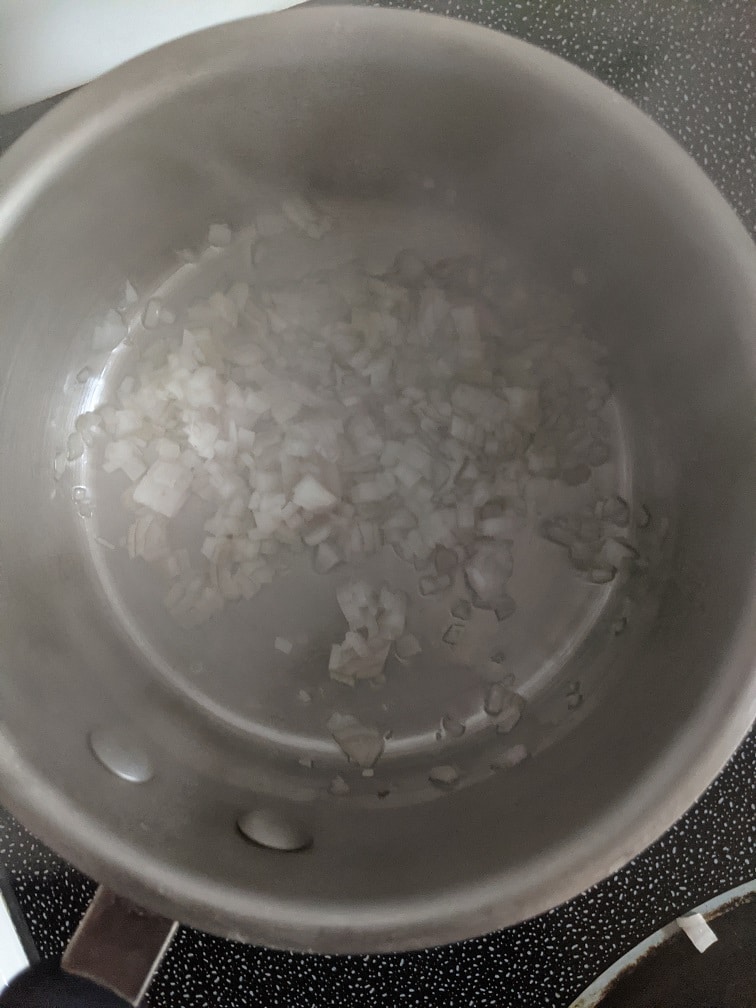
At this point, you’ve perfectly cooked some scallops. You can enjoy them as they are, or you can take them one step further and make this delicious Tequila Lime Sauce. To make the sauce, remove the scallops from the pan and take the pan off the heat to let it cool down slightly. Add 2 tablespoons of butter to the pan, wait for it to melt, then add 2 tablespoons of minced shallot or onion. Put the pan back on the heat and cook for about 2 minutes before adding 2 ounces of good quality tequila (the one I used). Cook the tequila for about a minute, then add the zest of half a lime and the juice of a whole lime. Add the scallops back into the pan and toss with about 1 tablespoon of fresh chopped cilantro, then serve.
Tequila Lime Scallops
Seared scallops in a quick Tequila lime sauce finished with cilantro. A quick scallop dish that tastes like summer.
Keyword: alcohol, Fish and Seafood, Scallops, Seafood, Summer, summer cooking
Servings: 4people
Author: Chef Ben Kelly
Ingredients
1lbScallops, foot removed and patted dry454 g
1 tbsp canola oil
Salt and pepper
2tbspsalted butter
2tbspminced shallotor onion
2ozTequila
1tbspchopped cilantro
1limejuice and zest
Instructions
Heat a large non-stick skillet over medium-high heat. Make sure the pan is very hot.
Lightly season the scallops with salt and pepper.
Add the oil to the pan and gently place the scallops in one at a time. Leave the scallops alone for 90 seconds.
Gently lift one of the scallops. If the bottom is a deep caramel brown, flip the scallops and cook for 1 more minute. If the scallop is still white or just turning brown, leave it for another 30 seconds or so, then flip it and finish it on the second side for 1 minute.
Remove the scallops from the pan and onto a warmed plate. Set aside.
Take the pan off the heat and add the butter. Once the butter melts, add the shallots and return the pan to the heat. Reduce the heat to medium-low and cook for 1 to 2 minutes or until the shallots soften and turn translucent.
Pour the tequila into the pan. If you use a gas range, lift the pan away from the flame before adding the tequila, then return the pan to the heat. Cook until the tequila has almost completely evaporated.
Take the pan off the heat and zest half the lime into it, then squeeze the juice from the whole lime into it. Return the pan to the heat for 30 seconds. Taste the sauce and add salt and pepper as needed.
Take the pan from the heat and add the scallops into the pan, toss with the cilantro and serve.
I hope that you’re now excited to buy some scallops and cook them up for yourself. I know the process may seem complicated, but really, at its core, it’s just dry the scallops and cook them quickly in a very hot pan. There isn’t that much to it. If you’re wondering how to tell if your scallops are cooked, that’s not too difficult either. Right now, as you read this, hold your hand out and gently touch the tip of your middle finger to the tip of your thumb. Now, poke the bit of meat on your palm right below your thumb. A perfectly cooked scallop will feel the same when you poke it. I hope that helps. Thanks for reading, remember to share it, and have a great day and a great week! Oh, and if you cook some scallops, share some pictures of them on my Facebook page. I’d love to see them.
Remember to share this post on Facebook or Pinterest if you enjoyed it. Thank you for reading, and have a great day! Remember, there are new Chef’s Notes posts every Wednesday, and you can subscribe below, so you never miss one.
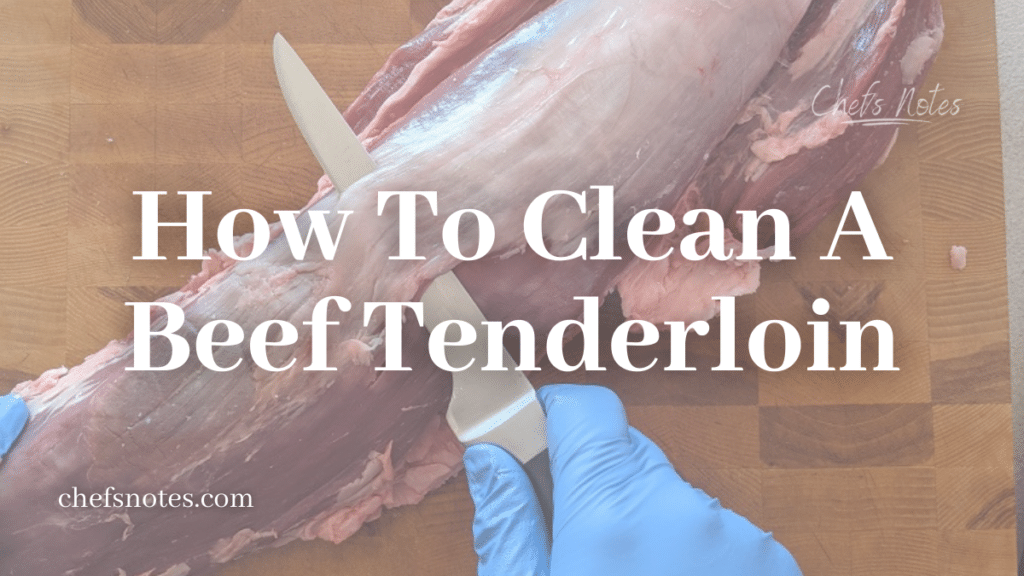
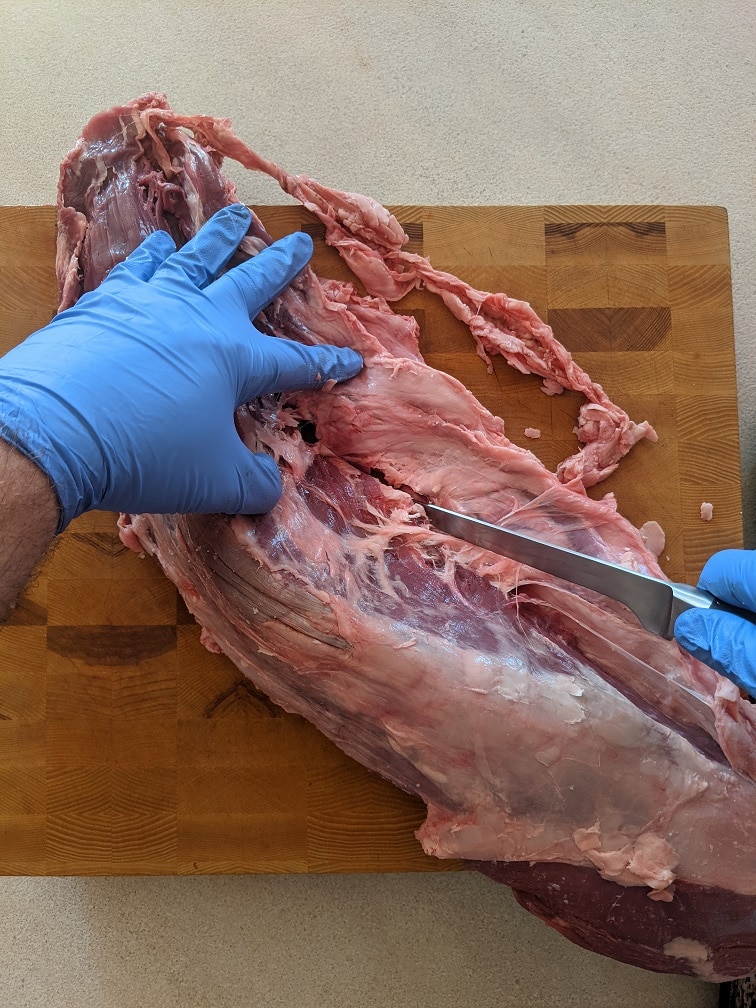
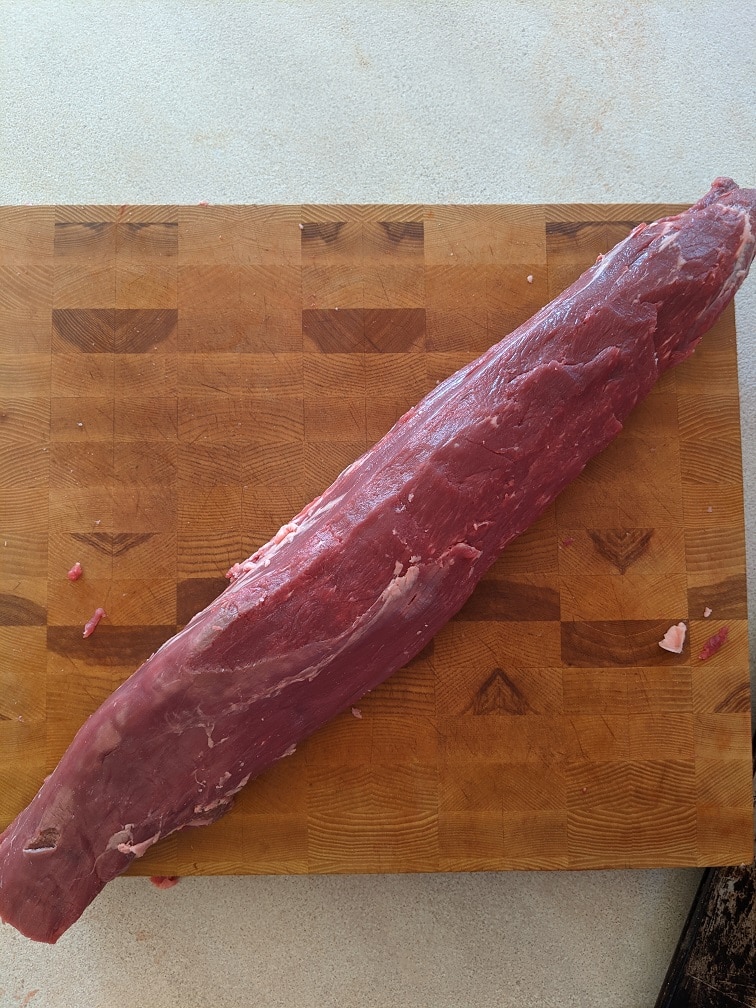
Welcome to the comprehensive guide on how to clean and prepare a whole beef tenderloin. As a personal chef, my experience has shown that a perfectly roasted beef tenderloin is a crowd-pleaser at any gathering. Today, I’ll share with you the essential steps to transform a whole tenderloin into a culinary masterpiece.
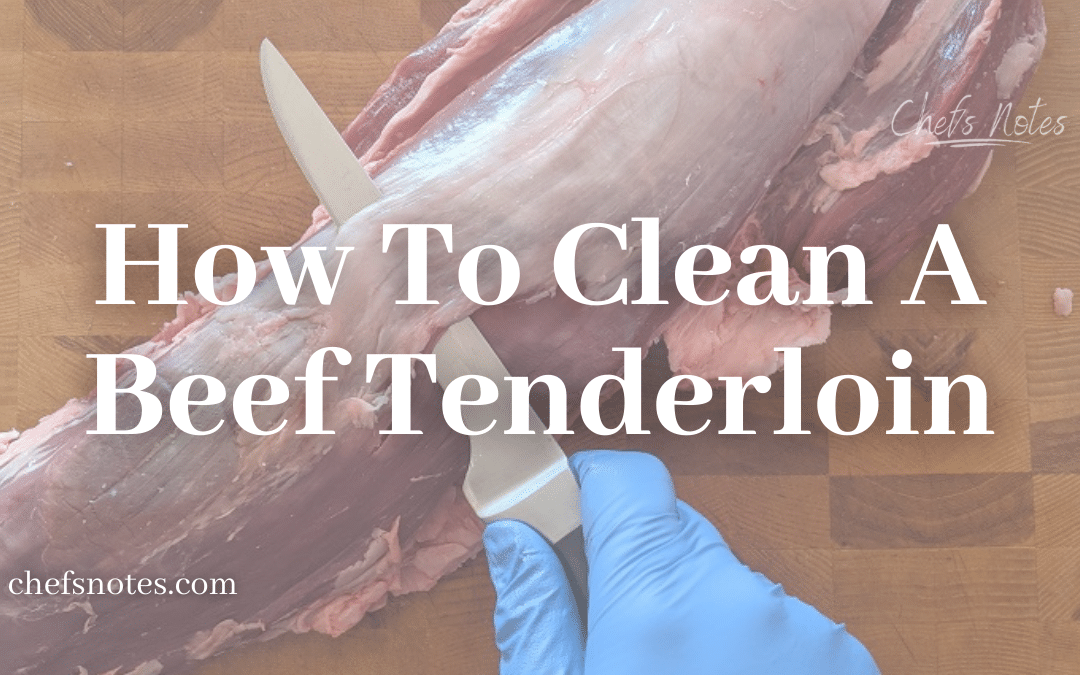
Cleaning the Tenderloin
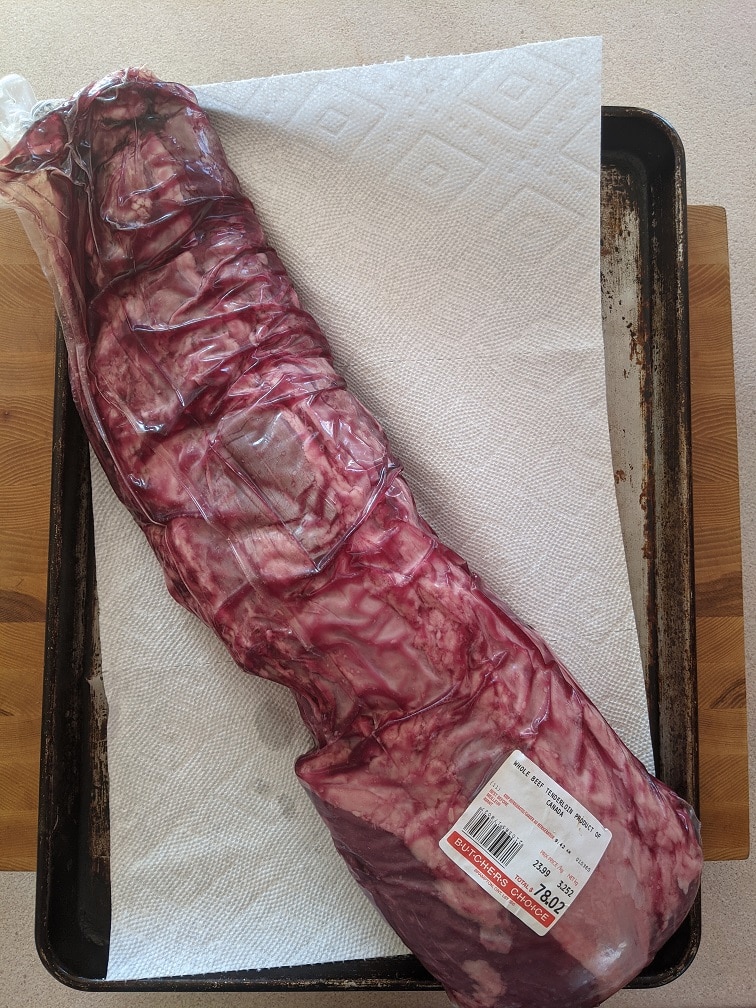
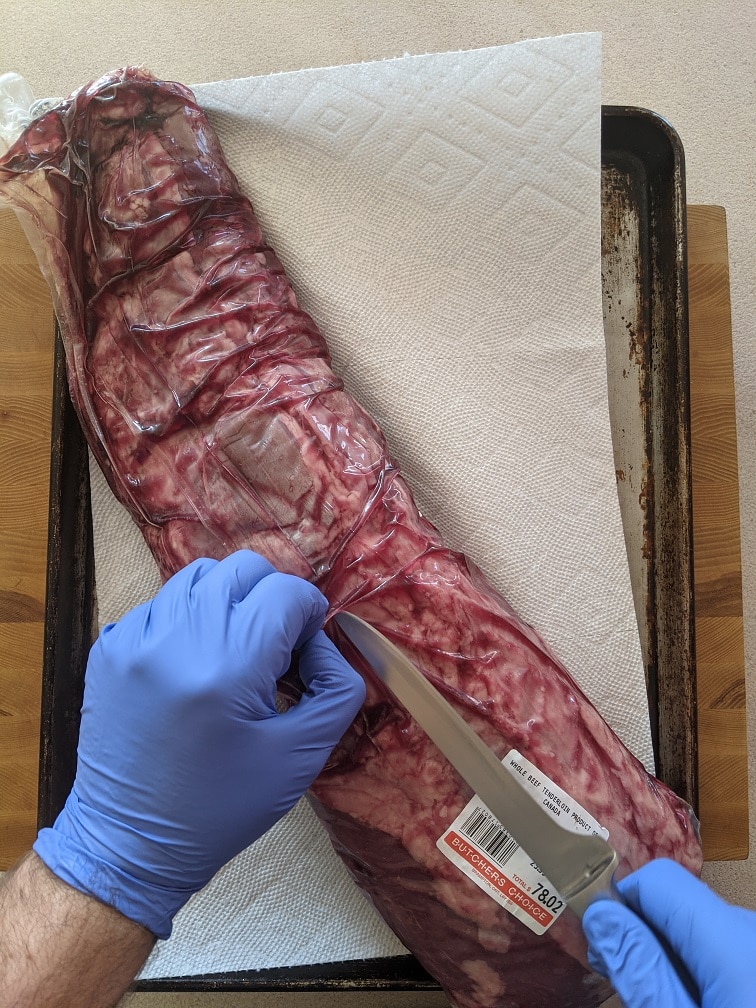
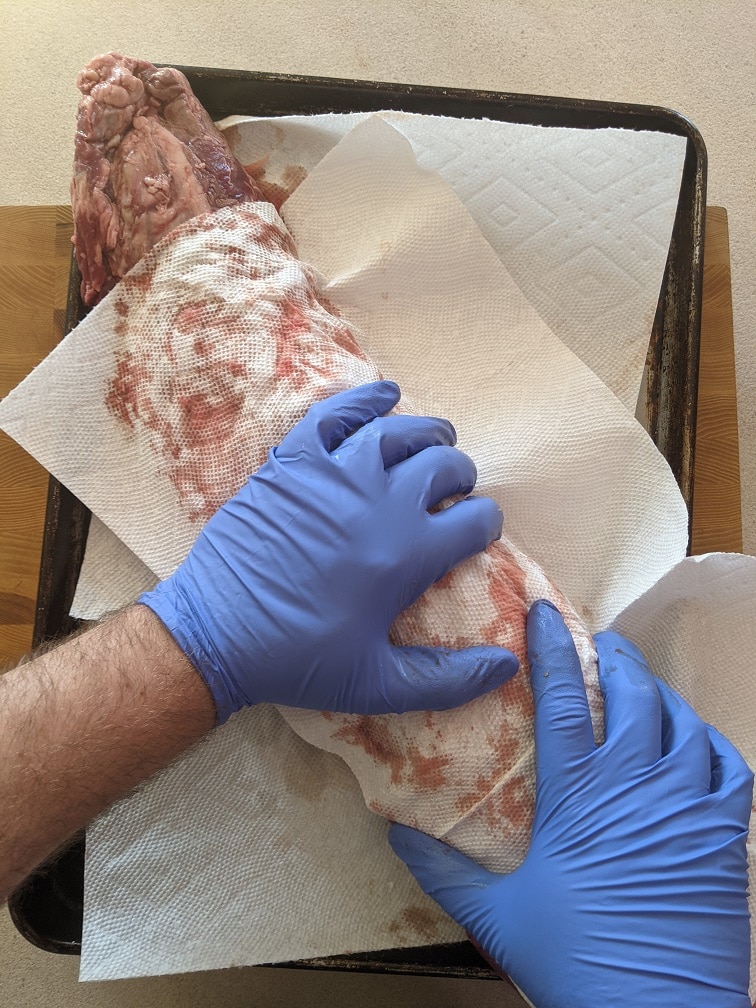
Begin by removing your whole beef tenderloin from its vacuum-sealed packaging. Expect some blood within the package; this is normal. Carefully line a baking sheet with paper towels, place the tenderloin on top, and pat it dry. Ensure to cut the packaging carefully, avoiding any accidental nicks in the meat.
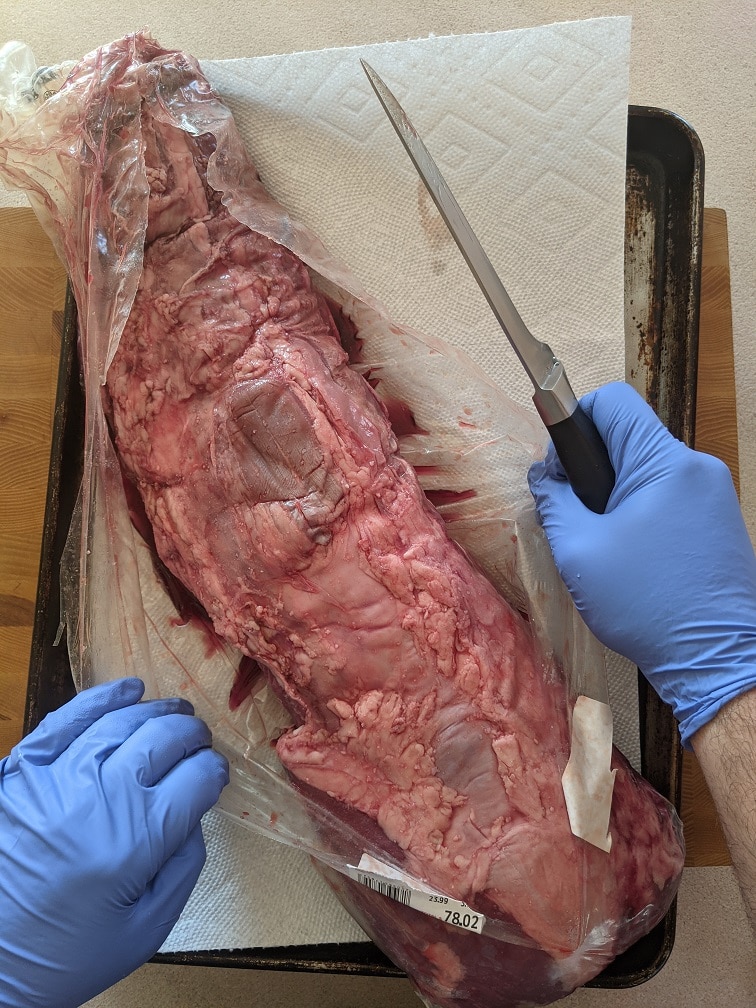
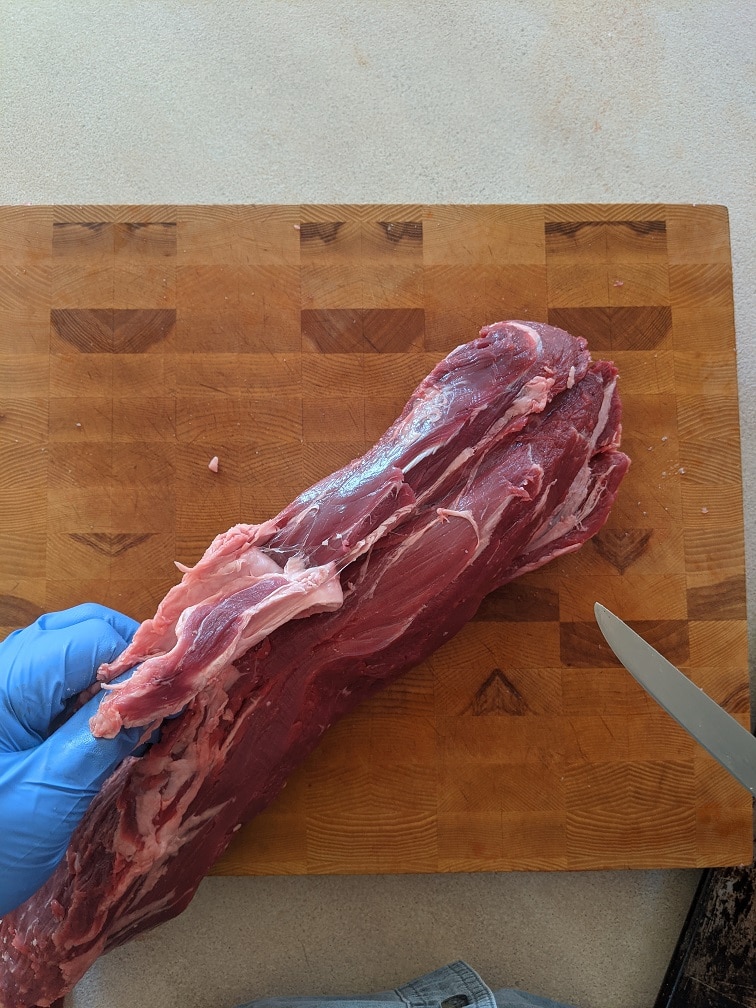
Removing Excess Fat and Sinew
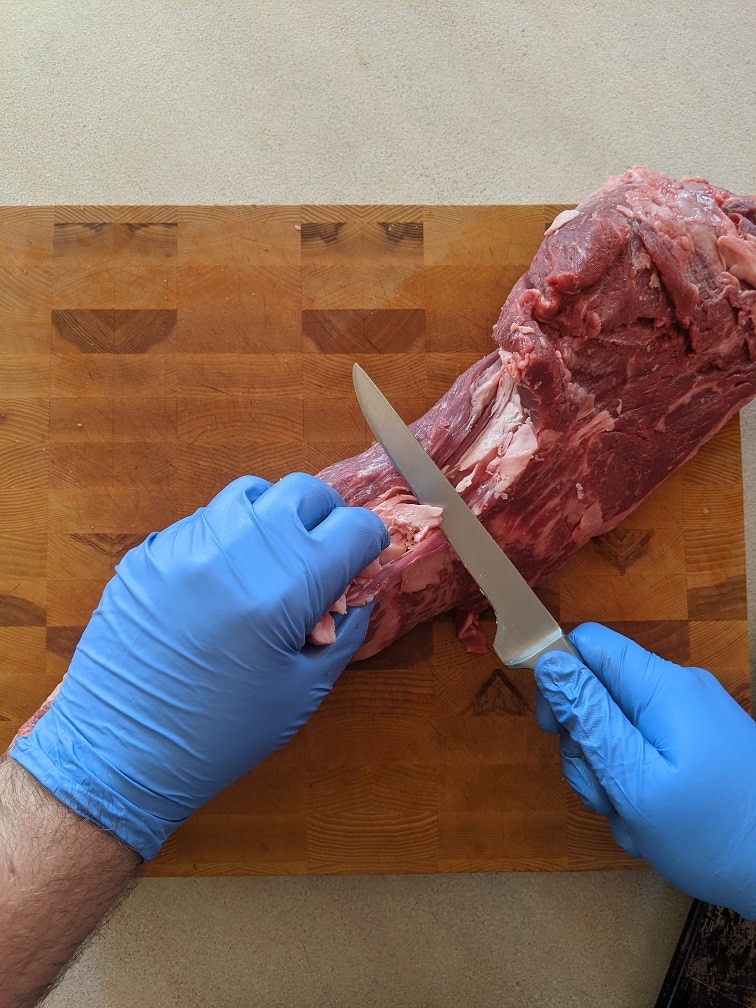
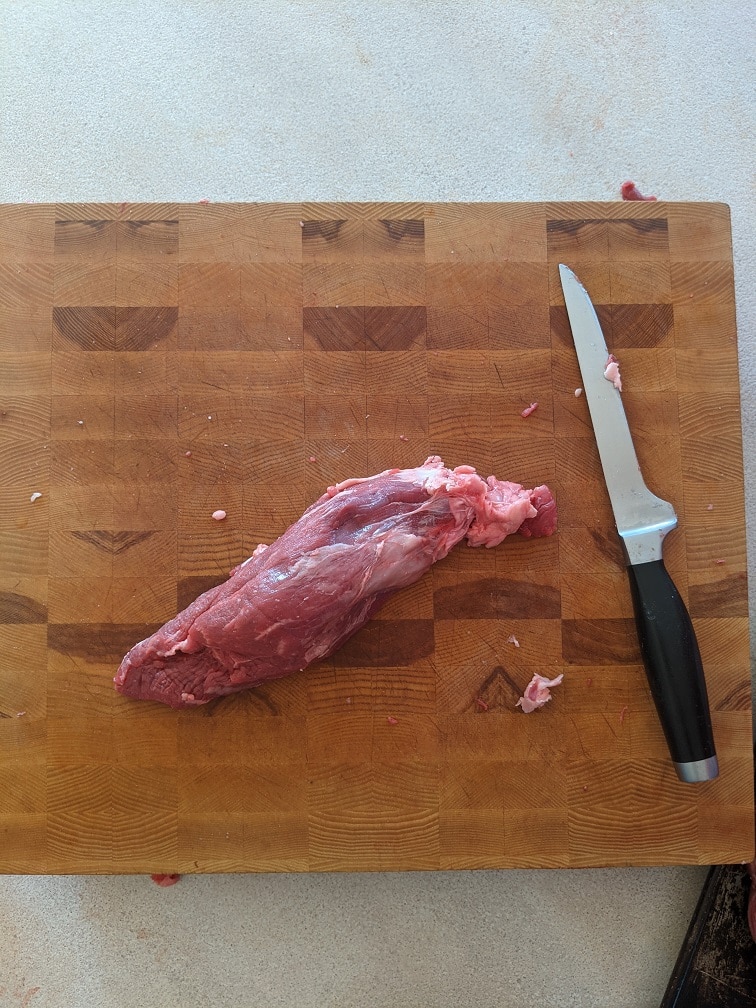
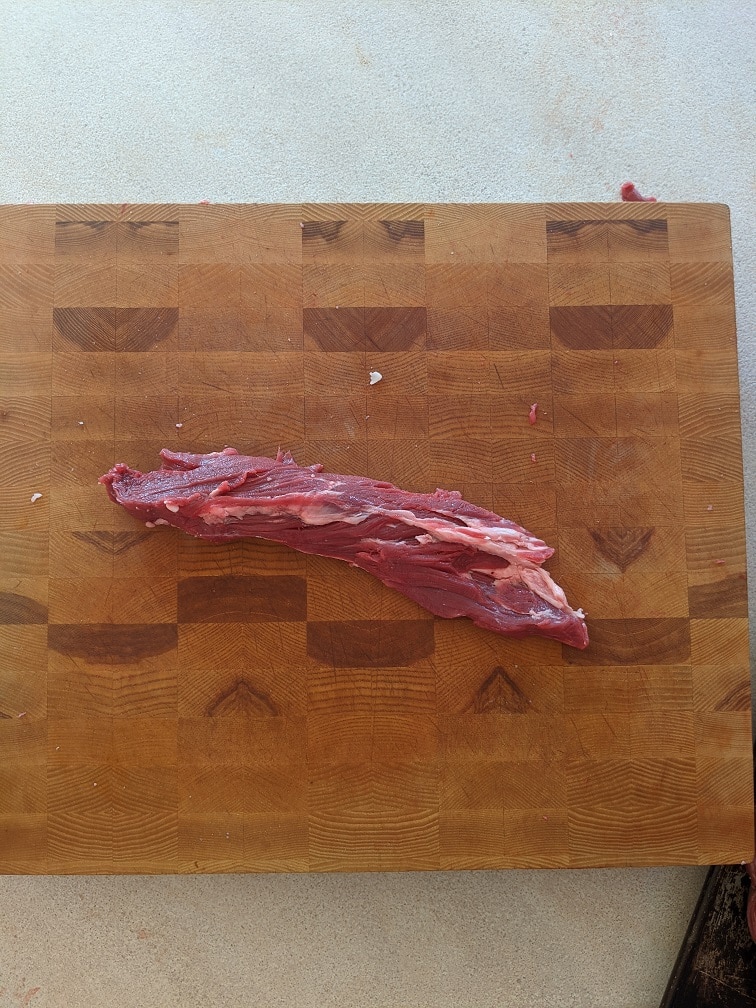
The key to a tender and flavorful beef tenderloin lies in removing the excess fat, sinew, and connective tissue. Pay particular attention to the ‘chain’, a strip of meat and fat running along the side of the tenderloin. While not suitable for direct consumption, it’s excellent for broths or can be trimmed further for skewers.
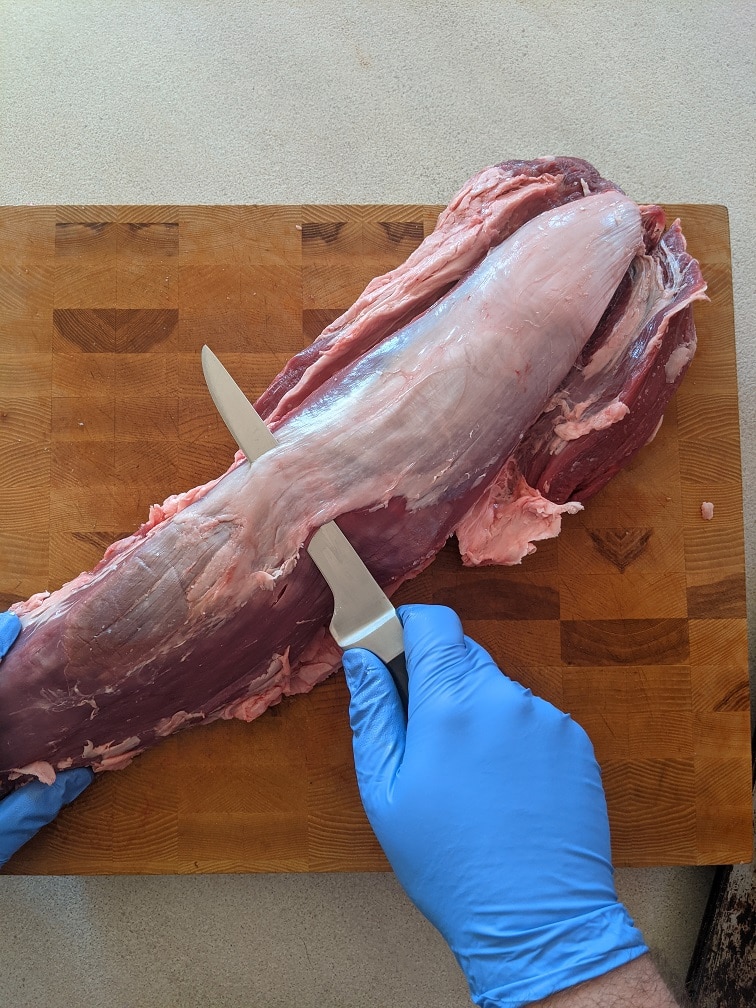
Eliminating Silver Skin
Silver skin is a tough connective membrane that doesn’t soften upon cooking, making it necessary to remove. Using a boning or fillet knife, gently slide the blade under the silver skin and strip it away in thin layers. While this process may result in a slight loss of meat, it’s crucial for ensuring the tenderness of your dish.
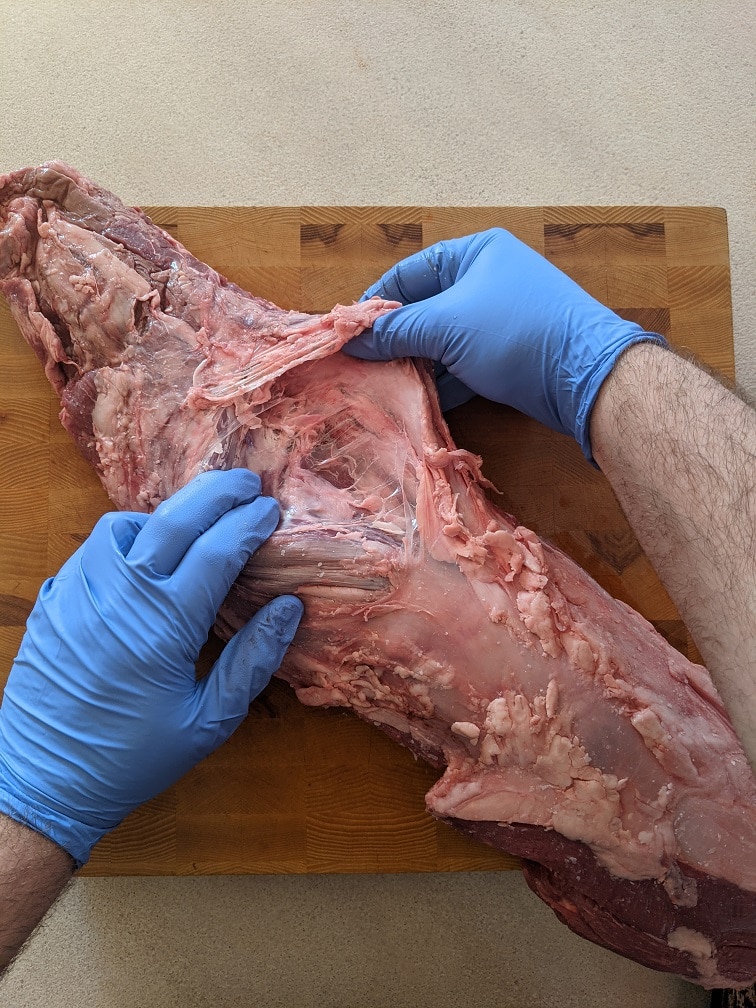
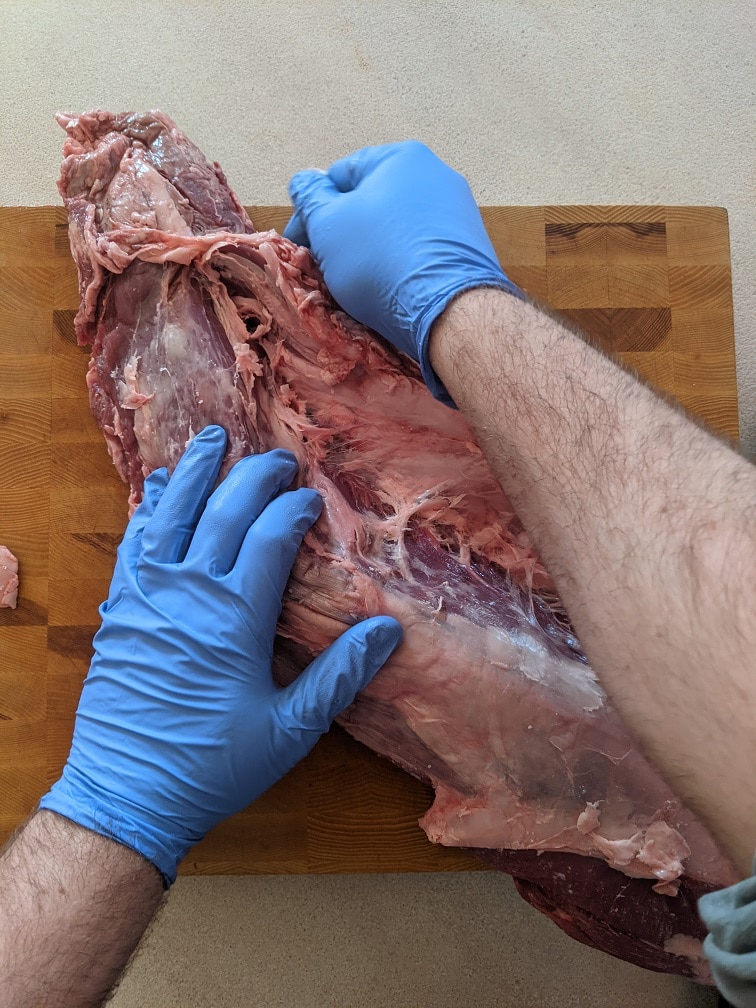
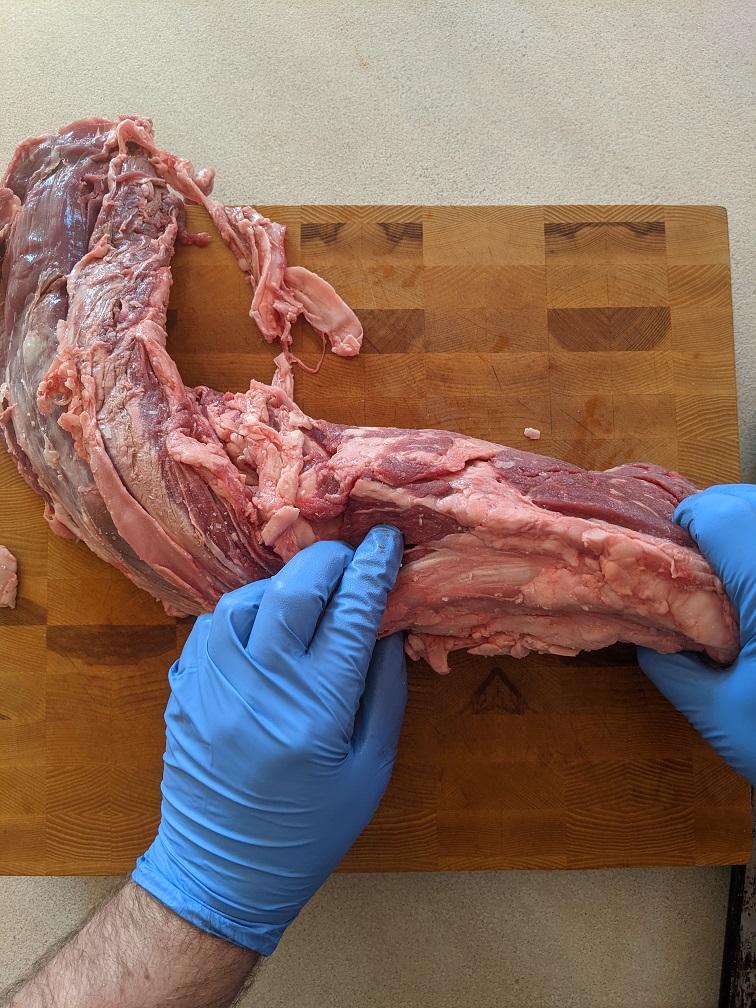
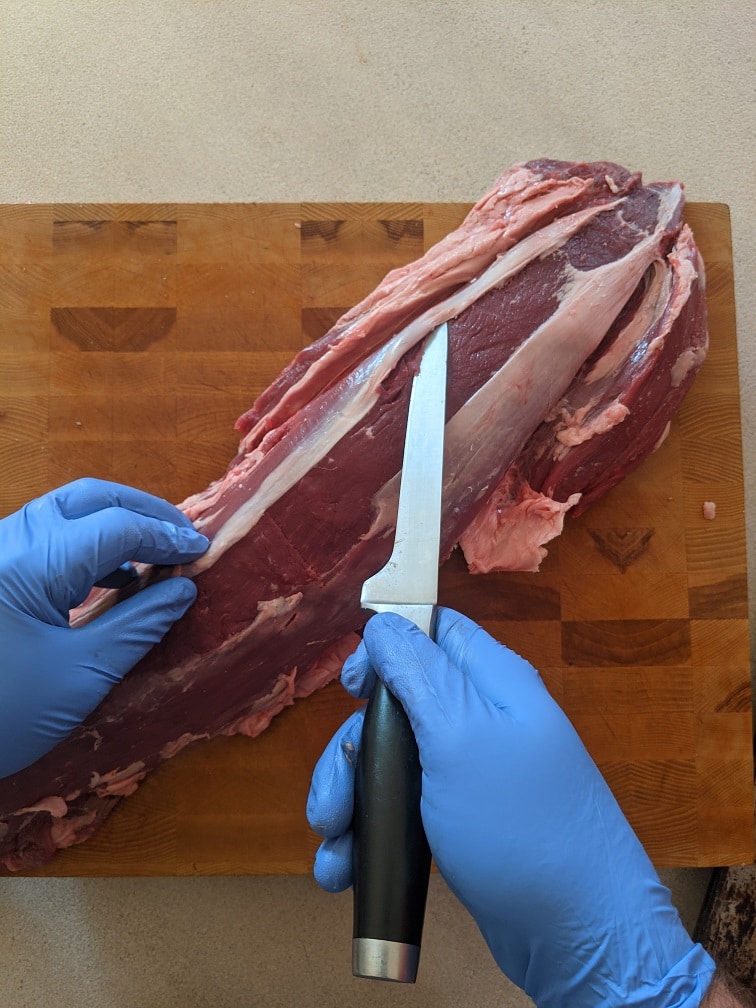
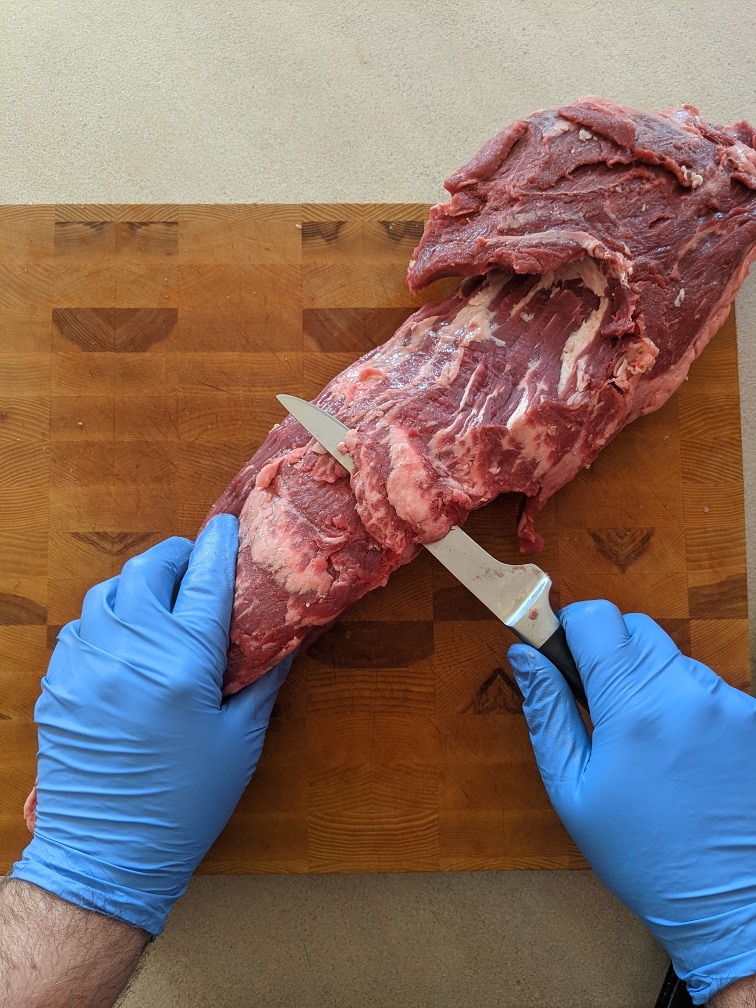
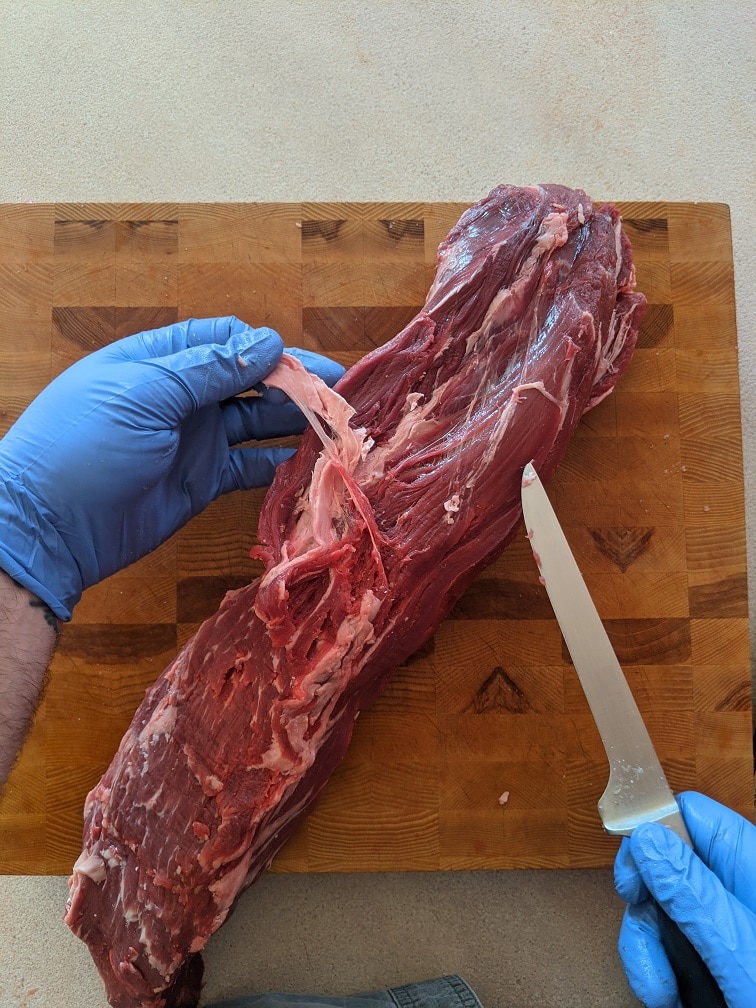
Flip the tenderloin
Once the silver skin is cut away, flip the tenderloin over. On the underside of the tenderloin, there’s going to some flaps of meat and fat. This is where the tenderloin is connected to the skeletal structure of the animal. This needs to be cleaned up too. All you can really do is cut it all away. Keep your knife as flat as possible and make long, smooth slices until the flaps are removed. The flaps can be used to make skewers or broth, so they aren’t going to waste.
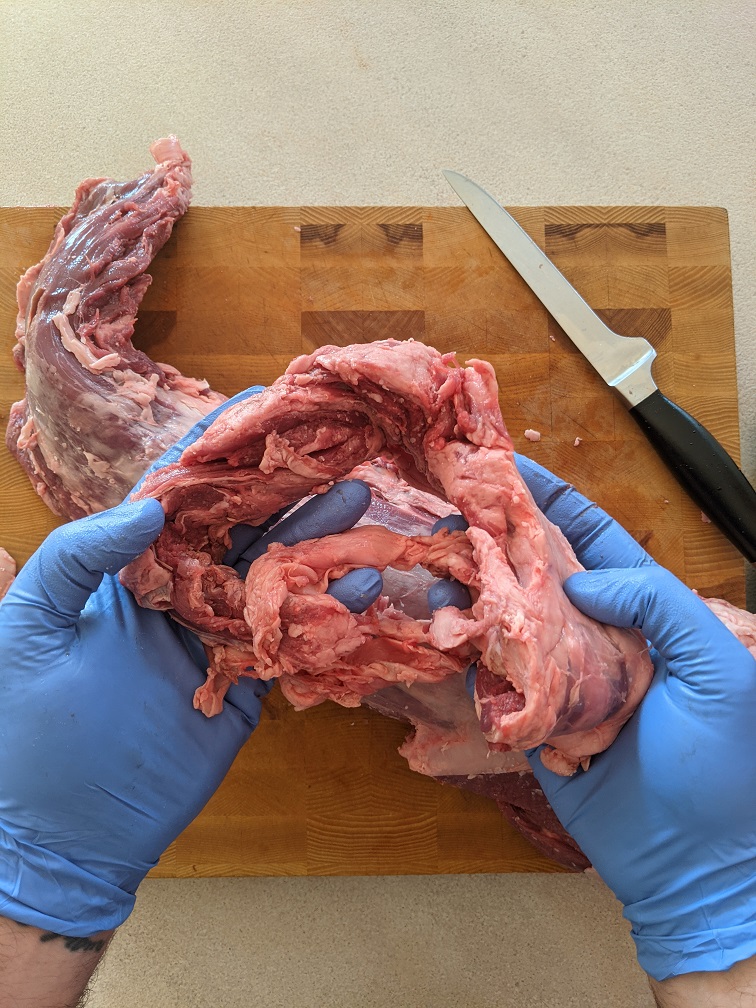
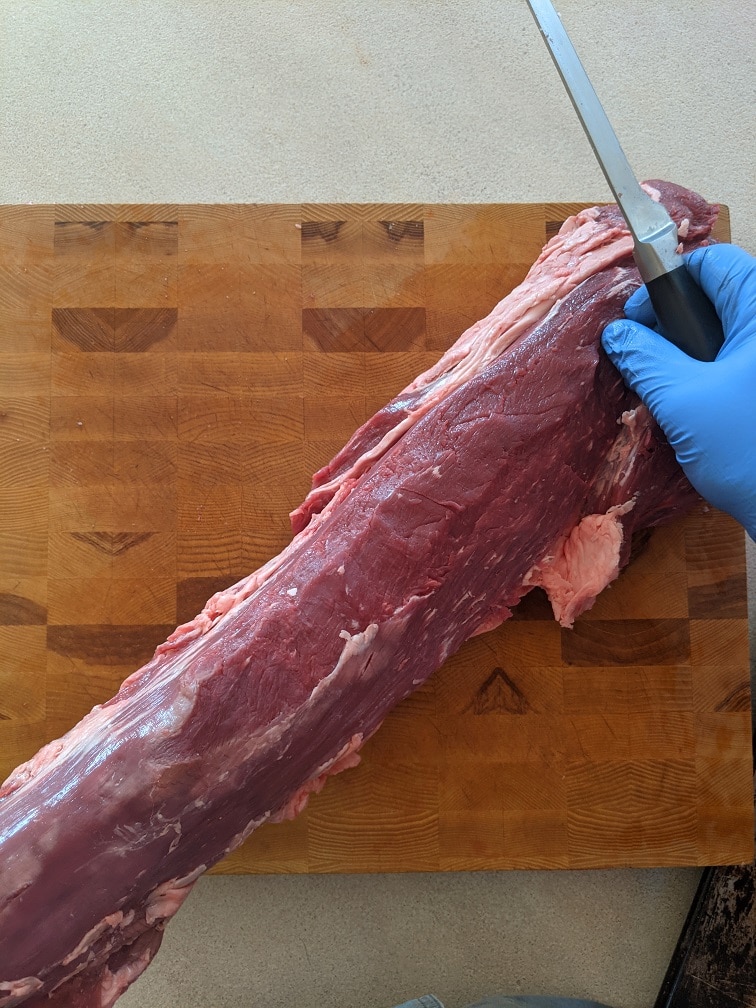
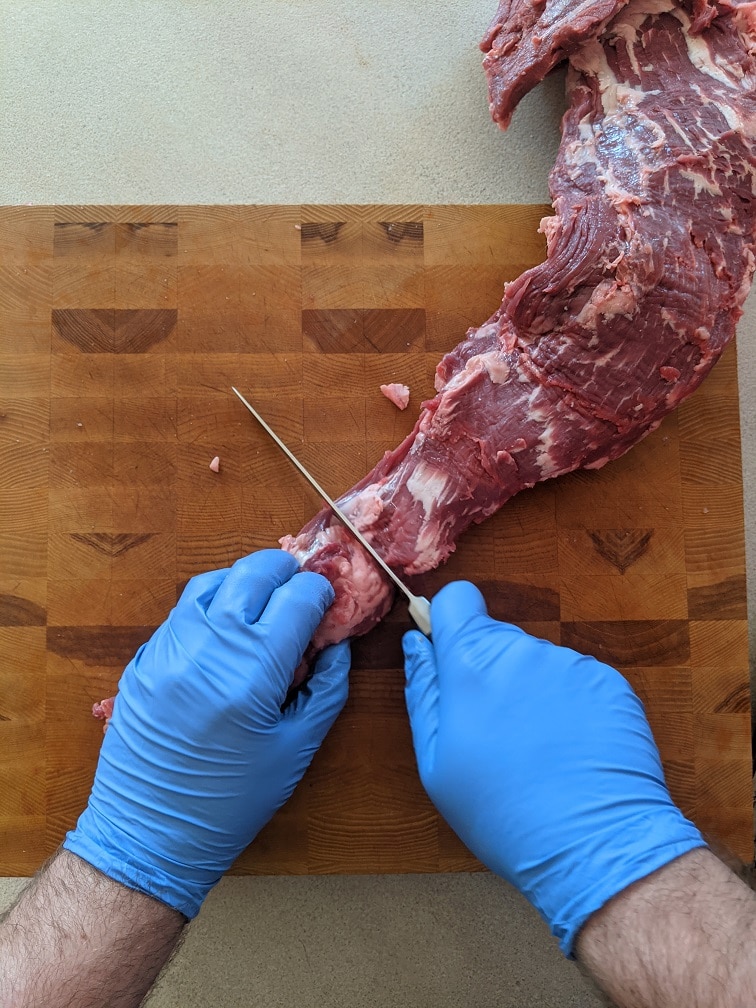
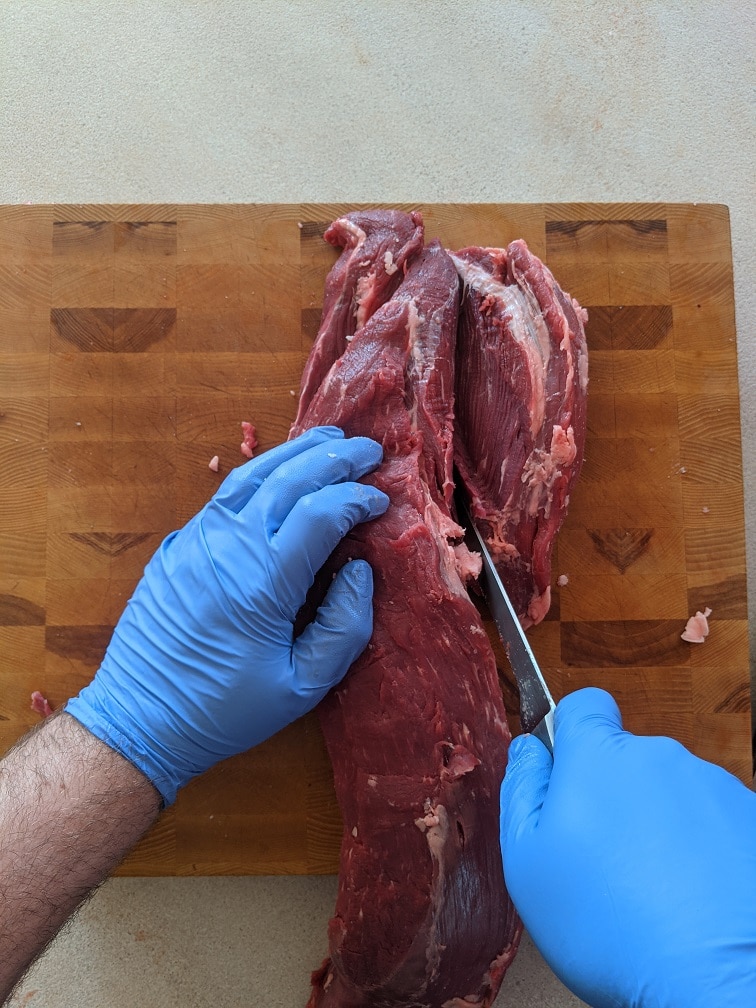
What to do with the extra pieces
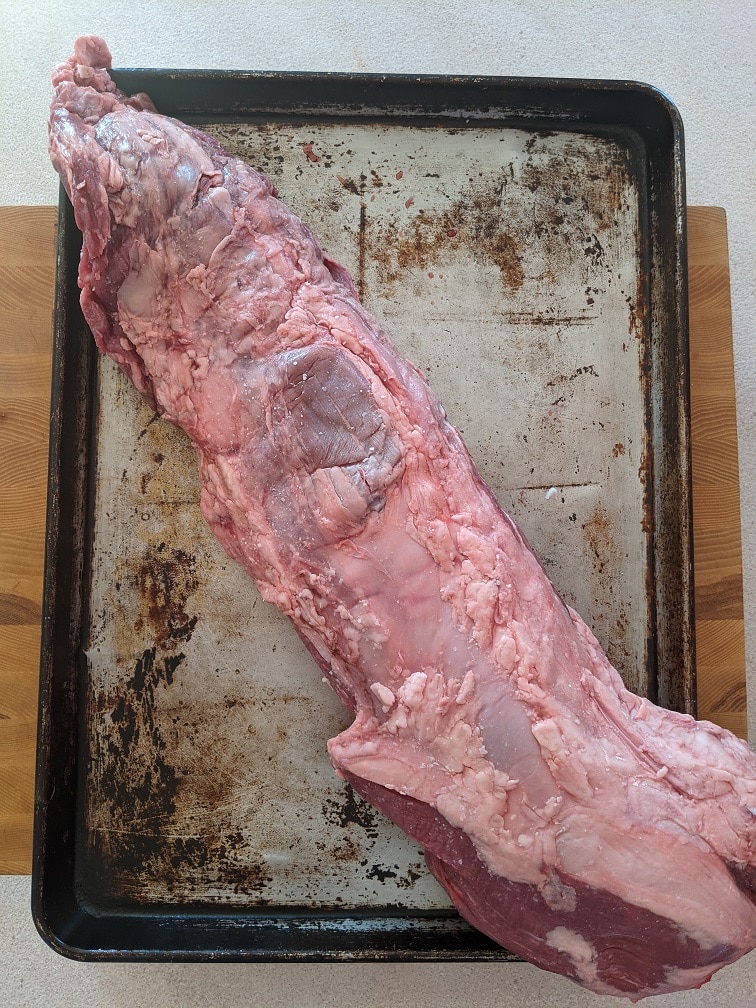
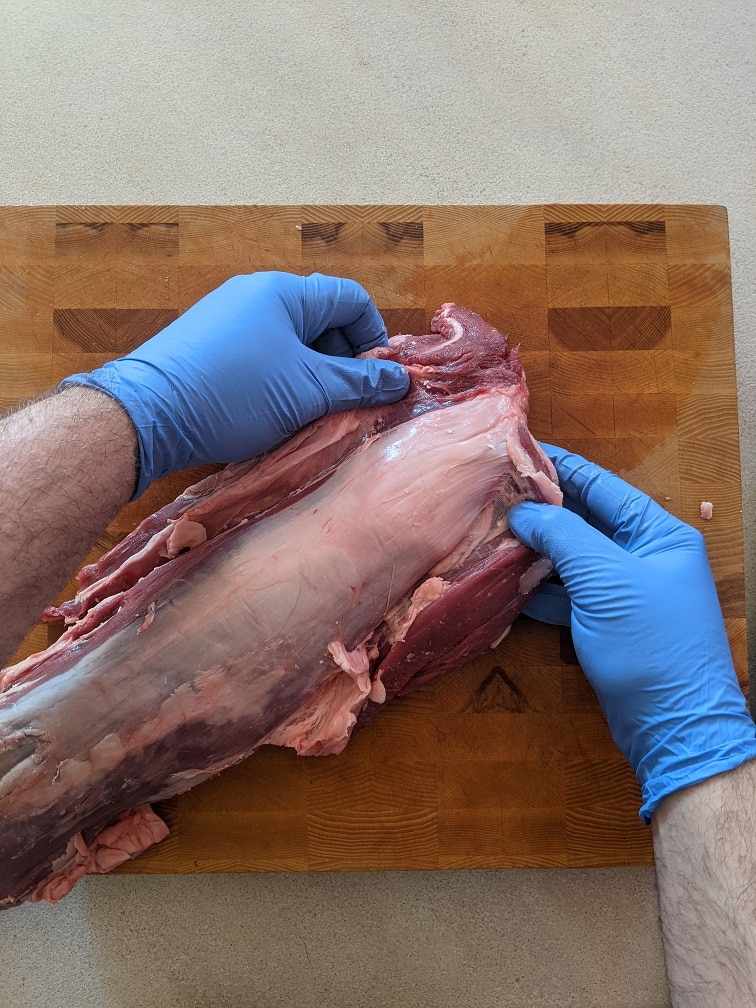
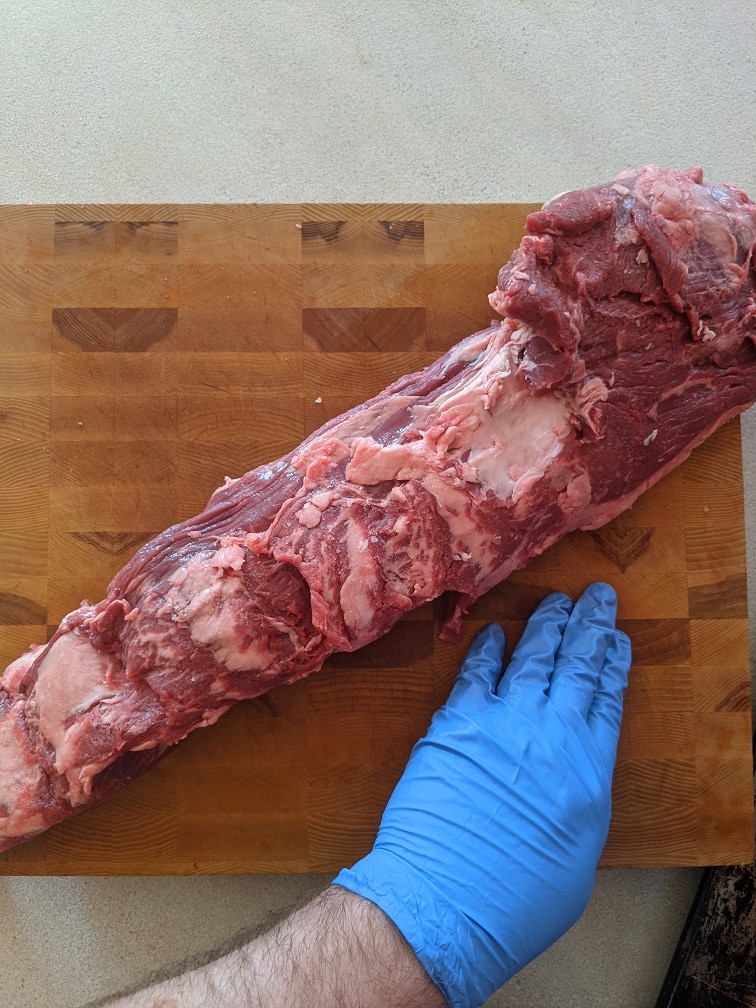
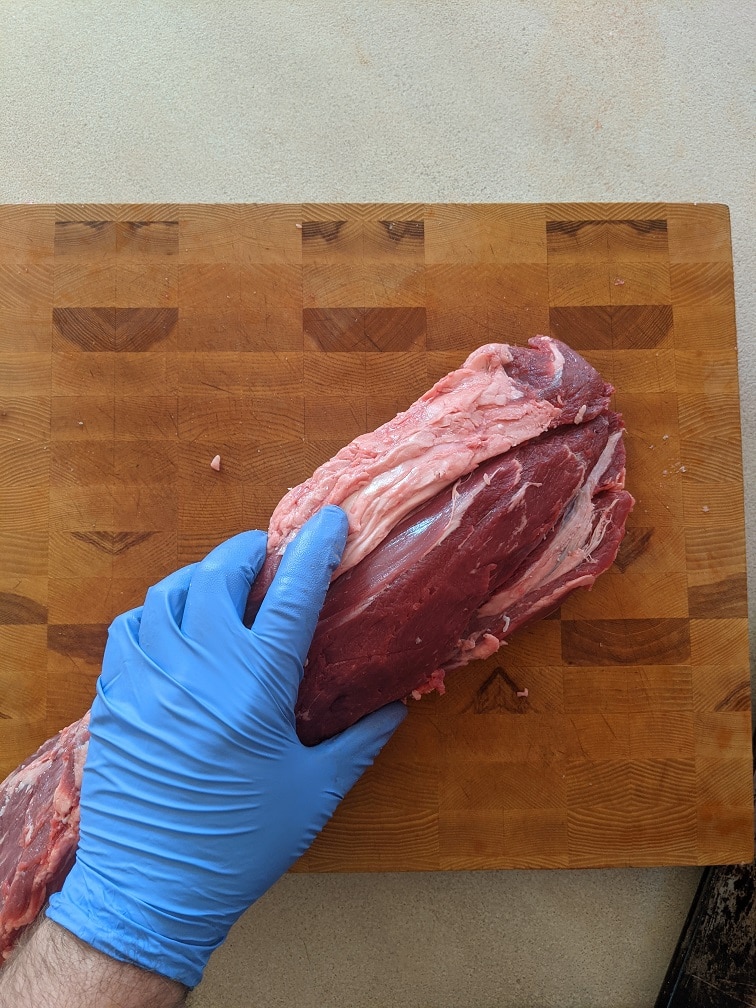
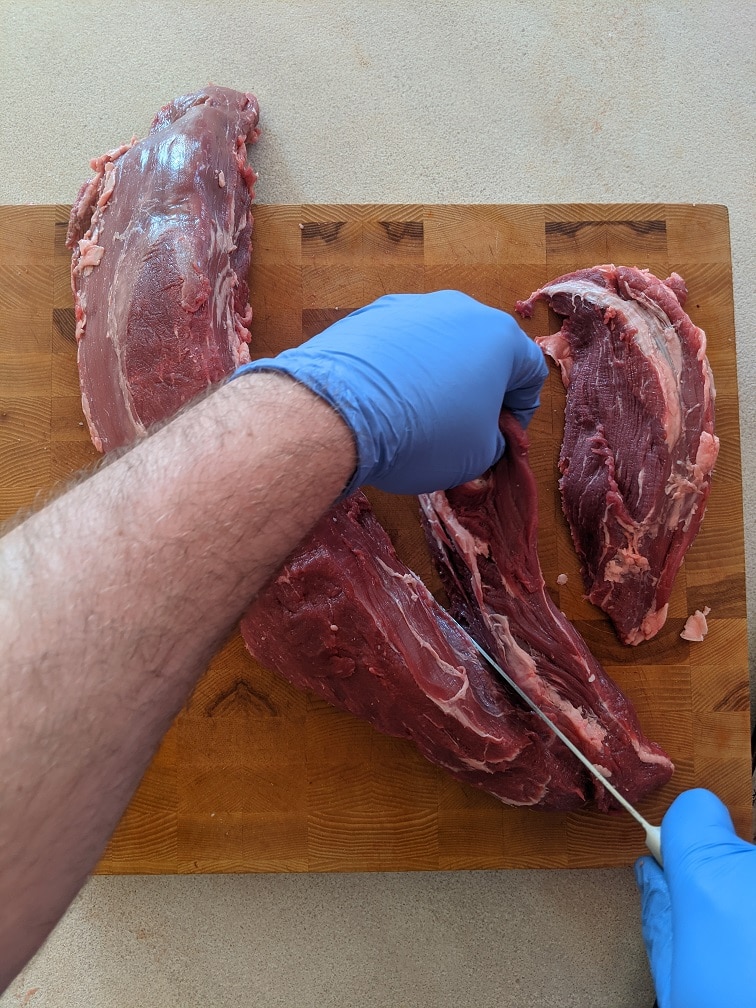
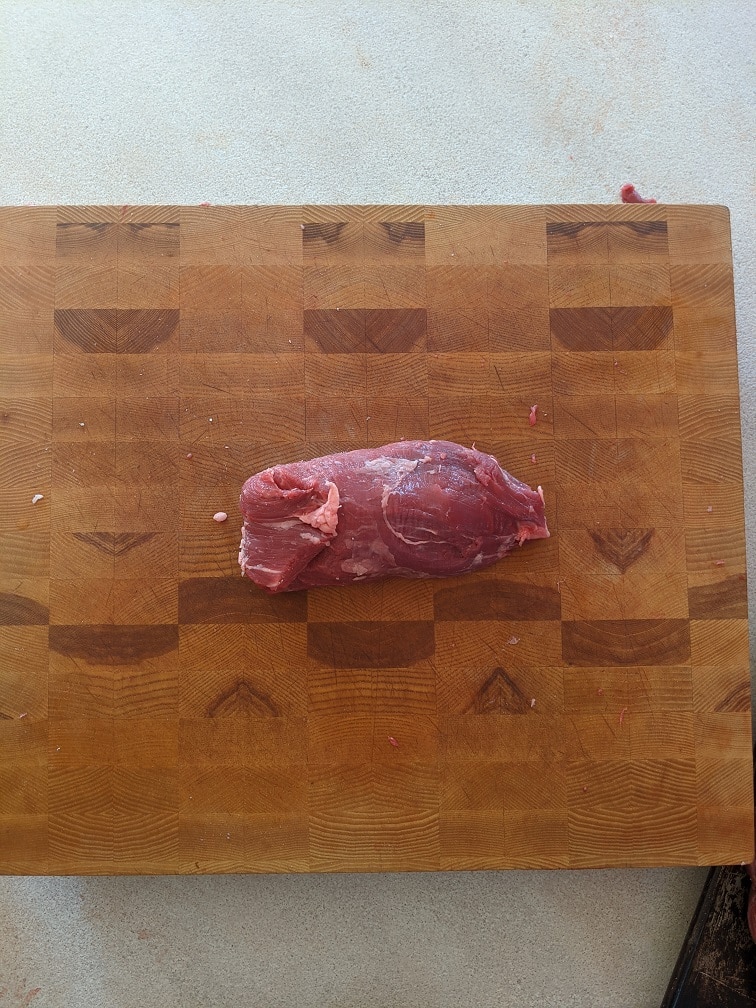
At one end of the beef tenderloin, there are two extra pieces of meat. These can be left on, but in the interest of even cooking, it’s better to take them off, but of course, they aren’t going to go to waste. To cut the pieces away, use your knife and make long, smooth slices down the outside edge of the tenderloin. The separation between the tenderloin and the other meat pieces will be more obvious with the smaller piece than the bigger piece, but it shouldn’t be too difficult either way. What you should have once those pieces are cutaway is a fully cleaned beef tenderloin.
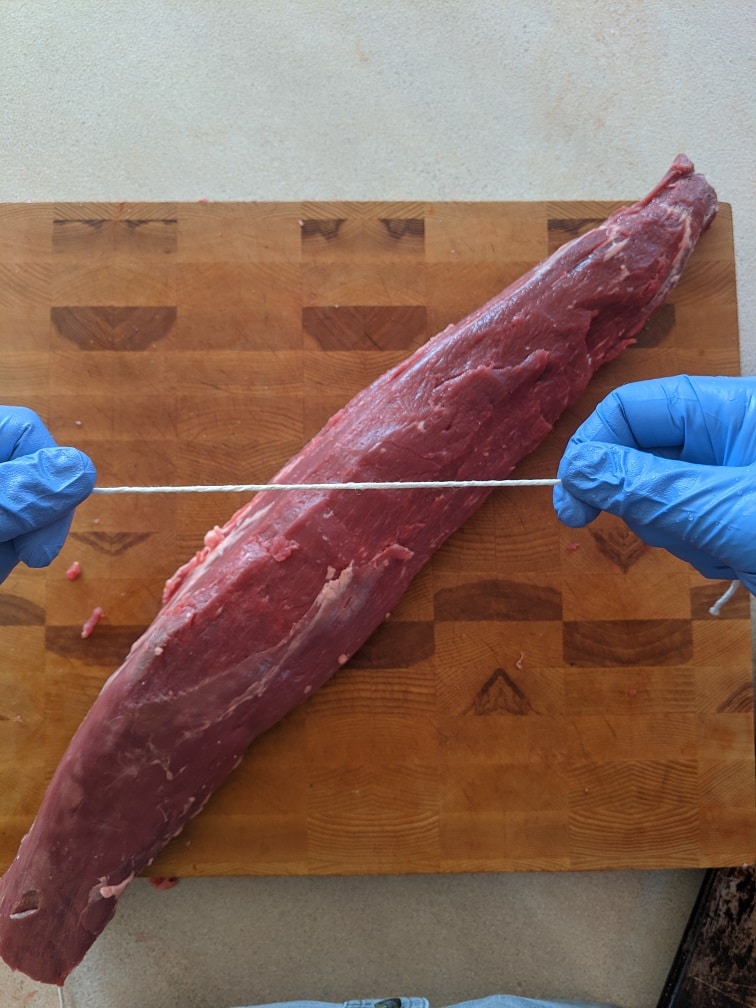
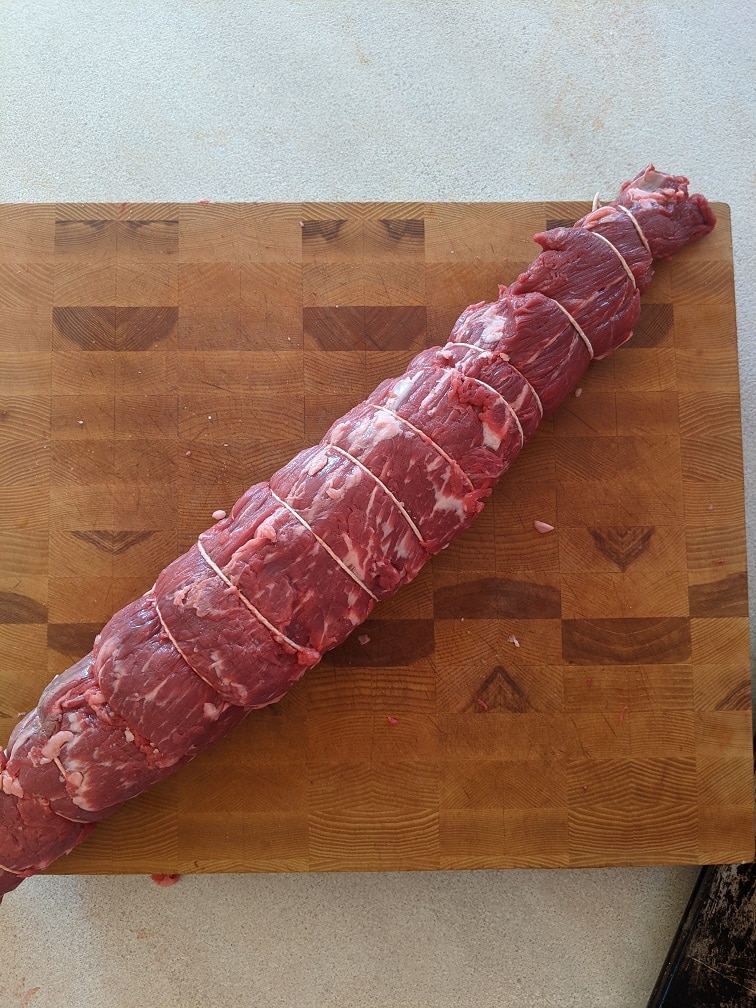
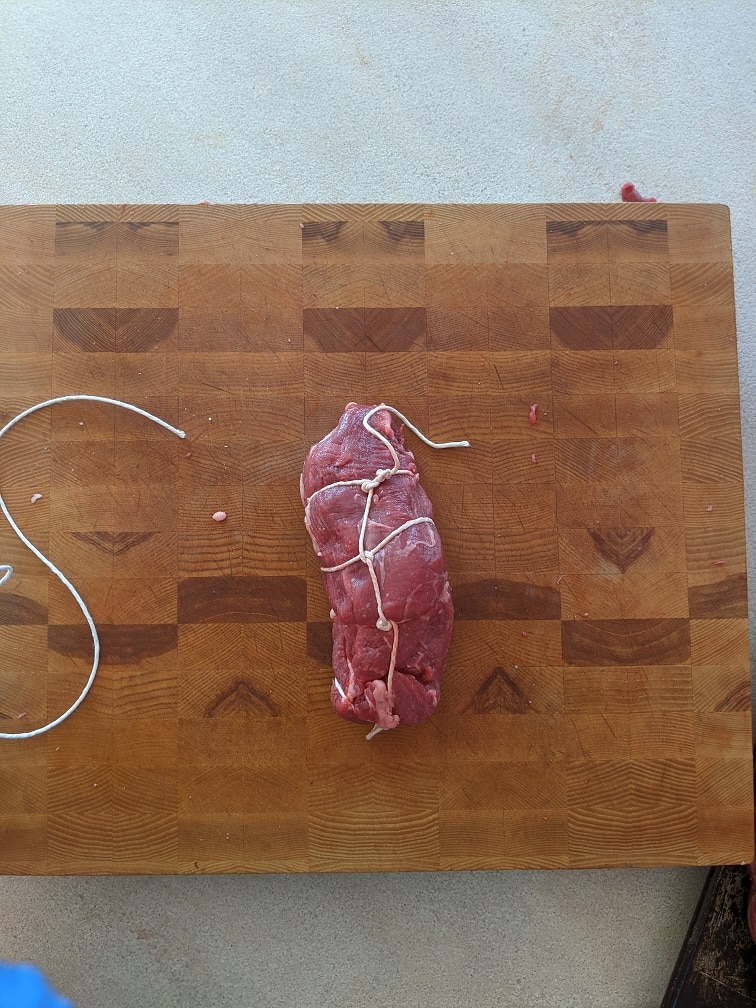
To Tie or Not To Tie
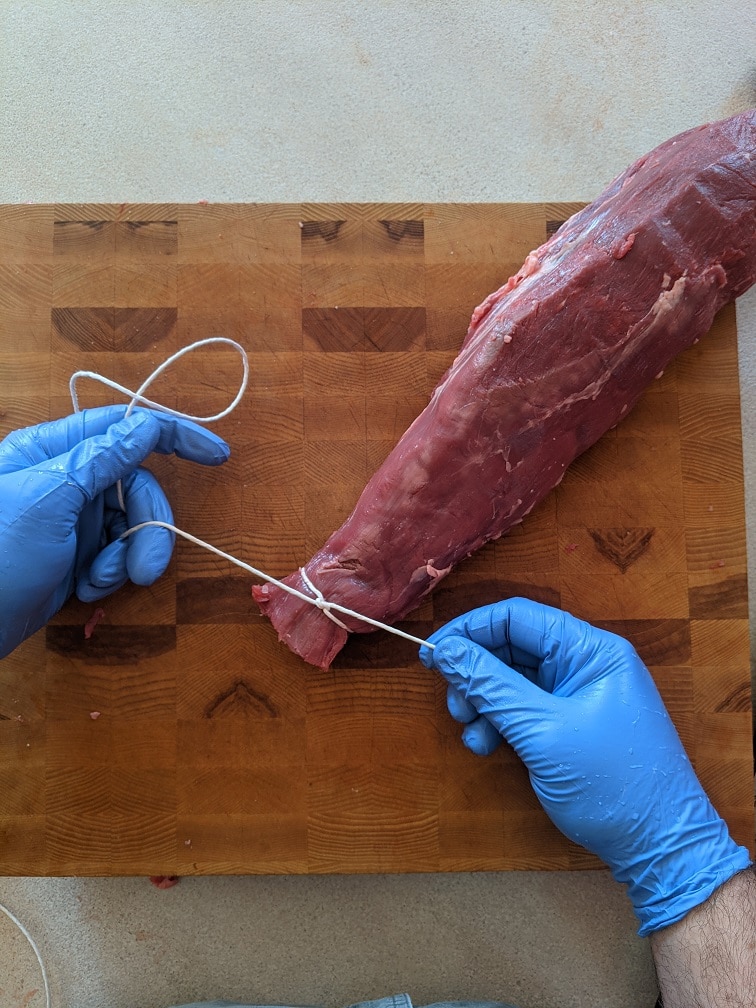
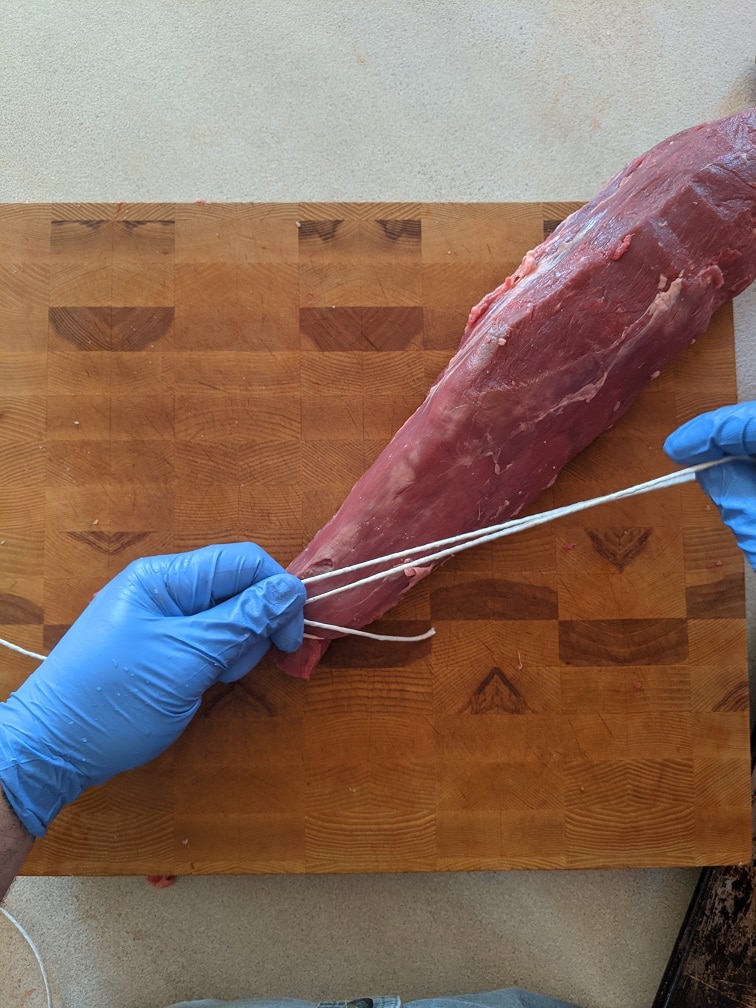
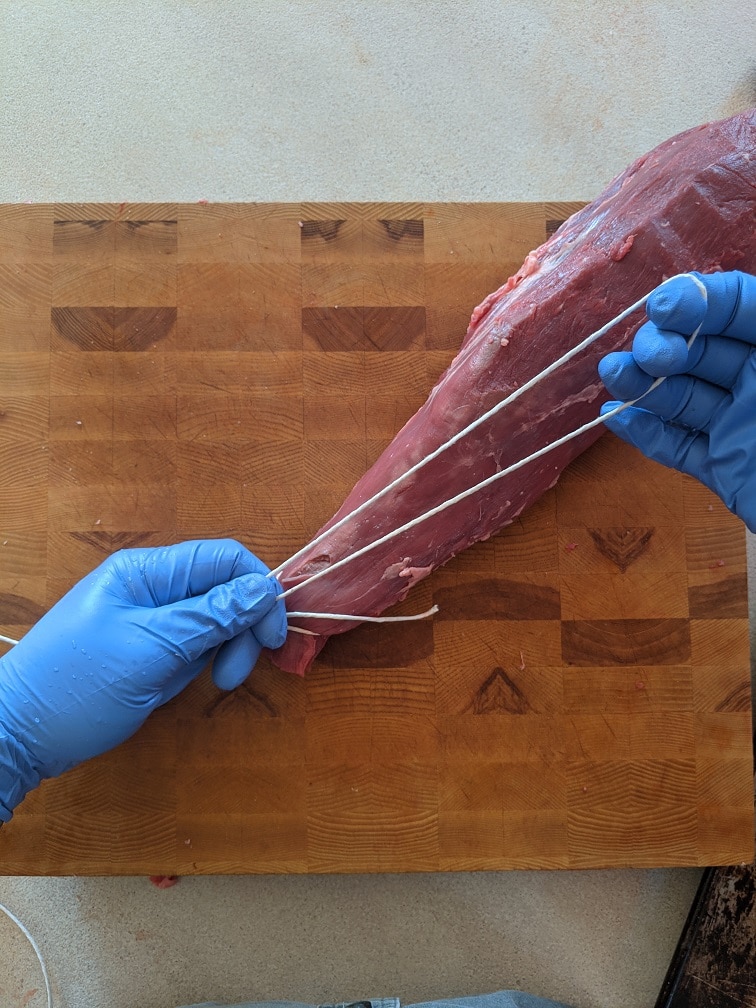
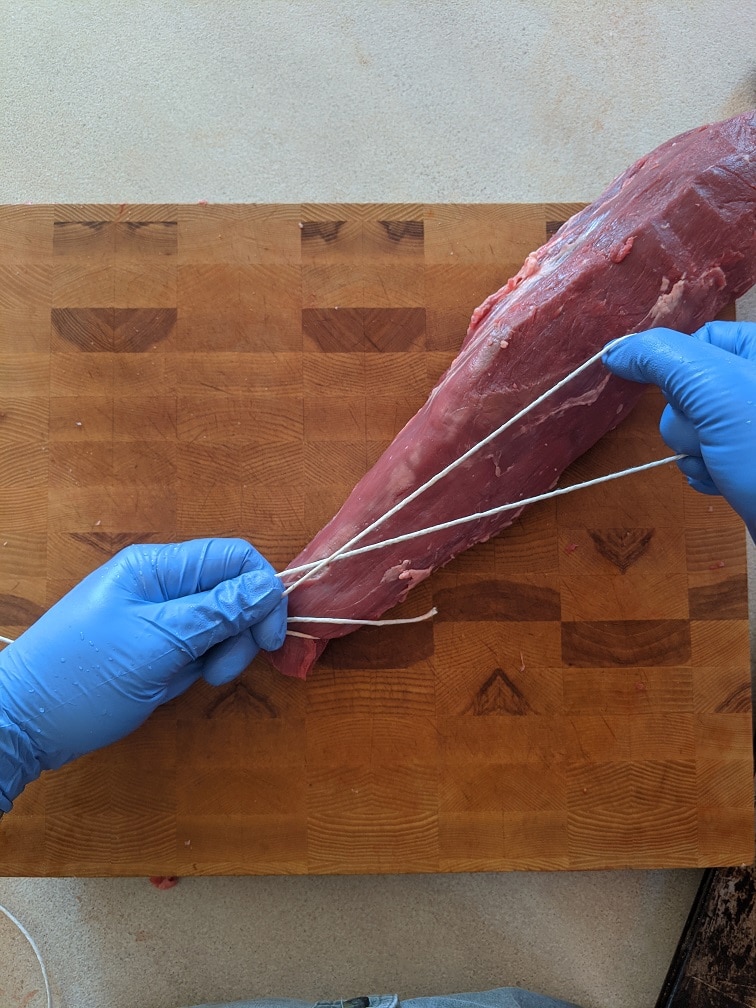
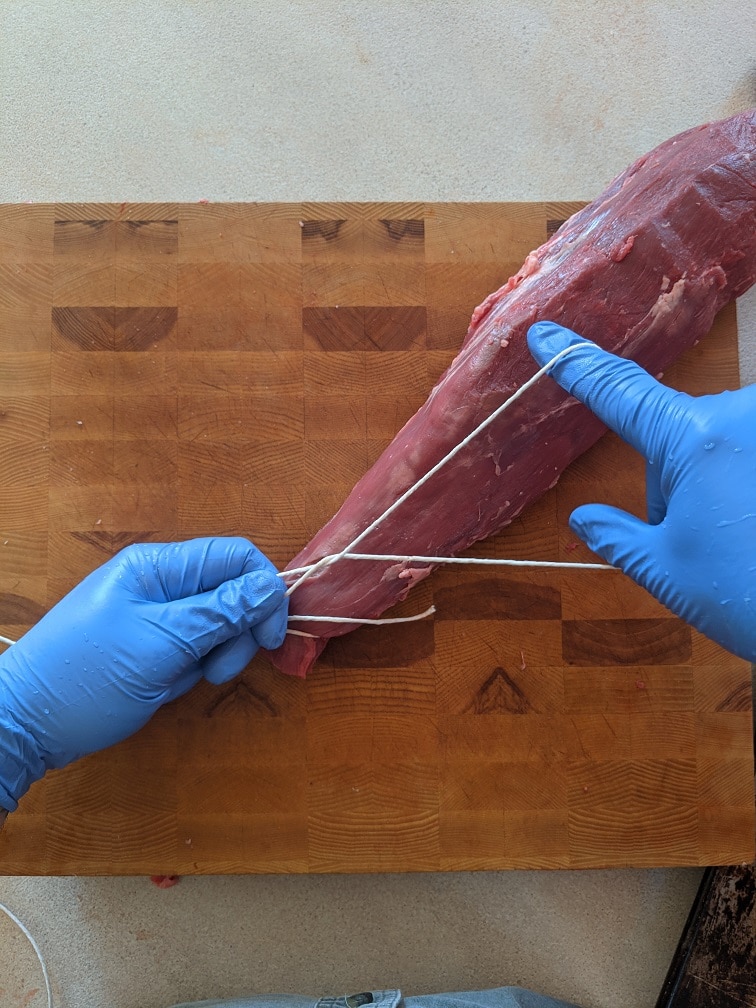
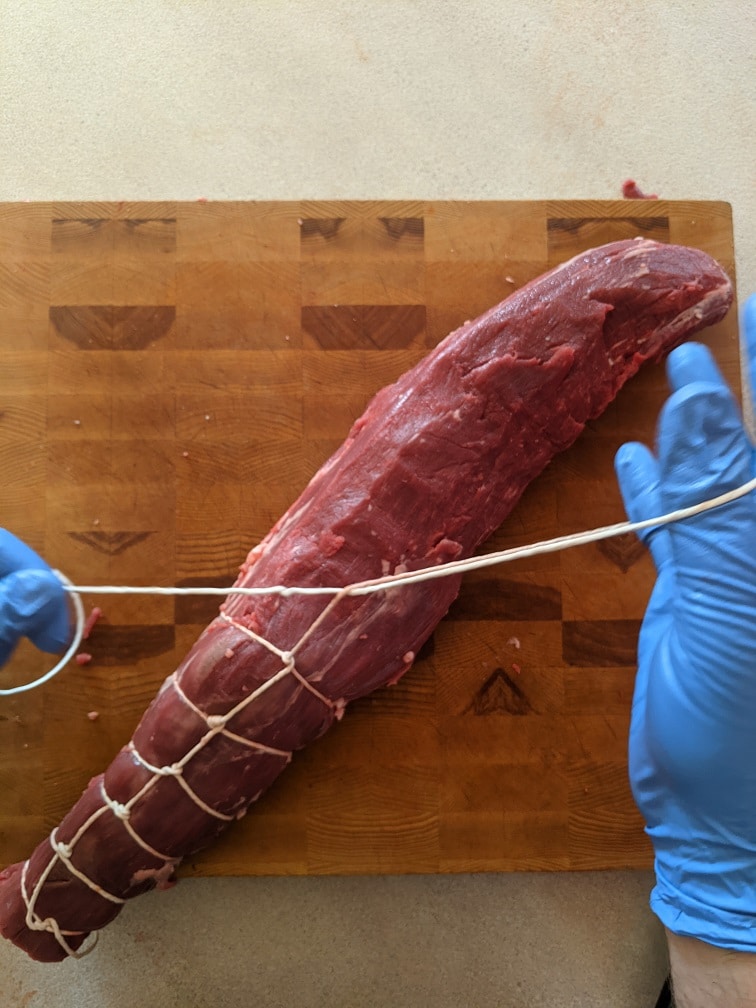
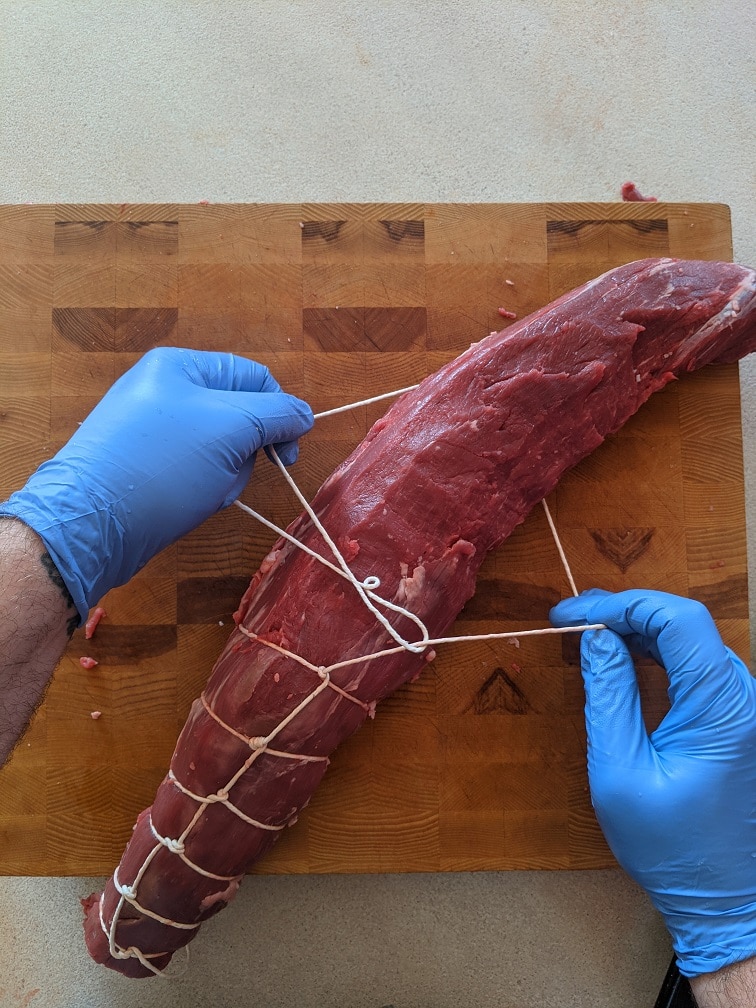
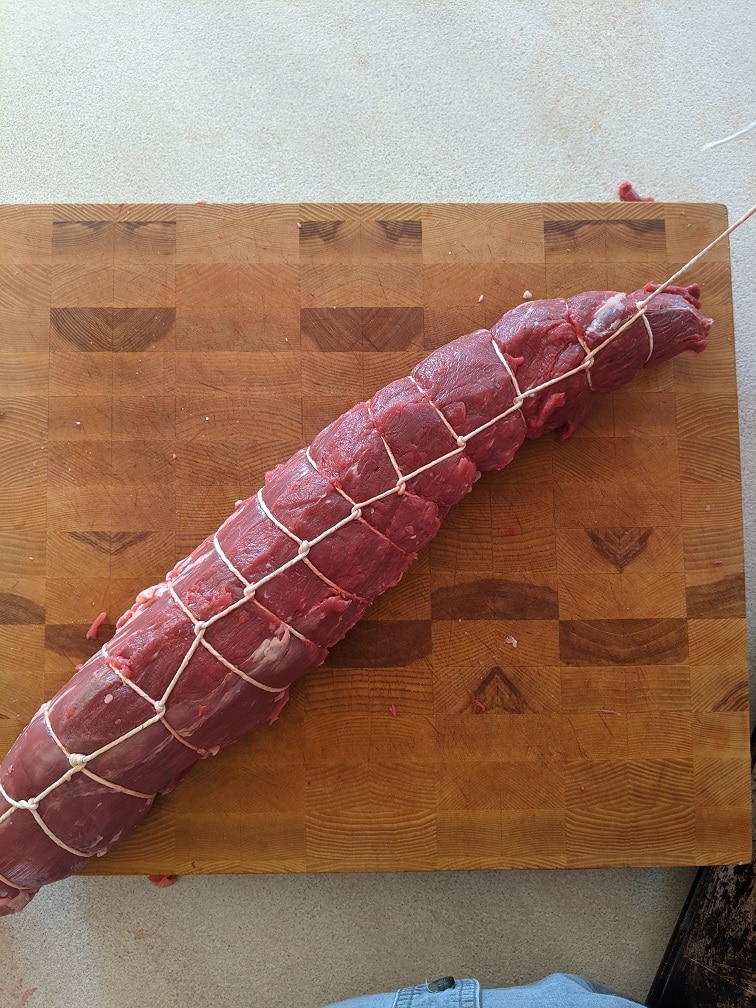
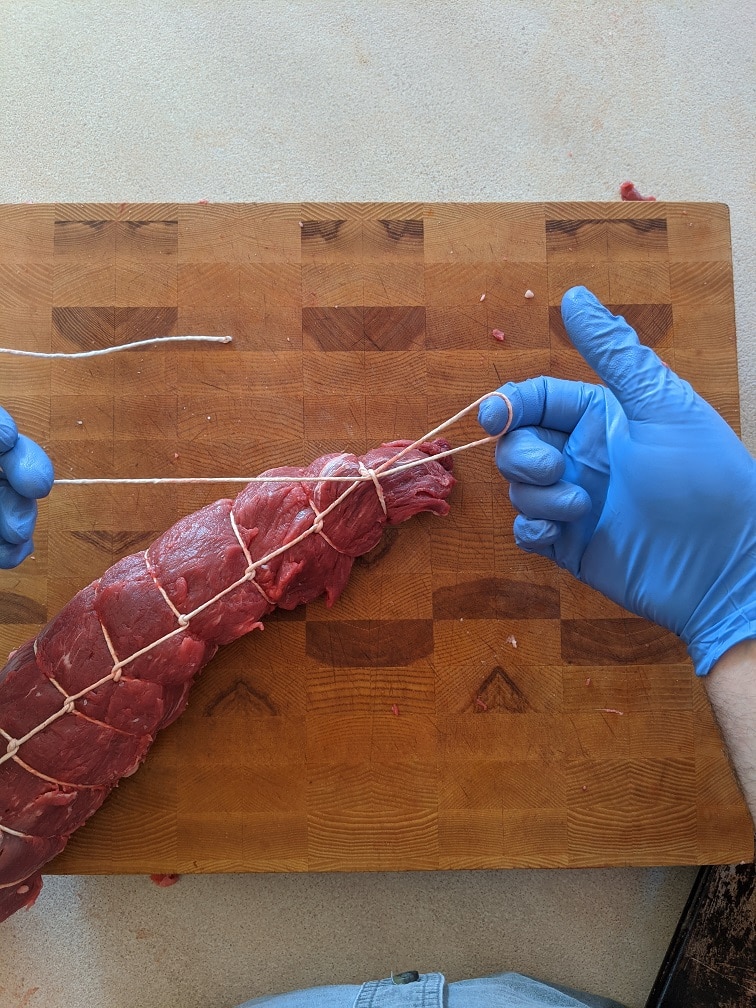
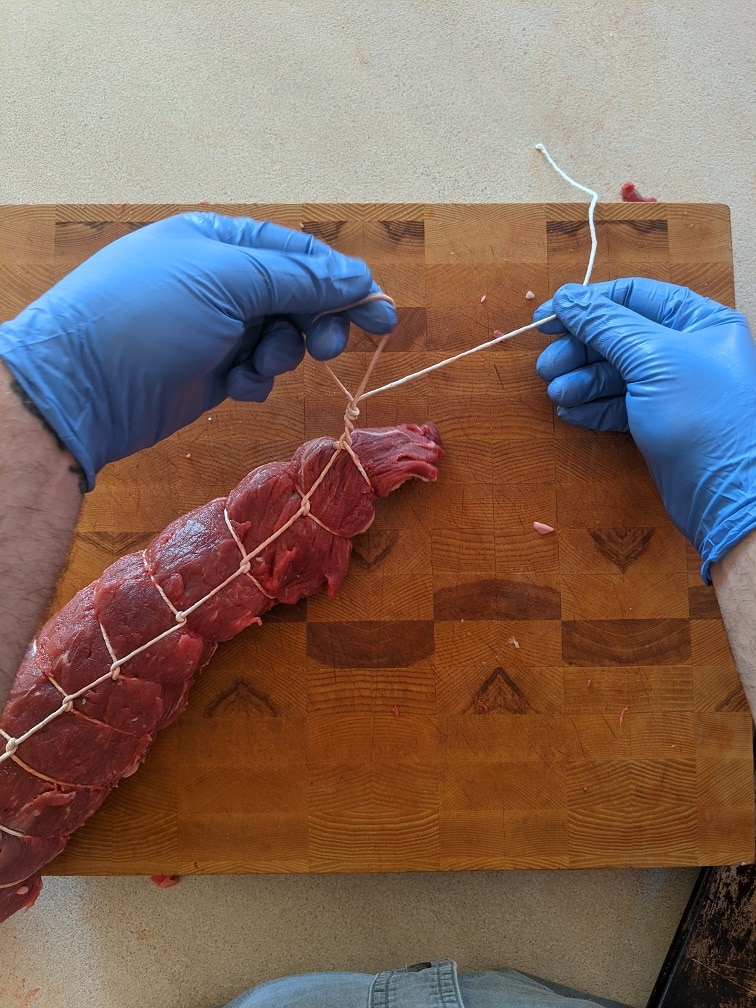
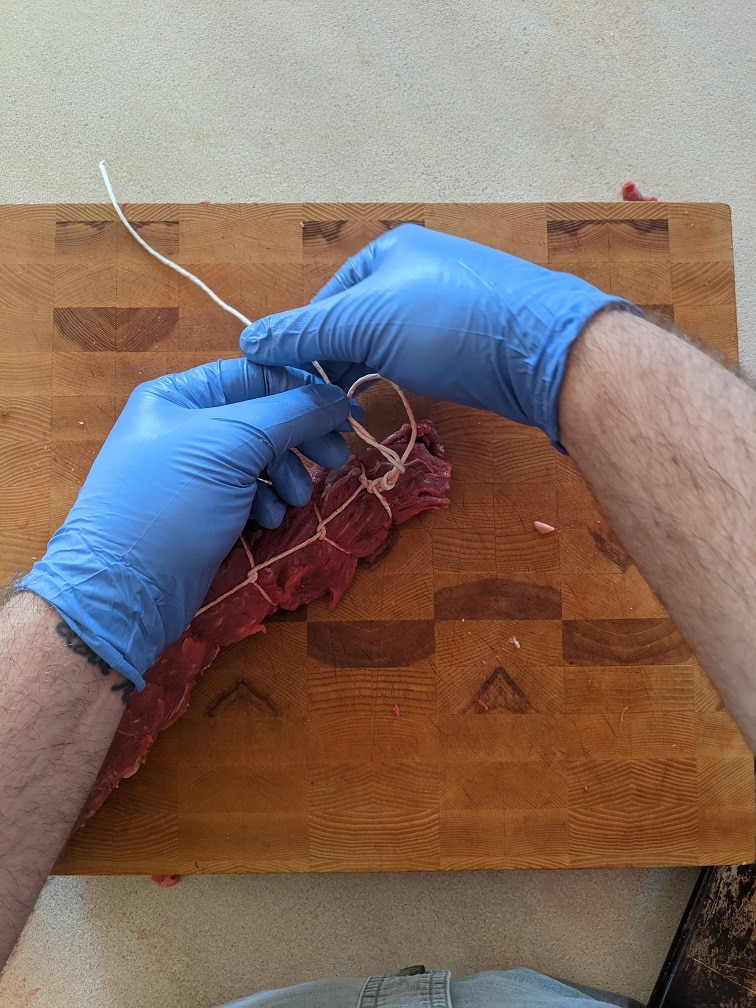
At this point, you can cut the tenderloin into steaks or tie it to be cooked whole. If you are cutting it into steaks, trim the tapered ends and add them to the scrap pile. This will help you get more equally sized steaks. If you are roasting the tenderloin whole, as I prefer to do, you are going to want to tie it. This isn’t strictly necessary, but it helps the tenderloin keep its shape when cooked and helps it cook more evenly. Use butcher’s twine to tie the tenderloin. Butcher’s twine is a 100% cotton string that you can buy in most grocery stores.
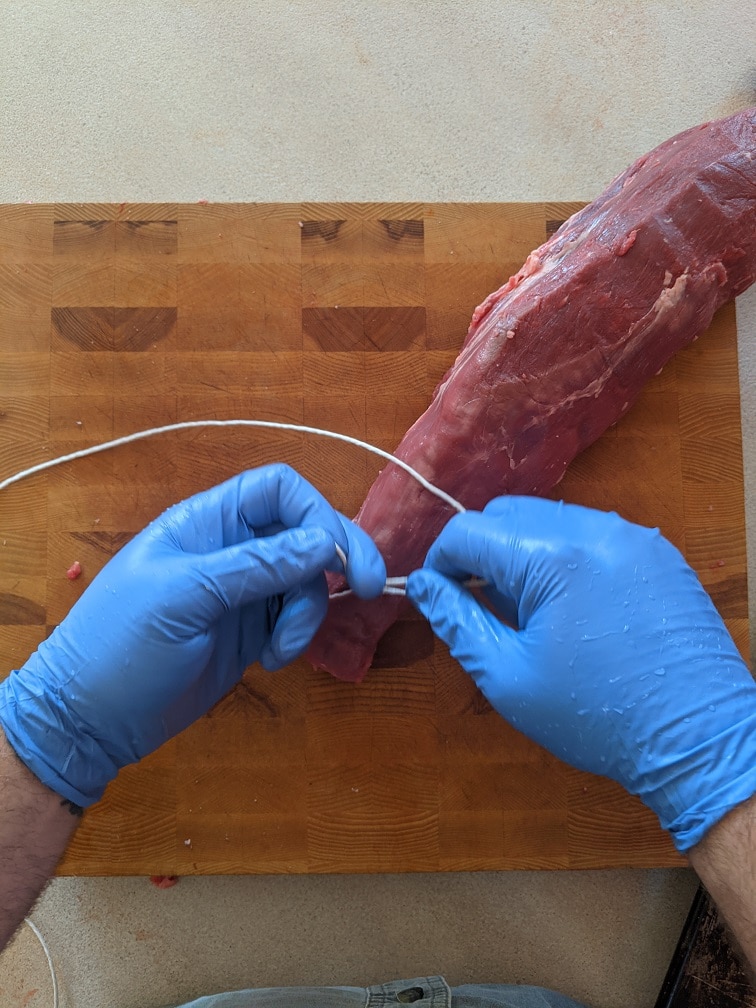
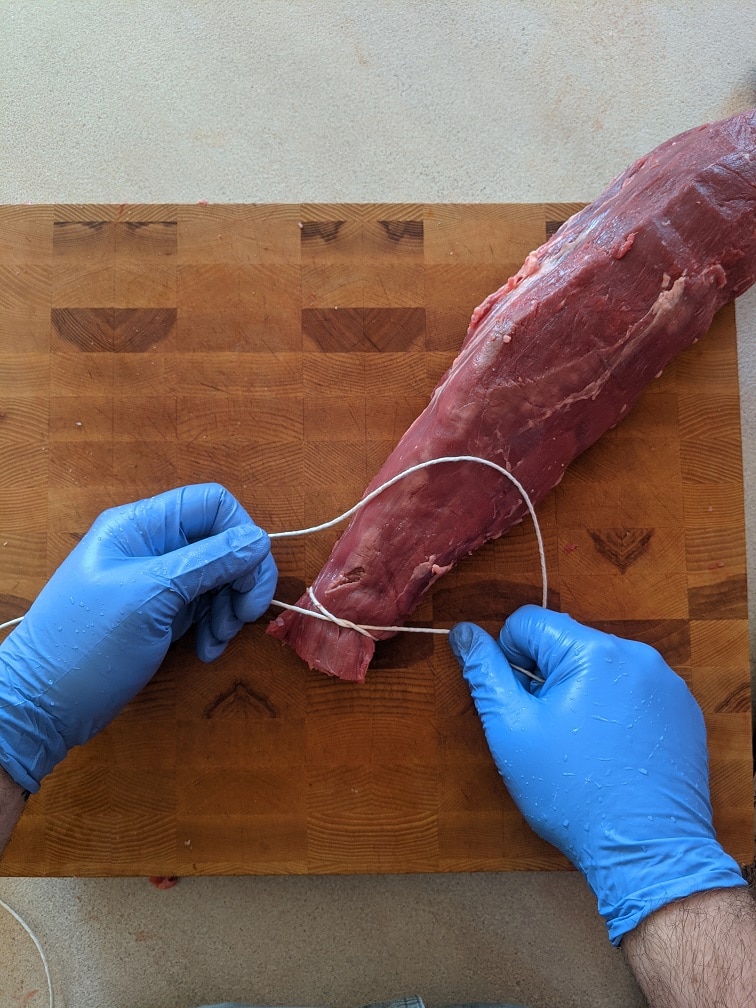
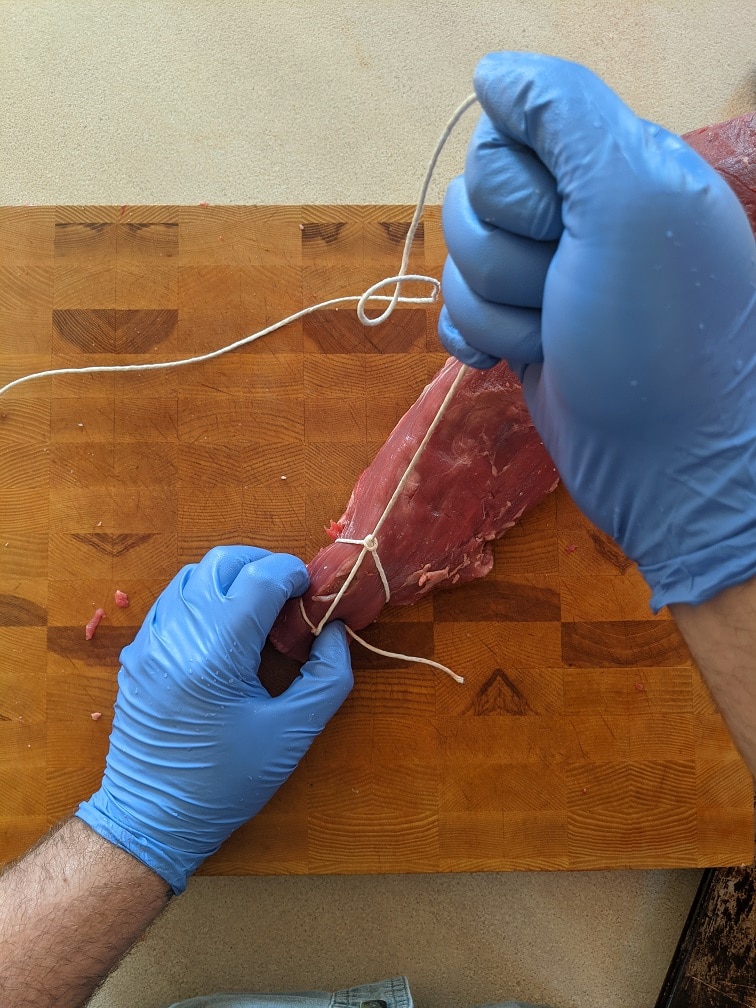
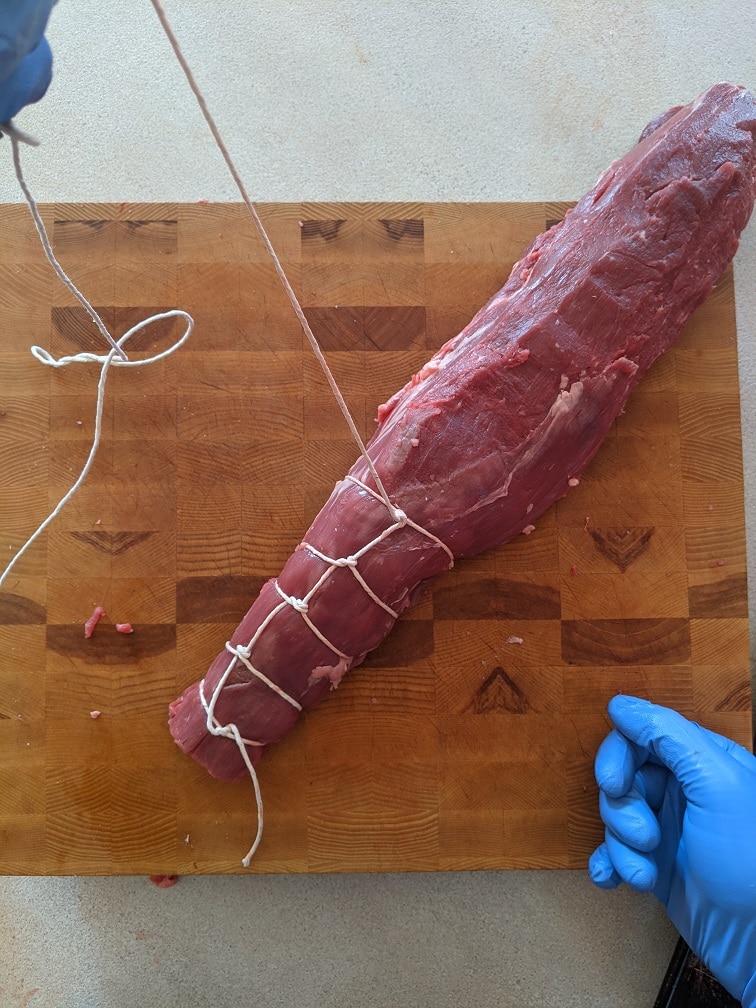
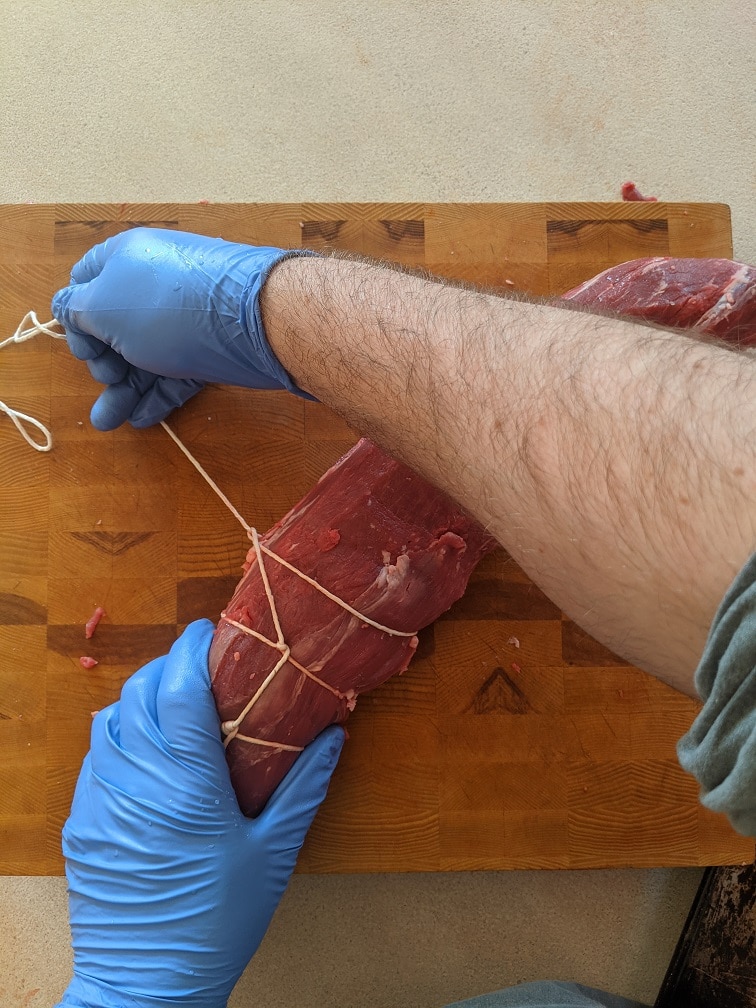
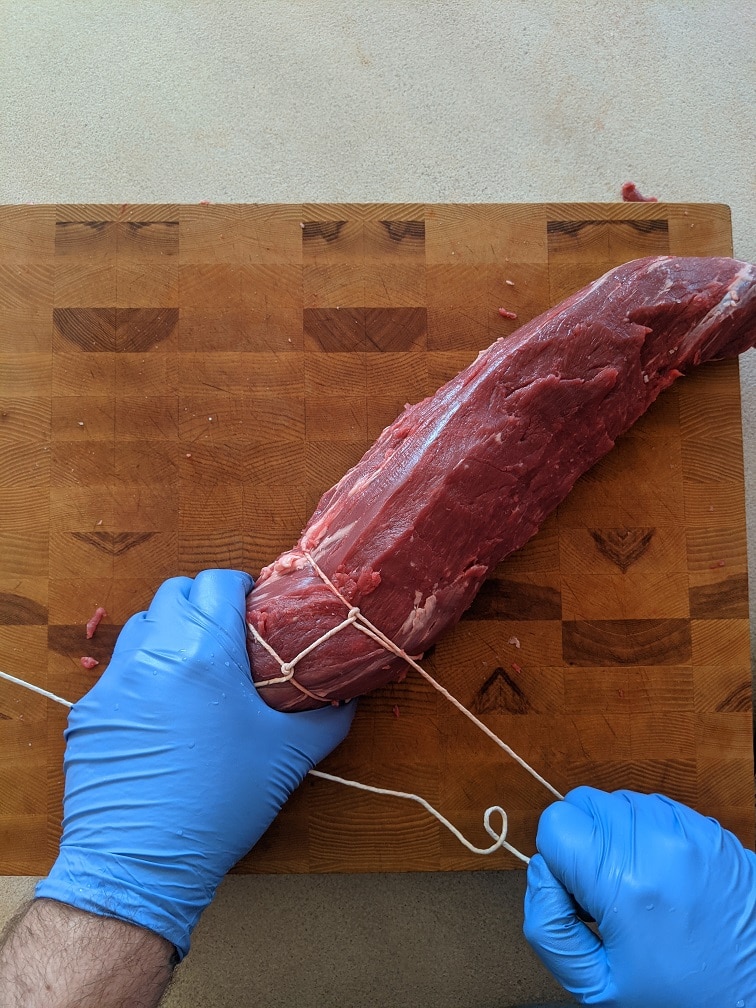
Tieing the Tenderloin
There are a few ways to tie the tenderloin. The first way is to cut 12 10-inch pieces of twine and tie each one evenly around the tenderloin. The second way and the one I prefer is to use butcher’s knots. Tie one end of the twine around one end of the tenderloin. Make a big loop with the twine and twist it twice. Thread the tenderloin through the loop and pull it tight. The loop will tighten around the tenderloin. Do the same thing again and space the second loop out from the first one by about an inch. Repeat until the whole tenderloin is tied, then cut the string and tie it off with any basic knot. This technique takes some practice, but once you get the hang of it, it becomes the easiest way to tie any roast.
The Scraps
Waste not! The scraps from your tenderloin, including the chain and trimmed fat, are perfect for making stocks or other dishes like skewers, stir-fries, or stroganoff. Every part of the tenderloin can contribute to a delicious meal.
Cooking the Tenderloin
Though this post focuses on cleaning, a basic cooking method involves rubbing the tenderloin with a mix of herbs, olive oil, salt, and pepper. Roast in a preheated oven or on a barbecue, ensuring you achieve the perfect internal temperature for your desired doneness.
Storing Beef Tenderloin
If you plan to store the tenderloin, it can be frozen either cleaned or uncleaned without losing quality. For optimal results, consider using a vacuum sealer or the original packaging.
Conclusion
Understanding how to properly clean and prepare a beef tenderloin can transform your culinary experience. Not only does it make for a more enjoyable meal, but it’s also cost-effective, allowing you to feed more people with a single purchase. Share this guide with fellow cooking enthusiasts, and don’t forget to subscribe for more tips and tricks. Happy cooking!
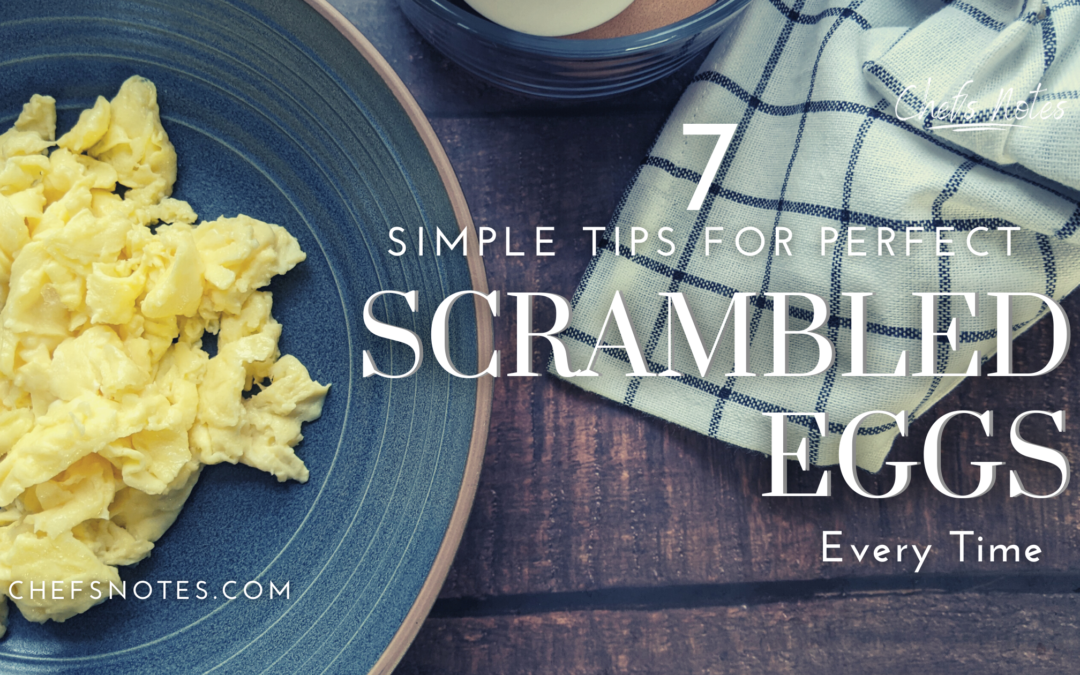
Welcome to my ChefsNotes.com! Today, we will discuss something near and dear to my heart: scrambled eggs. Scrambled eggs are one of the easiest dishes to cook, but that doesn’t mean there isn’t room for improvement. For years, I hated scrambled eggs – they were often heavy, had a weird taste, and looked strange. However, with time and practice, I learned that scrambled eggs could be amazing with just a few simple tips. In this post, I’ll share with you my seven easy tips for making perfect scrambled eggs every time, so you can enjoy this delicious dish just like I do!
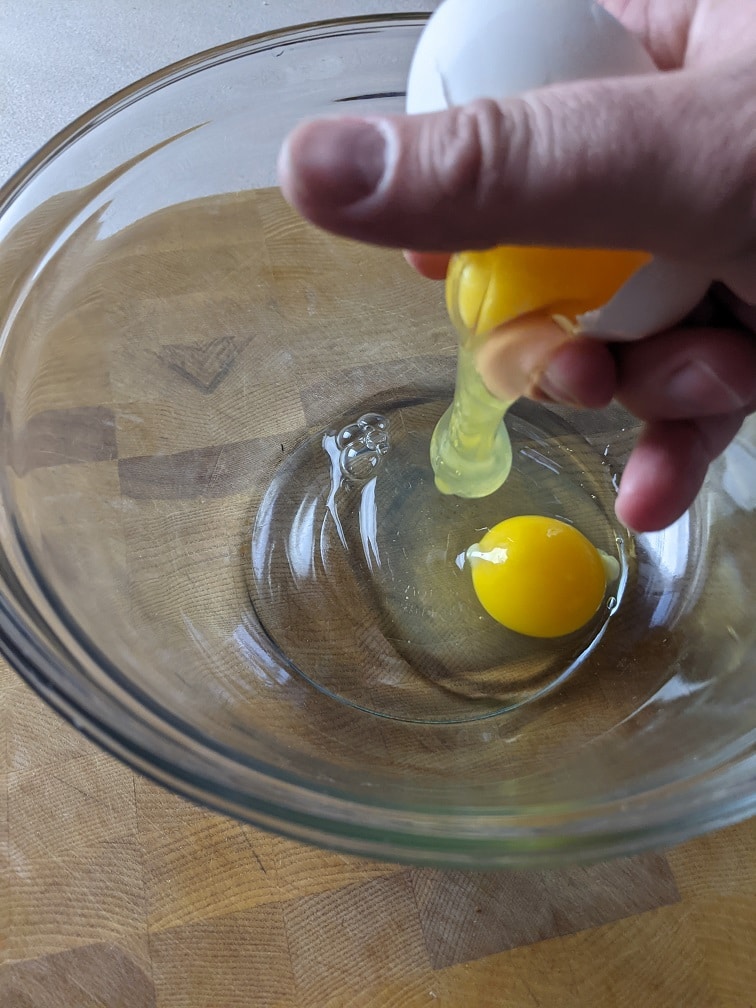
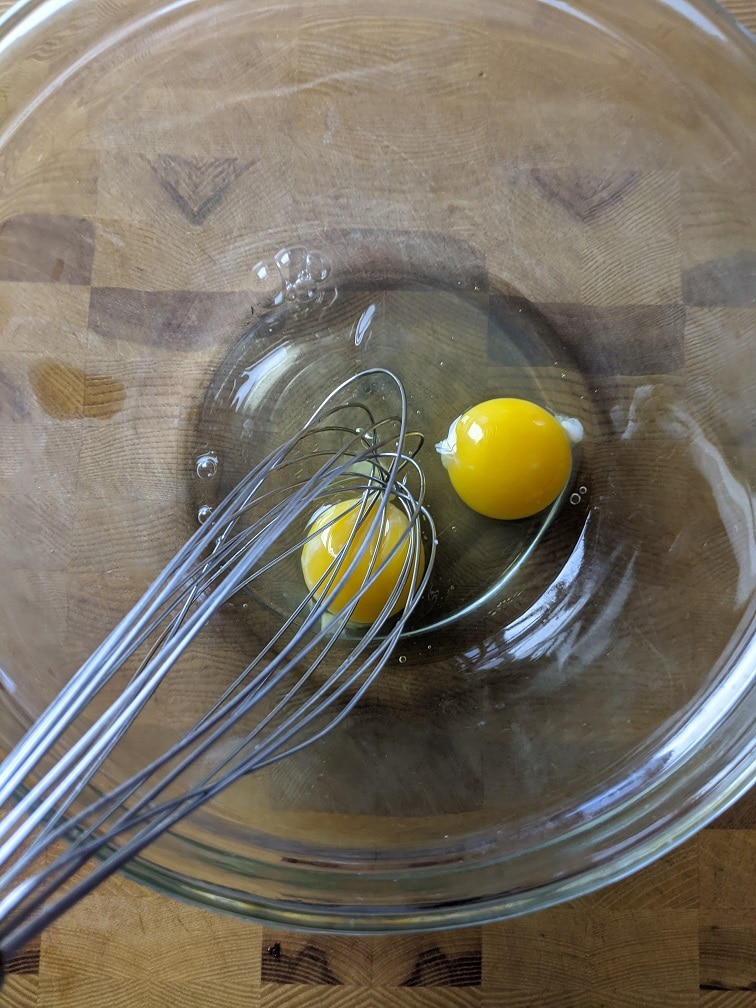
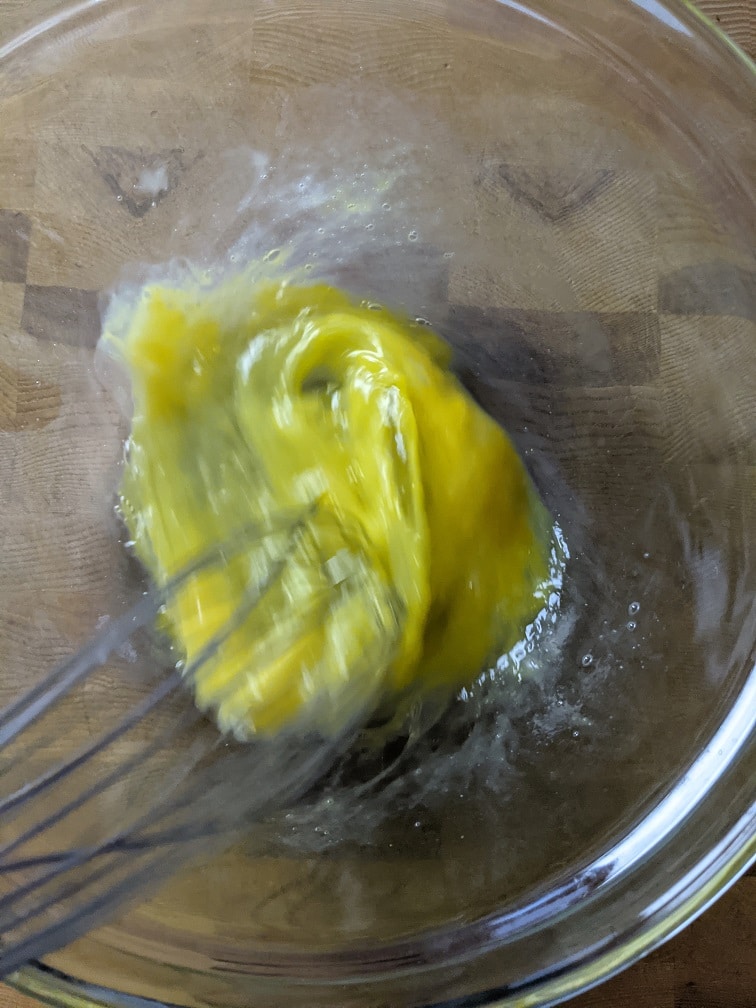
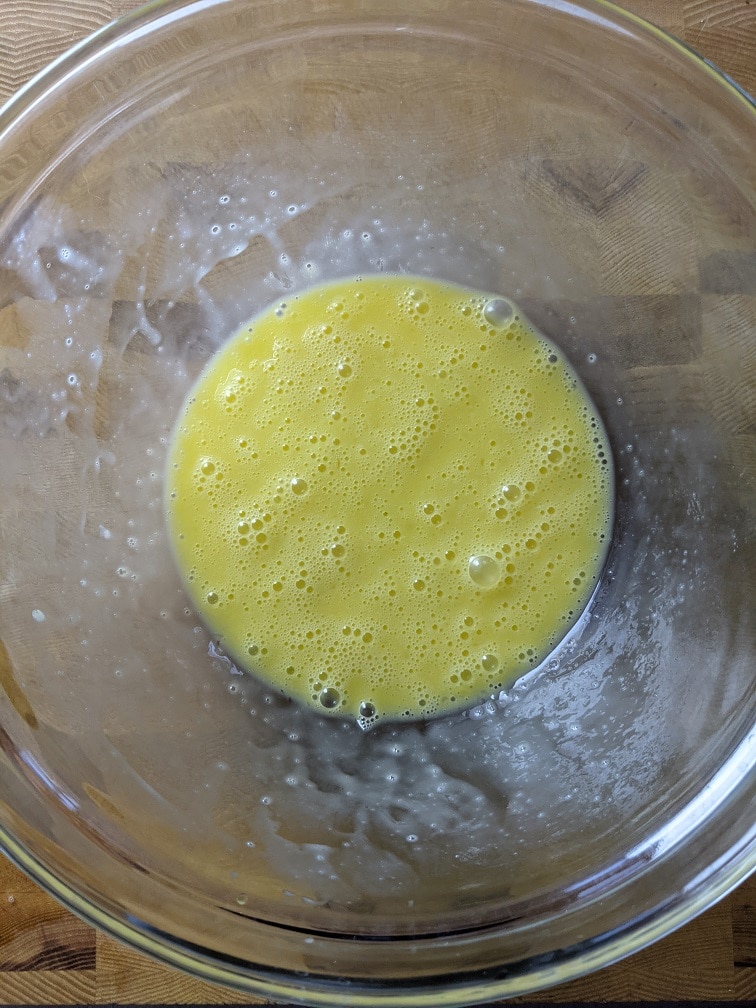
Whisk Eggs Just Enough: Avoid Overworking Your Eggs
Whisking the eggs is the first step in making scrambled eggs, but it’s important not to overdo it. Over-whisking can lead to rubbery and tough eggs, while under-whisking can result in bits of white in your scramble.
To achieve the perfect consistency, whisk the eggs until the yolks and whites are fully blended and the mixture has a uniform yellow colour. Avoid incorporating too much air into the mixture, resulting in a spongy or rubbery texture.
Using a fork or whisk, aim for a smooth, consistent mixture with no visible bits of clear white. Whisk just enough to combine the yolks and whites, and then stop. Following this tip will help you achieve light, fluffy, tender scrambled eggs that are perfect every time.
6. Don’t Add Milk Or Water To Your Scrambled Eggs
One of the most common mistakes people make when preparing scrambled eggs is adding milk or water to the eggs. While some people believe this is necessary to achieve light and fluffy eggs, it’s actually an unnecessary step that can compromise the texture of your scramble.
The truth is that milk and water can weigh your eggs down, making them dense and heavy. Additionally, if your eggs are even slightly overcooked, the milk and water can separate from the eggs and create a watery mess on your plate. For perfect scrambled eggs, skip the milk and water altogether.
If you’re accustomed to adding milk or water to your eggs, try preparing them without these ingredients just once. You may be surprised to find that they’re just as fluffy and delicious without the added liquid. Instead, focus on cooking the eggs gently and stirring them frequently to create small, soft curds.
Remember, scrambled eggs are all about simplicity. By using only eggs, salt, and pepper, you can create a delicious and satisfying breakfast that’s perfect every time. So ditch the milk and water and give it a try!
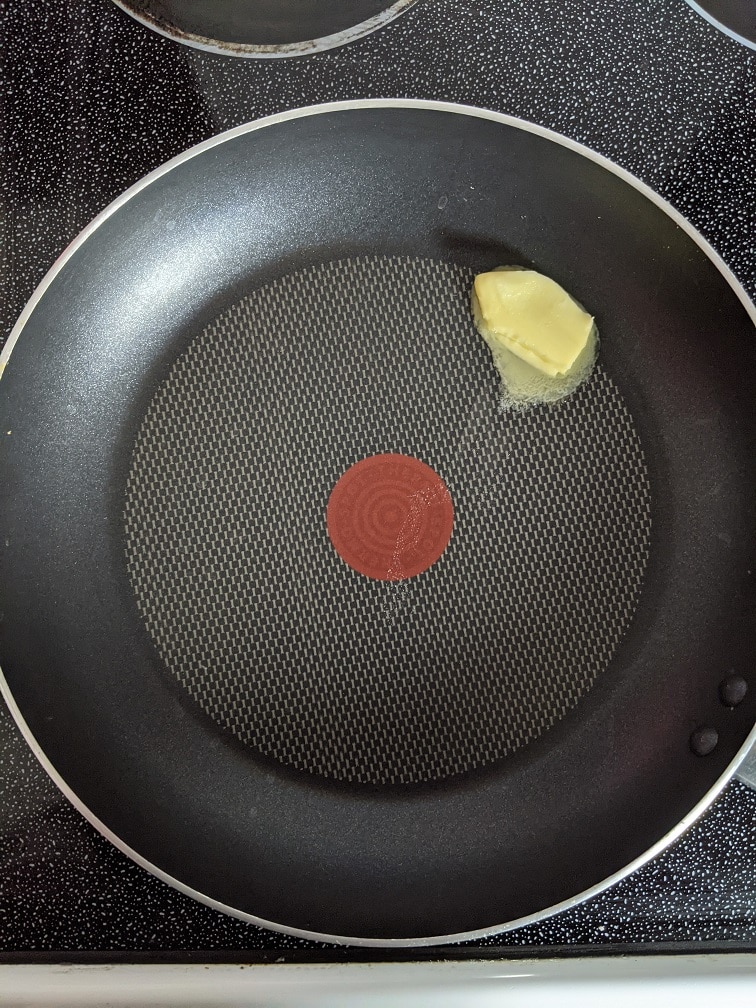
5. Use Moderate Heat and a Pre-Heated Pan
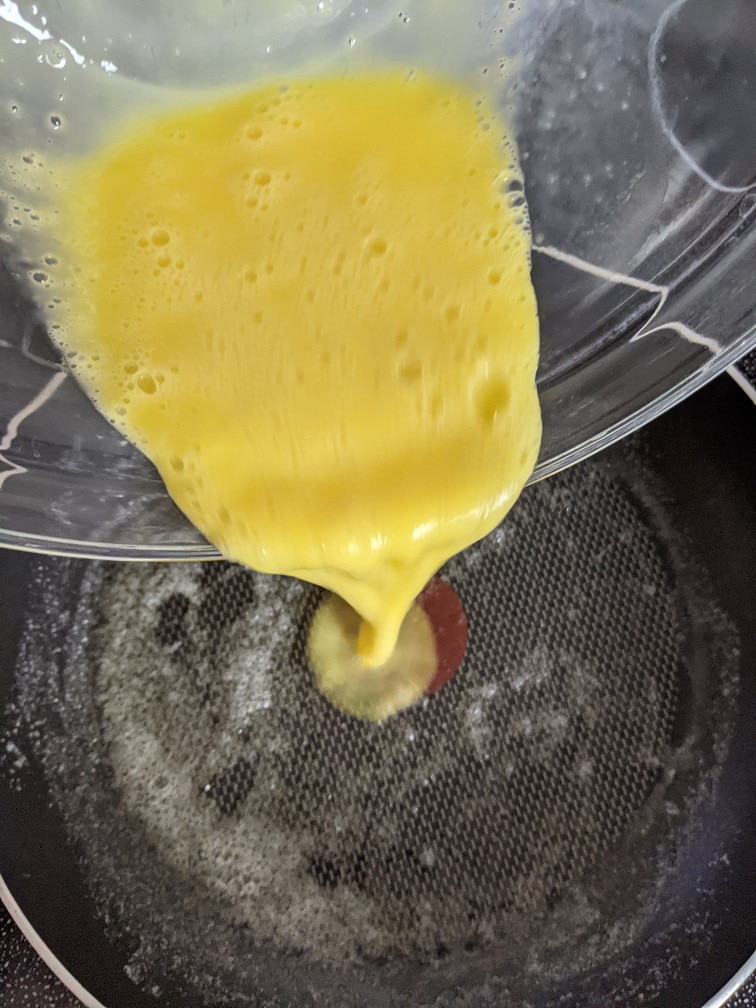
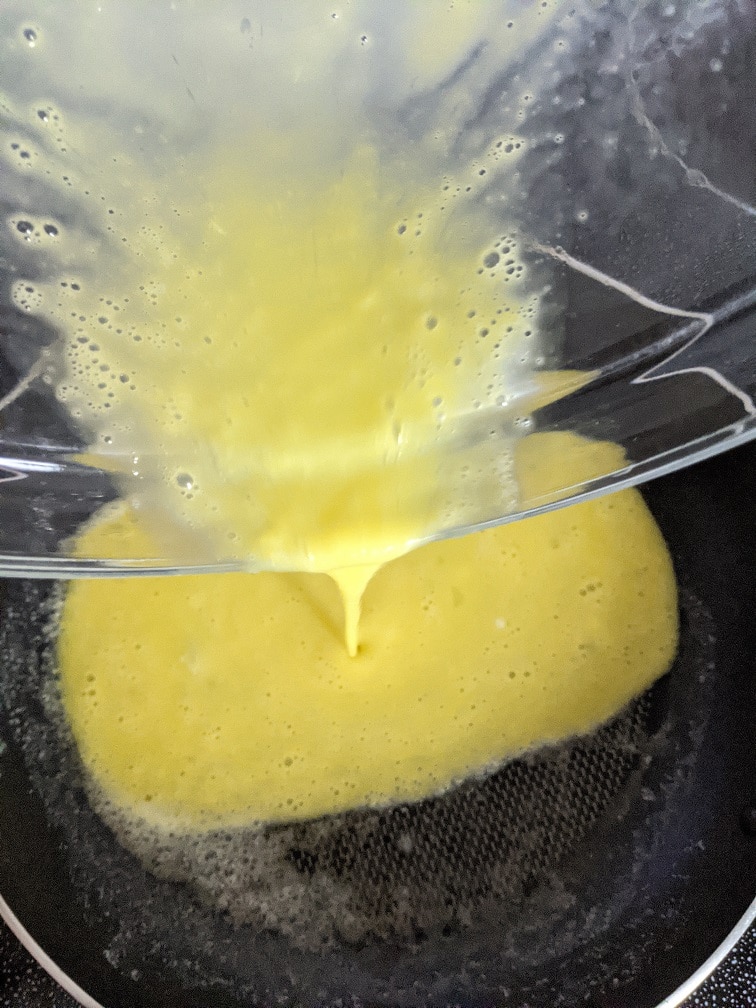
Now that you’ve whisked your eggs to perfection and skipped the milk and water, it’s time to cook them. To start, place a non-stick pan on the stove over medium heat. Give the pan time to heat up for at least two to three minutes before adding your fat or oil and eggs.
A pre-heated pan is essential for cooking perfect scrambled eggs. If you use a cold pan, your eggs will stick like glue, making them difficult to cook and resulting in an unappetizing mess. A non-stick pan is ideal for this task, but if you don’t have one, a preheated stainless steel pan will also work.
Moderate heat is also key to creating light, fluffy scrambled eggs. Avoid setting the heat too high, leading to overcooked, tough eggs. On the other hand, if the heat is too low, the eggs will take longer to cook and may be too moist.
Using a preheated pan and moderate heat, you can achieve perfectly cooked scrambled eggs that are light and fluffy with just the right texture. Keep reading for our next tip on ensuring your eggs are cooked to perfection.
4. Use Butter for Delicious Scrambled Eggs
When it comes to cooking perfect scrambled eggs, the type of fat you use matters. While you don’t need a lot of it, I adamantly believe that butter is the best option for cooking scrambled eggs. There are a few reasons for this.
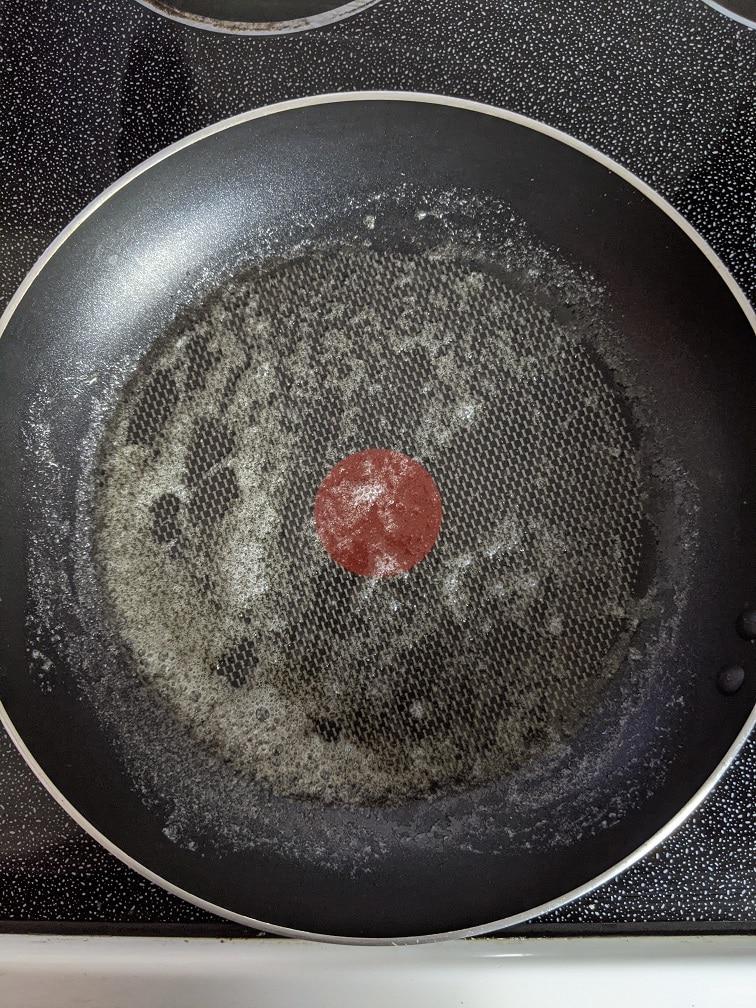
First, butter adds a rich, delicious flavour to your eggs that cooking oil or pan spray simply can’t match. Secondly, butter can help indicate when your pan is ready for the eggs. Heat your pan as described in the previous tip, then add a teaspoon or two of butter. Once the butter has melted and started to foam, the pan is ready for your eggs. Swirl the butter around the pan to coat it evenly, then pour in the eggs.
Another benefit of using butter is that it can help prevent the eggs from sticking to the pan. While there’s no official science to back this up, many cooks swear by butter for non-stick scrambled eggs. If you’re concerned about the cholesterol content of butter, you can use a plant-based alternative like coconut oil or vegan butter.
To make your scrambled eggs truly delicious, use high-quality butter and fresh eggs. By using these tips and tricks, you can create scrambled eggs that are light, fluffy, and absolutely delicious. Keep reading for our next tip on achieving perfect scrambled eggs every time!
3. Season Scrambled Eggs After Cooking
Salt and pepper are a classic seasoning combination for scrambled eggs, but it’s important to add them at the right time. Adding salt to the eggs before cooking can lead to several problems.
Firstly, the salt may draw moisture out of the eggs, leaving them dry and tough and resulting in a pool of unpleasant egg water on your plate. Secondly, salt can cause the eggs to discolour, leading to grey or even slightly green eggs with an off flavour.
To avoid these issues, it’s best to season your scrambled eggs after they are cooked. Once the eggs are cooked to your liking, remove them from the heat and then add salt and pepper to taste. This will ensure that your eggs are perfectly seasoned and full of flavour without being compromised by excess moisture or discoloration.
For an added burst of flavour, consider adding other seasonings like fresh herbs or spices to your scrambled eggs. Chives, thyme, or parsley are all great options for adding a pop of flavour to your scramble.
2. Don’t Over Scramble The Eggs
Believe it or not, it is possible to over-scramble your eggs. Over-scrambled eggs can look like tiny cheese curds before being pressed into cheese, with a texture that’s far from ideal. For perfect scrambled eggs, you want them to have some texture and body without being overworked.
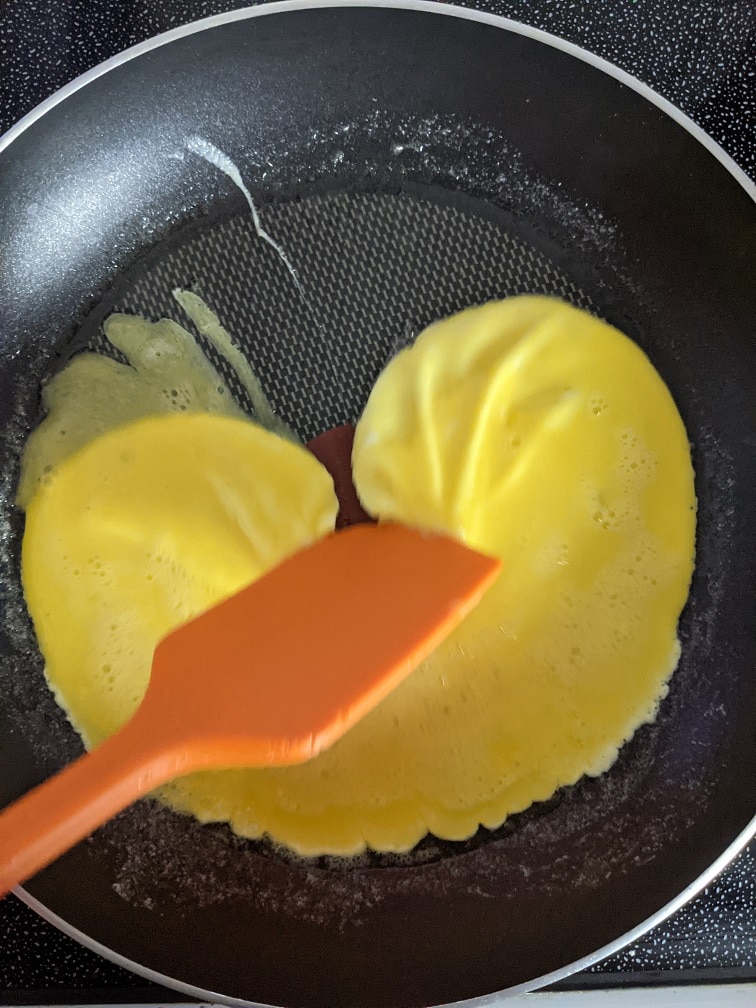
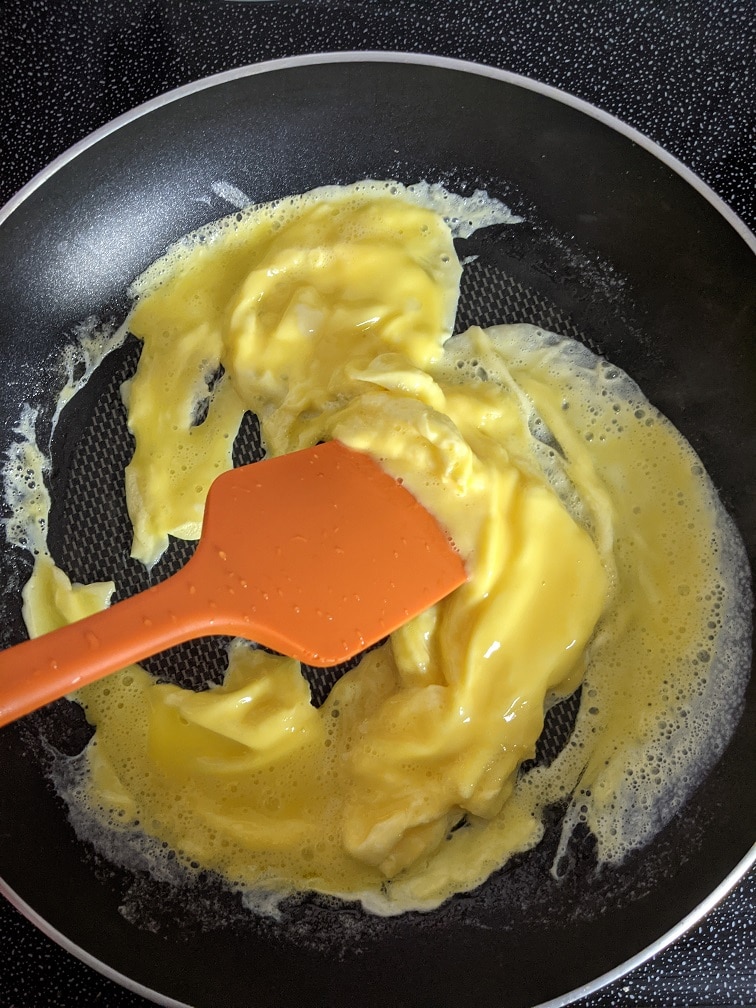
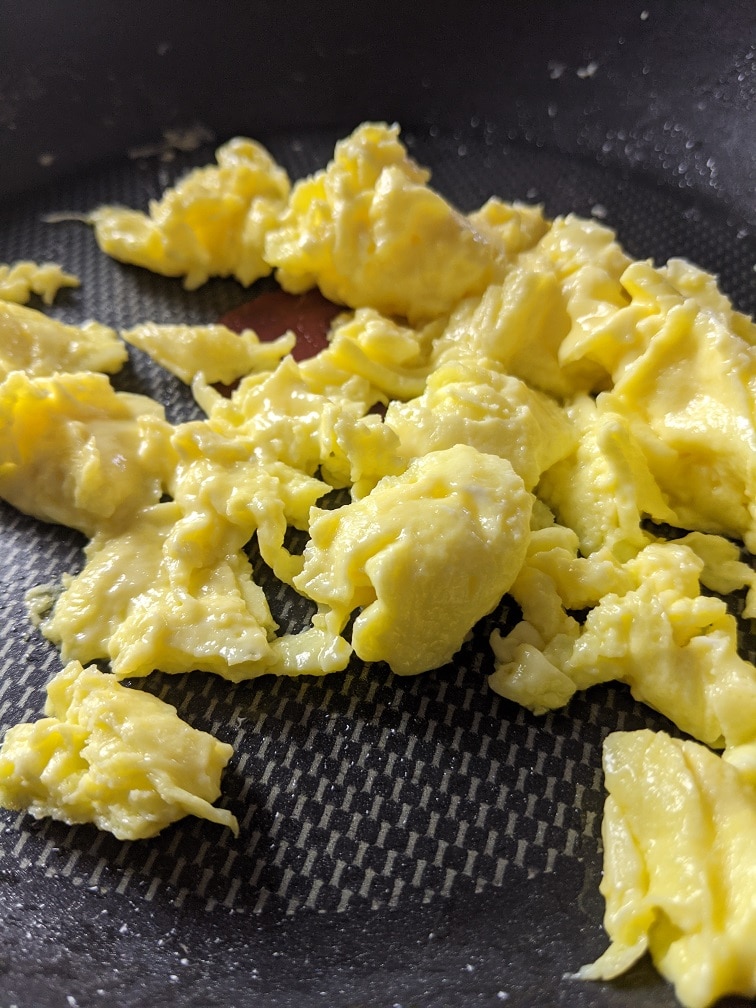
The technique for achieving the perfect texture is simple. Start by pouring your whisked eggs into the preheated buttered pan, then let them sit for a few seconds. Next, stir the eggs gently with a rubber spatula, then let them sit for a few more seconds. Repeat this process for a minute to a minute and a half or until the eggs are just about cooked.
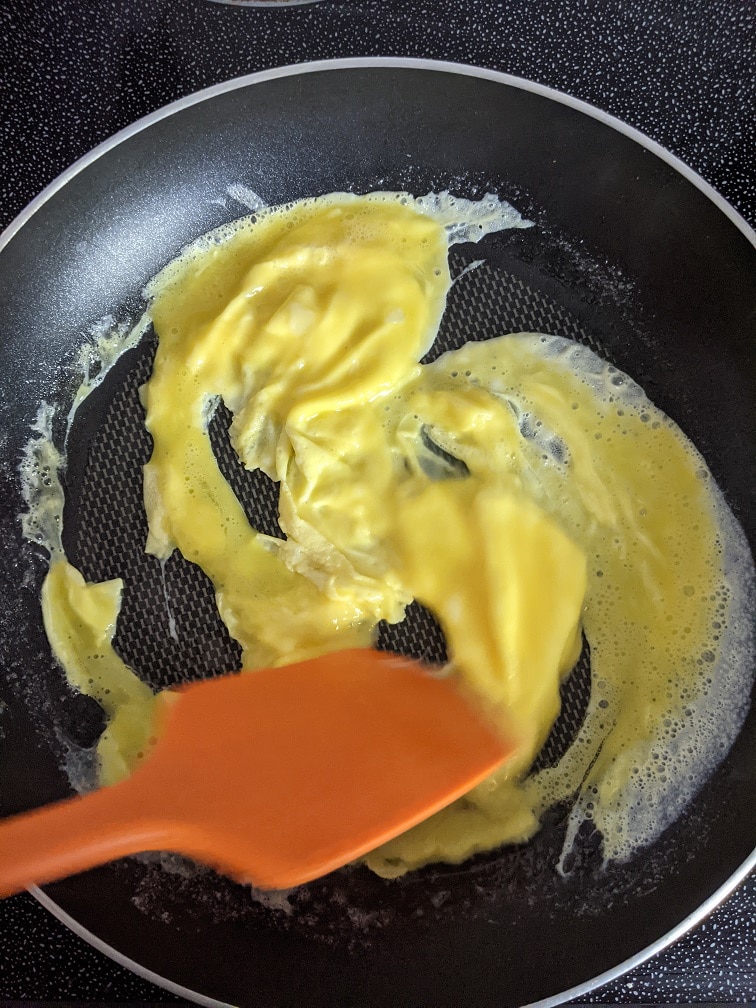
It’s important to note that the eggs will continue to cook even after you remove them from the heat, so it’s best to slightly undercook them to ensure they’re perfectly tender and not dry or rubbery. By gently stirring the eggs and letting them sit, you’ll create soft, delicate curds that are a joy to eat.
Remember, scrambled eggs should have some texture and body, but they shouldn’t be mashed to a pulp. By using a gentle hand and the right technique, you can create scrambled eggs that are light, fluffy, and absolutely delicious.
1. Don’t Over Cook Your Scrambled Eggs
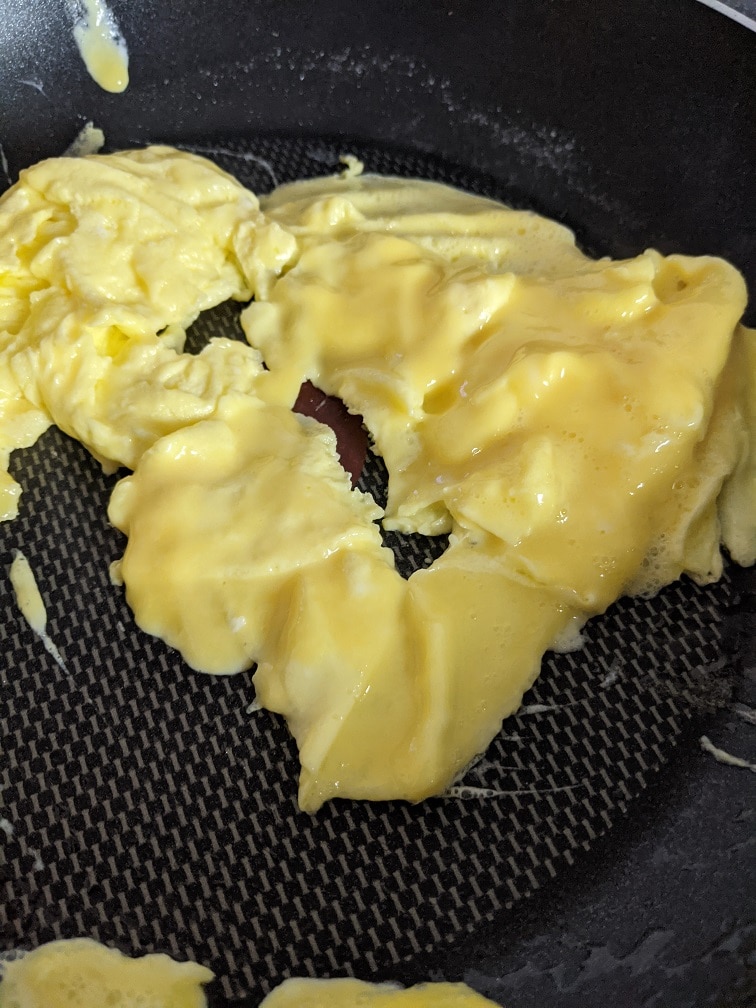
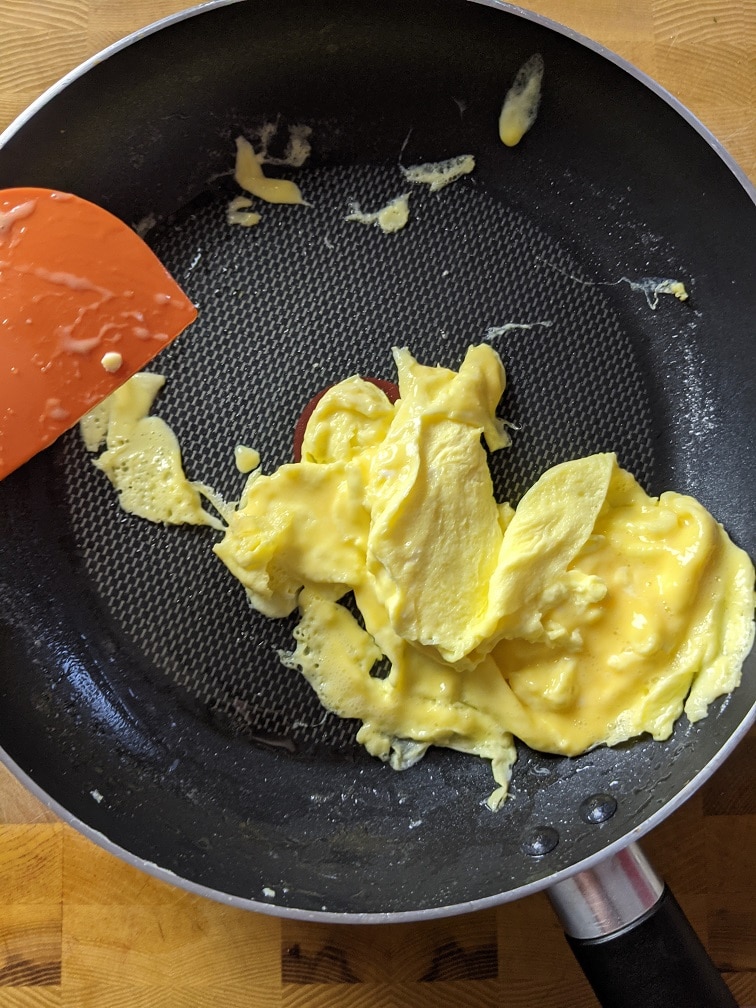
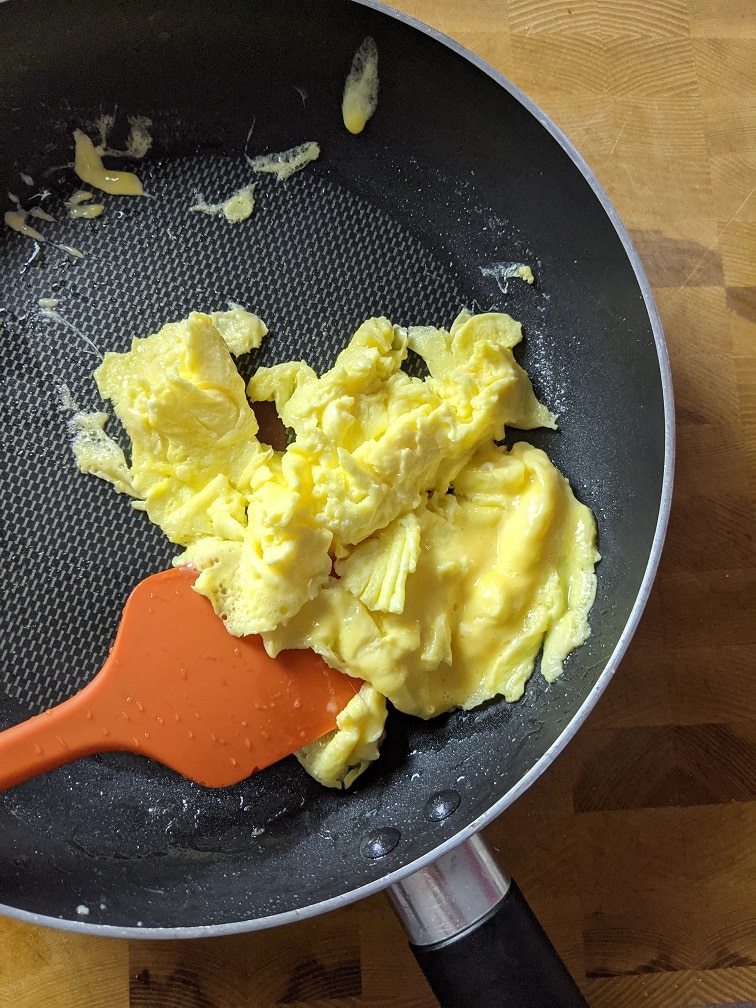
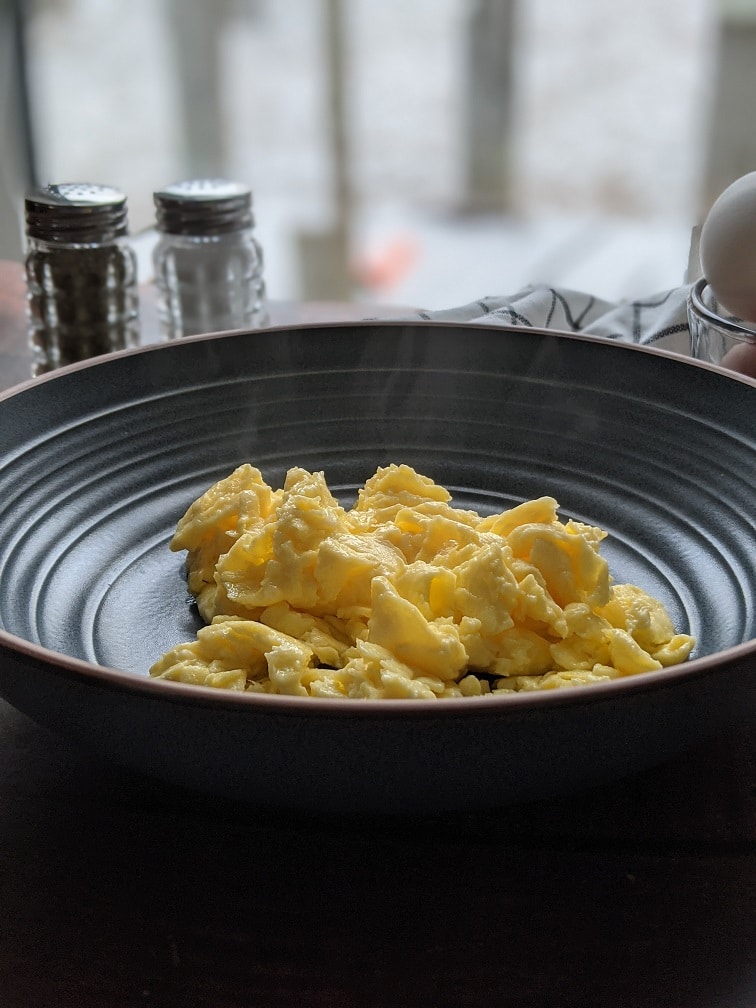
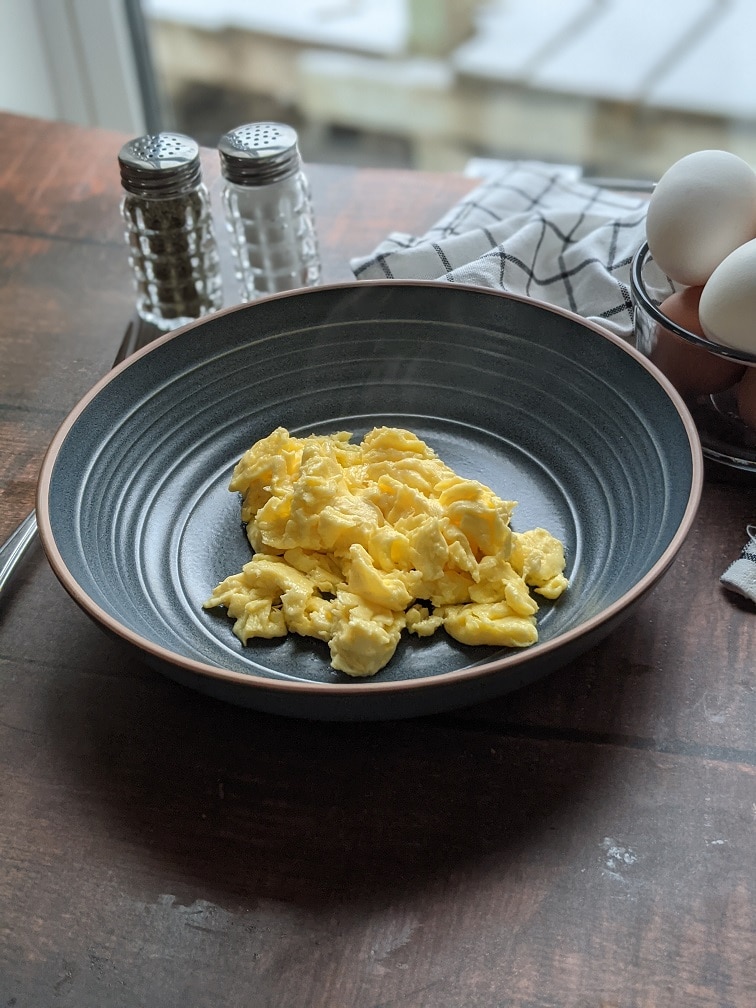
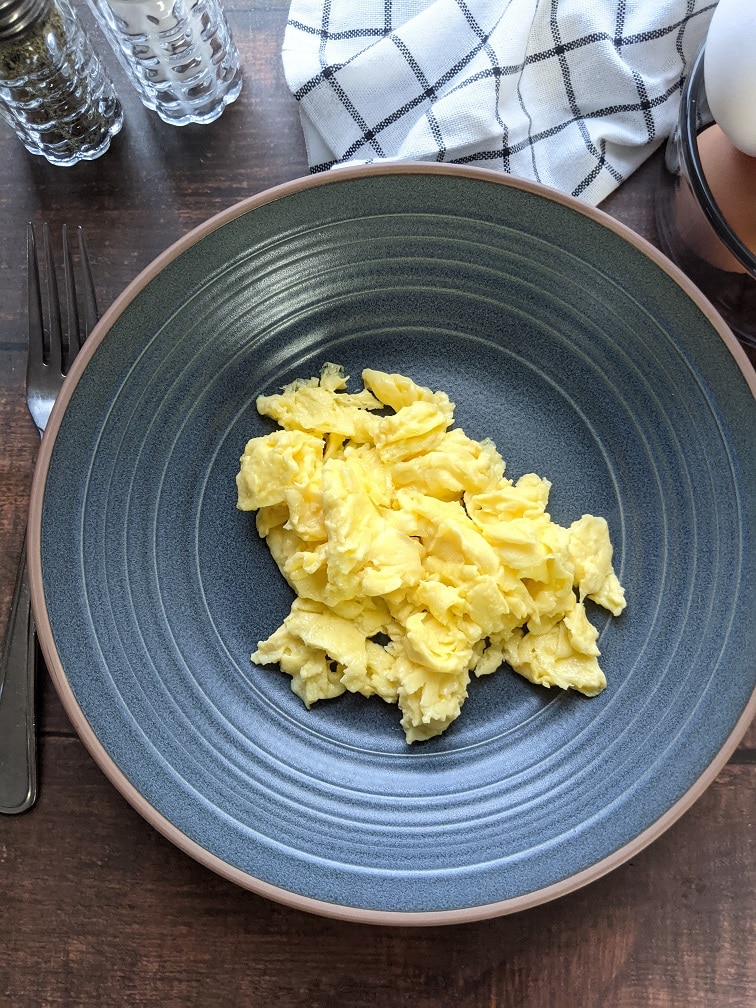
The final, most obvious, and most important tip is not to overcook your eggs. The French style of making scrambled eggs is to leave them a little bit runny. That’s not what I’m suggesting. What I’m saying is don’t overcook them. When overcooked, they become tough, gritty, heavy, tasteless, and watery if you added liquid to them. Eggs especially scrambled eggs, are fragile when it comes to heat. They don’t like a lot of it. So, once the eggs are about three-quarters of the way cooked, take the pan off the heat. The residual heat in the pan will be more than enough to finish cooking the eggs. Once the eggs are cooked, take them out of the pan and serve them immediately. Perfectly cooked scrambled eggs are a bit shiny and moist. They don’t look dull and dry.
The Wrap Up
Scrambled eggs are a breakfast staple, but making them perfect every time can be challenging. The good news is that it doesn’t take much to go from terrible to amazing. By following the simple tips we’ve shared, you’ll be able to achieve perfect scrambled eggs that are light, fluffy, and full of flavour.
Remember, simplicity is key when it comes to cooking eggs. Eggs are already a nearly perfect food on their own, and they don’t need to be overcomplicated or overworked. The more you add or fuss with them, the more likely they are to go wrong.
Some of the essential tips for making perfect scrambled eggs include using high-quality eggs, avoiding over-whisking, cooking on moderate heat, using butter as a fat, seasoning after cooking, and avoiding overcooking. By following these simple tips, you can create scrambled eggs that are both beautiful and delicious.
If you have any other tips or tricks for perfect scrambled eggs that we missed, be sure to share them in the comments below. We’d love to hear from you!
Thanks for reading, and we hope you enjoy perfect scrambled eggs every time. Stay tuned for more cooking tips and delicious recipes!
Thank you for reading this post. Please share it on Facebook, Pinterest, or Twitter to help Chef’s Notes grow. Subscribe to Chef’s Notes below, and you will never miss a post again.
We’ve all got them. They may be in a neat and tidy spice rack or jammed into an overstuffed cupboard that avalanches out every time we open it. Either way, spices and seasonings are our gateway to flavour and our ticket to travel the world without ever leaving our kitchens. Today we will root around in the cupboard, find some very common spices and seasonings and look at how we can use them in uncommon ways to create incredible flavours. We’ve got a lot to cover, so let’s get to it. After you read this, be sure to check out my post, 5 Cooking Principles for Success, to learn some real tips to improve your cooking.
Herbs
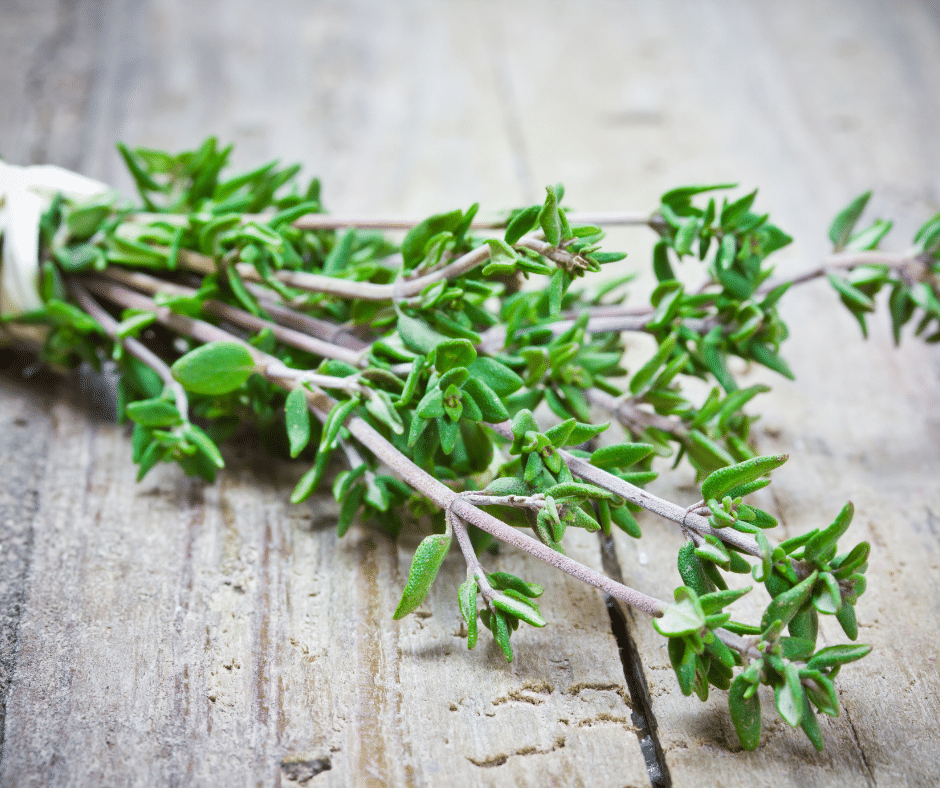
Thyme
Thyme is one of my all-time favourite herbs and one that I use more than almost any others. It can be used either fresh or dried, though I much prefer to use it fresh. Thyme is commonly used with pork though it is also fantastic with chicken, beef and fish. It can be added to soups, stews and chowders (especially clam chowder), sauces, roasted vegetables, and even bread. Thyme can also work well in sweet applications such as lemon and thyme muffins, blueberry crumble, or even apple crumble. This is an herb that I always have in the fridge and ready to go because it works with pretty much everything.
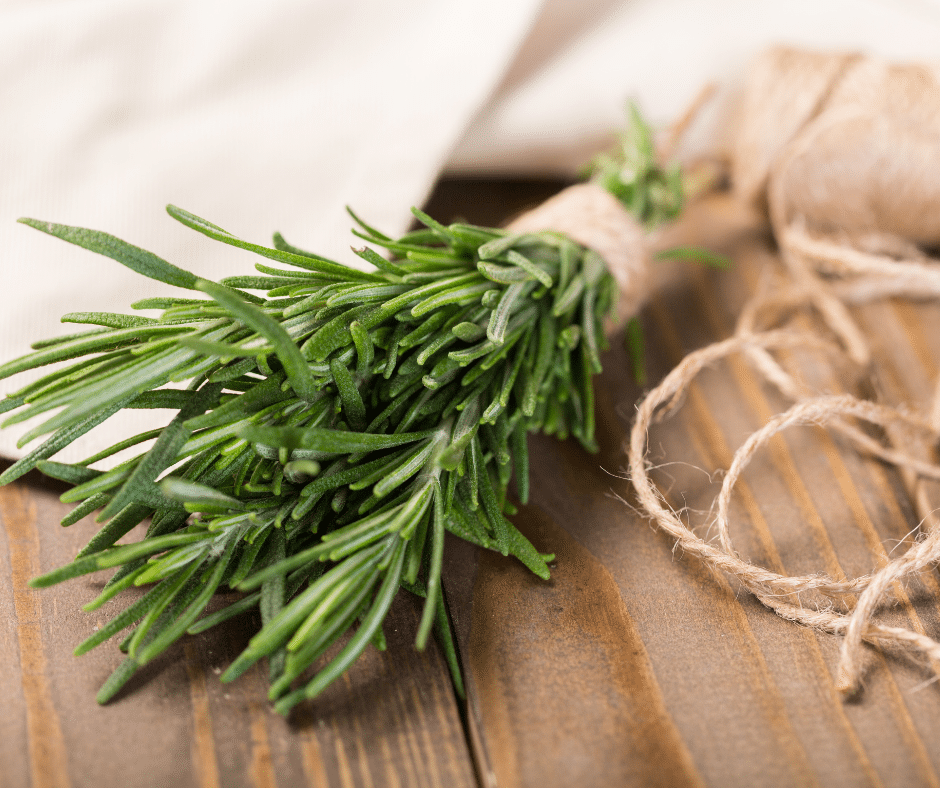
Rosemary
Rosemary can be used fresh or dried, but like thyme, I prefer to use it fresh. In fact, assume unless I say otherwise that all the herbs on this list are used fresh. It will save us all a lot of time. Rosemary has a strong initial flavour, but it can break down fairly quickly when cooked for long periods of time. For this reason, it is better to add rosemary around the middle of cooking rather than at the start. Rosemary works incredibly well with red meat and chicken, pork and even halibut, cod, and mackerel. It is great with beans, grilled or roasted vegetables and pairs well with lemon and garlic. I love to use it when braising beef or lamb in tomato sauce with a little red wine. Mushrooms and rosemary are good friends and go very well together in pasta with sausage and white sauce or risotto. Rosemary and tomato, either fresh or as sauce goes very well together too.
Parsley
Parsley should always be used fresh. Dried parsley has little to no flavour and lacks the bright green colour of fresh parsley. You can buy either flat-leaf (Italian parsley) or curly parsley. If you have a choice go with the flat-leaf, it has a better flavour. If you don’t have a choice, either will do. I use parsley mostly as a finishing herb. Not that I sprinkle it over the plate for garnish. I mean, if I’m making pasta, I’ll toss the pasta and the sauce together and finish it with a handful of parmesan, a handful of chopped parsley, and a nub of butter. The parsley adds a fresh, vibrant flavour that doesn’t overpower the rest of the dish. It also adds a bit of colour. Parsley can also be added to soups and chowders. Because of its neutral, fresh flavour, parsley pairs well with just about anything.
Basil
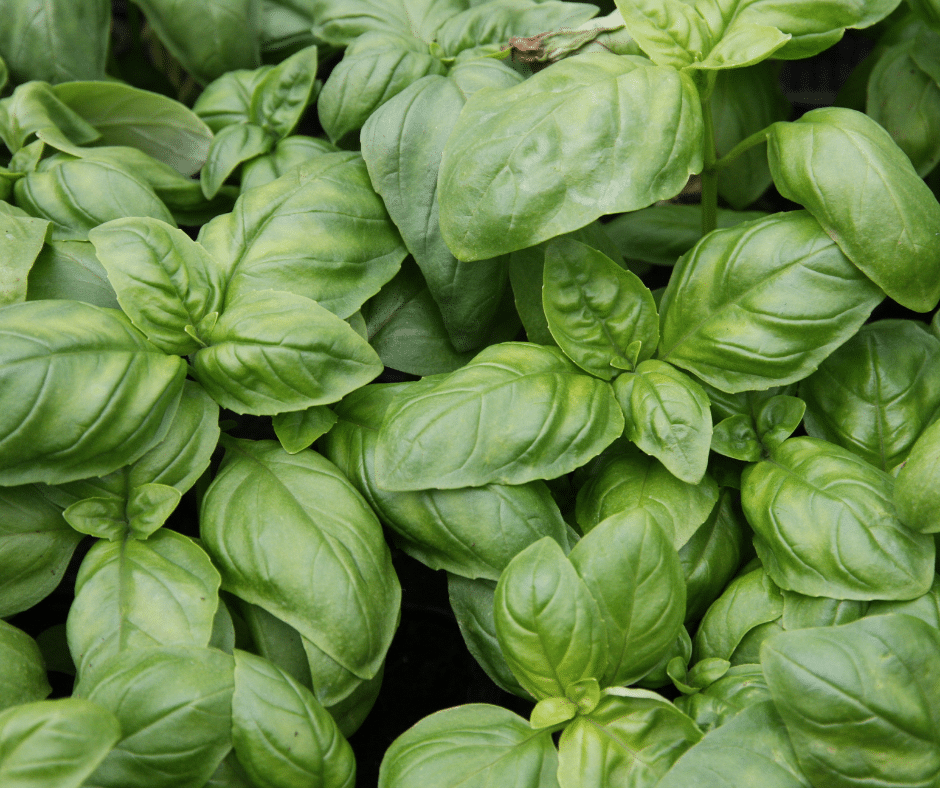
Basil obviously can be used to make pesto and pairs incredibly well with tomato in any form. But, did you know that it can be used just as easily with strawberries (especially in strawberry shortcakes), blueberries, peaches and white chocolate? It is also fantastic with white fish, especially when served with white beans. Dried basil can be used in sauces, but fresh is the way to go for other applications. For a surprisingly delicious combination, throw a small handful of fresh basil into your next coconut curry.
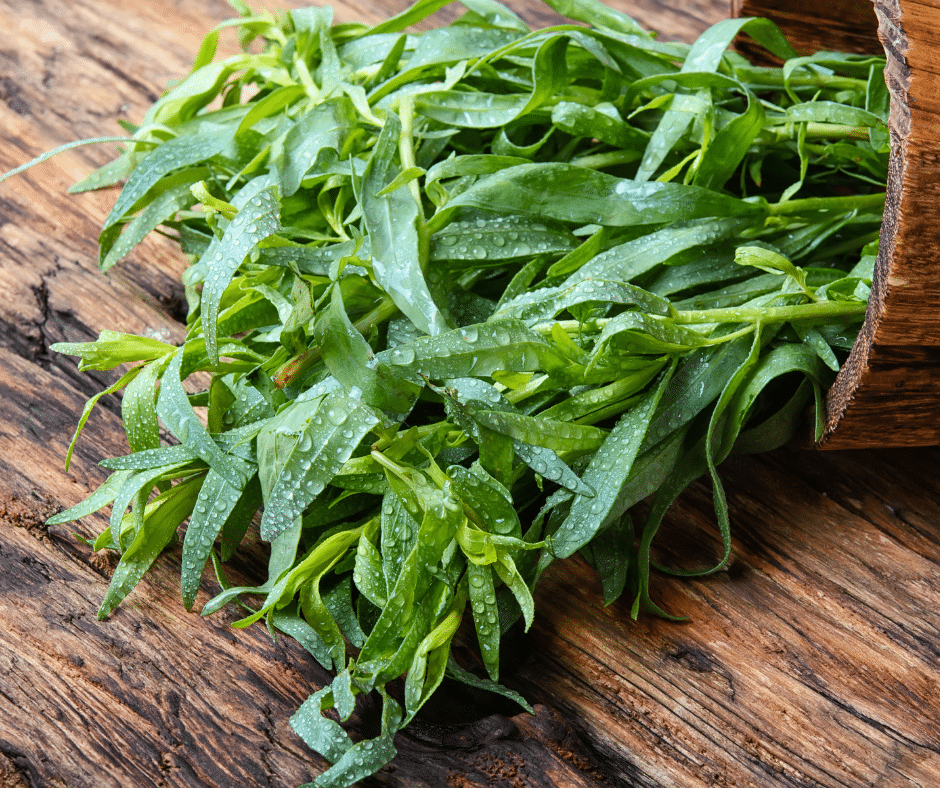
Tarragon
Tarragon is most commonly paired with deep flavours like mushrooms and beef. However, a little bit of tarragon in a seafood chowder is a thing of true beauty. It goes very well with chicken, especially with a little lemon as well as beets, and fish. In general, it is best to not use tarragon in combination with other herbs, as they have a tendency to clash.
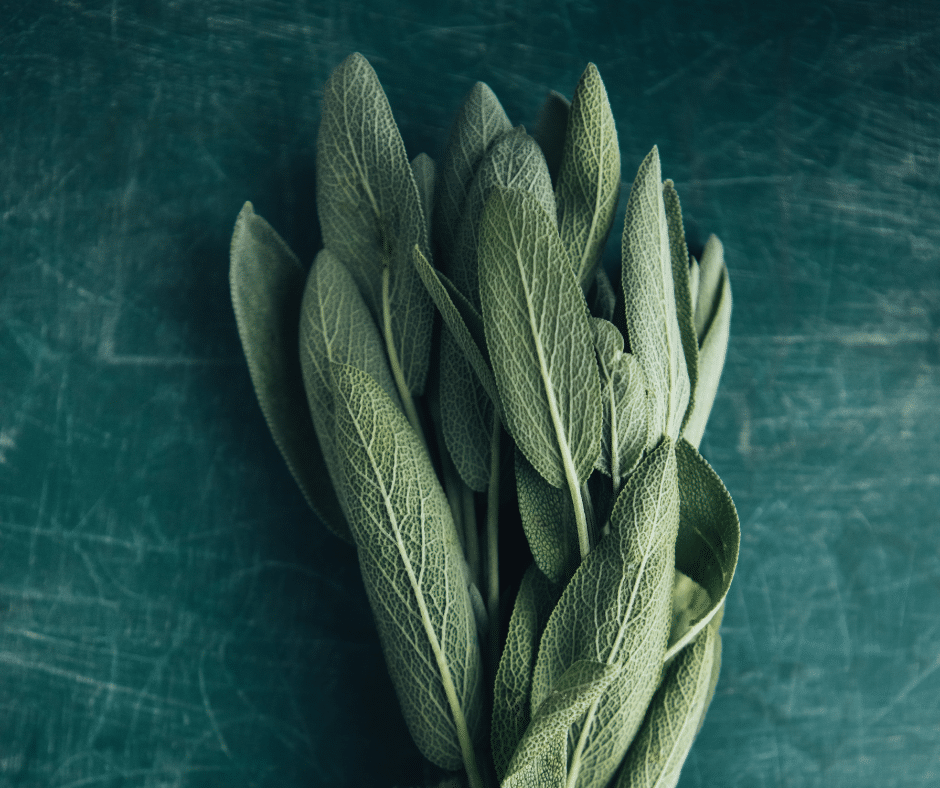
Sage
Sage goes well with beef, chicken, turkey, pork, rabbit, squash, and mushrooms. It can be used in stews and stuffings. It also goes very well with pasta combined with cream sauce, or brown butter, especially with ravioli stuffed with mushrooms, sausage, or squash. Sage can also be used with seafood, especially in Spanish paella.
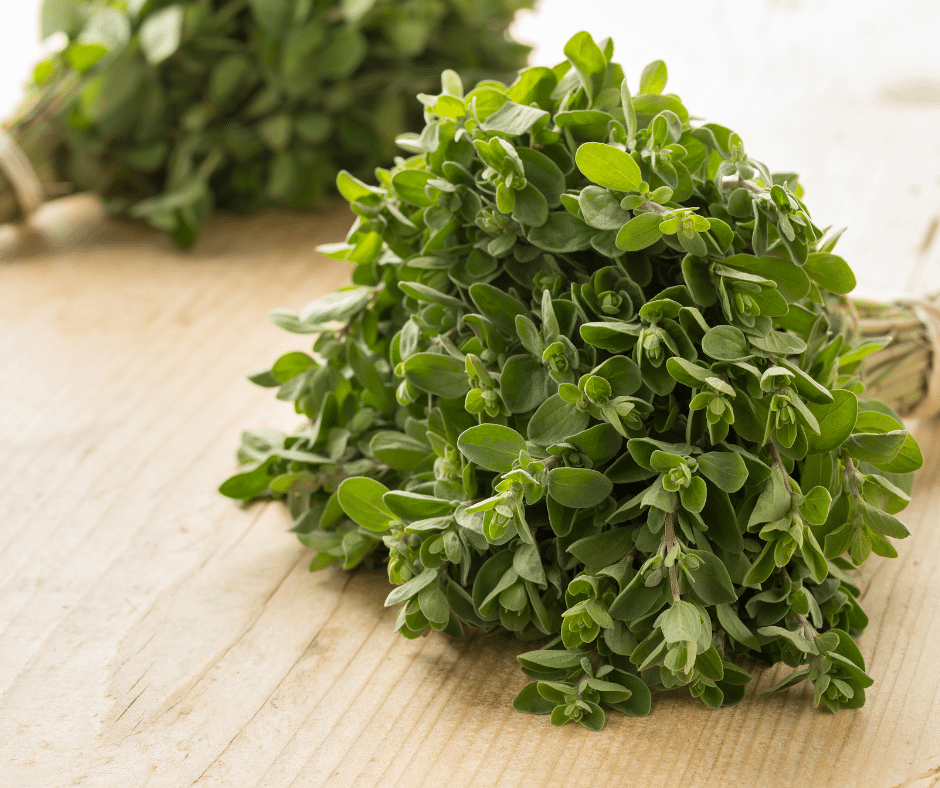
Marjoram
Margoram is like a milder version of oregano and it can be used in all of the same places. See oregano below for uses.
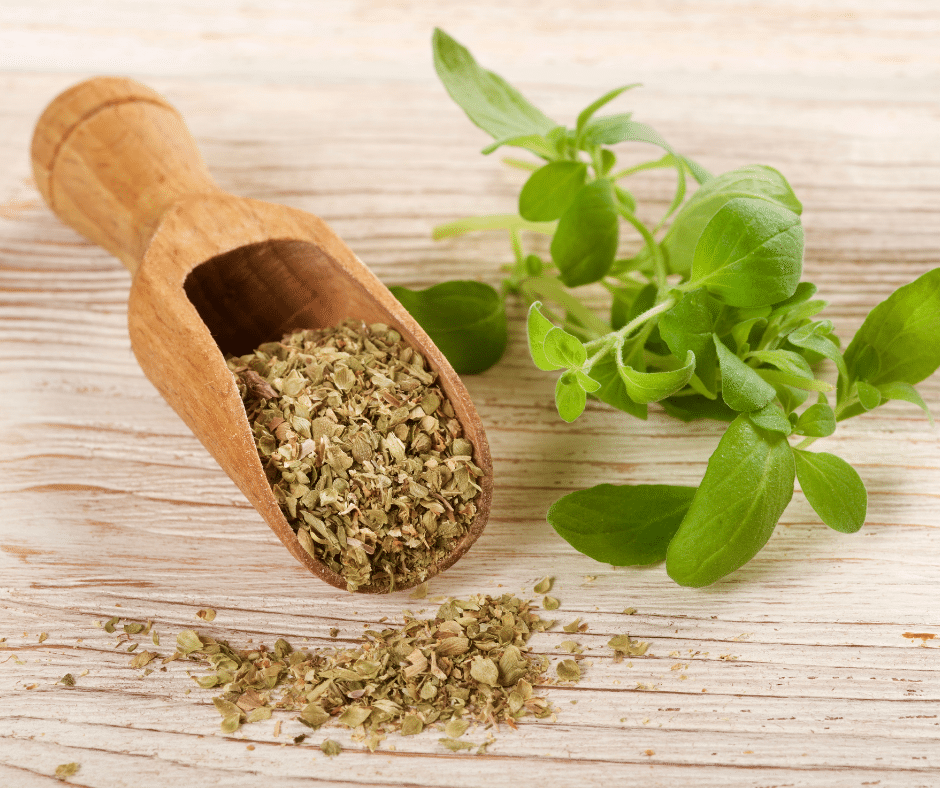
Oregano
When most people think of oregano, they probably think of Italian food, especially pasta and pizza sauce, they’re not wrong, but that’s only part of the story. Oregano is common throughout the Mediterranian and in Mexican cuisine as well. There are many oregano varieties, but the oregano in your cupboard can be used for all purposes. I love to marinate lamb, chicken, or pork for Mediterranian flavours in a combination of garlic, red wine vinegar, oregano, and lemon juice. I’ll sometimes add a bit of mint in there too. If I’m going for Mexican flavours, I’ll marinated pork or chicken with oregano, chillies, a touch of cinnamon, orange and lime juice, annatto, onion and garlic. When roasted, pulled, and quickly fried, this will make some of the best tacos you’ve ever had.
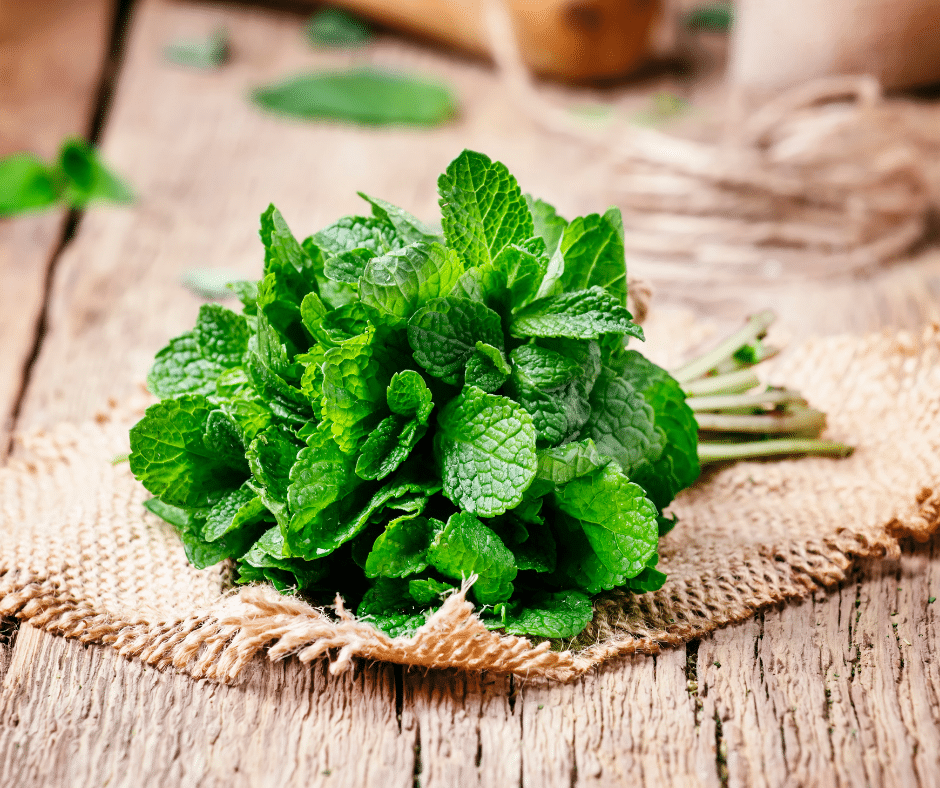
Mint
Most people don’t cook with mint. That’s unfortunate becasue it can add such great flavour to so many dishes. I love to add it to homemade tzatziki sauce along with a bit of dill. And I use it in my Greek Salad dressing. It is also a secret ingredient in my butter chicken and many Indian curries I make. Once cooked, I finish butter chicken with a small handful each of mint and cilantro. It is incredible.
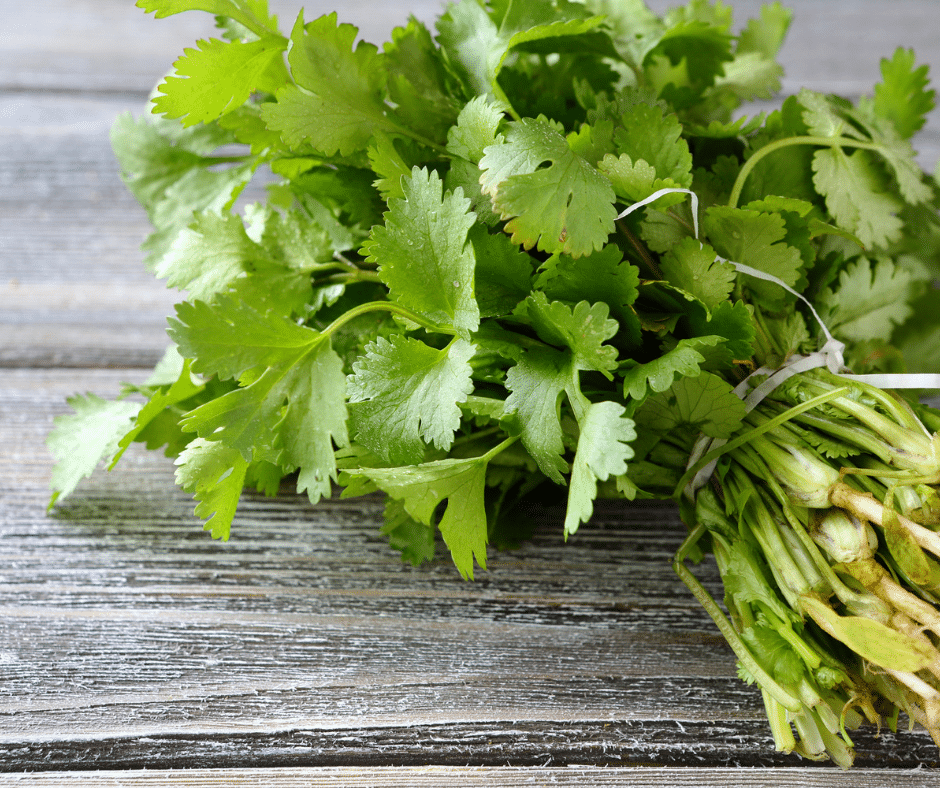
Cilantro
You either love cilantro, or you hate it. I absolutely love it. One of my favourites uses for it is also probably the simplest. I cut it up, mix it with an equal amount of minced onion and put it on top of tacos (real tacos, not old el Paso tacos). Cilantro is just as common in Indian and Thai cuisines as it is in Mexican. I love to add it to pineapple or mango salsa, salads, and chutneys. Like parsley, Cilantro is a finishing herb and should be added to dishes at the end of cooking. Otherwise, it will lose its flavour and may turn bitter. When making any curry, I throw a handful of cilantro in at the end.
I actually used to be one of those people that hated cilantro because I thought it tasted like soap. But at a restaurant I worked, we had smoked chicken poutine that was finished with a little sour cream and a handful of cilantro. It was one of the best things I’ve ever eaten. I still think about it often and occasionally make it. That poutine completely changed my view and taste of cilantro.
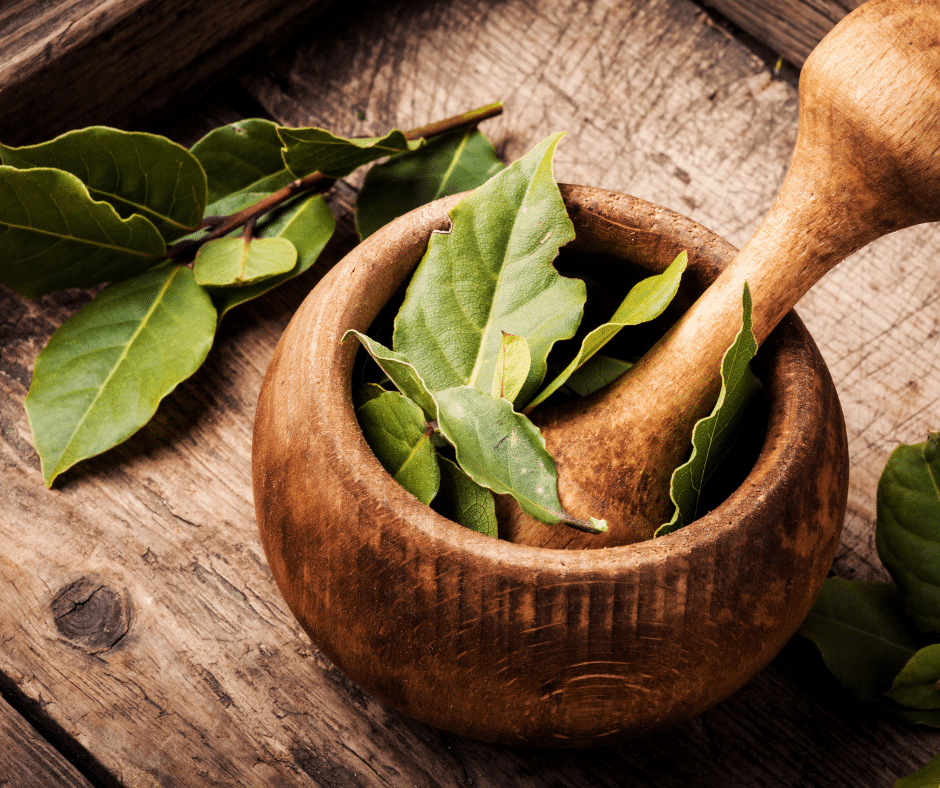
Bay Leaf
Bay leaf is commonly added to soups and stews, which is good. It is also an ingredient in Garam Masala. I use it a lot, in combination with star anise and occasionally other spices to flavour rice. It is a straightforward way to add some flavour to plain white rice. I add the bay leaf and other spices right in the beginning when I combine the water and rice. Once cooked and rested, the bay leaf and other spices sit right on top of the rice and can be picked out. Again, this is an effortless way to add flavour to rice with little to no effort.
Spices
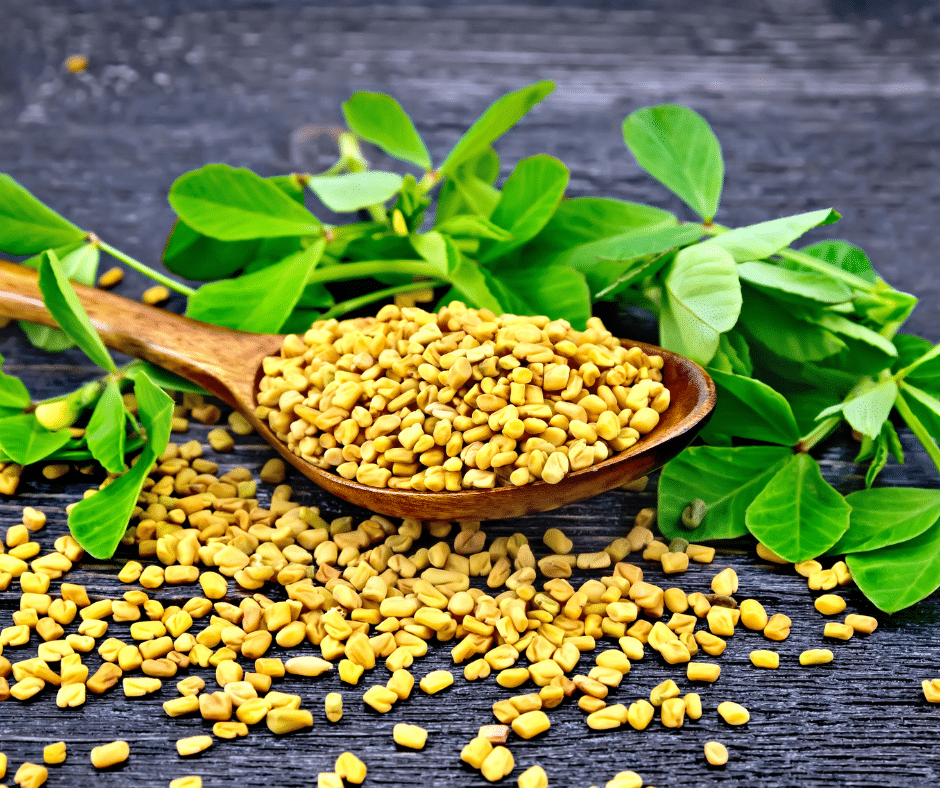
Fenugreek
Fenugreek may not actually be that common in North America, but I’ve seen it in enough spice cupboards to know that lots of people have it and have no idea what to do with it. It comes as either a powder, seeds (which are very hard) or a leaf more commonly known as methi (The Indian name). I prefer to use either the powder or the leaf because the seeds are just way too hard. Fenugreek is a common ingredient in Indian food and is one of the main flavours of butter chicken. Root vegetables tossed with olive oil, fenugreek and salt and pepper, then roasted are delicious. Fenugreek mixed with yogurt can make a fantastic marinade for chicken, lamb, pork, or even a salad dressing.
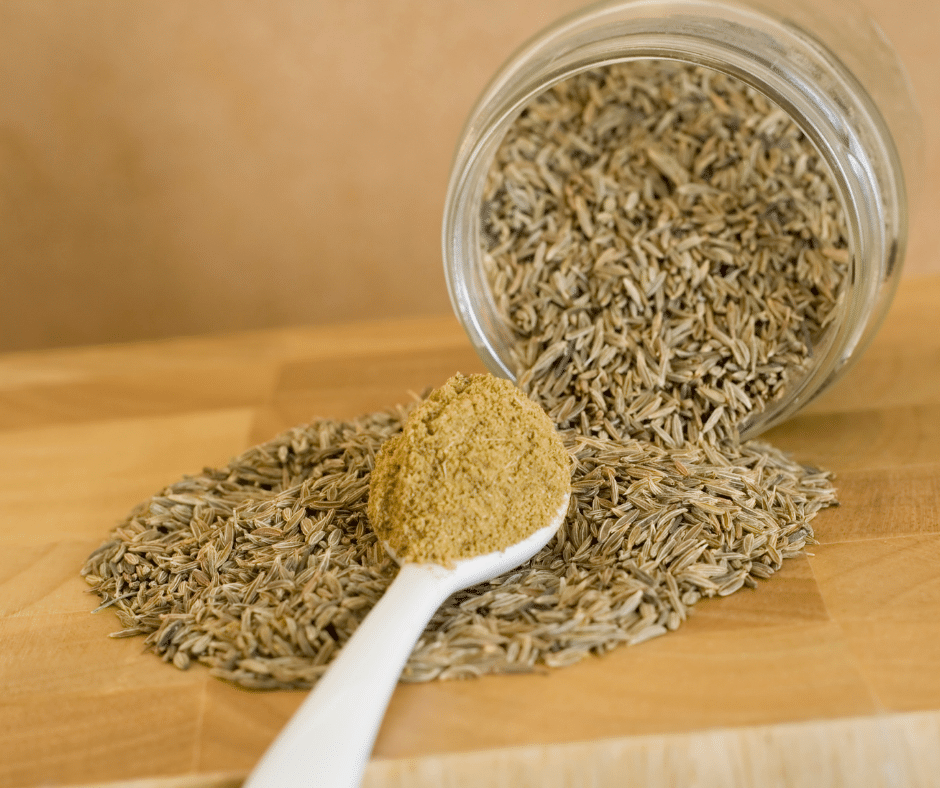
Cumin
Cumin is most commonly used in Indian, Mexican and Moroccan cuisines. It is a key ingredient in Garam Masala, as well as hummus. I like to add a few toasted cumin seeds to rice along with a bay leaf at the start of cooking to add a lot of flavour. I use powdered cumin in barbecue sauce, baked beans, and marinades. Honestly, cumin is one of the most used spices in my kitchen. I love it! For something special, mix a little powdered cumin with yogurt and a splash of lemon juice, thinly slice a cucumber and toss it with the cumin yogurt. This makes a great and simple side salad for curry, lamb, or just about anything.
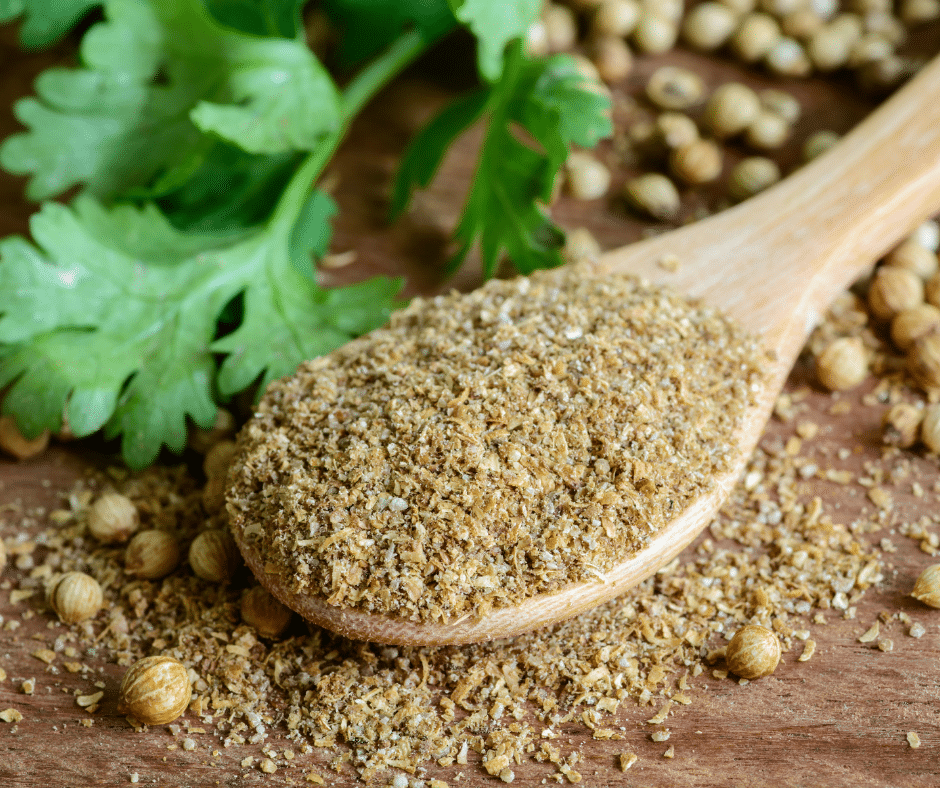
Coriander
I most commonly use coriander in tandem with cumin. I love the two of them together. Having said that, coriander is fantastic on its own as well. Coriander is the seed of the cilantro plant though it doesn’t really taste much like cilantro. If you want to make homemade taco bell or old el Paso tacos, cumin and coriander are your secret (or not so secret) ingredients.
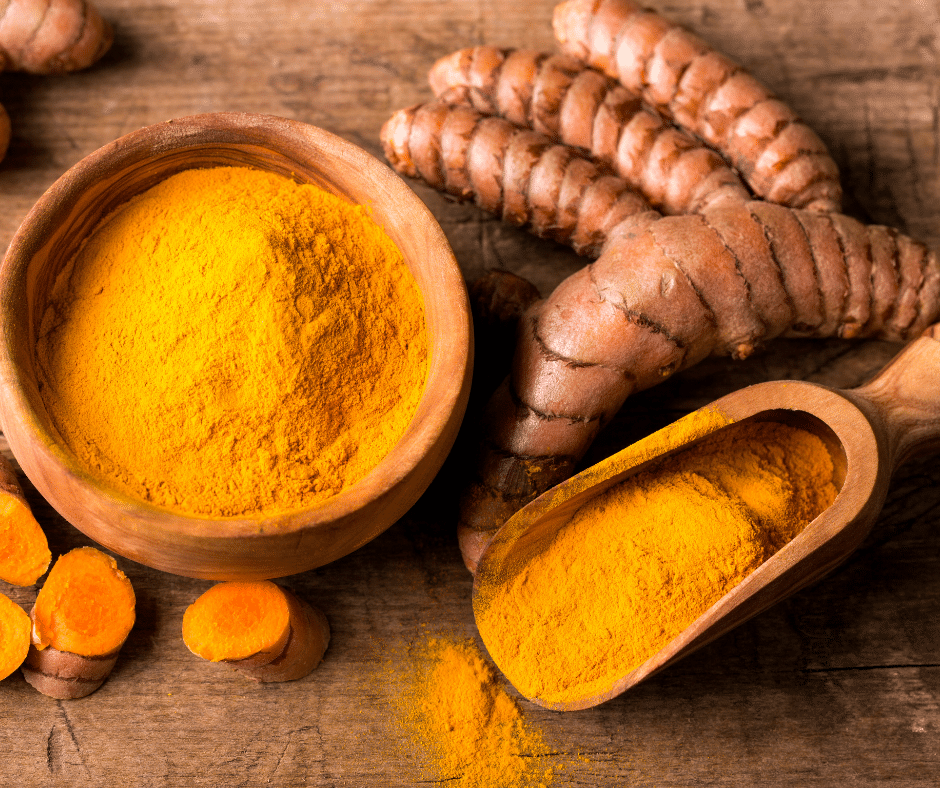
Turmeric
Turmeric is often an ingredient in an ingredient, meaning you’ll find it in Curry powder, mustard, Ras el Hanout, etc. It has a slight, but not unpleasant, bitter flavour that awakens that palate and makes you salivate. A little bit of turmeric added to rice will turn the whole pot yellow, adding a nice colour element to your meal. Potatoes tossed in olive oil, salt, pepper, and turmeric, then roasted, are very delicious and come out a nice golden yellow colour.
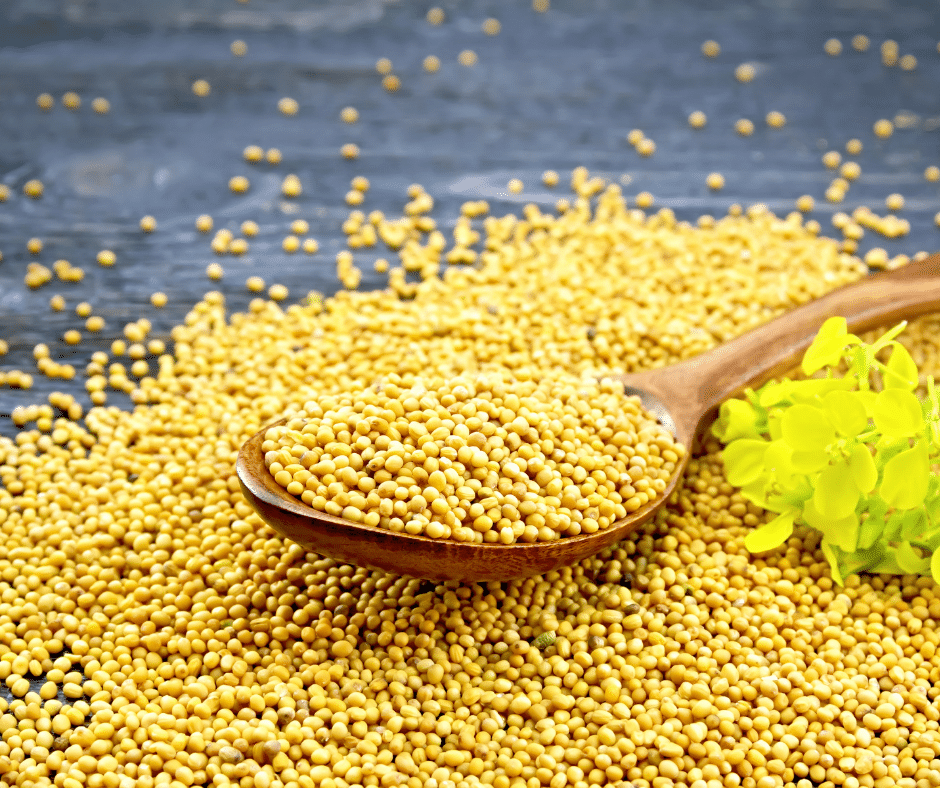
Mustard Seeds
Mustard seeds are obviously the main ingredient in mustard. However, they have lots of other uses, whether whole or ground. Mustard acts as a binder when making vinaigrettes. It is also very commonly used in baked beans, barbecue sauce, and rubs. I add a spoon of mustard seeds to the pot when making boiled dinner or corned beef and cabbage because the mustard seeds help take away any foul smells produced from the cabbage and help you digest the meal. I also like to add a small spoon full of mustard seeds to rice when cooking it on their own or along with a bay leaf and cumin seeds. They add a nice flavour and, again, help with digestion.
Fennel Seeds
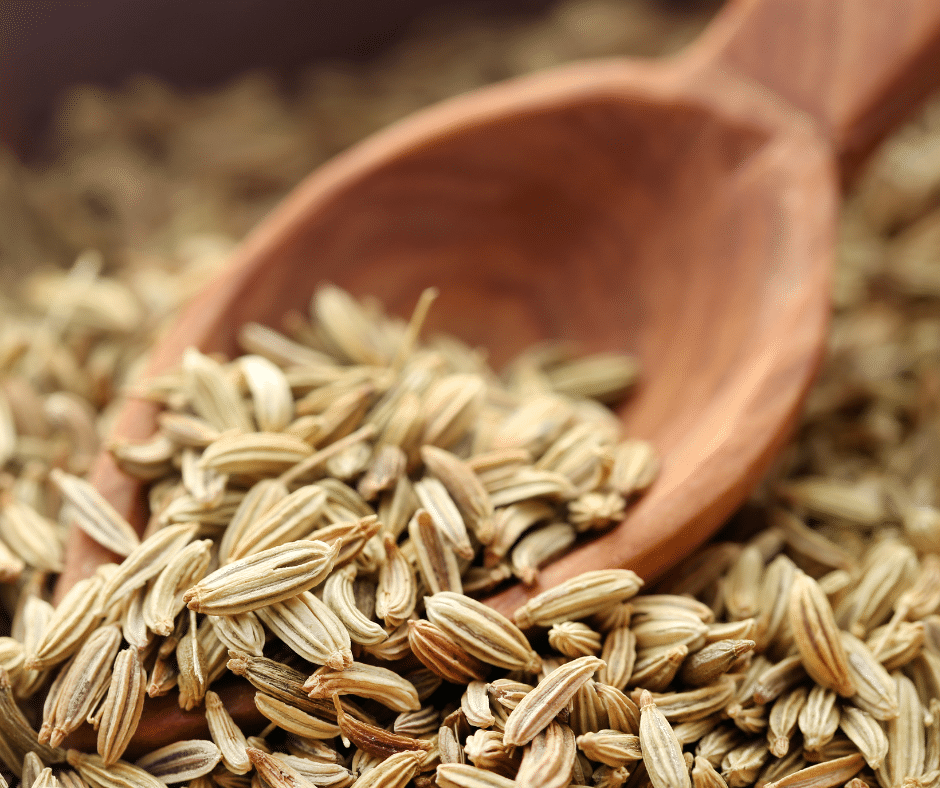
Fennel seeds have a mild anise flavour that goes very well with pork (especially in sausages), duck and chicken. They are one of the five ingredients in Chinese Five Spice. You will also find it in Garam Masala, Herbes de Provence, and Ras el Hanout. One of my favourite uses for fennel seeds is to toast them and add them to pizza sauce. They add an incredible flavour that is hard for people to pin down. You will often find fennel seeds in Eastern European baked goods and even sauerkraut.
Star Anise
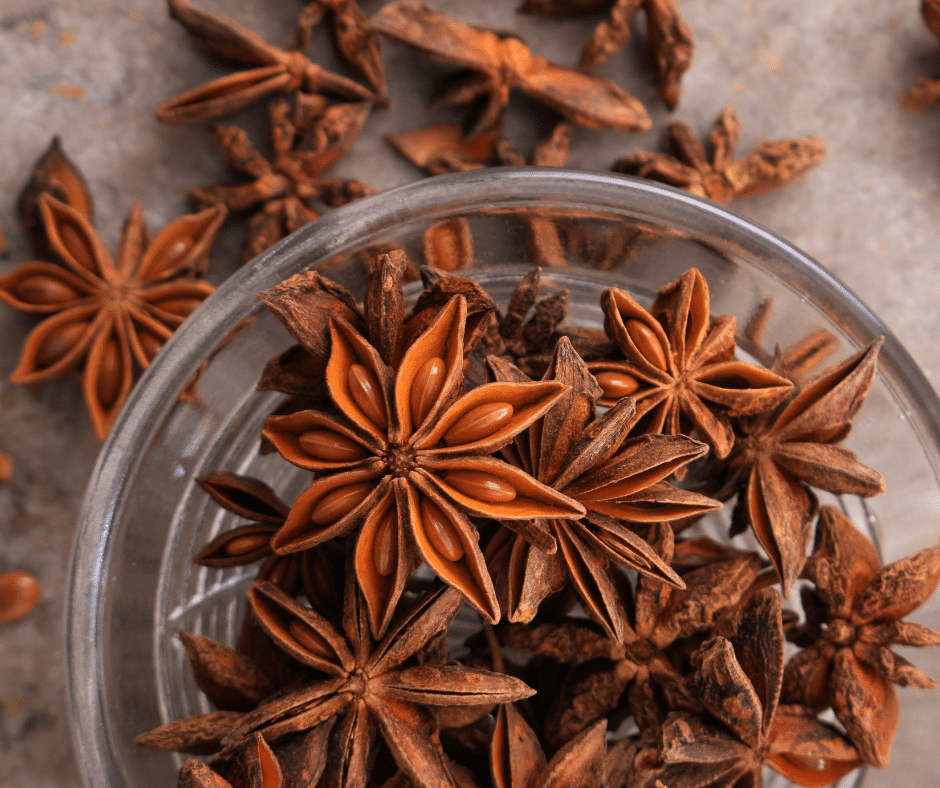
Star anise is not only the most photogenic of all the spices; it is also one of the most underused. Like fennel seeds, star anise is one of the five ingredients in Chinese Five Spice. I love star anise with anything pork. I often braise pork belly or ribs in a combination of soy sauce, honey, star anise, and pepper. The anise flavour pulls something really magical out of the pork. Star anise is another ingredient that I love to throw in rice. It can be used along with the other ingredients I mentioned, on its own, or just with a bay leaf. Either way, it will be some of the best rice you’ve ever tasted.
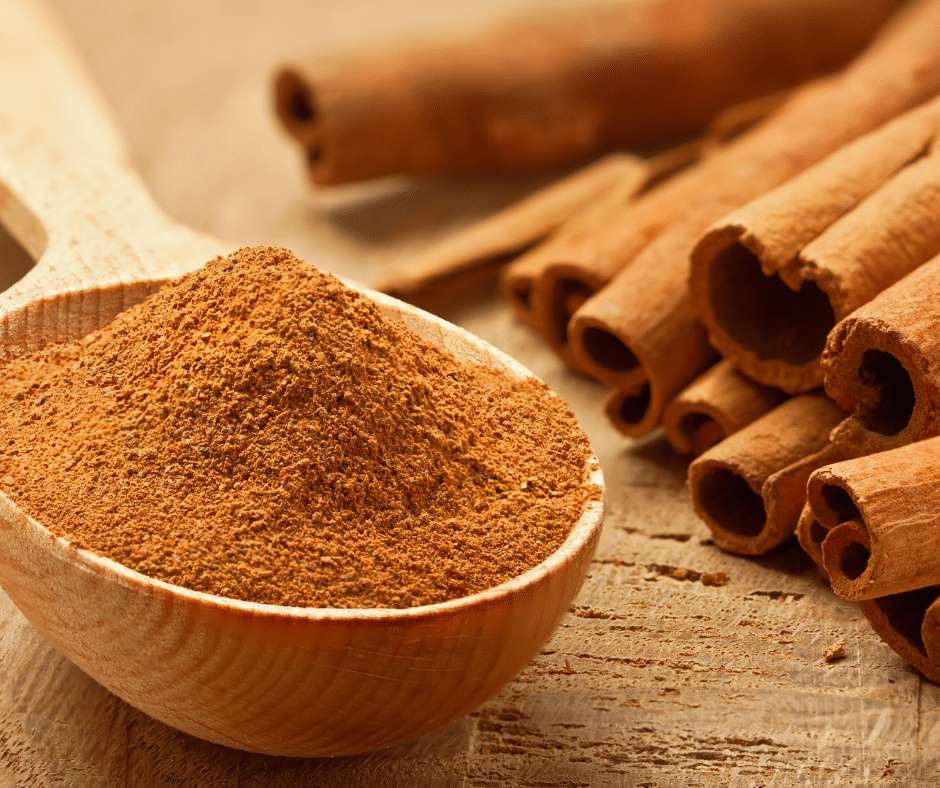
Cinnamon
Cinnamon is generally considered a sweet spice, commonly used in desserts, but that’s not even half the story. It is the third of five ingredients in Chinese Five Spice and a main ingredient in Garam Masala and Ras el Hanout. It is also widespread in Indian, Mexican and Middle Eastern foods. Cinnamon pairs very well with beef, lamb and goat, root vegetables and squash. One of my favourite uses of cinnamon is to add a little bit of it to a pot of Chili. It really brings out all of the other flavours. I think that cinnamon is one of the most underused and underrated spices in North America.
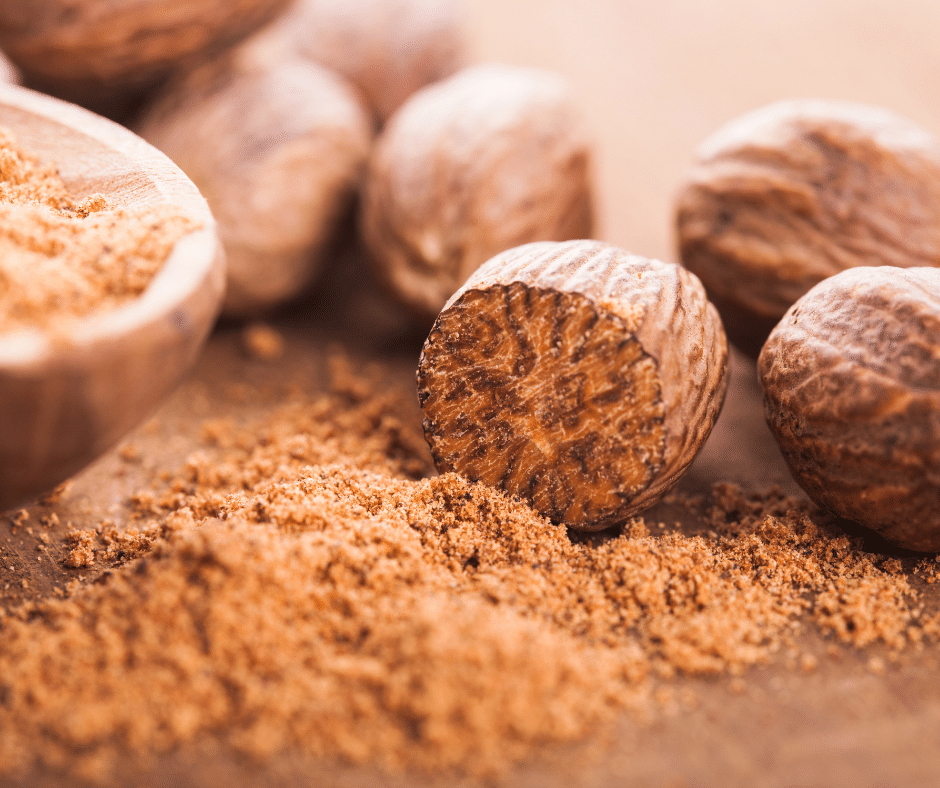
Nutmeg
The most obvious use for nutmeg is in pumpkin pie and pumpkin-spiced things. But, there is so much more to that little nut than pairing it with pumpkin. I like to add a tiny bit of nutmeg to cream sauces and even mashed potatoes. I add it to spinach and cottage (or ricotta) cheese when making lasagna or ravioli. It is fantastic with braised beef, lamb and fish. When making braised collard greens or swiss chard, I add nutmeg to boost the flavour. I also use it a lot when making Cuban food, especially red beans, and Jamaican food like jerk spice.
Conclusion
There is a world of possibilities held within the confines of your spice cupboard. I hope that this post has helped to illuminate that world to you. Obviously, this post is not exhaustive. There could be an entire blog dedicated to just this topic. We’ve only scratched the surface, but that’s better than nothing. The point is that I hope you look at the spices in your cupboard a little differently now. And that you experiment a little more with what they can do and be used for.
Thank you to Sue for suggesting this post. If you have a suggestion for a post, tell me in the comments, email me, or message me on social media.
Thank you for reading this post. Share it on Facebook, Pinterest, or Twitter to help Chef’s Notes continue to grow. Subscribe to Chef’s Notes below, and you will never miss a post again.
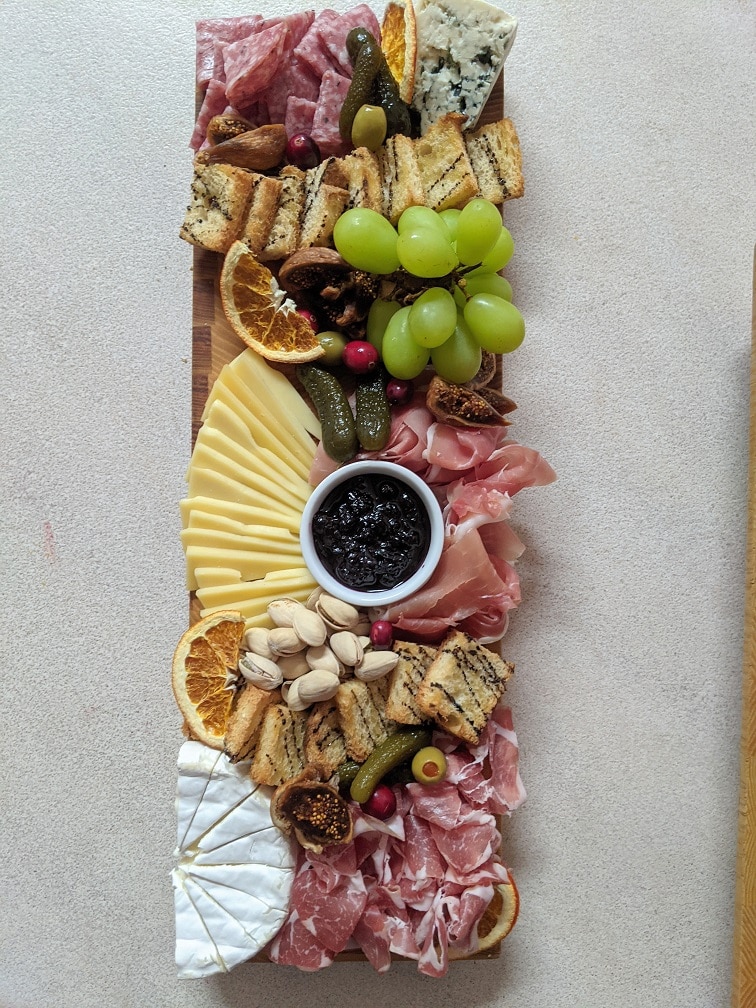
Whether you are having a big party (in any other year) or a small intimate evening in, nothing can beat a well presented Charcuterie Board. The key is that it has to be well presented. Otherwise, it’s just some meat and cheese on a plate. Today, I’ll share some tips and tricks with you so that you can make your next Charcuterie Board look just like the pros. Let’s get to it.
Getting Started
First things first, let’s talk about ingredients. There is no point in putting in the effort to make a beautiful charcuterie board using low-end ingredients. Now, to be clear, I’m not saying you need to spend loads of money here. But, we’re not making a supermarket deli tray either. Splurge and get a few nice cheeses and a few nice types of meat. That’s all you really need. Let’s look at some specifics.
Choosing The Right Cheese
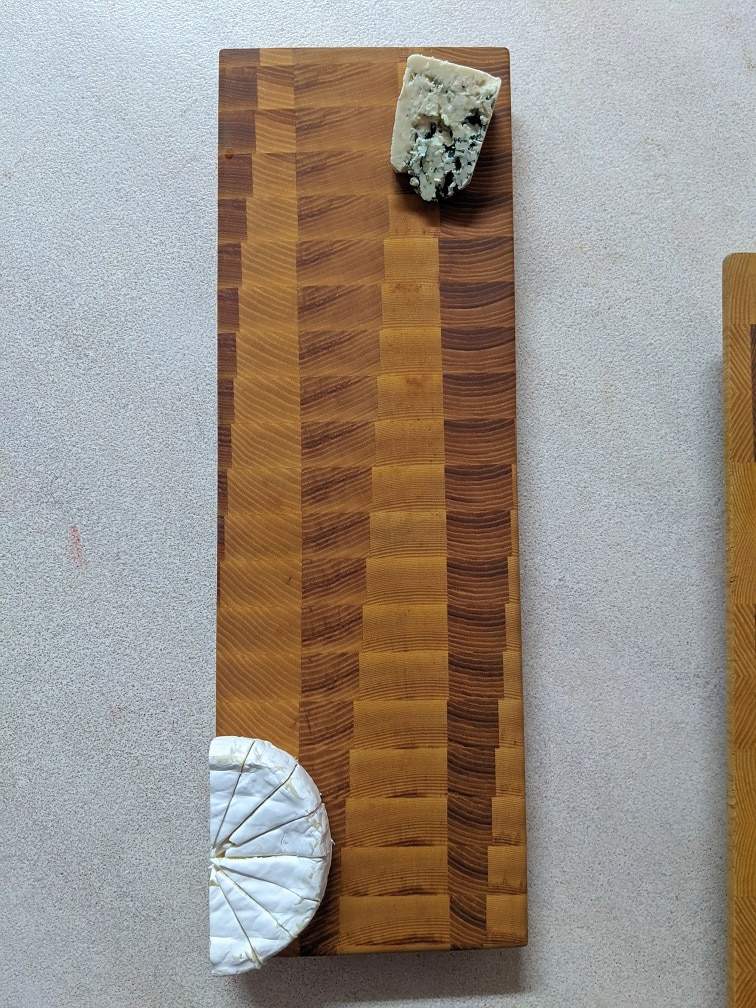
There are three things that I think about when I choose the cheese for any charcuterie board. First and foremost, it has to taste good. If it doesn’t, why would you use it? Next, I think about shape and texture. If all of the cheese on the board is the same shape and texture, it will look boring, and it will be boring to eat. Yes, you can control the shape to some degree with how you cut and present the cheese, but there is only so much you can do. Finally, I think about variety and the style, and the taste of the cheese. Usually, I try to have one soft cheese like brie or camembert. I like blue cheese, so I pretty much always include one such as gorgonzola or stilton. And, I usually use a semi-firm to firm cheese. This can be anything from a really nice aged cheddar to asiago, to manchego, or Beemster.
If you want to really get into it, you can use cheese that comes from the same places as your meats. So, if you are using Italian meats, or Spanish meats, you would use Italian cheese, or Spanish cheese. I don’t generally worry about this too much unless the board itself is themed to a specific place. Using French cheese with Italian meat isn’t going to ruin your board or your experience.
One other tip when it come to the cheese is to avoid novelty cheese like beer-veined ones, or holiday shaped ones. For the most part, they aren’t going to taste good. They aren’t going to pair well with the other things on your board. And they are going to make your charcuterie board look kind of hokey.
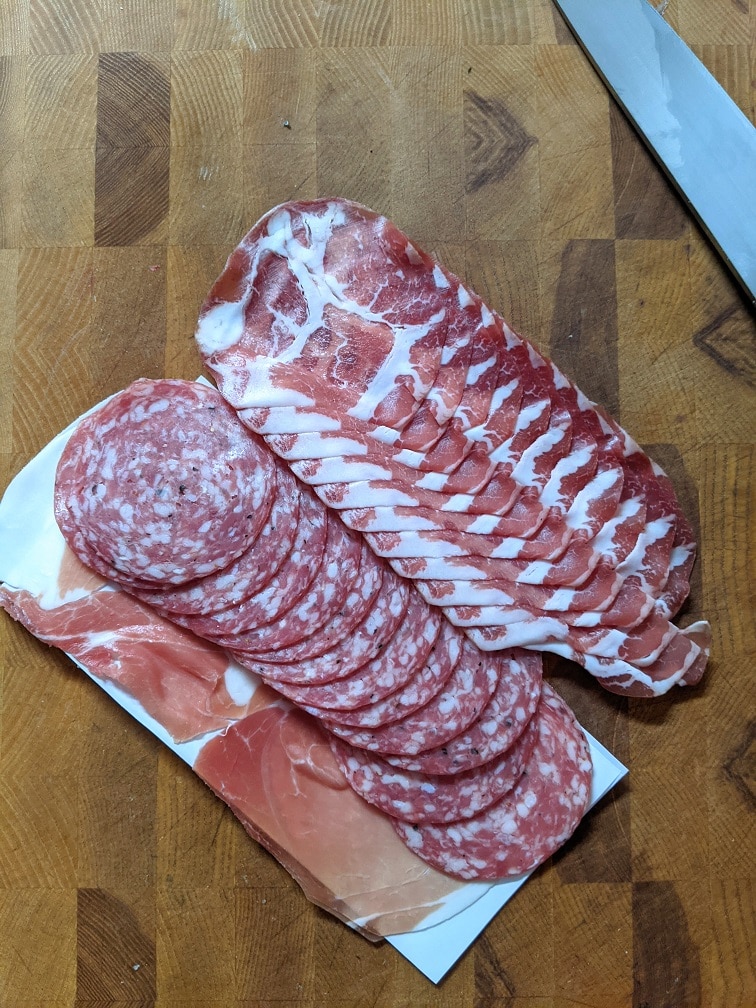
Charcuterie Meats
When it comes to the meat on a Charcuterie Board, I actually really like the three packs of Italian meats you can get at most grocery stores. Please don’t buy the cheapest one. It will likely taste cheap. Having said that, you don’t have to buy the most expensive one either. These packs work best when making a board for two to six people, but any more than that, and you are going to want to go to the deli counter and get them to cut the meats fresh for you. This will save you a considerable amount of money.
If you have a specialty charcuterie store in your city, go there. It is going to be exponentially better than what you get at the grocery store. They will likely have some delicious paté, terrines and lots of other items that you can use on your Charcuterie Board as well. Speaking of paté, I don’t typically recommend grocery store paté, but if you like them, go for them.
Sauce
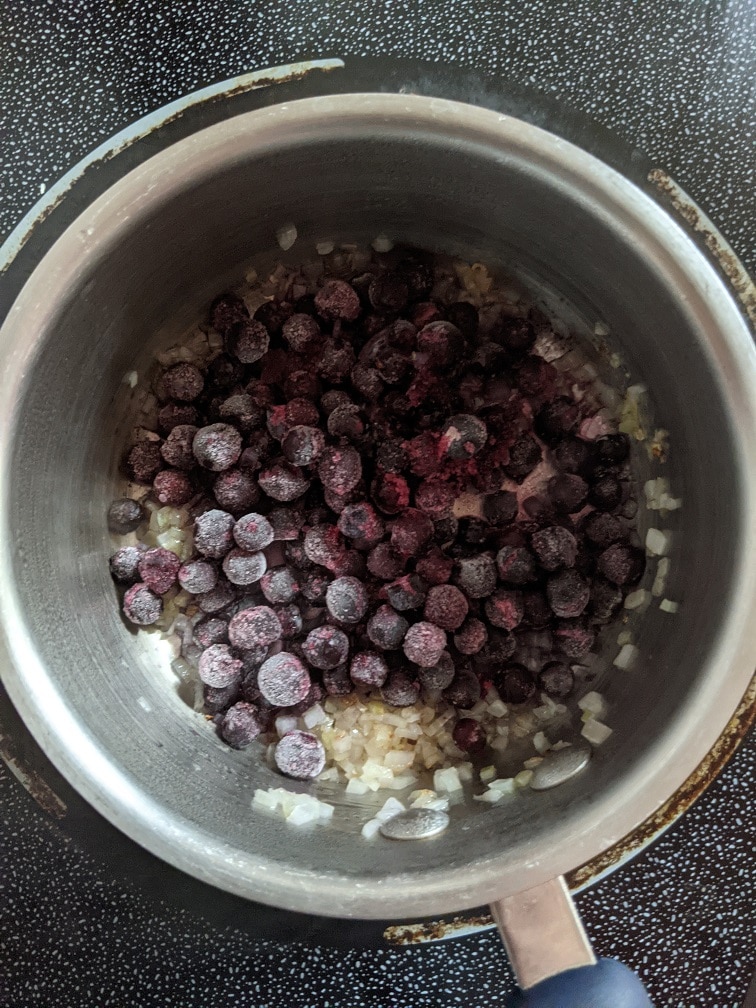
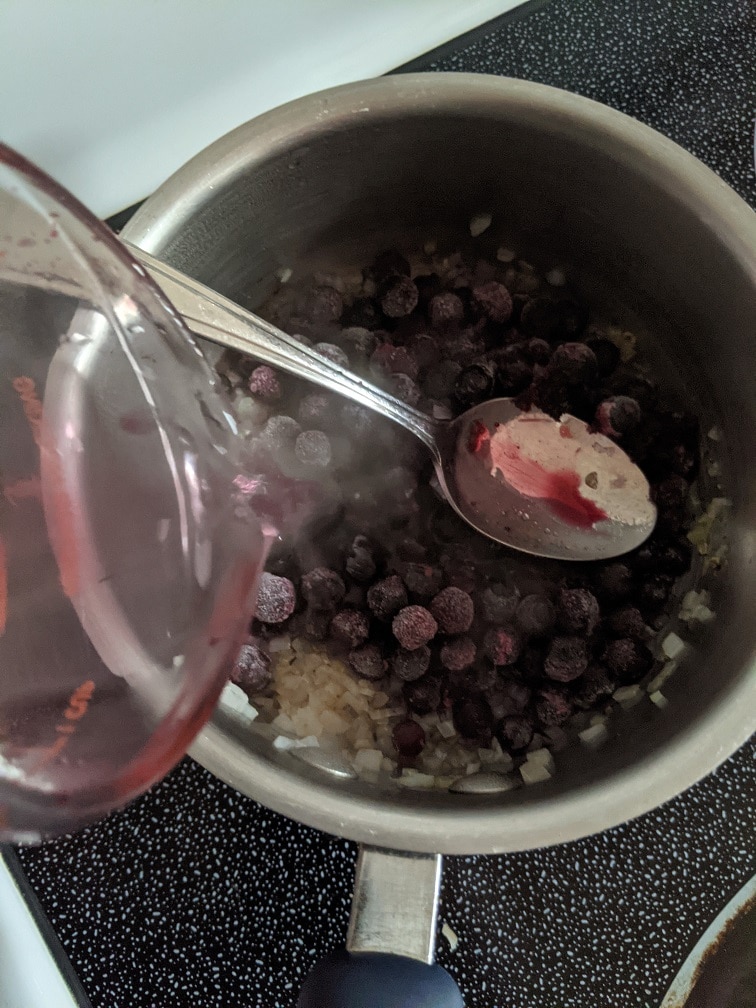
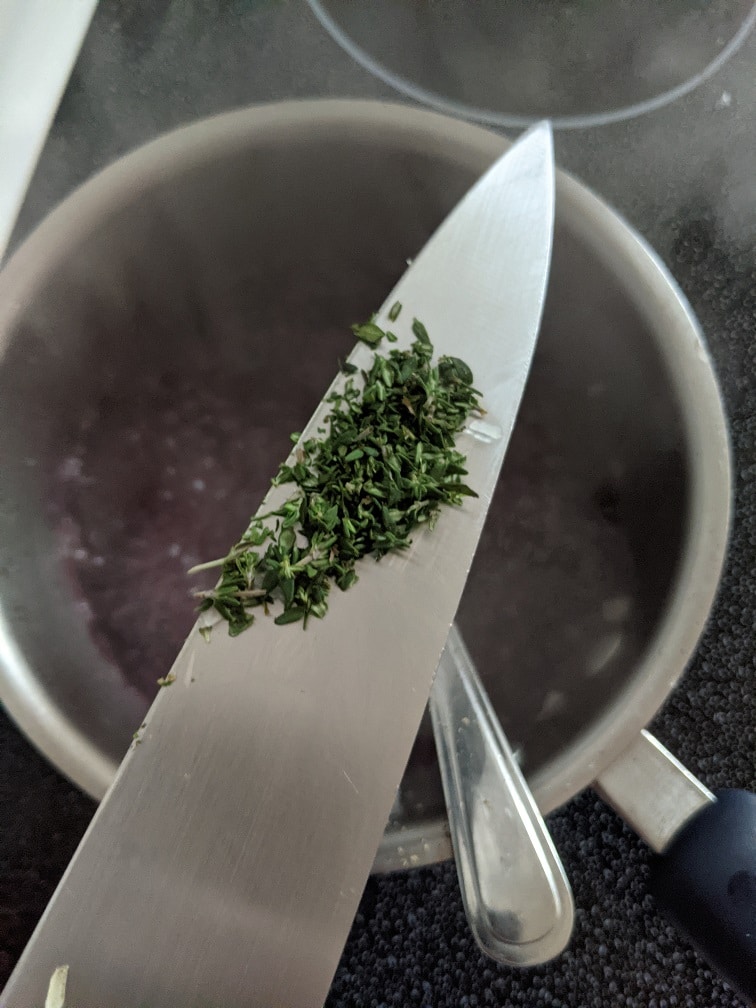
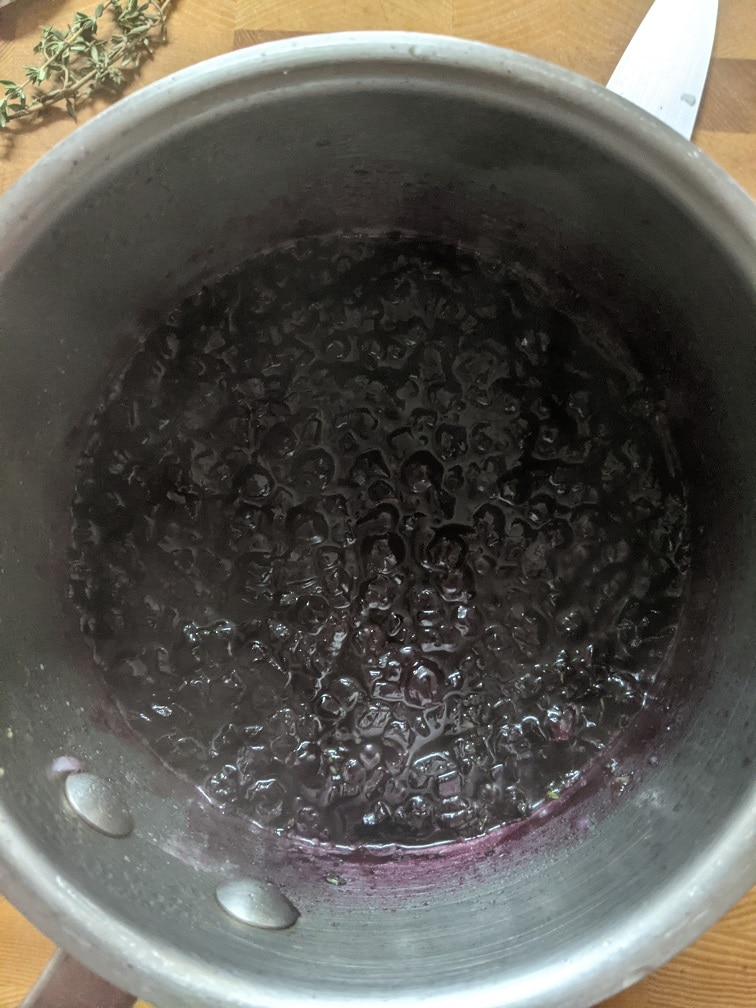
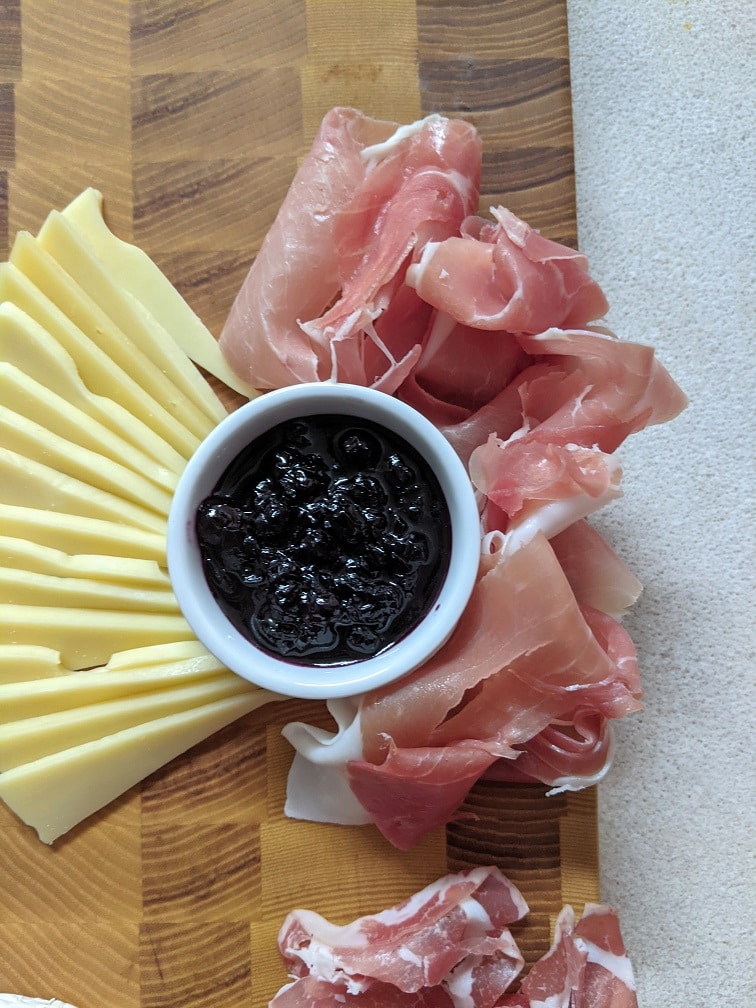
It’s always nice to serve at least one kind of sauce with your Charcuterie Board. This could be as simple as nice mustard to pair with the meat or a high-end jam to go with the cheese. I really like a savoury blueberry compote paired with cheese, especially brie and blue cheese. If you’d like to make my blueberry compote, you can find the recipe at the end of this post.
Bread
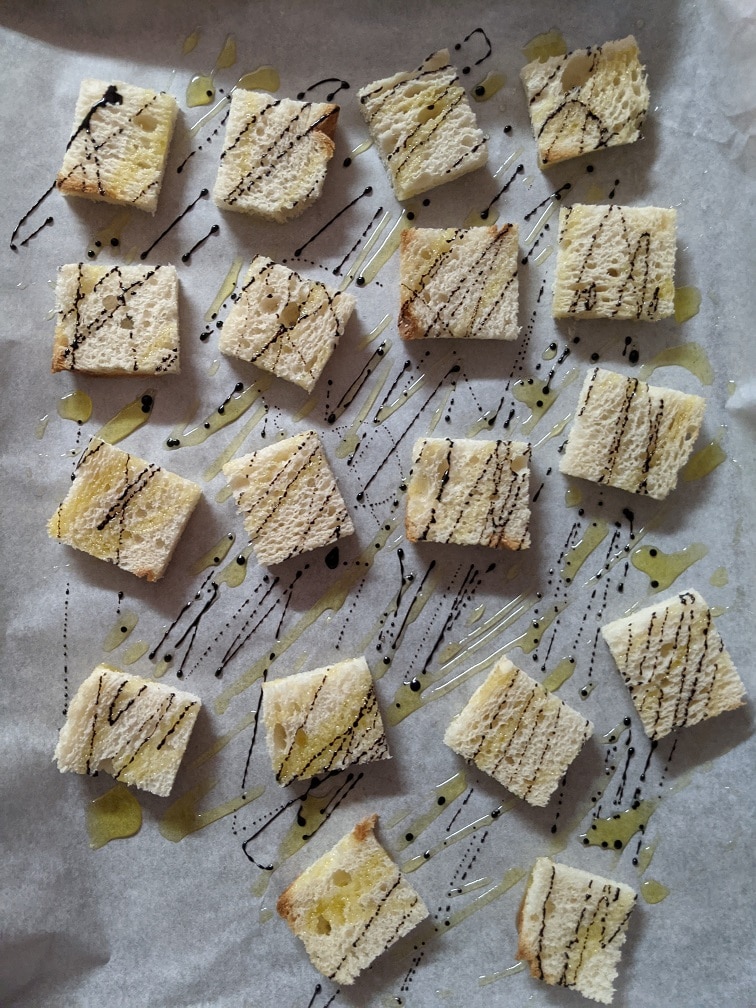
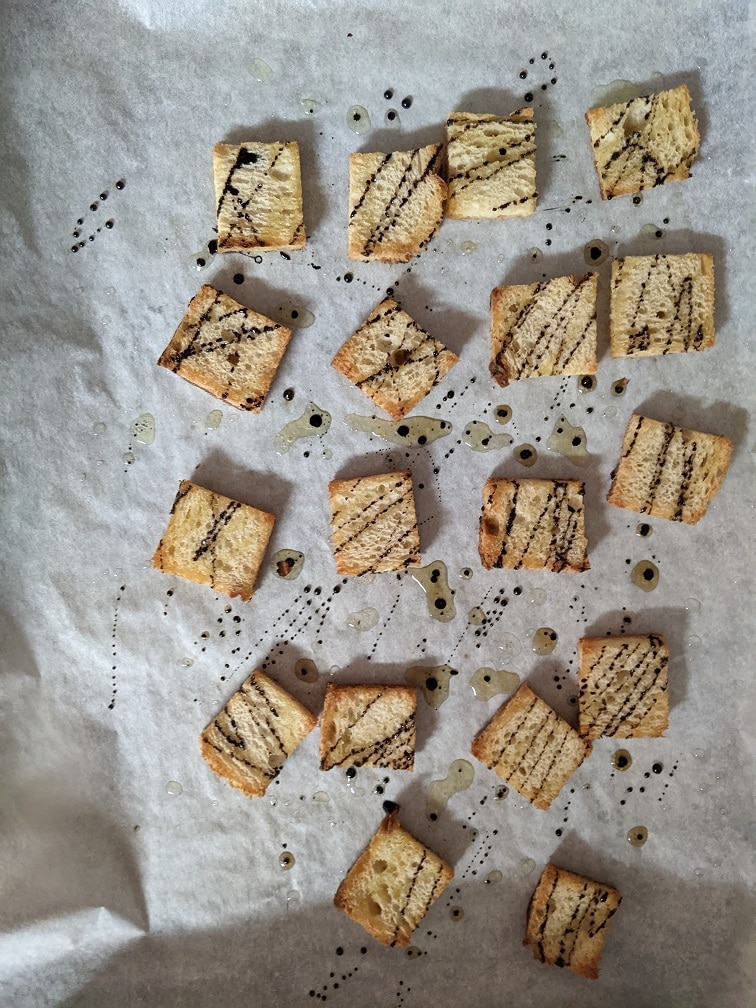
Every Charcuterie Board needs some type of bread item. This could be as simple as some torn up baguette or store-bought crackers. But, I find that toasting some bread (this is gluten-free sourdough from Promise Gluten-Free) with olive oil and aged balsamic or balsamic reduction not only tastes great but looks great too. It really adds that extra wow factor to the board. To make these, cut some bread into 5 cm x 5 cm squares, put them on a lined sheet pan, drizzle with olive oil and thick balsamic vinegar (reduction or aged), then bake on 400°f for ten to twelve minutes.
Assembling Your Charcuterie Board
Now that we have the main components of our Charcuterie Board mapped out, let’s look at how to put it all togehter.
The Board
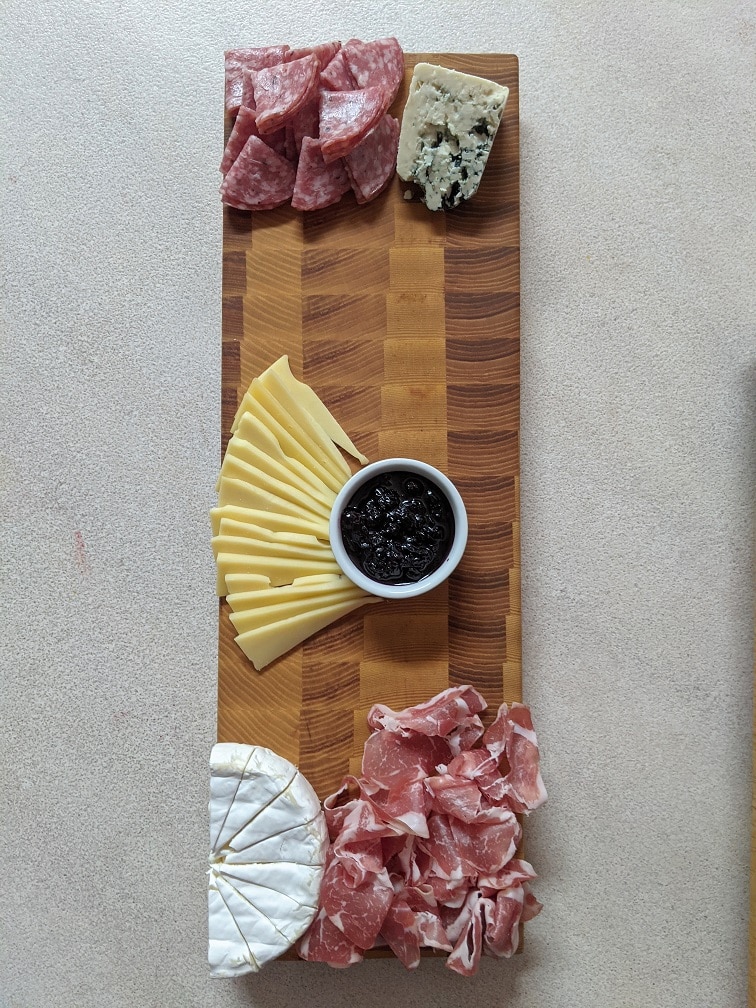
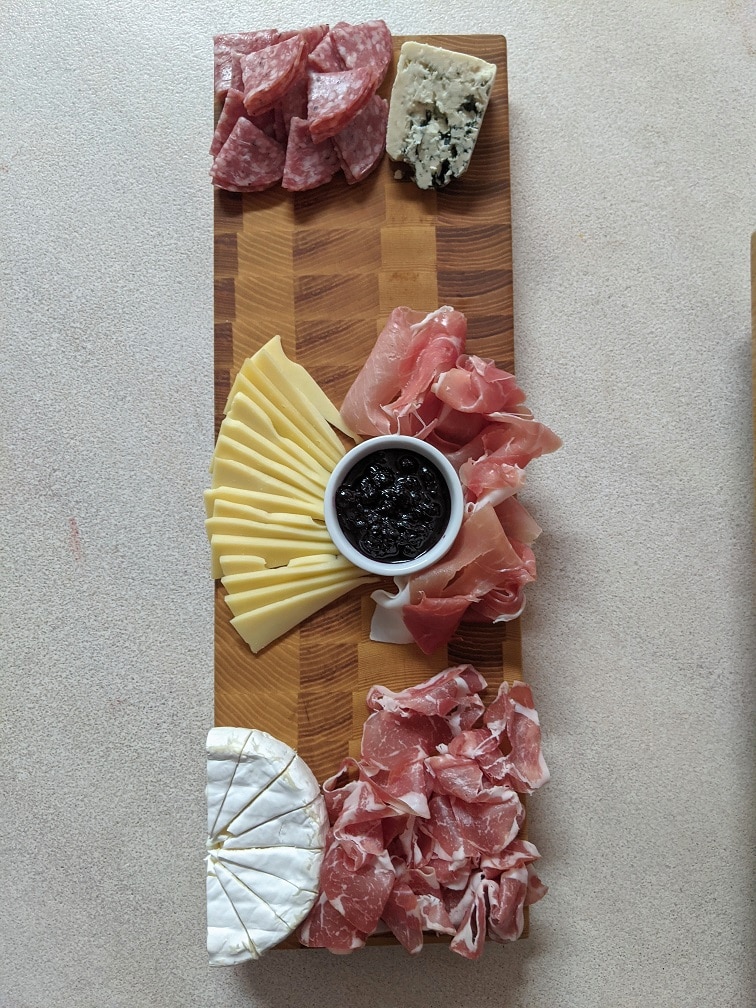
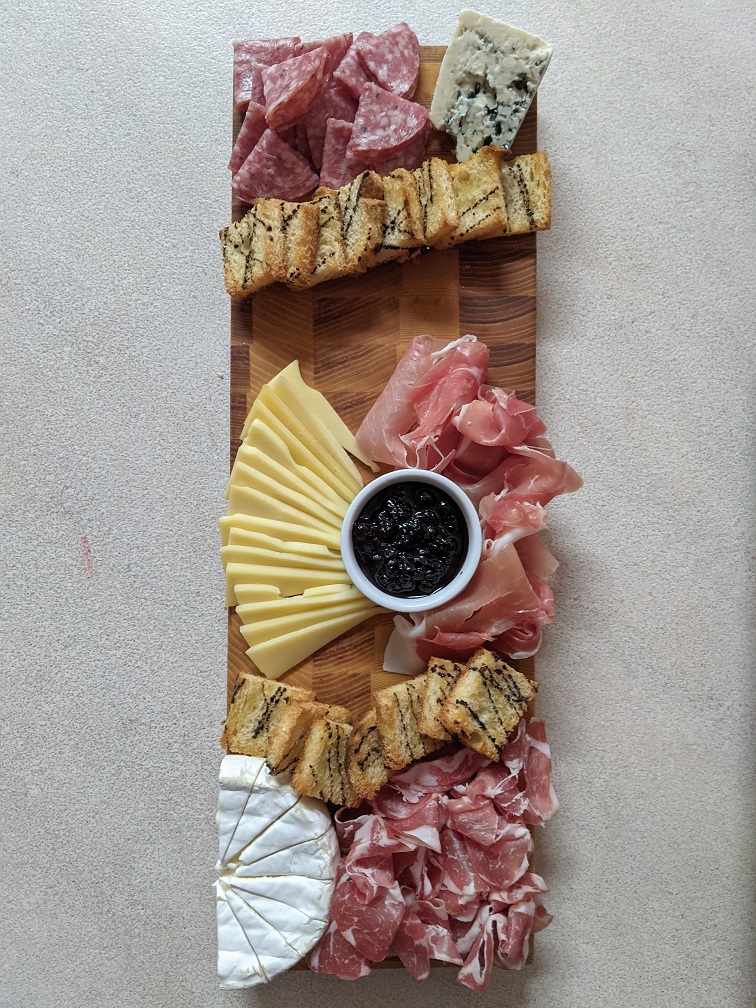
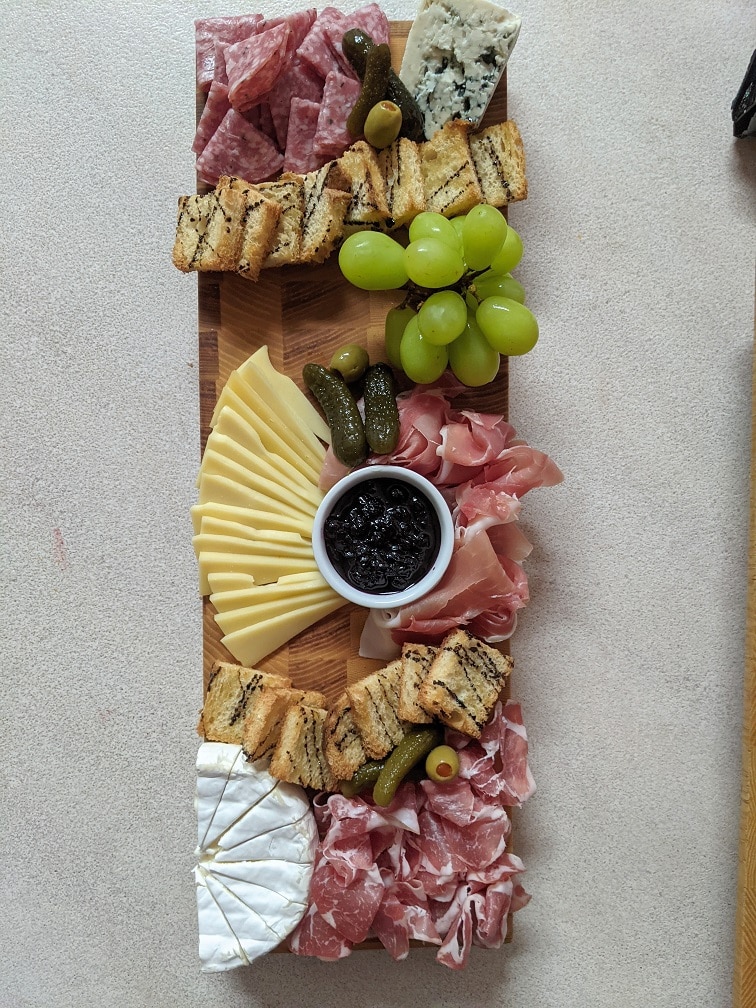
Obviously, you are going to need a plate or board to put your ingredients on. For two to six people, I use a twelve to sixteen-inch board. For two people, this would be a meal, not an appetizer. The board can be a cutting board, a sanded and oiled piece of maple, or even a long narrow plate. You can plate your charcuterie on a round plate, but that’s not what we are doing today. The board I’m using is from Ashwurks Cutting Boards.
The Cheese
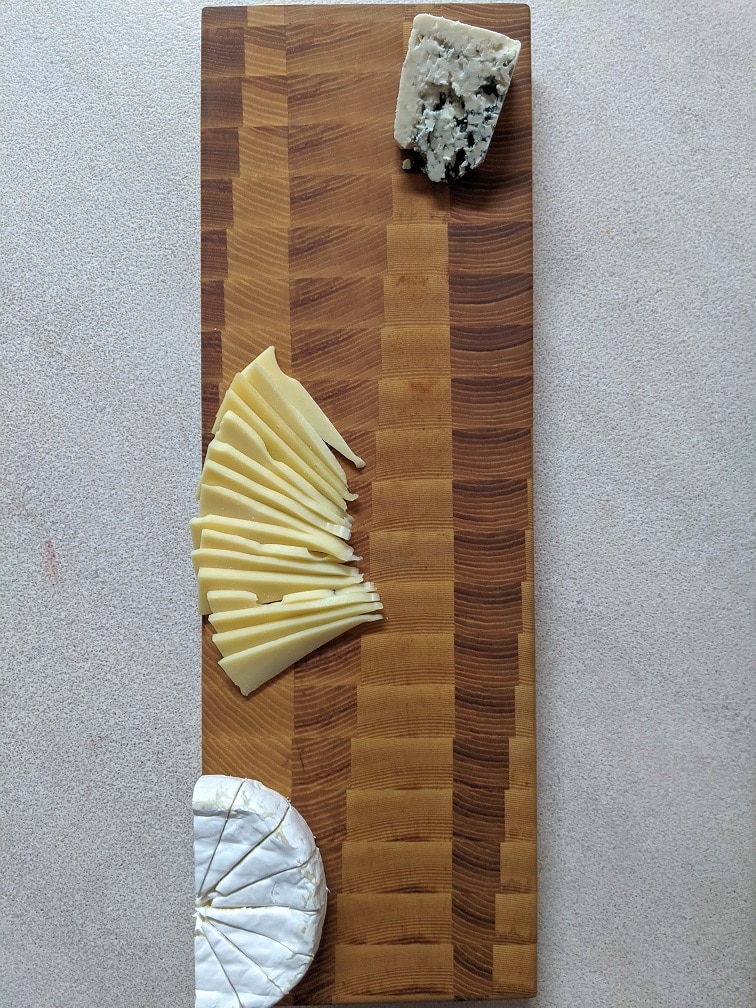
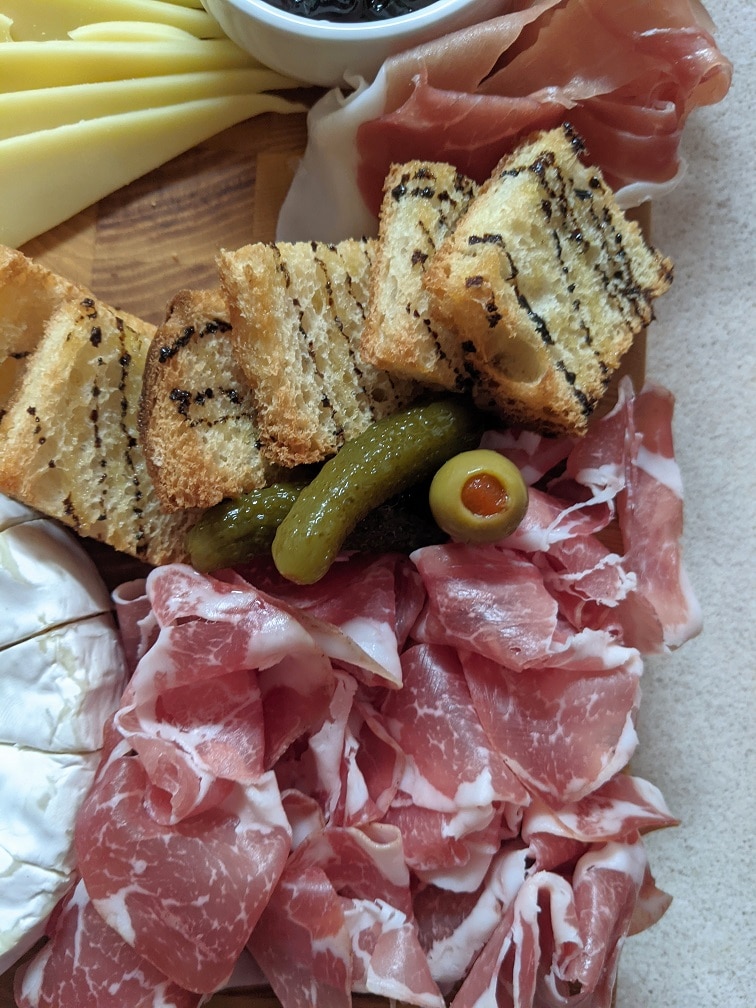
I always start with the cheese becasue it helps shape the rest of the board and becasue the cheese is best served at room temperature. So, as I’m putting the rest of the board together, the cheese is coming up to the perfect eating temperature. I always put cheese on opposite corners when using a square or rectangular board, then one cheese in the middle. This helps to break the board up and gives me lots of room for everything else.
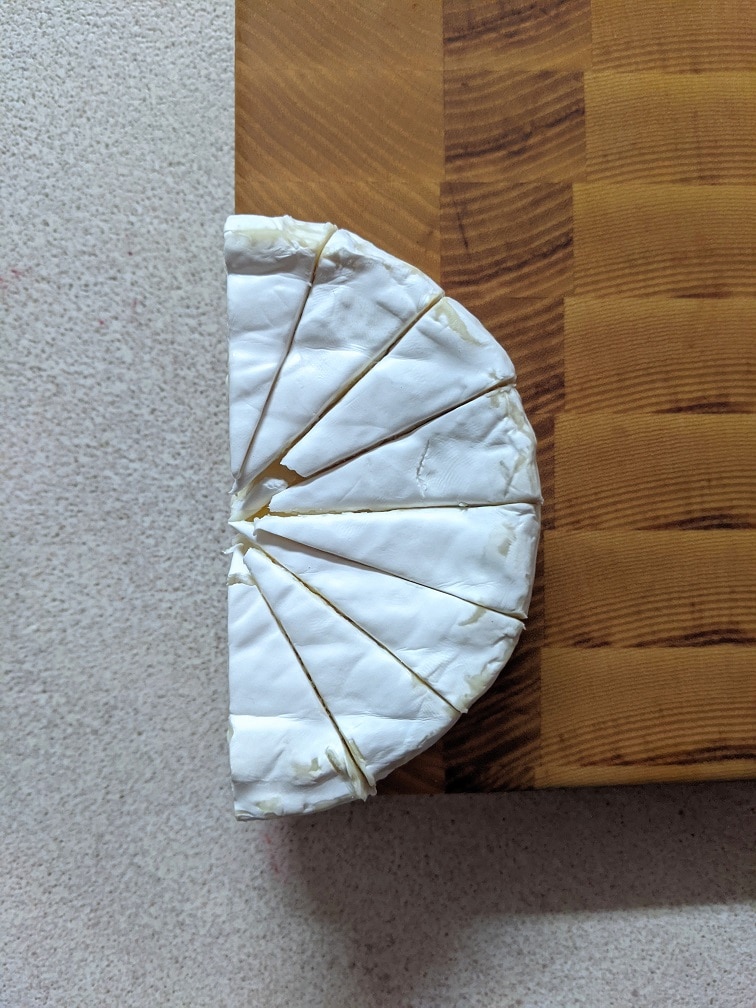
Brie and other wheels of cheese can be served as either a whole wheel or a half wheel. Obviously, you can buy bigger pieces of brie, in which case, you would not use a full or even half wheel. But, when buying small wheels, I will put a half wheel in a corner or put a full wheel right to the center of the board. I also like to pre-cut brie and other soft cheese becasue it is easier to cut when it’s cold, which prevents a large mess later on.
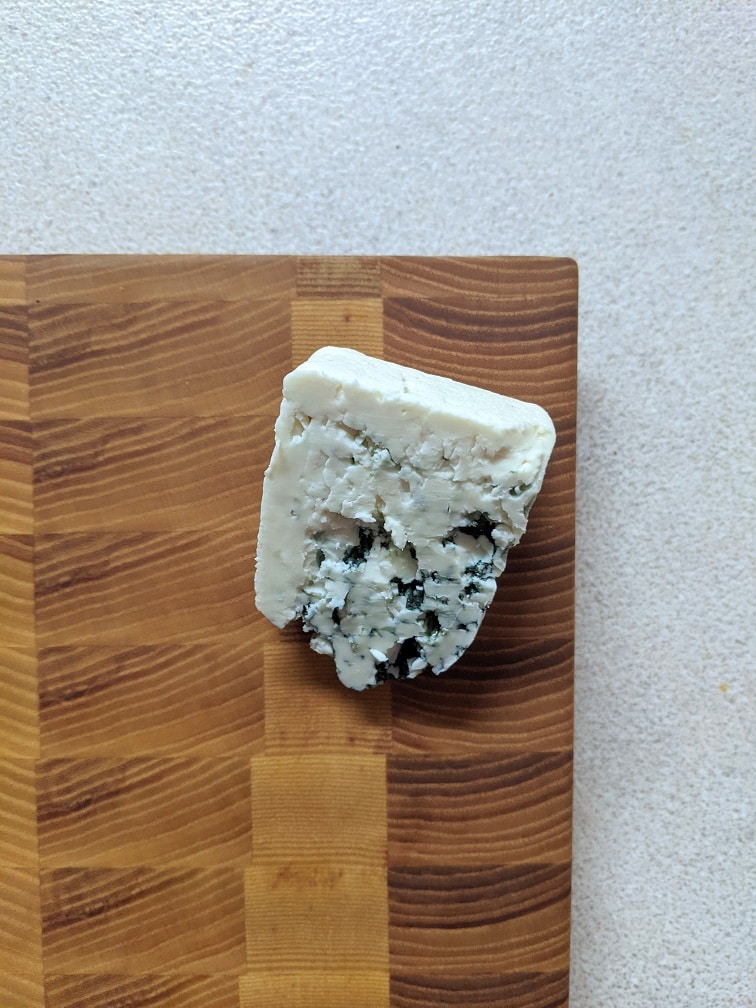
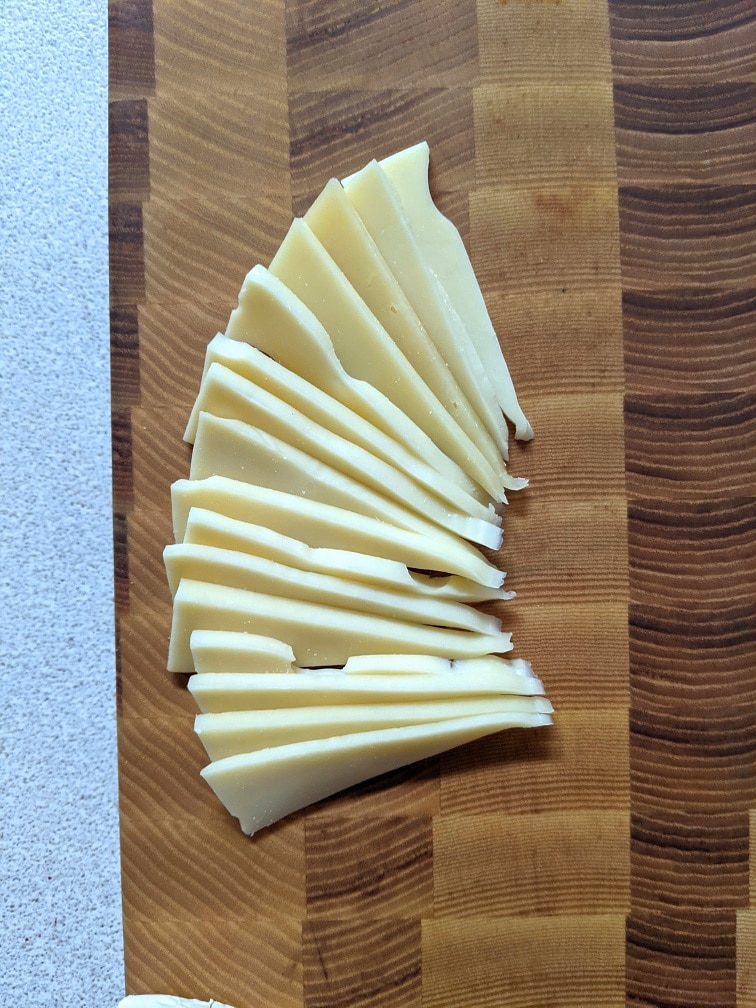
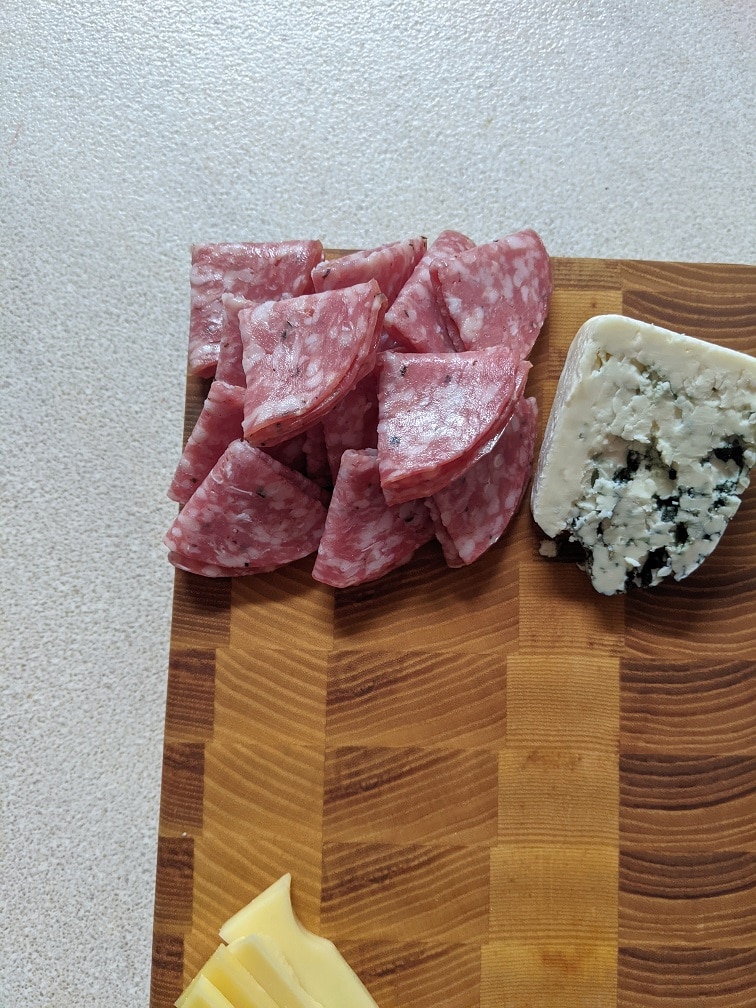
Blue cheese I don’t cut becasue it is typically pretty crumbly. I put a wedge of it in one corner and make sure to serve a cheese knife with it. Whatever it may be, the third cheese is what I use to break up the board visually. I avoid cutting the cheese into cubes like the plague. There is nothing that is going to make your board look cheaper than cubed cheese. Suppose the cheese comes in a wedge, cut across it to get thin triangles. If the cheese is rectangular, slice it, cut the slices into triangles if you can, or use the thin rectangles. Fan the third cheese out. This looks great and makes the cheese easy to grab.
How much meat and cheese to serve?
If the charcuterie board is served before a meal, aim to have about 56 grams or 2 ounces of cheese per person and the same amount of meat. If the board is the meal, aim for about 150 g or just over 5 ounces per person. That is cheese in total, not of each kind of cheese and the same with the meat.
Cups and bowls
After the cheese, I like to add any cups or ramekins that I may be using. On my example board, I use one small cup of blueberry compote. But you may have cups of mustard, pickles, olives, anything like that. Essentially, anything rigid should be added to the board, right after the cheese.
Your Charcuterie Meats
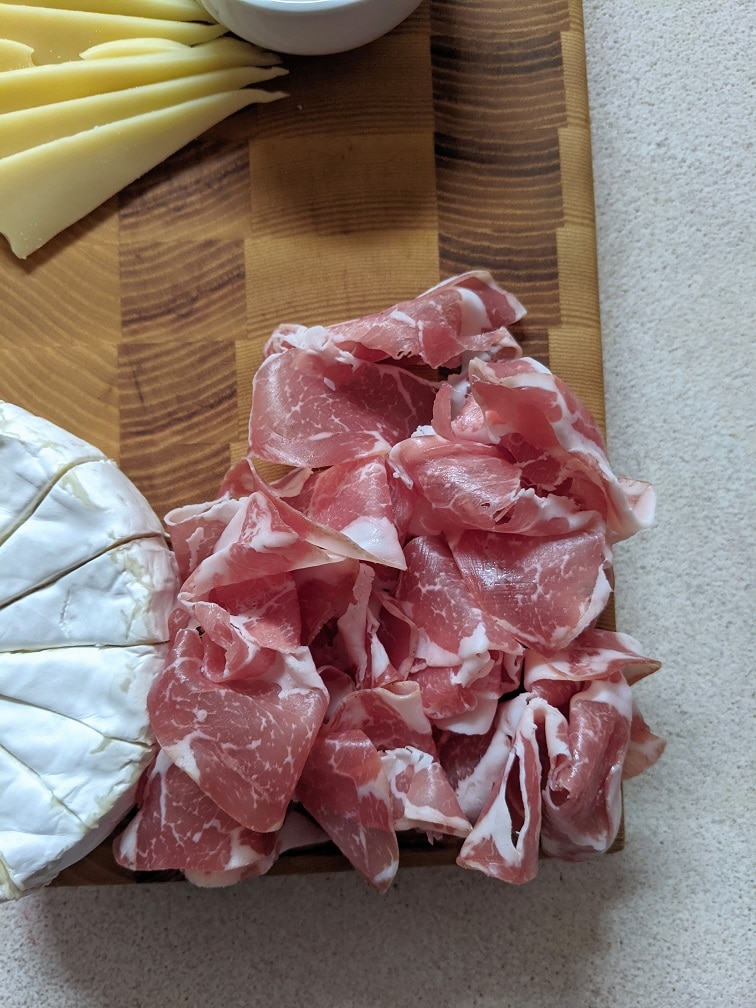
Next up, the meat gets added. Just as with cheese, you want to create different textures with the meats. Again, this isn’t a meat and cheese tray from your local grocery store’s deli section. Avoid rolling meats into tubes and stuff like that. How you present the meat really depends on what meat you have. With my example board, I have coppa, salami, and prosciutto. The coppa and salami are both round, and the prosciutto is prosciutto shaped. Generally, I fold salami into quarters. It holds well and looks nice enough. With the coppa, I pinch it gently in the middle and form it into a loose bunch.
There is a common mistake when it comes to preparing slices of prosciutto for a charcuterie board. People tend to roll it or fold it up, but it makes eating very unpleasant. Eating rolled prosciutto feels very similar to eating raw meat, which is not usually very much fun. Instead of rolling, gently fold the prosciutto into ribbons. When your guests eat it, they should be eating only one-two to layers at a time. This makes the prosciutto much more enjoyable to eat.
Position of the meats
As for where to place the meats on your board, I like to bunch them up with the cheese. You don’t have to do this, but I find it helps keep everything looking nice and tidy, and saves room for bread or crackers, and other garnishes.
Bread and Crackers
The next elements to be added to the board are the crackers or bread. I like to use these items as borders or dividers between the different sections of my board. There are salami and blue cheese at the top, then a bread border. At the bottom, coppa and brie, and a bread border. Again, this helps with the visual appeal, but it also puts the bread or crackers exactly where you want them next to the spreadable cheese.
Garnishing Your Charcuterie Board
The final step, and visually the most important, is to garnish your charcuterie board. For the best visual appeal and variety in eating, use a few different garnishes. I have grapes, cranberries, dried figs, pistachios, gherkins, olives, dried orange slices, and a few sprigs of fresh thyme on my board. So that you know, most of these items I had on hand already. Don’t spend more on garnish than your main items. Buy one or two things, then use whatever you have around the kitchen.
You don’t have to use the exact garnishes that I did, but the idea is to fill the blank space with pops of colour and different textures. Of course, you want most, if not all, of your garnish to be things that you actually want to eat. Also, don’t go overboard here. There is such a thing as too much garnish. A few pieces of each item is more than enough.
The Finished Charcuterie Board
Your finished charcuterie board should be visually stunning and easy and enjoyable to eat. This is food, after all. Ideally, your guests or partner will literally say, “Wow!” when they see it. If someone says, “I don’t want to eat it because it is too beautiful.” you know you’ve done your job.
Conclusion
There isn’t much difference between a professionally prepared Charcuterie Board and an amateur one. It’s mostly the same meats and the same cheese. Like with most things, it is the little extras that separate the two. Pay attention to the placement of things. Think about colour and texture. And use garnish to fill up the board and add pops of colour. Just like that, your amateur looking Charcuterie Board has become a masterpiece that any pro would be happy to serve.
You can find the Blueberry compote recipe below.
Thank you for reading the post. If you liked it, remember to share it on Facebook, Pinterest, or Twitter. Did you know that Chefsnotes.com has over 400 posts just like this one? Subscribe to the blog below, and you will be notified of every new post so you will never a helpful tip or recipe again. And if you would like to know more about me, click the picture of me below to read my story “Life on the line.”
Heat a small pot over medium heat. Add the canola oil and shallot. Cook for 2 to 3 minutes or until the shallots start to soften.
Add the remaining ingredients, bring to a boil, reduce the heat to low and simmer for 10 minutes or until a spoon dragged across the bottom of the pot, leaves a line for at least one second.
Polenta is creamy, buttery, cheesy, and oh so delicious. It also happens to be very simple to make. If you can boil water and stir, you can make polenta. But why should you? You should make polenta not only becasue it is delicious but because it makes a great side dish for meat sauce, vegetarian ragu, braised meats, and more. It also can be eaten on its own with butter and cheese or topped with sausage and egg for a hearty breakfast. The point is that polenta is one of those all-purpose dishes that is a must for anyone who loves to cook or eat. Today, I’m going to show you how to make it. Are you ready? Good, let’s get to it.
What is Polenta?
Polenta is ground-dried corn (cornmeal) cooked in boiling liquid (water, milk, or stock). The cooked cornmeal thickens and takes on a porridge-like consistency that is great when paired with rich tomato-based sauces or with lots of cheese and butter.
Is Polenta gluten free?
Yes, polenta is gluten-free. Polenta is made from ground cornmeal, which does not contain gluten. This makes it a safe option for people with gluten intolerances or celiac disease. However, when purchasing pre-prepared or packaged polenta, it’s important to check the labels to ensure that it has not been processed in a facility that also handles wheat or other gluten-containing grains, which could lead to cross-contamination.
Different Types of Polenta
There are two main ways to serve polenta. They are creamy and firm. Firm polenta is creamy polenta that has had a little more moisture cooked out of it, and then it has been left to cool, cut into shapes and recooked. Creamy polenta has a higher moisture content and is served fresh. Firm polenta can be cut into many different shapes and fried or seared to develop a crisp exterior and a soft interior. Creamy polenta should resemble scrambled eggs.
Polenta Ingredients
Polenta really only has a handful of ingredients. They are cornmeal, liquid (water, milk or stock), seasoning (salt and pepper), cheese (usually parmesan) and butter (to add flavour and creaminess). Other ingredients added to polenta can include bay leaves, herbs like thyme and rosemary, different types of cheese like cheddar and asiago, or even onion and garlic.
How To Make Polenta
To make polenta, bring a pot of water to a boil (use four to five times more liquid than cornmeal), add the seasoning and herbs if you’re using them, then whisk in the cornmeal. Turn the heat down to medium and cook, continuing to stir, for about twenty minutes. Once the cornmeal has softened, and it resembles scrambled eggs take it off the heat and stir in some parmesan cheese and butter. Taste the polenta and adjust the seasoning with salt and pepper as needed.
What to serve polenta with
My favourite thing to serve with polenta is beef or pork braised in a rich tomato sauce. You can do the same with mushrooms. I also really like it served as a side with roasted meats. And I love it for breakfast with sausage, egg, and lots of cheese. Essentially, it can replace pasta or potato in most cases.
Perfect Polenta
Have you ever dreamed of a creamy side dish, made of corn and loaded with butter and cheese? Yes, you have? Oh, fantastic! Have I got the thing for you. This polenta fits all of those wants.
Add the salt and pepper to the boiling water then whisk in the polenta.
Turn the heat down to medium and cook the polenta, stirring constantly until it resembles scrambled eggs. About 20 minutes.
Take the polenta off the heat and stir in the butter and parmesan cheese.
Serve the polenta as it is, as a side dish with meat sauce or roasted meat, with mushroom ragu, or for breakfast with fried eggs and sausage. You can also spread the polenta out on a sheet pan and cool it, then cut it into shapes, and pan fry it to get a crisp exterior and a soft interior.
Polenta is one of the most versatile, easy to make, and delicious side dishes you’ll find. Not only that, but it seems fancy. It seems like the kind of thing that can only be made by true masters, but it really isn’t. Anyone, and I do mean anyone, can make polenta. So what are you waiting for? You probably already have all the ingredients on hand. Get cooking! And for more on polenta, take a look at this post I wrote way back in September of 2018 called Everything You Ever Wanted To Know About Polenta.
Thank you for reading the post. If you liked it, remember to share it on Facebook, Pinterest, or Twitter. Did you know that Chefsnotes.com has over 400 posts just like this one? Subscribe to the blog below, and you will be notified of every new post so you will never a helpful tip or recipe again. And if you would like to know more about me, click the picture of me below to read my story “Life on the line.”
It’s only a few days away. Can you believe it? Before you know it, you and your family (or maybe just you) will be gorging yourselves on mashed potatoes, sweet potatoes, stuffing, gravy, and of course, turkey. Last Thanksgiving, I shared four different and unique turkey recipes in “A Tale of Four Turkeys.” This year, I will share my seven Thanksgiving turkey cooking tips with you to help you make one bird exceptionally well.
With everything going on this year, and people not being able to gather for Thanksgiving, many people will be cooking a turkey for the first time. But don’t worry, whether you are new to this, or you’ve been cooking turkey your whole life, I’m sure you will find some, if not all of the information in this post helpful. So, let’s get to it.
1. Defrost
Defrosting in The Fridge
First and foremost, you are likely buying a frozen turkey. It is important to defrost it properly to keep it safe. The last thing you want is to make anyone sick. The best way to defrost a turkey is in the fridge. But this takes a long time. For example, I recently defrosted a nine-pound turkey in the fridge for four days. After the four days, the body cavity was still full of ice. A bigger turkey may take up to six days to fully defrost in the fridge. Essentially, if your turkey isn’t in the fridge defrosting right now, it should be. If you defrost the turkey in the fridge, make sure to sit in a large pan or bowl to collect any liquid that melts off the bird.
Defrosting in Water
Another safe way to defrost a turkey is to put it in the sink or (clean) bathtub and submerge it in cold water. Change the water every hour until the bird is fully defrosted. This technique will defrost the bird in about a day. For a massive turkey, it may take two days.
Defrosting at Room Temperature
Defrosting a turkey at room temperature is a big no-no. I know that some people reading this have done this their whole lives and have not made anyone sick. But, it is very, very risky. At room temperature, the turkey’s surface will go into what is known as the danger zone. That’s the temperature range between 4°c and 60°c at which bacteria grow exponentially. Even though the turkey is mostly still frozen, bacteria are growing on the surface and have the potential to make people very sick. For this reason, it is never a good idea to defrost a turkey, or anything really for that matter, at room temperature.
One step that people often miss when preparing their Thanksgiving turkey is to dry the skin. You can do this really simply with a paper towel, but it is best if it is left to air dry. I recommend uncovering the turkey a day or two before you are going to cook it. Put it on a rack set over a pan and put it back in the fridge. You can loosely cover the turkey with plastic wrap to prevent it from contaminating any other foods.
Why Dry The Skin
So, why do this? Why dry the turkey skin? Dry the turkey skin because it will get brown and crispy. That’s it. It just makes it more delicious and involves very little effort. So, why not do it? Right?
3. Grease it on or under the skin
Fat, on or under the turkey skin, be it butter, bacon fat, olive oil, lard, whatever. It will also help the skin get nice and crispy. There is the added benefit that fat pushed under the skin will make the breasts exceptionally moist and flavourful too. Now, pushing butter or bacon fat under the turkey skin will take practise. If you’re new to cooking a turkey, you might not want to go that far. So, just rub the turkey all over with melted butter or another fat of your choice.
Basting Tips
I’m going to talk about basting here really quickly too. If you don’t know, basting is when you take a liquid and pour it over the turkey (or another food item) during cooking. The old school way of thinking is that this will help the turkey stay moist and juicy and impart flavour. Basting will add some flavour, but we now know that it doesn’t really help with moisture or anything like that. The liquid isn’t going to penetrate the skin and get to the meat. What basting can do is help to develop an even brown colour and evenly crisp skin.
When basting, always use fat. It can be fat collected from the bottom of the roasting pan. It could be melted butter, olive oil, or whatever. What you don’t want is “juice” or anything watery. That will moisten the skin and prevent crisping and browning. Really all you want to do is every thirty to sixty minutes, take the turkey out of the oven and baste any light spots with fat. Put it back in the oven and keep doing that until the bird is fully cooked. This will give you that nice golden brown skin with a nice crisp texture.
4. Seasoning
Seasoning is what you put on the turkey to add flavour. For most people, this comes down to personal preference and family tradition. For my own turkey over the last year or so, I’ve been leaning into poultry seasoning, which you can make or buy. Here is a recipe from All Recipes that looks pretty good if you want to make it yourself. Our Thanksgiving turkey was always heavily flavoured with Summer Savoury, sage, and the like growing up. My mom would also put sausages or bacon around the turkey to add a little more flavour and fat. There is no right or wrong way to season a turkey. But, be generous with the seasoning and always use salt and pepper. For more unique seasoning options, check out last year’s Thanksgiving post.
5. Stuffing, yes or no
Stuffing. Of all my turkey cooking tips this one has gotten me in the most trouble. This has gotten me some angry emails in the past, but I have to stick to my guns. I don’t believe that you should stuff a turkey, and here’s why. When you stuff a turkey, you create a solid mass in the middle of an already dense bird. To make the stuffing safe to eat, it has to reach a temperature of 165°f. To get the stuffing to that temperature, the turkey has to be cooked to 180°f. Normally, you would only cook a turkey to 170°f. By the time the turkey rests and the residual heat dies down, 180°f is going to be closer to 200°f or, in other words, overcooked and dry.
I prefer to cook the stuffing outside of the bird (which makes it dressing). I pour some of the turkey juice over the stuffing as it cooks to add flavour. As for the turkey, I don’t leave it empty. I chop up an onion, throw it in there, and sometimes even a carrot and some celery. But, I keep it loosely packed. This adds loads of flavour to the turkey but makes it so I can cook it to 170°f and still get a nice juicy bird.
6. Cooking, temp and times/ get a thermometer
Turkey temperature
What temperature should you cook your Thanksgiving turkey on, for how long and to what temperature? Great questions. Let’s get the easy one out of the way first. Cook your unstuffed turkey until a meat thermometer inserted into the breast’s thickest part reaches 165°f and inserted into the thigh reaches 170°f. For a stuffed turkey, you want to cook it until the stuffing reaches 165°f. The breast will be around 175°f, and the thigh will be around 180°f.
Oven Temperature
Your oven temperature will depend on the bird’s size but generally, for any turkey over 10 lbs ( 5.5 kg), cook it at 325°f. Any turkey under 10 lbs (5.5kg) can be cooked at 325°f or 350°f. Larger birds are cooked at lower temperatures so that the outside of the turkey doesn’t overcook before the inside is cooked. With smaller birds that isn’t so much of a concern.
Turkey Cooking Times
Thanksgiving turkey cooking time depends on the bird’s size, whether it is stuffed, and the oven’s temperature. But generally, for an unstuffed bird being cooked at a temperature of 325°f, it will take about seventeen minutes per pound. Meaning a fifteen-pound unstuffed turkey will take about four hours and fifteen minutes. A stuffed turkey will take about twenty minutes per pound at 325°f. So, a fifteen pound stuffed turkey will take about five hours to cook. Cooking a smaller turkey at 350°f will take about thirteen to fifteen minutes per pound.
Unstuffed over ten pounds = Turkey Weight x 17 = time to cook at 325°f
Stuffed over ten pounds = Turkey Weight x 20 = time to cook at 325°f
Unstuffed under ten pounds = Turkey Weight x 13 = time to cook at 350°f
Stuffed under ten pounds = Turkey Weight x 15 = time to cook at 350°f
Of course, these cooking times are estimates and should be confirmed with a meat thermometer.
7. Resting
The last turkey cooking tip that I have for you is to let your turkey rest. For a turkey over ten pounds, let it rest for at least an hour, under ten pounds at least thirty minutes. Resting will allow the turkey juices to redistribute throughout the bird, making it juicier and more flavourful. There is no point in having gone through all the trouble of buying the turkey, defrosting it, seasoning it, cooking it, and then ruining it by cutting into it right away. Plus, letting the turkey rest will give you time to get the rest of the dinner cooked.
To rest the turkey, take it out of the oven, loosly cover it with a lid or foil, and set it in a warm part of your kitchen. That’s it.
Conclusion
Thanksgiving just isn’t the same without turkey. Whether you are with your family this year or not, don’t let the spirit of the holiday go. Enjoy some turkey, skype in with your family, and share a meal even if it is from a distance. Even though this year has been crazy and doesn’t always feel like it, we all have a lot to be thankful for. I think a bite of flavourful, juicy, tender turkey will help remind us all of that.
Happy Thanksgiving, Everyone. I’ll see you right back here next Wednesday. And if you are wondering what to do with all your leftover turkey check out thinkturkey.ca. They have lots of great recipes.
Thank you for reading the post. If you liked it, remember to share it on Facebook, Pinterest, or Twitter by clicking the icon to the left of the right of the page. Did you know that Chefsnotes.com has almost 400 posts just like this one? Don’t ever miss a post again. Become a Chef’s Notes member right here. You will be notified of every new post. And if you would like to know more about me, click the link below to read my story.
We use cookies on our website to give you the most relevant experience by remembering your preferences and repeat visits. By clicking “Accept”, you consent to the use of ALL the cookies.
This website uses cookies to improve your experience while you navigate through the website. Out of these, the cookies that are categorized as necessary are stored on your browser as they are essential for the working of basic functionalities of the website. We also use third-party cookies that help us analyze and understand how you use this website. These cookies will be stored in your browser only with your consent. You also have the option to opt-out of these cookies. But opting out of some of these cookies may affect your browsing experience.
Necessary cookies are absolutely essential for the website to function properly. This category only includes cookies that ensures basic functionalities and security features of the website. These cookies do not store any personal information.
Any cookies that may not be particularly necessary for the website to function and is used specifically to collect user personal data via analytics, ads, other embedded contents are termed as non-necessary cookies. It is mandatory to procure user consent prior to running these cookies on your website.