Compound butter may seem intimidating. Especially when the name suggests something complex and when butter is $7.00 a pound. You don't want to mess it up. However, compound butter is just a fancy name for butter with other ingredients mixed in. You'll see in this post that making compound butter is easy, and it's a great way to add flavour to your butter and stretch your butter a little further.
Jump to:
This post has four recipes for compound butter: horseradish butter, lemon-thyme butter, herb butter, and the best-ever garlic butter. All of these work beautifully as steak butter recipes. You will learn four ways to form compound butter, store it, and, even more importantly, use it. So, are you ready? Good! Let's get to it.

The Basics Of Compound Butter
Compound butter unsurprisingly starts with butter. You can use unsalted butter or salted butter to make compound butter. I prefer to use salted butter. When using salted butter, you know how much salt is in there. You don't need to add any more, limiting the chance of the final compound butter being under or over seasoned.
The butter has to be soft when making compound butter. Take it out of the fridge a few hours before you're ready to use it to get it to room temperature. Then, beat the butter in an electric mixer with the paddle attachment on medium-high speed. Beat the butter for 7 to 8 minutes, stopping to scrape down the sides of the mixing bowl at least once or twice. The butter should be light and airy.
If I were only making one type of compound butter, I would add the ingredients to the beaten butter and mix it with the electric mixer for a minute. However, because I made four kinds of compound butter for this post, I divided my butter into smaller portions and mixed the ingredients in by hand.
If you enjoy building flavour in your dishes, you might also love making homemade ketchup, mustard, mayonnaise, and relish from scratch. Compound butter pairs wonderfully with a perfectly grilled teriyaki steak, too.


How To Store Compound Butter
You should store compound butter in the fridge or freezer in an airtight container. Depending on the ingredients you've added to the butter, it should last in the refrigerator for one week and a maximum of one month. In the freezer, compound butter will last for months.
As you'll see below, there are many different ways to form your butter to make it easy to use. The shape you use for your butter doesn't matter. There's no rule saying this kind of butter needs to be this shape, used for this, or has to look like this. Form the butter however you want.
Forming Compound Butter
There are four main ways to form compound butter. The first is by far the easiest. That's to put the butter in a ramekin or small dish. The problem with this method is that if you're storing the butter in the fridge or freezer, it will be difficult to use. You'll have to soften it every time you want to use it. So, let's forget about that method.
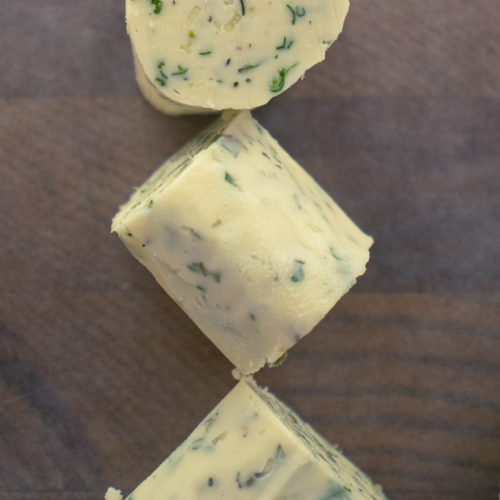
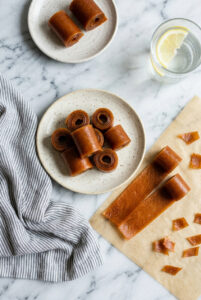
Rolling Compound Butter
The second easiest way to form compound butter is to roll it. To roll your butter, you can use plastic wrap, parchment, foil, or even waxed paper. For getting a nice tight roll, I prefer plastic wrap.
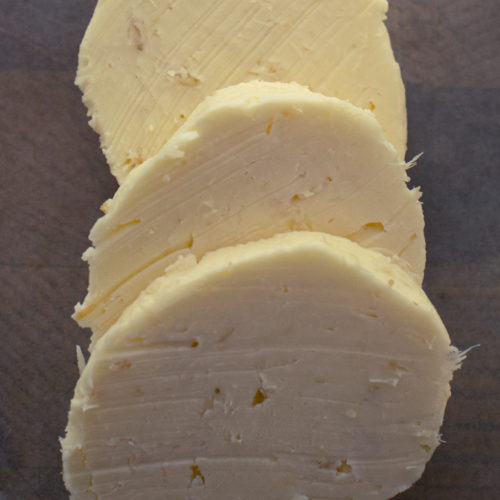
For this method, lay a piece of wrapping flat on your work surface. Spread the butter in a line about two-thirds down the wrapping, then roll. If using plastic wrap, twist the ends until tight. You can store butter wrapped like this in the fridge or freezer. You can unwrap it and cut pieces as needed. Alternatively, you can chill the butter in the refrigerator for two hours, cut it into coins, and store those coins in an airtight container in the freezer.


Small Butter Rolls
Rather than making a large roll of butter, you can make a small roll. This method is excellent if you sprinkle herbs, seasonings, or even edible flowers into the butter. This works best with parchment or waxed paper.
For this method, spread the butter out into a thin rectangle, sprinkle whatever ingredients you want over the butter, then roll it up and pull the paper back as you roll forward. You may find it easiest to chill the butter for 5 to 10 minutes before rolling to help it loosen from the paper. Once chilled, you can cut the butter into little nubs showing the rolled-in ingredients. I didn't actually roll any additional ingredients into my butter, but you can see how it works below.


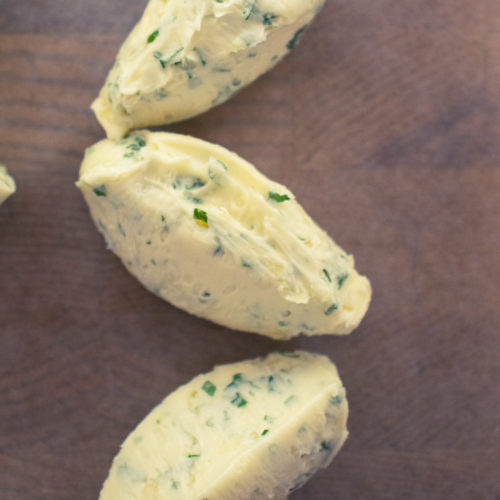
Quenelleing Butter
A quenelle is a fancy thing in cooking where we take two identical spoons and pass food between them, forming the food into a quenelle or football shape. It's easiest to look at the pictures below rather than trying to read a description of the process.
This takes practice, but it's pretty easy once you get the hang of it. It's a great way to form butter, as you can see below, but also mousse, ice cream, gelato, and even whipped cream. If you dip your spoons in hot water, you will get smooth edges on the butter, but you will also waste a little due to melting. Butter formed like this should be chilled or frozen in a single layer on a baking sheet. Once chilled or frozen, the butter quenelles can be stored together in an airtight container.


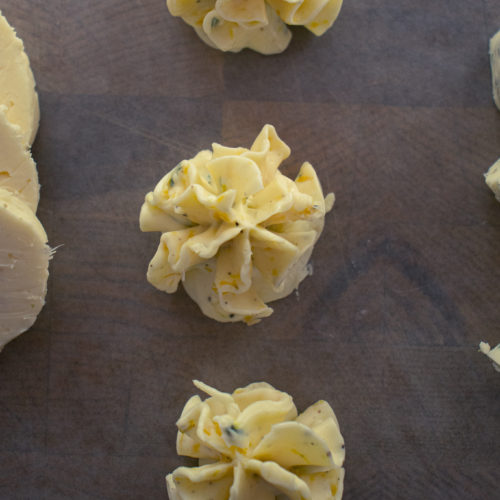
Piping Butter
The prettiest way to form compound butter is to pipe it through a star tip. If you've ever piped icing, it's the same. Put the piping tip into the bag, add the butter, and pipe it into little rosettes or whatever shape you'd like.
Next, chill or freeze the butter in a single layer on a parchment or waxed paper-lined baking sheet. Once chilled, you may store the piped butter in the fridge or freezer in an airtight container. Butter shaped like this is great to have on hand if you regularly have people over. Whether serving dinner or a light lunch, serving butter like this elevates the meal.


Best Ever Garlic Butter
Arguably, the most common compound butter is garlic butter. You can buy it, though store-bought garlic butter is generally margarine instead of butter and would have garlic powder and dried parsley. I'm trying to say that the store-bought stuff isn't good, especially after trying the recipe below.
The garlic butter in this recipe is made of butter, fresh garlic, fresh parsley, and a little bit of brandy to tie it all together. You can omit the brandy, but I suggest keeping it in. You can buy a small bottle of brandy for under $15 and use it in cooking. Its sweetness adds a lot to pork, chicken, or fish dishes. Use brandy in place of wine in almost any recipe.
I don't think I need to run through the common uses of garlic butter because we're all pretty familiar with it. But I might as well share some of my favourite uses that aren't so common. For example, it makes a great steak butter recipe to add while the steak is resting. The butter sits on the steaks, melts, and adds lots of flavour.
It's also great to throw a tablespoon or two of garlic butter into a tomato-based pasta to finish it. So, imagine your sauce is all done, you've added the pasta, now toss in a bit of garlic butter, stir it until it melts, then serve. You won't believe how much flavour that little bit of garlic butter adds to the pasta. Try it with a simple oven-baked arrabbiata sauce and you'll see what I mean.


Recipe
Best Ever Garlic Butter
Ingredients
- 1 cup butter softened
- 2 tablespoon garlic
- 2 teaspoon brandy
- 2 tablespoon parsley
Instructions
- Put the softened butter in the bowl of a mixer and beat with the paddle attachment on medium-high speed until the butter is light and airy. Scrape the sides of the bowl down at least once to ensure an even mix.
- Add the garlic and parsley and beat on medium for two a minute.
- While the mixer is running, pour the brandy into the butter and mix just until it's incorporated.
- Stop the mixer and remove the bowl. Line a baking sheet with waxed paper or parchment paper.
- Dip two spoons in hot water, then scoop up 1 tablespoon of butter with one spoon. Pass the butter between the two spoons until the butter is a football shape.
- Put the formed butter on the sheet pan and chill in the fridge for two hours or freeze. Once chilled or frozen, put the butter in an airtight container and store it in the fridge for up to a week, or in the freezer for up to three months.
Herb Butter
If you'd like an excellent table butter, meaning a butter you put on the table for dinner, you can't go wrong with a herb compound butter. If using it as a table butter, I suggest piping it, but I did a flat roll with it here.
This herb butter has parsley, thyme, rosemary, dill, oregano, and garlic. Herb butter is great for adding to soups or sauces. It also makes a great finishing butter for chicken or fish. Try it on top of roasted lemon parmesan broccoli for an extra layer of richness.


Recipe
Herb Butter
Ingredients
- 1 cup butter
- 2 tablespoon chopped parsley
- 2 teaspoon fresh thyme, chopped
- 1 tsp fresh rosemary, chopped
- 1 teaspoon dried dill
- 1 teaspoon dried oregano
- 2 teaspoon minced garlic
Instructions
- Put the softened butter in the mixer bowl and beat with the paddle attachment on medium-high speed until the butter is light and airy. Scrape the sides of the bowl down at least once to ensure an even mix.
- Add the parsley, dill, oregano, thyme, rosemary, and garlic to the mixer and beat for 1 minute or until mixd.
- Spread the butter out onto a 12-inch piece of parchment. Roll the butter into a thin log. Chill the butter for 30 minutes, remove the parchment and cut the butter into thumb-width pieces.
- Put the formed butter on the sheet pan and chill in the fridge for two hours or freeze. Once chilled or frozen, put the butter in an airtight container and store it in the fridge for up to a week, or in the freezer for up to three months.
Lemon-Thyme Butter
Lemon-Thyme Butter is fantastic with chicken or fish, especially white fish like haddock or cod. You can put it on the fish before or after cooking. Either way, it is delicious. The ingredients are all pretty much there in the name, except black pepper. You can substitute the thyme for dill and get an equally delicious butter if you'd like.
This butter is one of my favourite compound butters to keep in the freezer. It melts beautifully over a piece of pan-seared fish and turns a simple weeknight dinner into something special. If you're a fan of haddock, try this butter on my favourite haddock fish cakes for a real treat.


Recipe
Lemon-Thyme Butter
Ingredients
- 1 cup butter
- 2 teaspoon lemon zest
- 2 teaspoon chopped thyme leaves
- ¼ teaspoon ground black pepper
Instructions
- Put the softened butter in the mixer bowl and beat with the paddle attachment on medium-high speed until the butter is light and airy. Scrape the sides of the bowl down at least once to ensure an even mix.
- Add the lemon zest, thyme and pepper. Mix for 1 minute.
- Put the butter in a piping bag fitted with a large star tip.
- Pipe the butter onto a parchment-lined sheet pan.
- Put the formed butter on the sheet pan and chill in the fridge for two hours or freeze. Once chilled or frozen, put the butter in an airtight container and store it in the refrigerator for up to a week or in the freezer for up to three months.
Horseradish Butter
Making horseradish butter is as simple as mixing prepared store-bought horseradish with softened, beaten butter. Horseradish butter is fantastic on a steak, salmon, or even a burger.
Like any other compound butter mentioned in this post, you may use horseradish butter before or after cooking. For example, you can put room-temperature horseradish butter on a piece of salmon when it comes out of the oven or off the grill. The butter will melt over the salmon and add flavour. The butter also adds a nice glazed appearance.
Alternatively, you can put cold horseradish butter on a piece of salmon, then roast or broil it. This will give the salmon a nutty flavour and a darker appearance. It's equally delicious on a steak salad with blue cheese dressing.


Recipe
Horseradish Butter
Ingredients
- 1 cup butter
- 2 tablespoon horseradish
Instructions
- Put the softened butter in the mixer bowl and beat with the paddle attachment on medium-high speed until the butter is light and airy. Scrape the sides of the bowl down at least once to ensure an even mix.
- Add the horseradish to the butter, and beat for 1 minute or until mixed.
- Place a 12-inch long piece of plastic wrap flat on your work surface.
- Put the butter in a long mound on the plastic wrap.
- Fold the bottom of the plastic wrap up and over the butter, rolling forward to seal. Twist the end of the wrap to tighten the roll.
- Chill the butter and leave it as is until you're ready to use it, or remove the plastic, cut the butter into medallions and store it in an air-tight container in the fridge for up to two weeks or in the freezer for up to four months.
Frequently Asked Questions
How long does compound butter last in the freezer?
Properly wrapped compound butter will last up to three months in the freezer. The key is to use an airtight container or wrap it tightly in plastic wrap to prevent freezer burn. If you've rolled the butter into a log, slice it into coins before freezing so you can grab individual portions without having to thaw the whole batch.
Can I use unsalted butter for compound butter?
Yes, you can use either salted or unsalted butter. If you use unsalted butter, add a pinch of quality salt to taste when mixing in your other ingredients. Salted butter is easier to work with because the seasoning is already built in, which reduces the chance of under-seasoning your finished compound butter.
What are the best uses for compound butter?
Compound butter is incredibly versatile. Use it as a finishing butter on steaks, chops, or fish right after cooking. Toss a tablespoon into pasta sauces, melt it over steamed vegetables, or spread it on bread before grilling or toasting. It also works beautifully tucked under the skin of a whole chicken before roasting. Essentially, anywhere you would use plain butter, compound butter will add an extra layer of flavour.
Do I need a stand mixer to make compound butter?
A stand mixer makes the process faster and gives the butter a lighter, more airy texture, but it is not strictly necessary. You can beat softened butter with a hand mixer, a wooden spoon, or even a fork. The main goal is to get the butter soft and pliable enough to incorporate your ingredients evenly. If mixing by hand, make sure the butter is very soft before you start.
Make Compound Butter Your Secret Weapon
Compound butter is one of those kitchen skills that looks impressive but is genuinely simple once you've done it a couple of times. I keep at least two varieties in my freezer at all times, and I'd encourage you to do the same. There's something truly satisfying about pulling a coin of garlic butter from the freezer and dropping it onto a sizzling steak, or melting a rosette of herb butter into a bowl of mashed potatoes.
The flavour combinations I've listed here are just the beginning. Once you get comfortable with the technique, you'll start dreaming up your own variations, and that's exactly the point. Try the ones I've shared, then make them your own and let me know what you come up with.


Leave a Reply