In the early part of my career, I worked in a few pubs. For whatever reason, all of these pubs served a version of steak fajitas. The steak was tossed with bell peppers, red onion, and cajun seasoning then cooked in a pan or on a flat-top. To accompany the fajita mix would be tomatoes, lettuce, salsa, sour cream, cheese, and guacamole (for an extra charge). More often than not, the meat and vegetables would be brought to the table in a hot skillet, so it was sizzling when it came out of the kitchen. We always splashed water on the skillet to make the sizzle more impressive for the customer. The steak fajita recipe I will share with you today doesn’t stray far from the version I made so many times in those early years. However, I did my best to elevate it. To make it something even more than it already was. I hope you enjoy it.
Want to see how to make them? Find the recipe directly below, but keep reading for more detailed instructions.
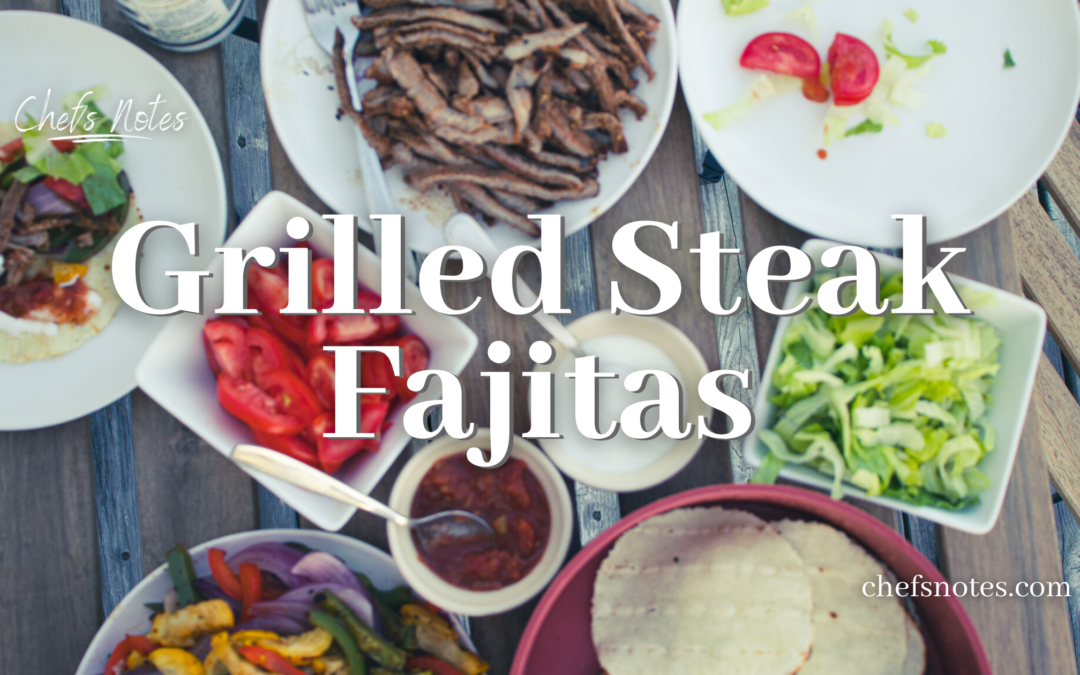
Grilled Steak Fajitas
Steak fajitas are good, grilled steak fajitas are even better. Fire up the barbecue, take an afternoon and make this truly delicious family recipe. It's the perfect thing for family get togethers to parties.
Combine all the marinade ingredients in a medium glass or plastic bowl.
Add the meat, cover tightly with plastic wrap and put it in the fridge for at least 2 hours or up to 24 hours.
Remove the steak from the marinade and grill on high heat for about 3 minutes per side.
Allow the meat to rest for 5 minutes, then thinly slice it against the grain and serve.
Tortillas
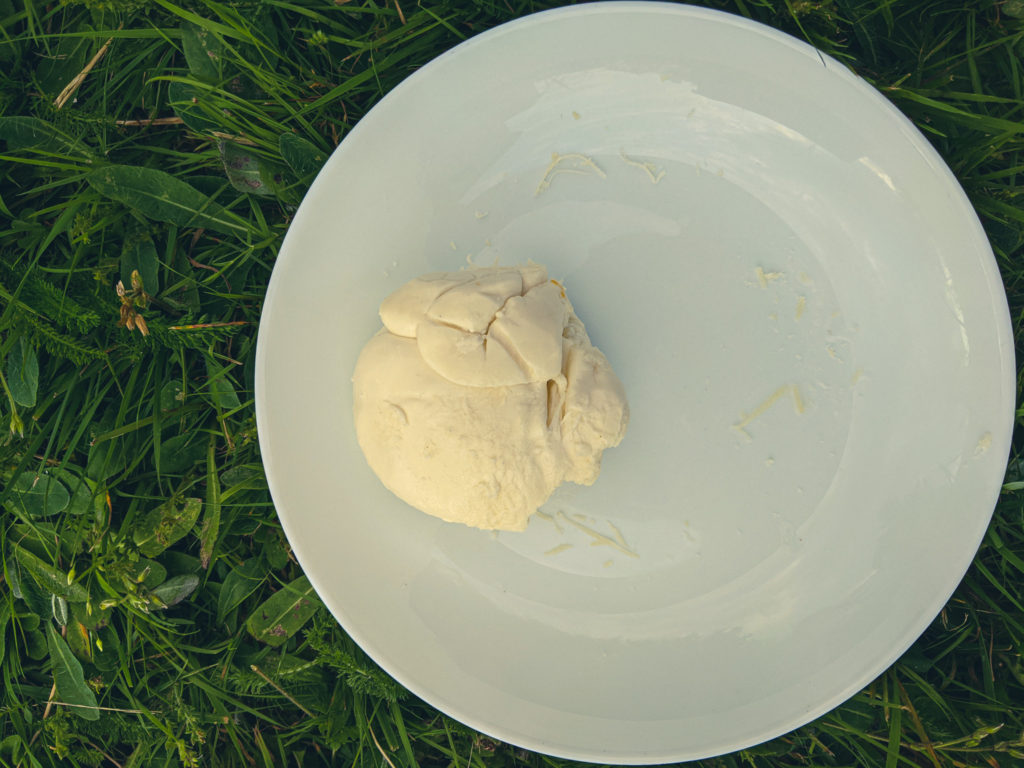
Pour the water into a large mixing bowl and stir in the salt.
Slowly mix in the masa and knead until the mixture forms a firm dough.
Divide the dough into tablespoon-sized pieces and roll into balls.
Press the dough balls between two sheets of waxed paper on a tortilla press or use a heavy pot.
Grill the tortillas on high heat for about 90 seconds per side.
Keep the cooked tortillas in a tortilla warmer, or wrap them in a clean kitchen towel until you are ready to serve them. If the tortillas cool down too much, reheat them for 20 seconds in the microwave.
Vegetables
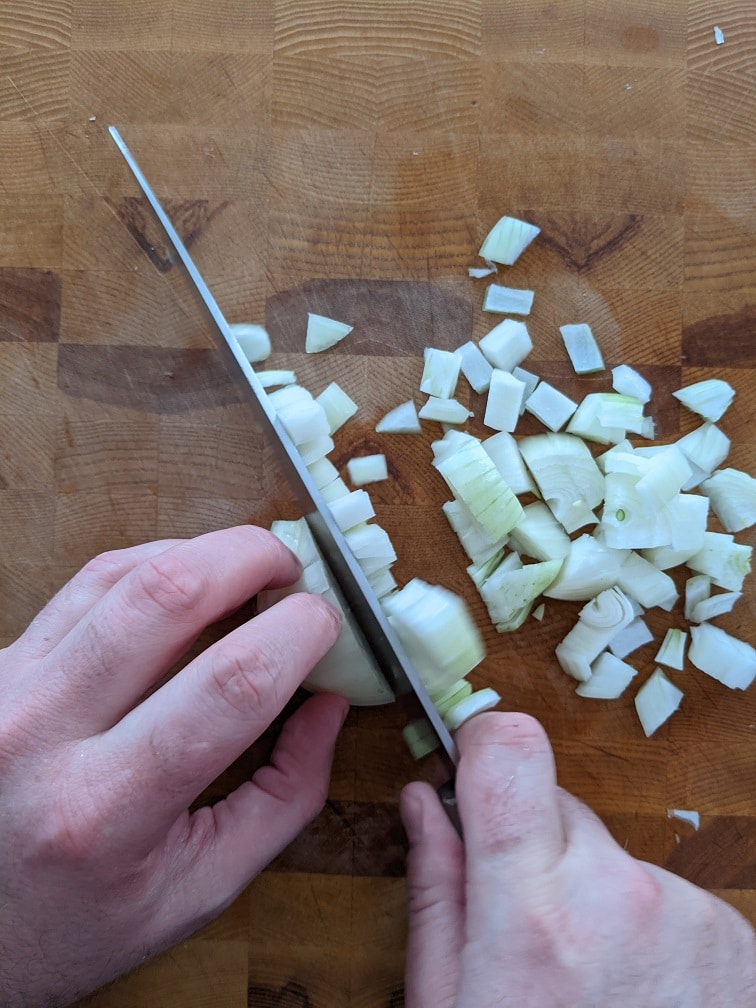
Cut the red onion in half through the root and stem.
Grill the onion, cut-side down for about 20 minutes on moderate heat. Flip the onion and cook on high heat for another 10 minutes.
Remove the onion from the grill and allow it to cool for 5 to 10 minutes.
Cut the ends off the onion and remove the peel.
Thinly slice the onion and put it in a medium mixing bowl to be tossed with the other grilled vegetables.
Cut the sides off of the red and green bell peppers discarding the seed pods.
Cut the ends off the zucchini and discard. Slice the zucchini into long thin slices.
Put the peppers and zucchini in a large mixing bowl, drizzle with the olive oil, then season with the cajun seasoning.
Grill the peppers and zucchini on medium-high heat for about 6 minutes per side.
Remove the vegetbles from the grill and allow them to cool just long enough that you can handle them. Thinly slice the vegetables, mix with the sliced onions and serve.
Serving
Serve the steak, vegetables, and tortillas with grated cheddar cheese, thinly sliced lettuce, diced tomatoes, salsa and sour cream. Avocados or guacamole and fresh lime are also great additions.
At their core, fajitas are like a DIY Taco, though they are about as Mexican as I am. They originate in Texas (I know, it used to be part of Mexico, but that was long before Fajitas existed). Rather than being Mexican, Fajitas are part of a strange but delicious sub-sect of food known as Tex-Mex. AKA Americanized Mexican food. Of course, none of this really matters because Steak Fajitas are delicious and make a perfect family meal.
Steak Fajita Marinade
The first step to making my version of Steak Fajitas is to marinate the steak. To do that, we need to make a marinade. You can find all the measurements above, so I won’t list them here. But, the ingredients for the marinade are oregano, paprika, cayenne, ancho chili powder (optional), cumin, garlic, onion, pickled jalapeno, kosher salt, olive oil, and red wine vinegar. Put all the ingredients in a mixing bowl and mix it up.
The Steak
The steak I used was fast fry sirloin tip. These are just very thin sirloin tip steaks. You can use any thin cut of steak. You could also take a thicker steak and pound it out with a meat mallet if you’d like. That’s just more work, though. I’ll leave it up to you. Either way, put the meat in the marinade, mix it up to ensure all the meat is coated, then cover the meat with plastic wrap, making sure to push the wrap down to the surface of the meat rather than just covering the bowl. This will help prevent the meat from discolouring. Put the bowl in the fridge for a minimum of two hours and a maximum of twenty-four hours.
Fajita Vegetables
The traditional fajita vegetables are bell peppers and red onion. When I pulled the peppers out of the fridge, I noticed this beautiful yellow zucchini and thought it would make a great addition to the vegetable mixture. I was right. You can leave it out if you’d prefer.
Prepare the vegetables
To prepare the peppers, stand them straight up on your cutting board and cut the lobes away from the core. Then, discard the seed pod. Cut the ends off the zucchini, then cut it into long thin slices. Toss the peppers and zucchini with olive oil and the mandatory fajita spice, Cajun seasoning. Cut the red onion in half down through the root and stem. That’s all you have to do to the onion right now. And yes, before you ask, leave the peel on.
Homemade Corn Tortillas
Okay, you can totally skip this step and just buy tortillas. You don’t have to make them yourself, but they are way better when you do. Having said that, it is a lot of work—your choice. If you do want to make them, here is how you do it. Go to the store and buy a bag of masa. I like PAN yellow or white masa. Masa is corn that has been treated with an alkaline solution, rinsed, cooked, ground, and dried. Treating the corn with an alkaline solution makes the corn’s nutrients more accessible to your body and makes the corn earlier to digest. It is a process that the ancient Mayans and Aztecs perfected over 2000 years ago.
Anyway, once you get your masa home, just follow the instructions on the bag. This particular brand suggests 2 cups of masa flour to 2 1/2 cups of water along with a teaspoon of salt. I halved the recipe. To make the dough mix the water and salt, then stir in the cornflour. Mix it and knead it until it forms a soft dough. Divide the dough into 1 tablespoon-sized piece and roll them into balls. Using a tortilla press and two sheets of waxed paper, press the dough balls to flatten them into tortillas. Leave them wrapped in plastic or waxed paper until you are ready to cook them.
Get Grilling!
Grilled Red Onion
All your prep is done. Now, it’s time to cook. Get your grill nice and hot, then put your red onion on the cut side down. On my grill, the front is the hottest part, and the back is cooler. So, I put the onion on the back and grilled it for about 20 minutes. Then, I flipped it, brought it to the front and cooked it for another 10 minutes.
Grilling the Tortillas
While the onion is grilling, cook up the tortillas. Grill them on the hottest part of your grill. They should take about 90 seconds per side. Once grilled, put the tortillas in a tortilla warmer, or wrap them in a clean kitchen towel or foil.
Grilled Peppers and Zucchini
Once the tortillas come off the grill, you can put the peppers and zucchini on. Cook them for about 8 to 10 minutes per side over moderate heat. You want them still to have a small bit of crunch to them but not be raw.
Grilling The Steak
Finally, you can grill the steak. Take it out of the marinade and grill it on the hottest part of your grill for about 3 minutes per side.
Cut it up!
Now that all your ingredients are cooked, it’s time to cut them up! Let the vegetables cool for 5 to 10 minutes or just until you can handle them comfortably. Thinly slice the peppers and zucchini, then put them in a medium mixing bowl. Cut the ends off the onion and remove the skin. Cut the onion into slices the same width as the peppers and zucchini. Add the onion to the other vegetables and mix. Put in a serving dish and serve. Let the steak rest for 5 minutes, then thinly slice it across the grain. Put the meat on a serving platter and serve.
Serving The Grilled Steak Fajitas
Serve the fajitas as a family-style meal, meaning everyone serves themselves along with the fajitas, put some salsa, sour cream, sliced lettuce, tomatoes, and avocado on the table. Enjoy!
The Wrap Up
There is something special about sitting down to a nice meal with your family and having everyone reaching around the table and food being passed back and forth. It takes attention. You can’t have a cell phone in your hand if you have to pass the peppers or the meat. This kind of meal gives a family time to talk and enjoy each other’s company. Couldn’t we all use a little more of that? Couldn’t we all use a few more steak fajitas in our life? I thought so. So, what are you waiting for. Fire up the grill and get cooking!
Get chef’s notes in your inbox. Put your email address in the box below to subscribe and never miss a post.
One of my first food memories, actually just one of my first memories, is of a small pizza place under the MacDonald bridge in Dartmouth. It was only about two or three blocks from my family home, and I have a memory of trying my first bite of donair from there. We moved from Dartmouth when I was almost four, so that first donair experience would have been when I was about three. I have loved them ever since. Over the years, I have done my fair share of experimenting with donair flavours. I even once put a donair-spiced scallop dish on a menu. And so, I wanted to make a donair, without making a donair. I wanted the same flavours but in a different package. To do that, I went back to the origins of the donair but kept the flavours that I’ve loved for my whole life. And so, I present to you my Halifax-Style Donair Kabobs with tomato salad and yogurt sauce.
The Recipes
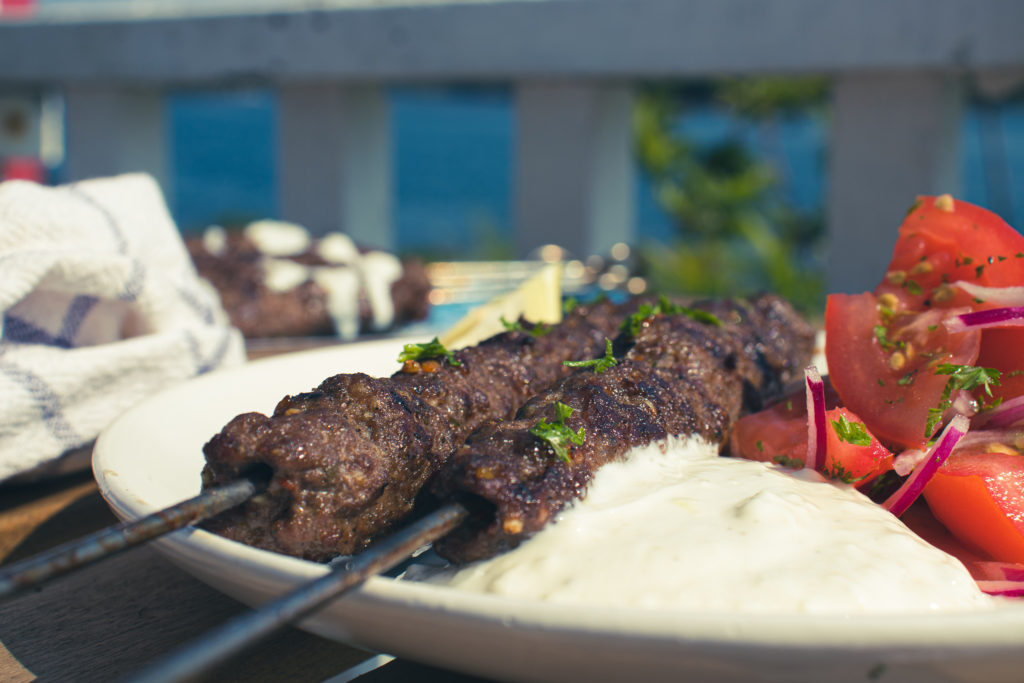
Halifax-Style Donair Kabob
Donair Kabobs seasoned in the Halifax Style. The perfect dish to add to your barbecue menu.
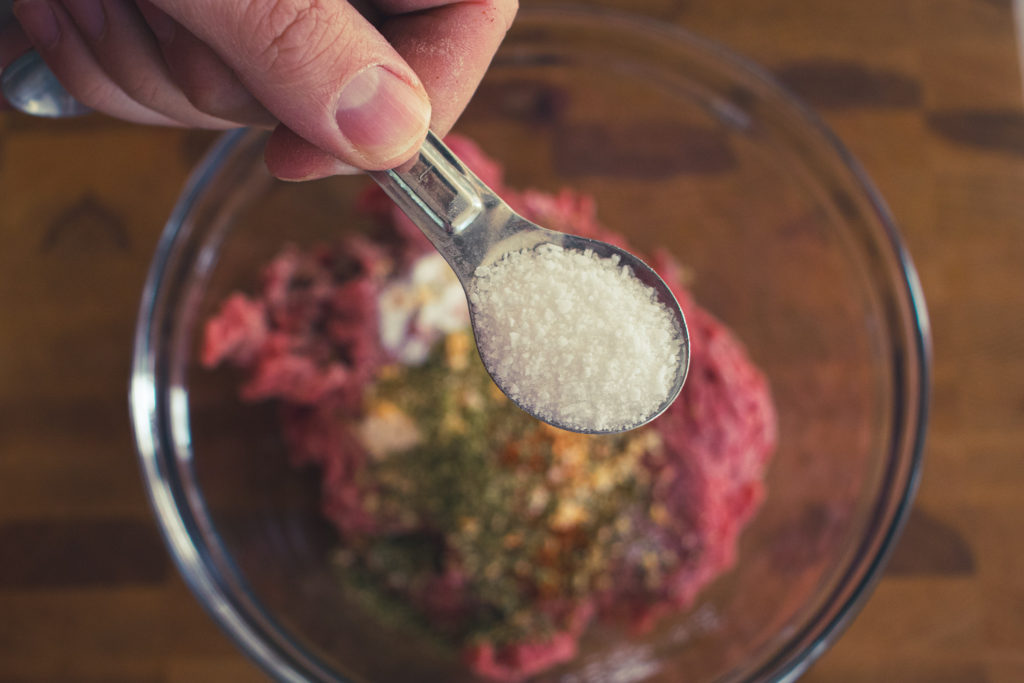
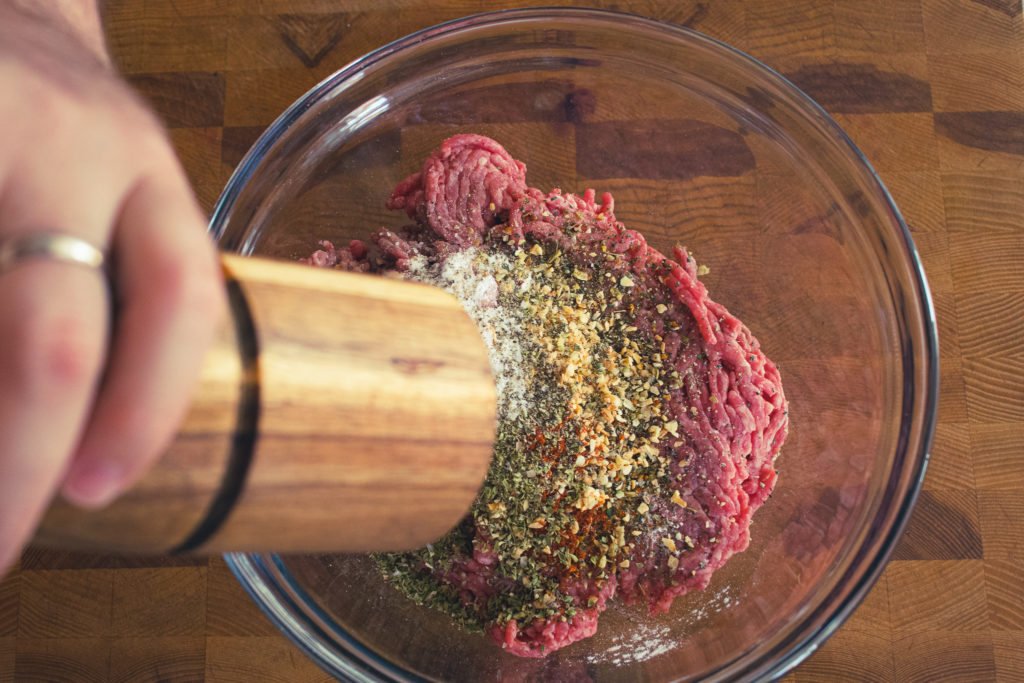
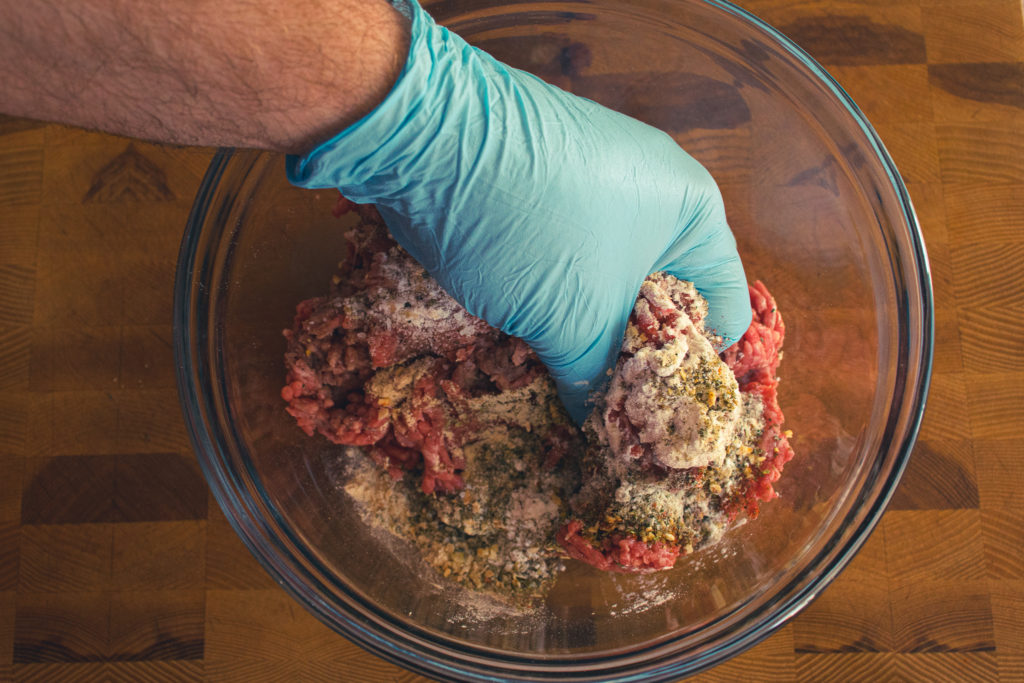
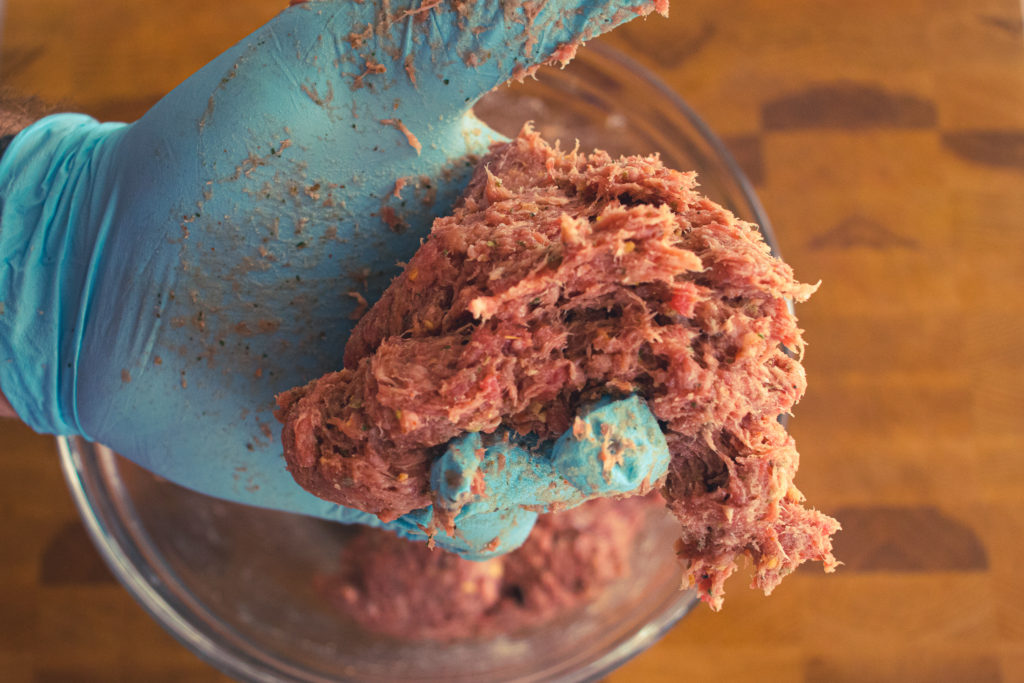
Place all the ingredients in a medium mixing bowl and mix well. Knead the meat mixture for five minutes or until it develops a tacky texture and appearance.
Divide the meat in four and form each fourth of meat around a 12-inch skewer. If you are using wooden or bamboo skewers, soak them in water for 1 hour before skewering the meat.
Wrap the meat around the skewer and gently squeeze it to spread it out in an even layer around the length of the skewer.
Heat your grill to 400°f.
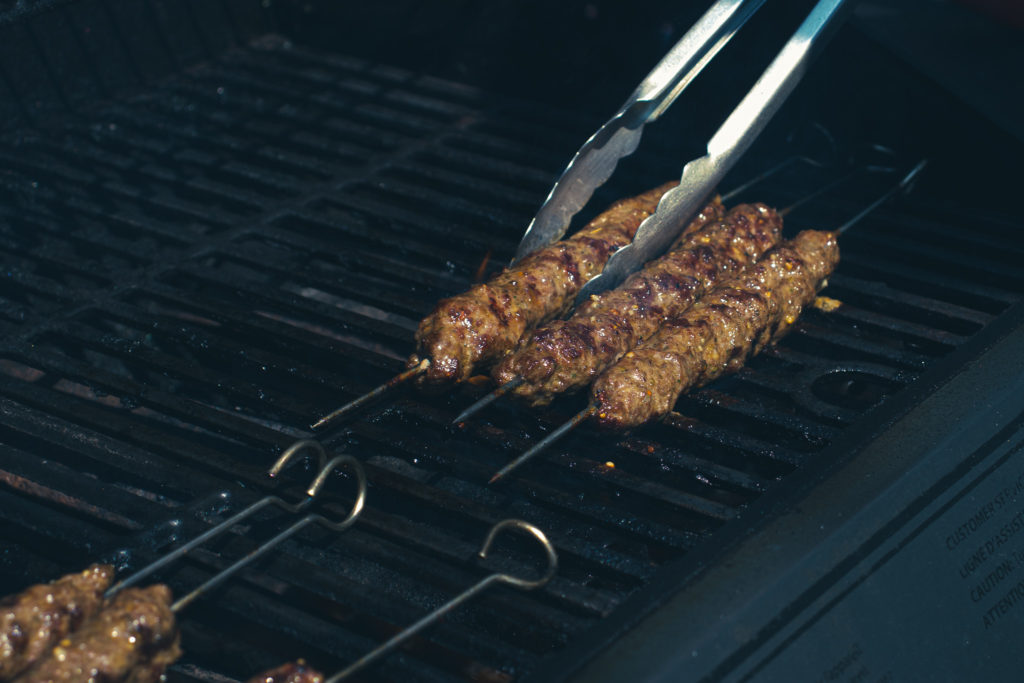
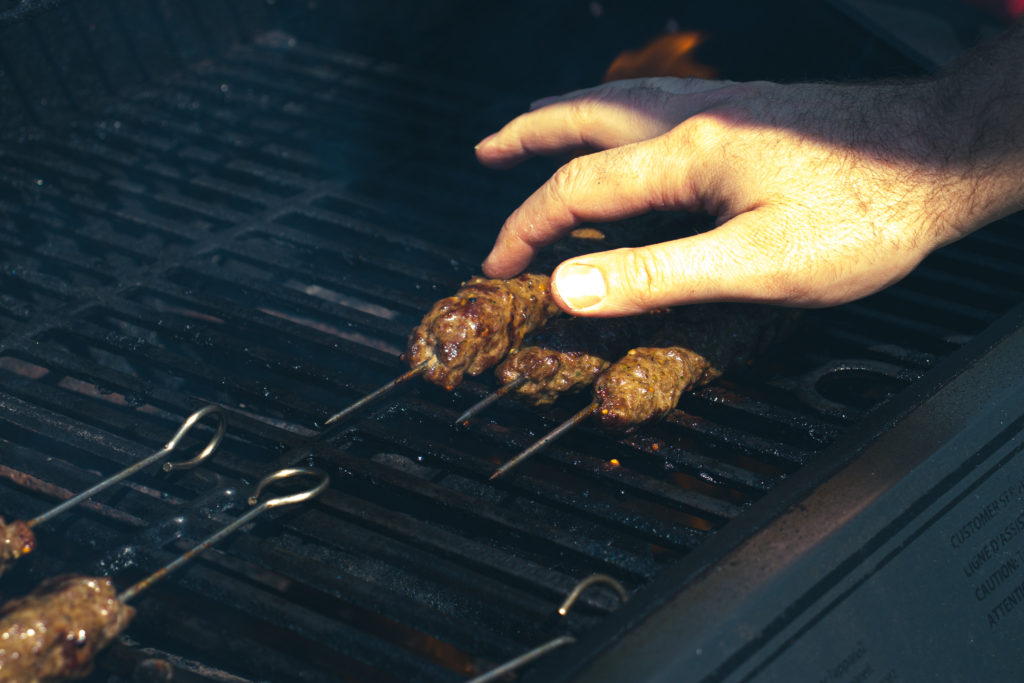
Grill the skewers on the hottest part of your grill for 10 to 12 minutes or until cooked through. Flip them every 2 to 3 minutes.
Take the skewers off the grill and serve immediately.
Notes
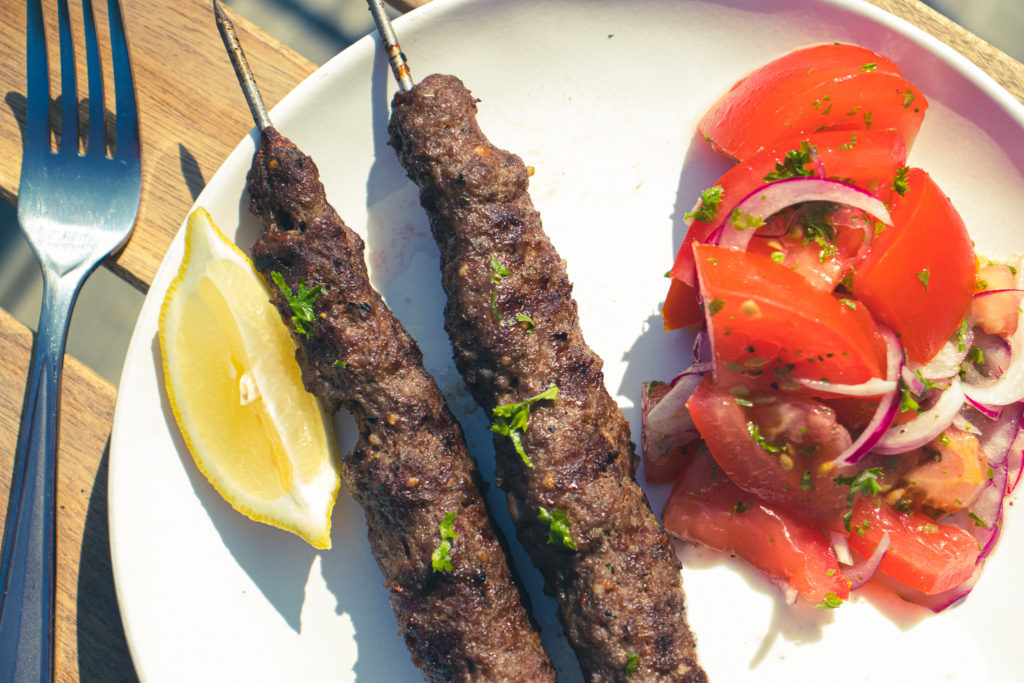
These Donair Kabobs are great with tomato and onion salad and garlicky yogurt sauce, but they also work very well in the traditional pita, with donair sauce, tomato and onion, or in a salad bowl with garlic mayo.
If you aren’t from Nova Scotia, you may be wondering to yourself, “What is a Halifax Donair?”. Let me enlighten you. A Halifax Donair is made from spiced beef that is cooked on a verticle spit. Thinly shaved and wrapped in a soft Lebanese-style pita with fresh diced white onion and tomato, and finished with a sweet and tangy sauce made of sweet and condensed milk, vinegar, garlic powder, and onion powder. It is the kind of thing you usually only eat after a long night of drinking, or on a Friday night in with friends. Every Pizza Place in the province, except for some of the big national chains, sells donairs. And just about every Nova Scotian, at least from a certain generation forward, has a deep-seated love for them. I happily include myself in this group.
Other places in the world have Donair, often spelled doner kebab, or gyros, which are similar. But none are quite like the Halifax Donair, which was introduced to the region by Greek immigrants in the 1970s. It was originally served as a lamb gyro with tzatziki sauce, but the recipe was changed to what it is now to suit local tastes. Since then, it has been a local favourite and has now begun to spread across the country. However, only one city can truly claim it as their own. It is, after all, the official food of Halifax.
Making The Donair Kabob Meat Mixture
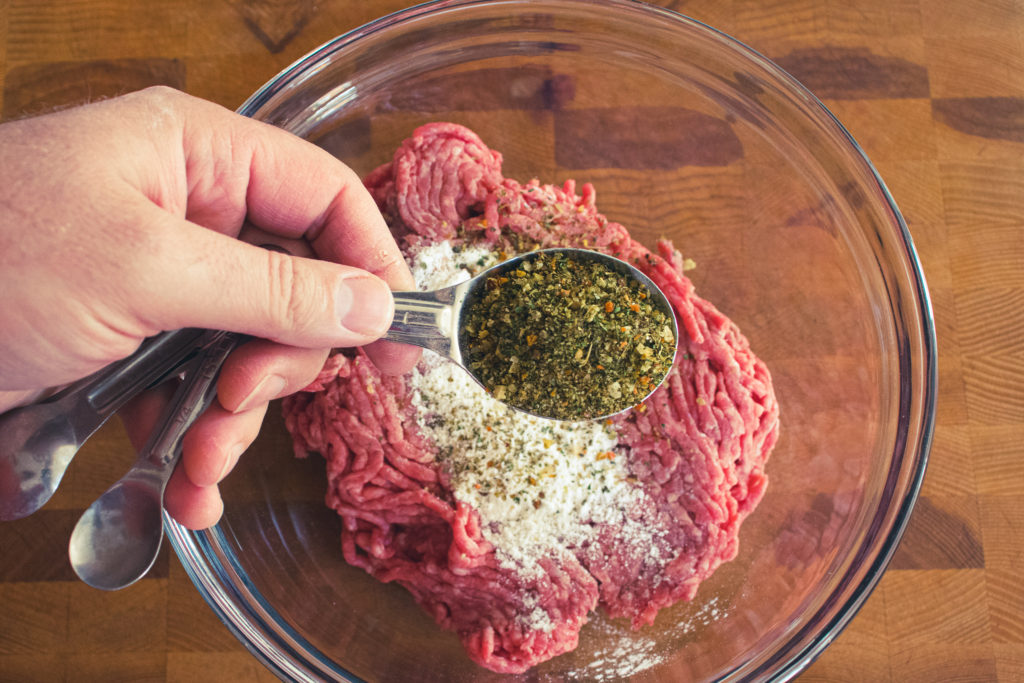
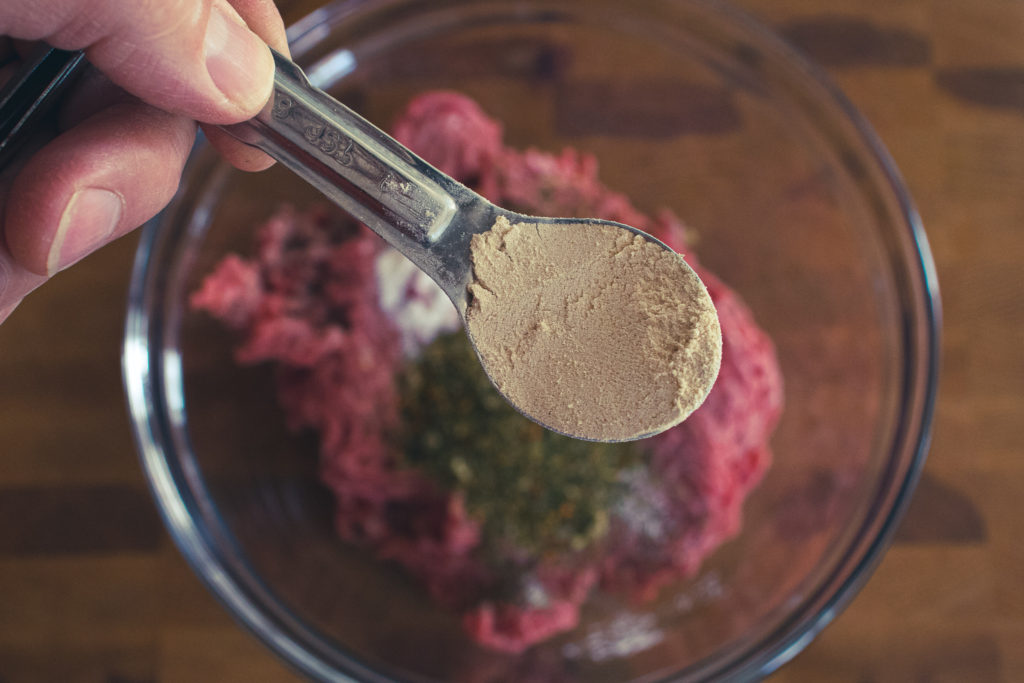
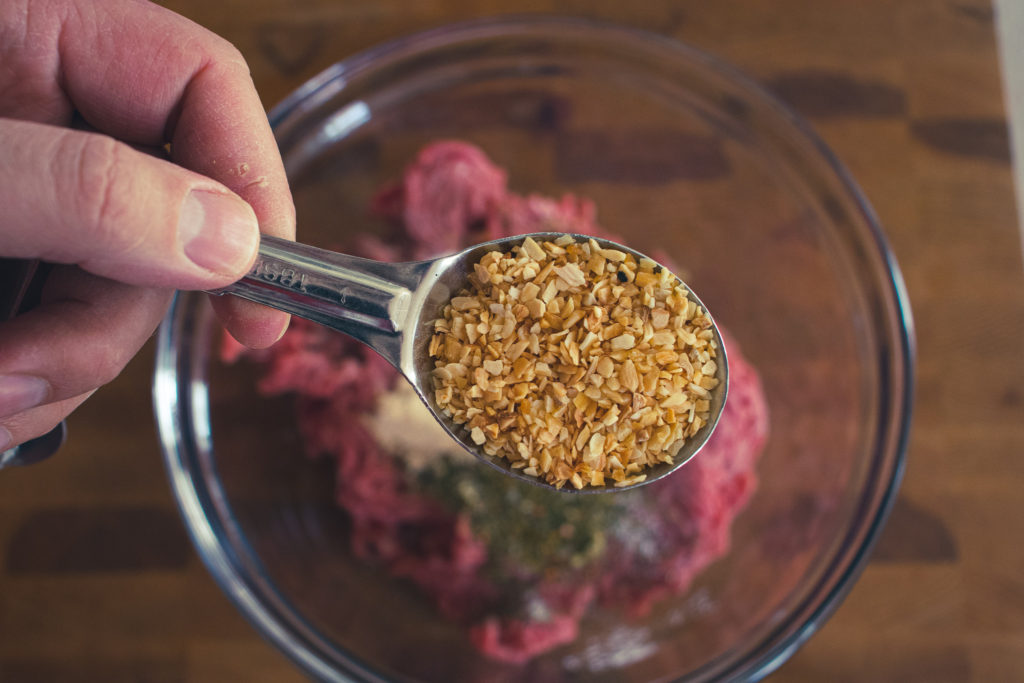
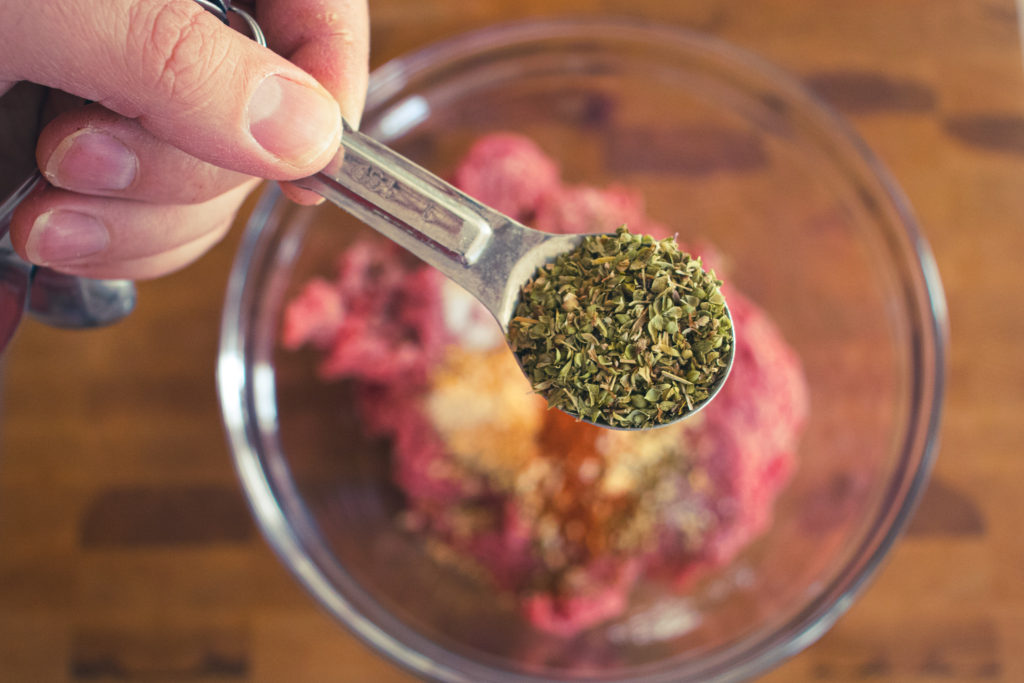
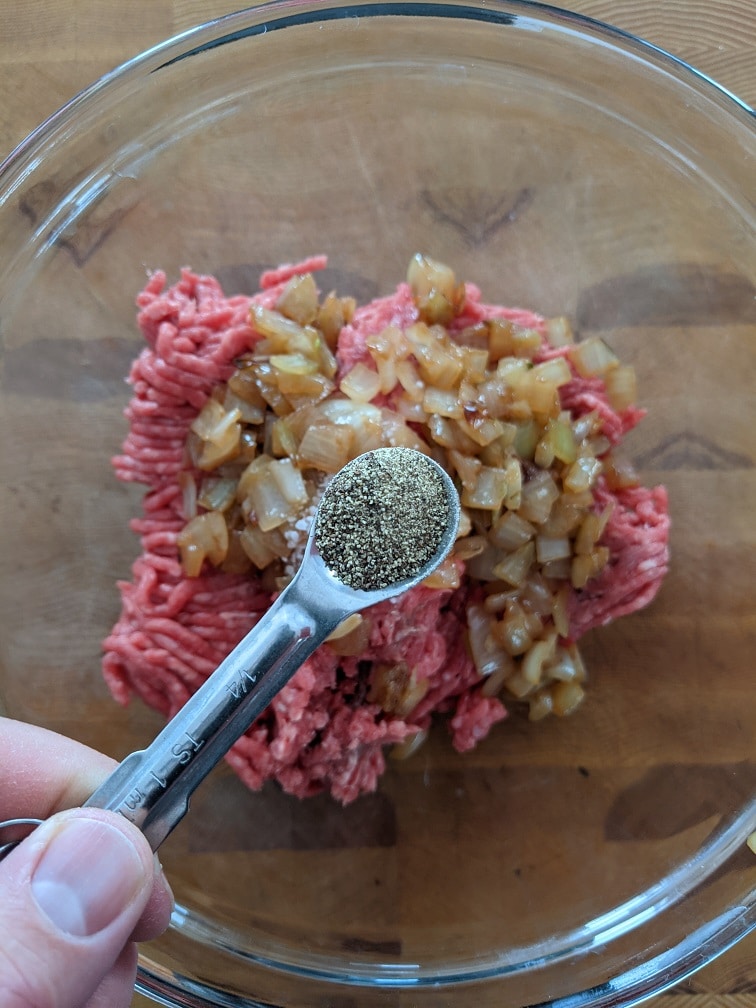
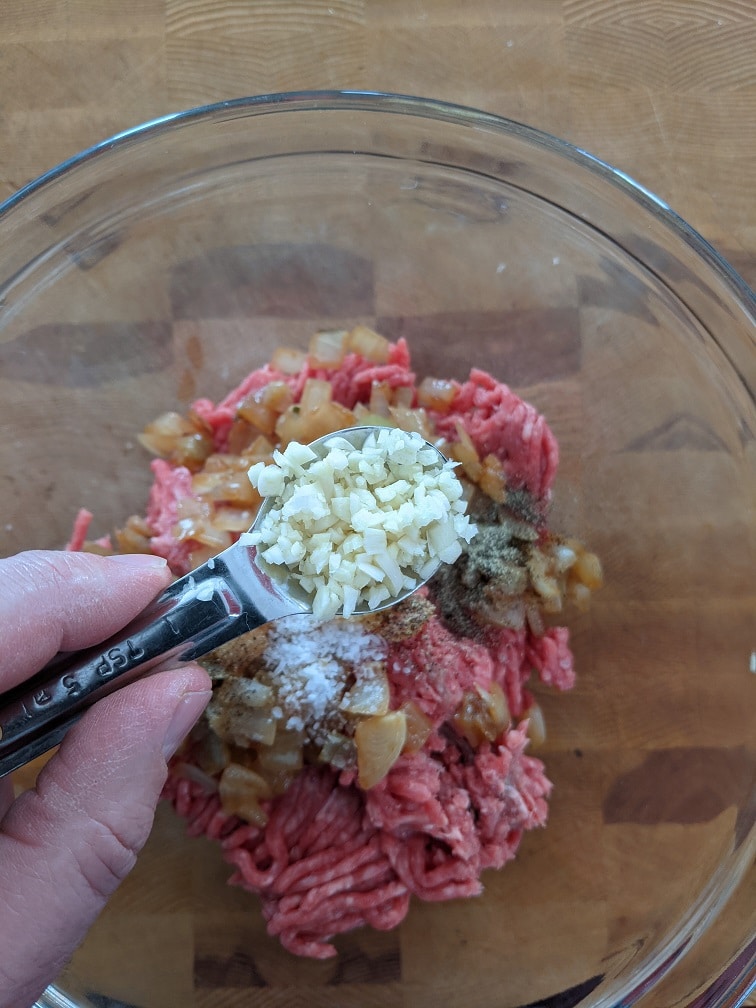
Okay, let’s get cooking. Start with a pound of lean ground beef. Add some flour (I used gluten-free all-purpose flour), Italian seasoning, garlic powder, dried onion or onion powder, cayenne, oregano, salt, and pepper. See the recipe above for all the measurements.
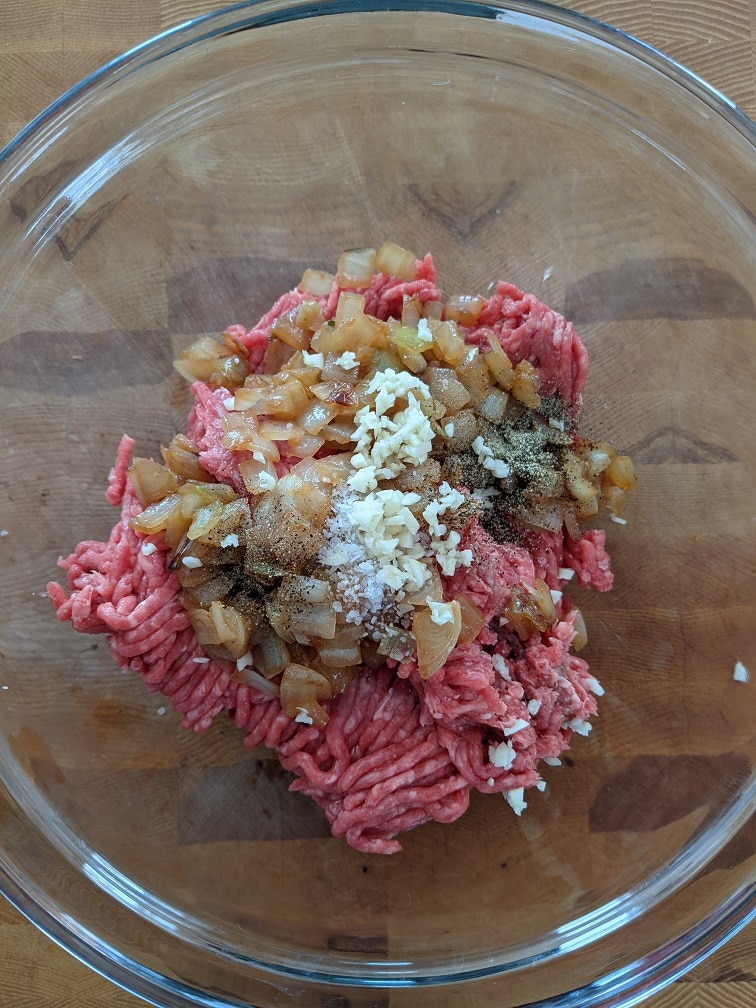
Mixing and Tasting The Donair Meat
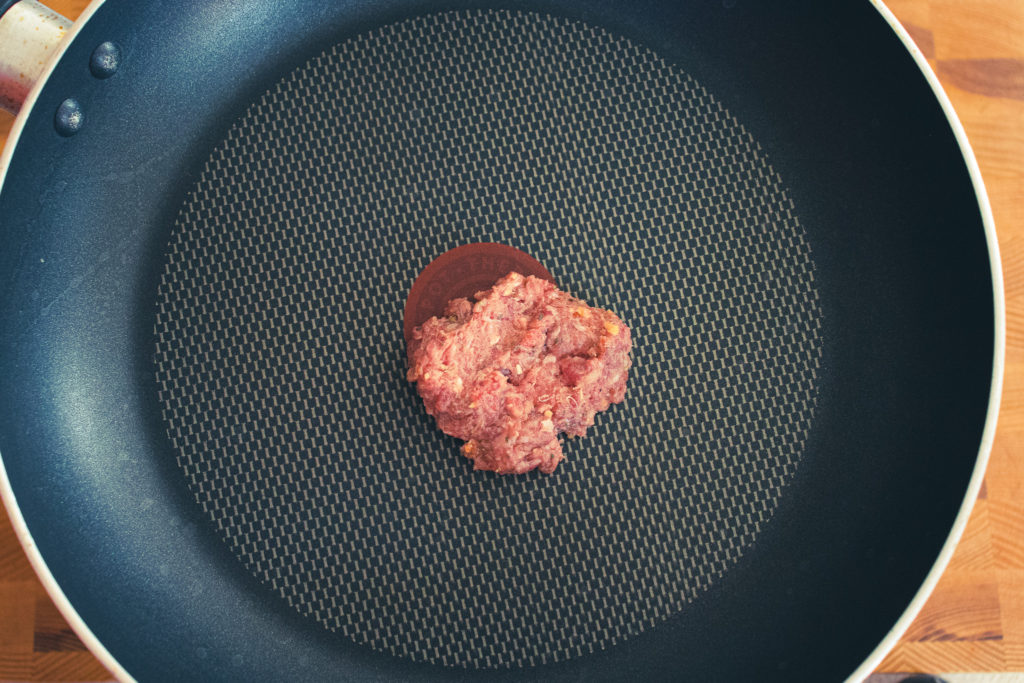
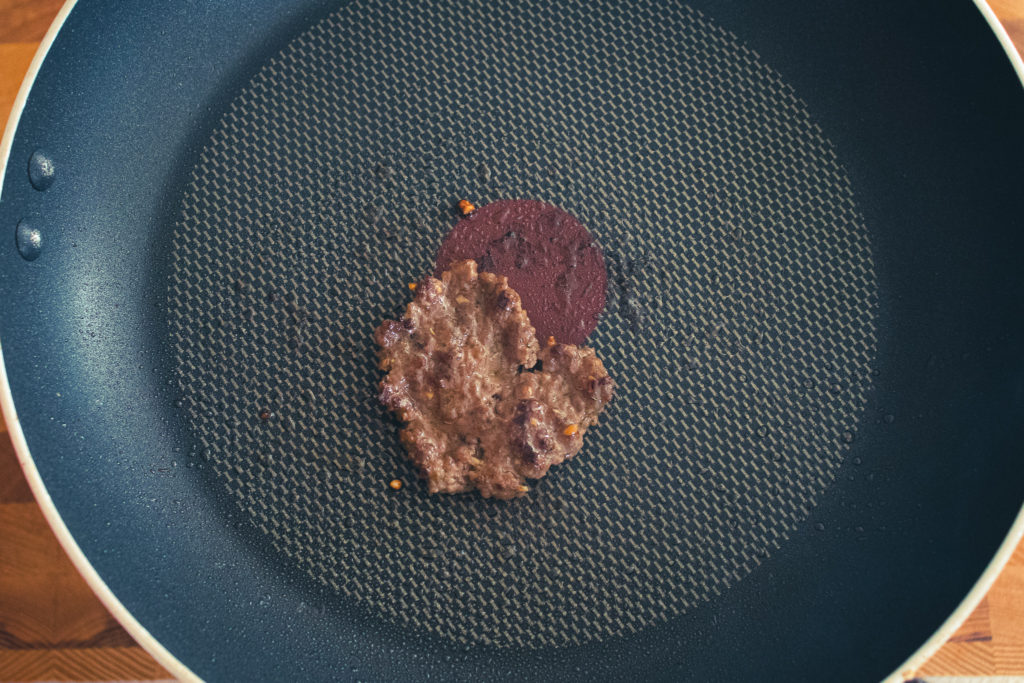
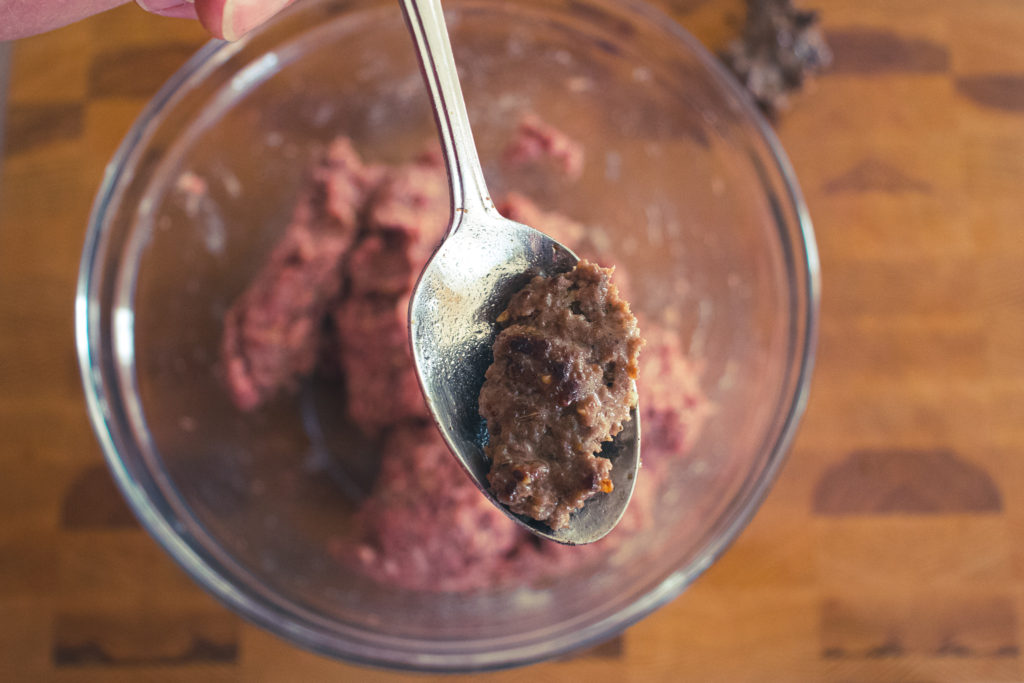
Mix the meat well. I mean really well. You want to knead it for about five minutes or until it develops a tacky look and texture. This will give the meat the right texture when cooked. Break off a little piece of the meat and cook it in a small frying pan over medium-high heat. Taste it, and adjust the seasoning as needed. This is a good habit to get into whenever making anything with ground meat like meatloaf or burger. Season the meat, cook off a little piece and taste it.
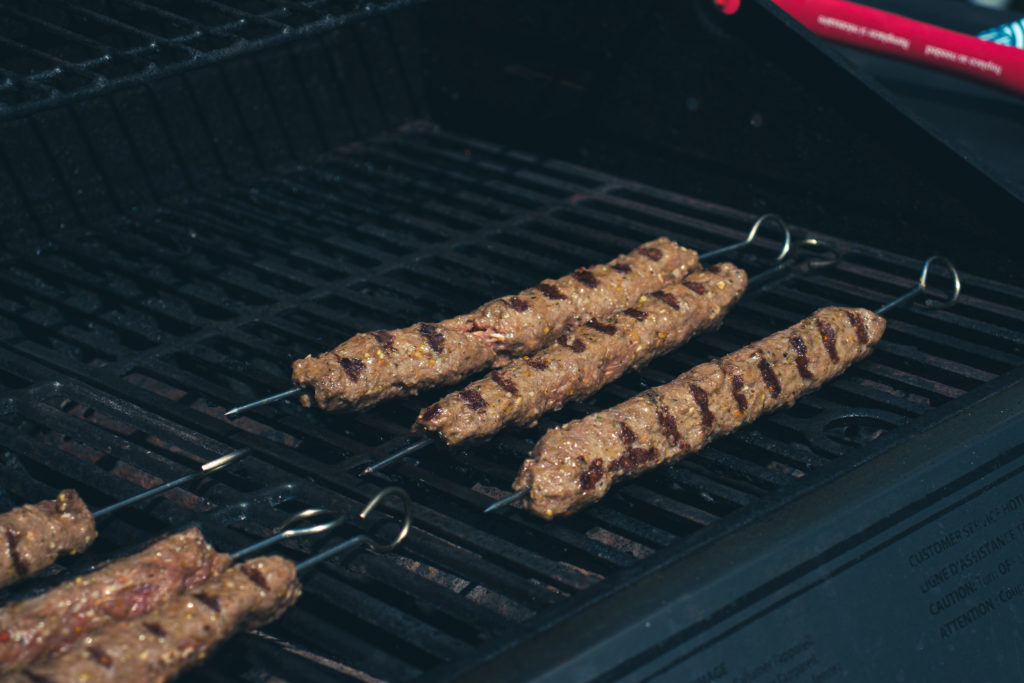
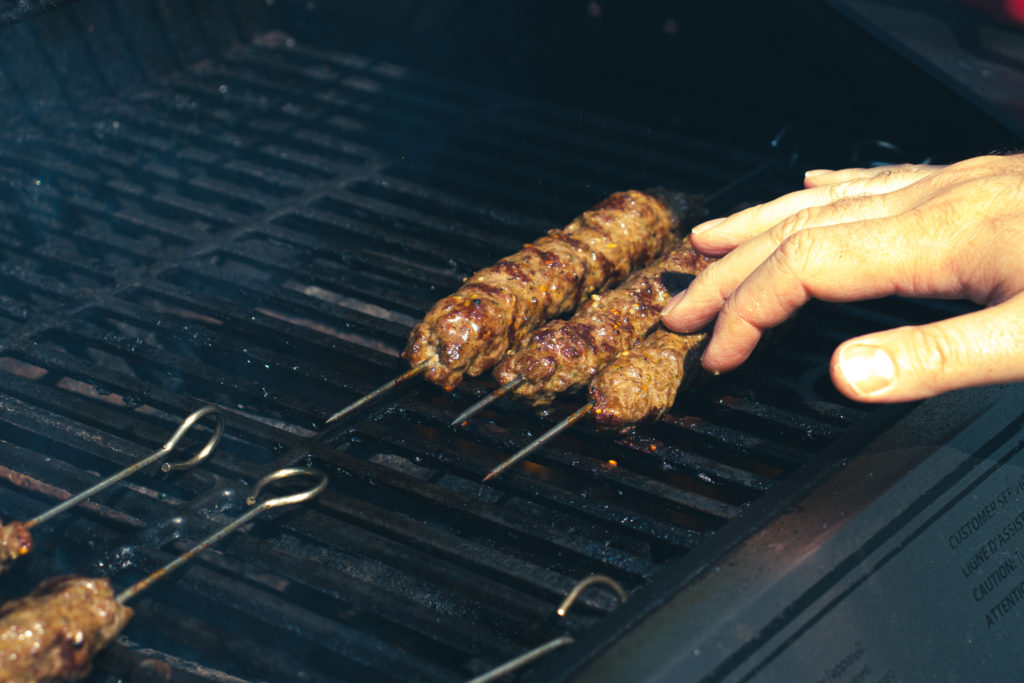
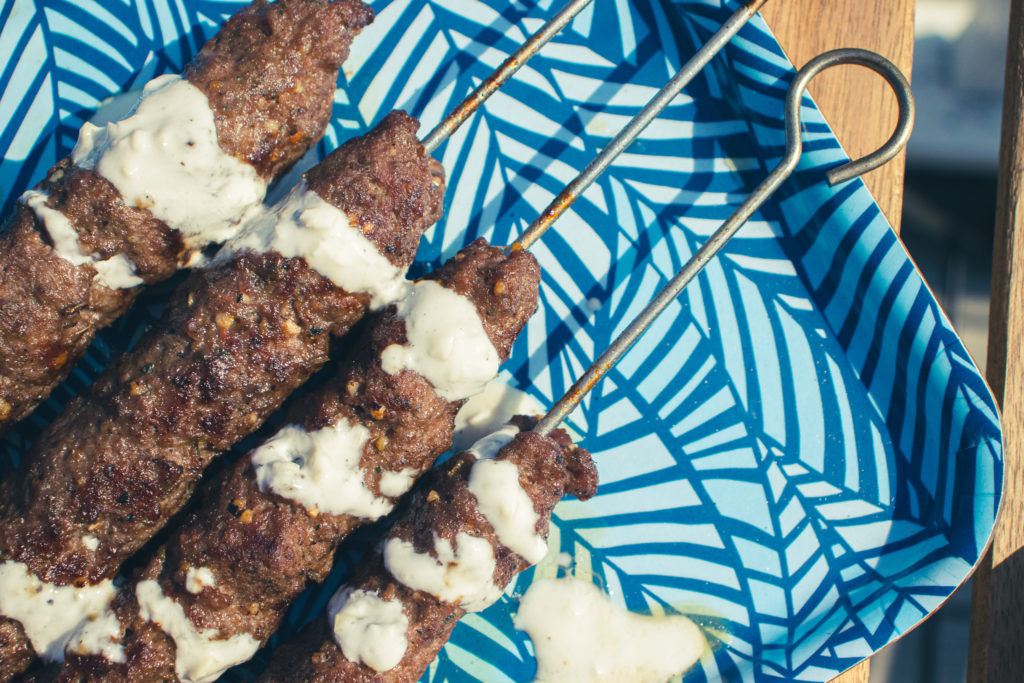
Making Donair Kabobs
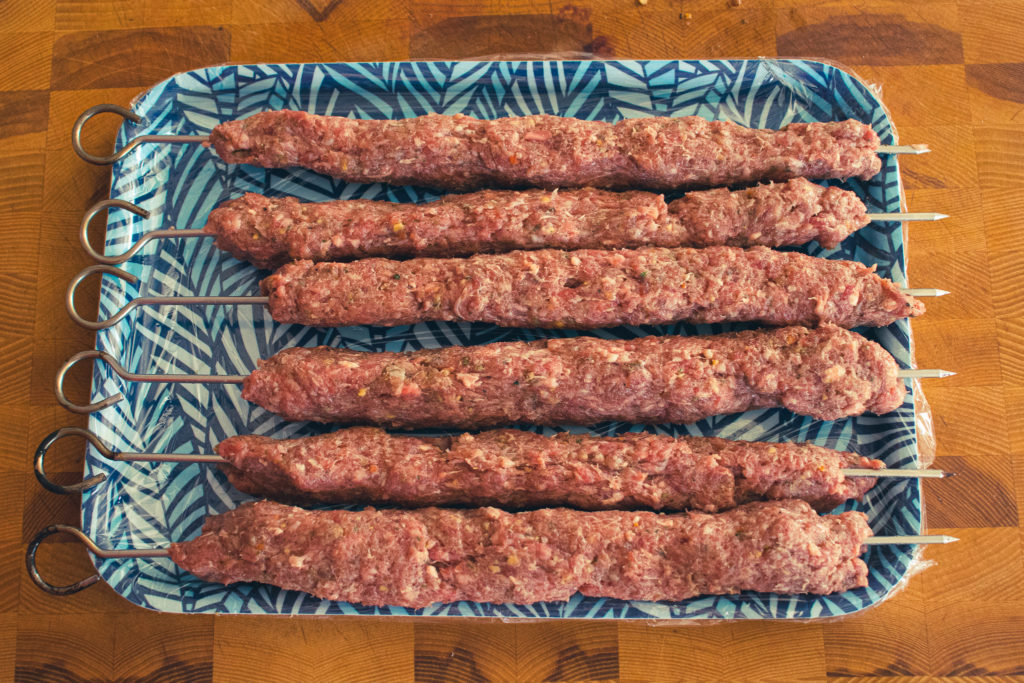
The picture below shows six skewers, but the recipe above only makes four. I apologize for the confusion. I adjust the recipe because the salad and the sauce were only enough for four.
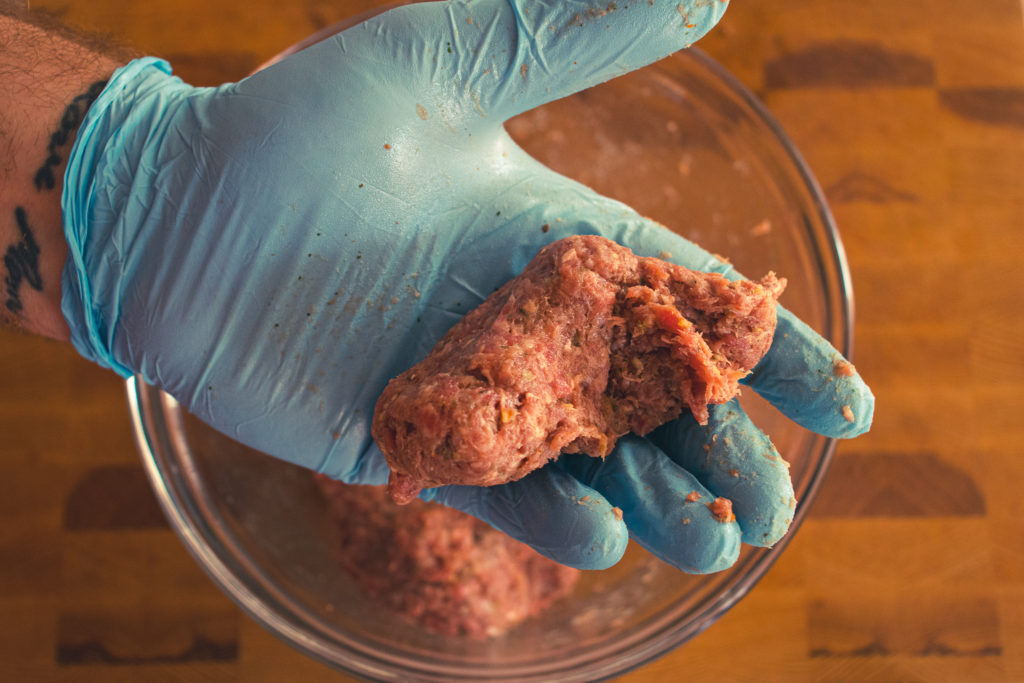
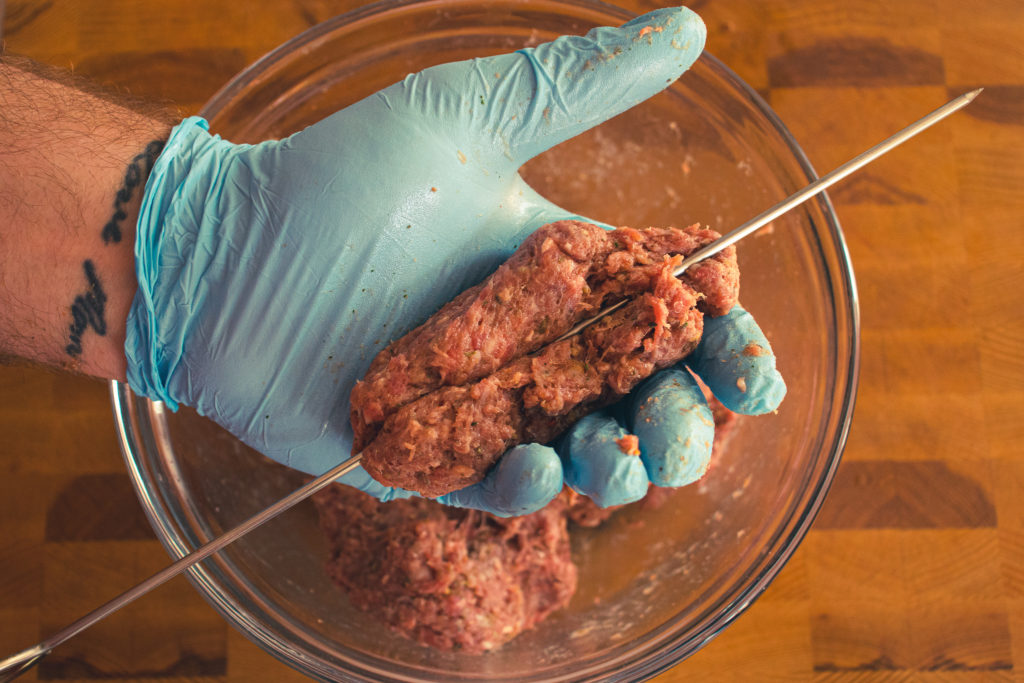
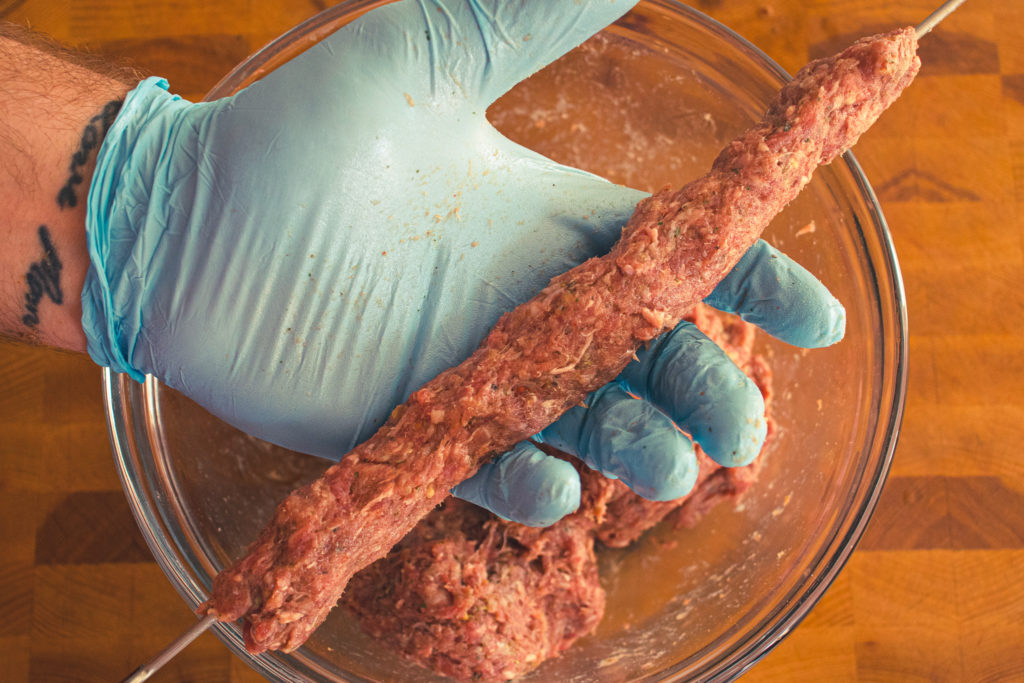
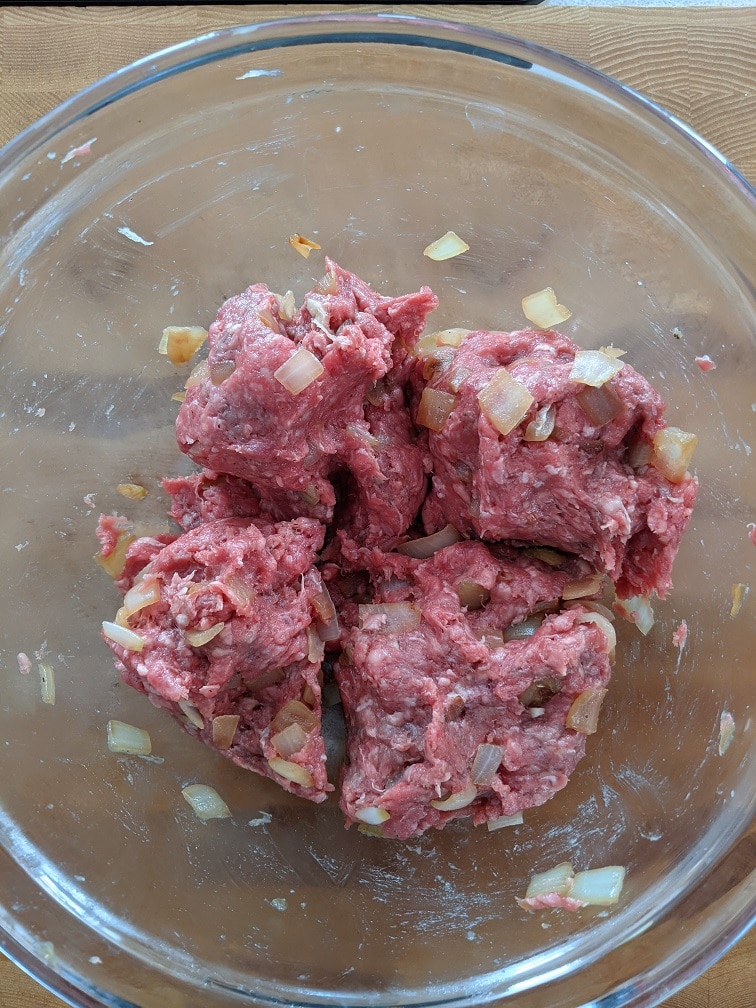
Divide the meat into four evenly sized balls. Wrap each ball around a metal or pre-soaked wooden or bamboo skewer. Gently squeeze the meat to spread it out the length of the skewer in an even layer.
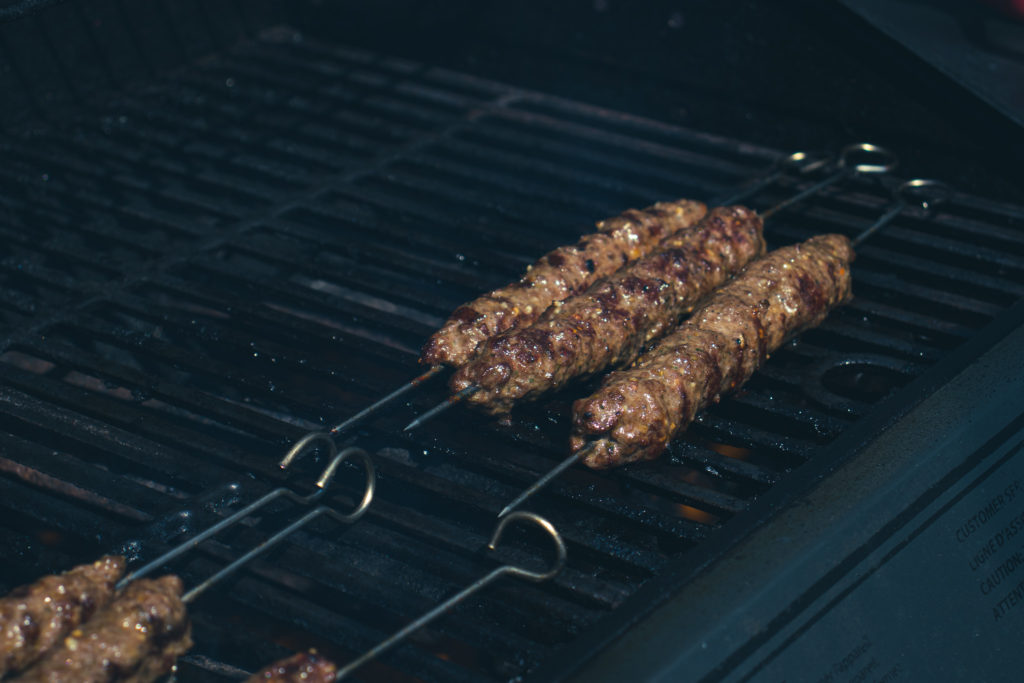
Grilling The Donair Kabobs
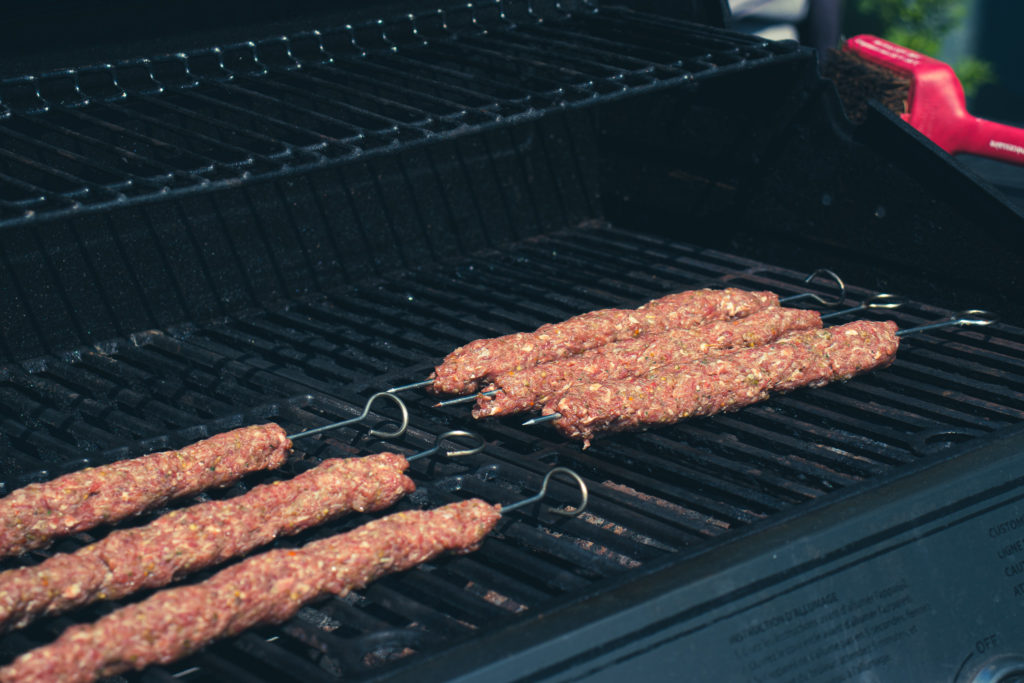
Heat your grill to 400°f and let it sit for about 10 minutes to get the grates nice and hot. Cook the skewers for 10 to 12 minutes, rotating every 2 to 3 minutes until cooked. The meat should be firm to the touch with a little spring back when fully cooked. Take the Donair Kabobs off the grill and serve immediately.
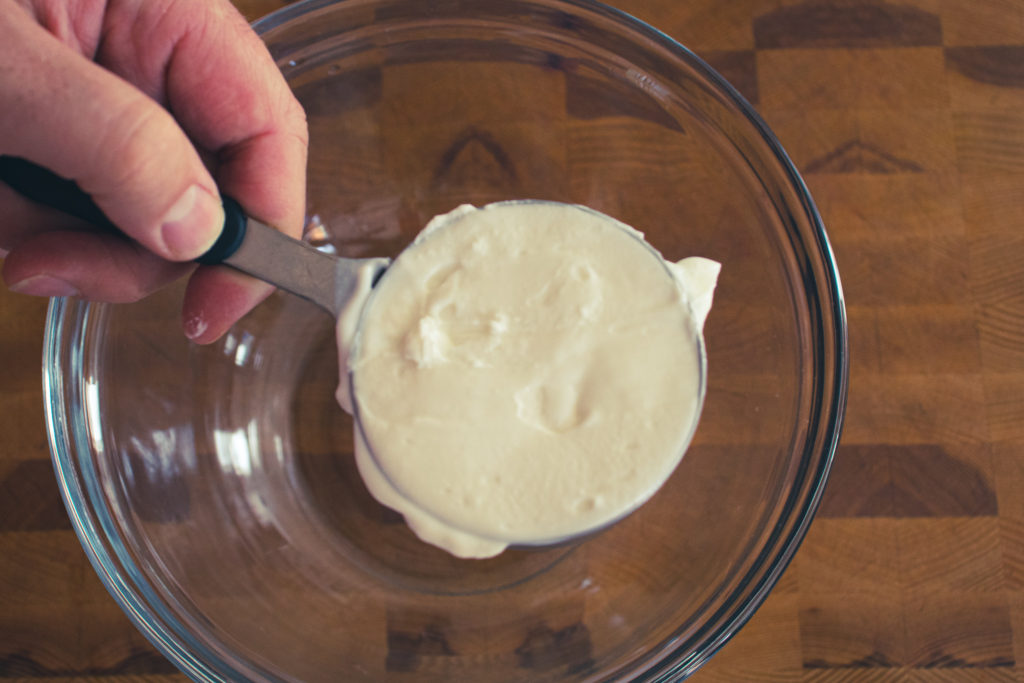
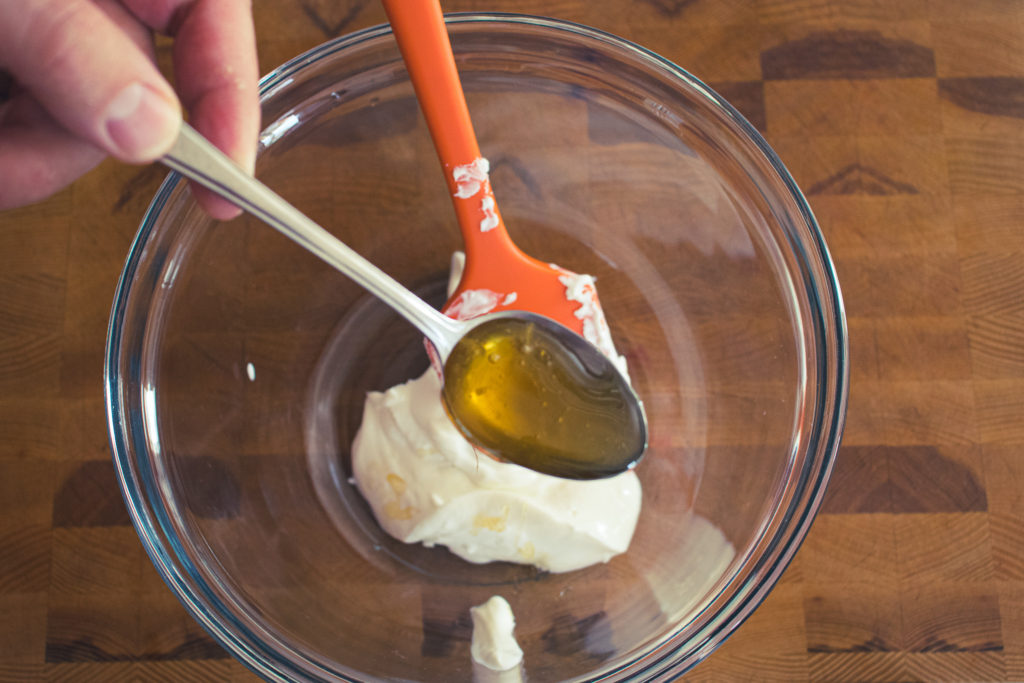
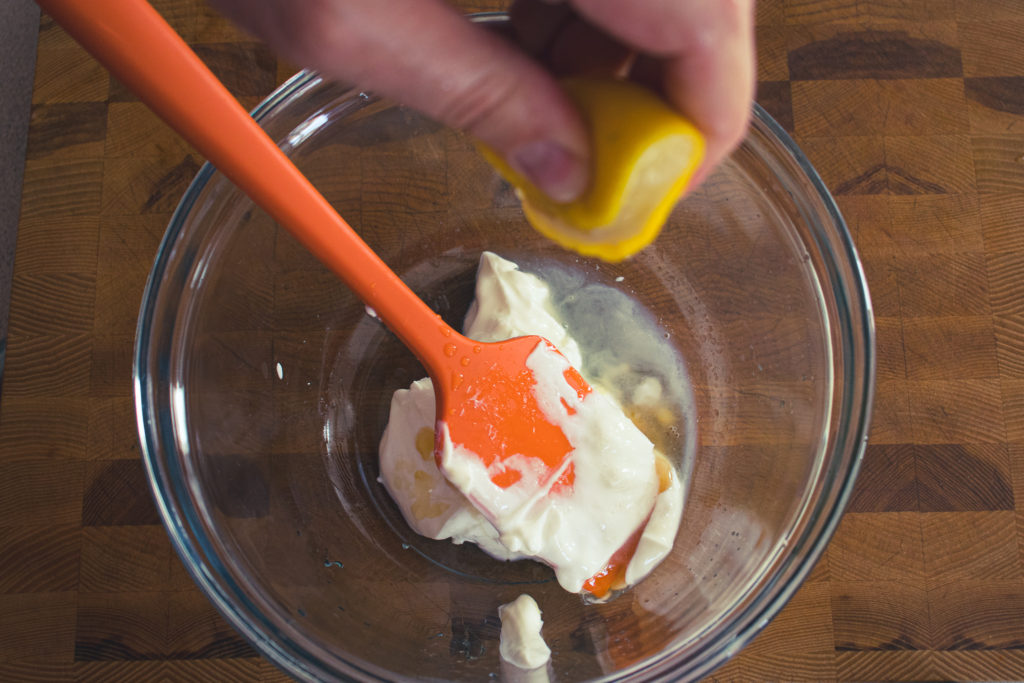
Garlicky Yogurt Sauce
Traditional Donair Sauce is made with sweet and condensed milk, onion powder, and garlic powder. It is delicious but not great if you are trying to watch your waistline. So, I wanted to make a slightly healthier sauce. I made a version with non-fat Greek yogurt as the base. It is sweetened with honey, soured with lemon juice, has plenty of garlic, a bit of onion powder, and tastes delicious. Mix all the ingredients, cover the bowl and put it in the fridge for an hour to let the flavours develop. This sauce works with any spiced meat and goes great on salad bowls too.
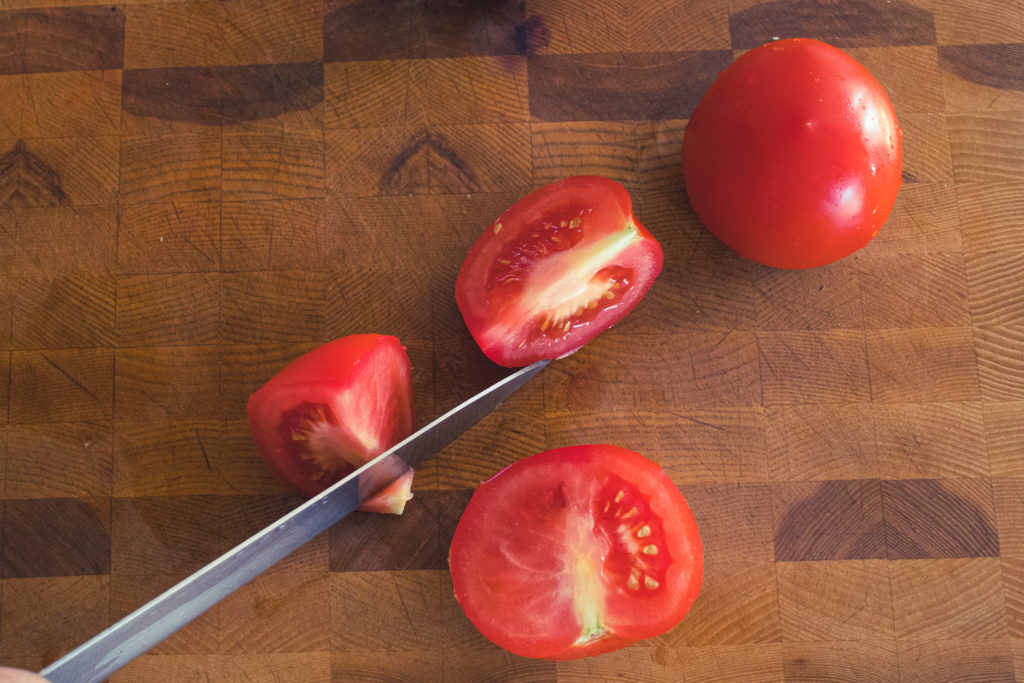
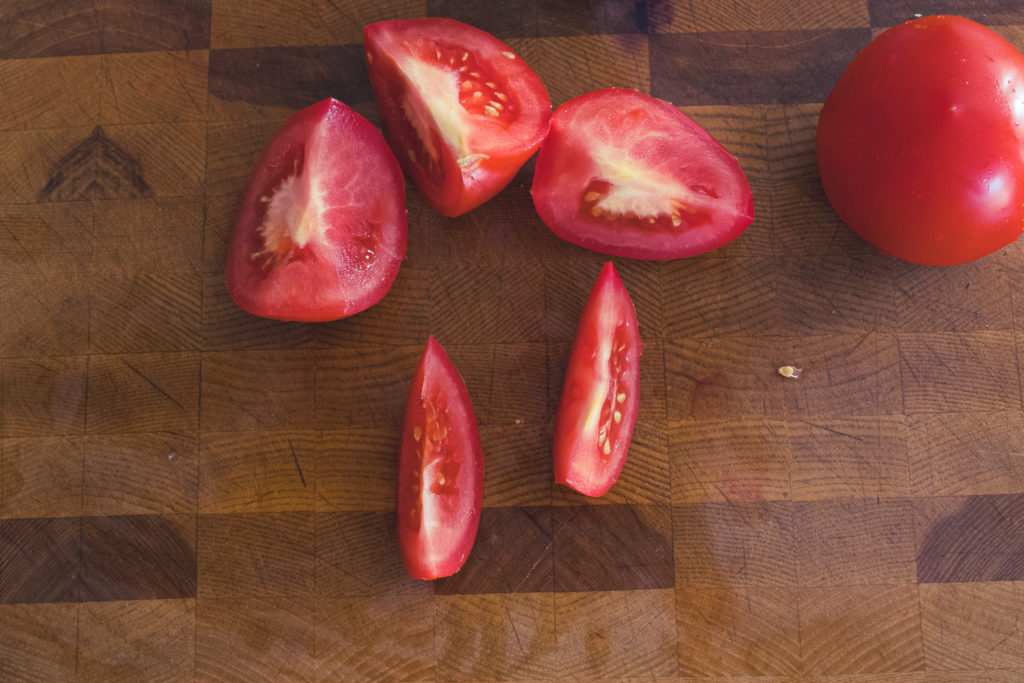
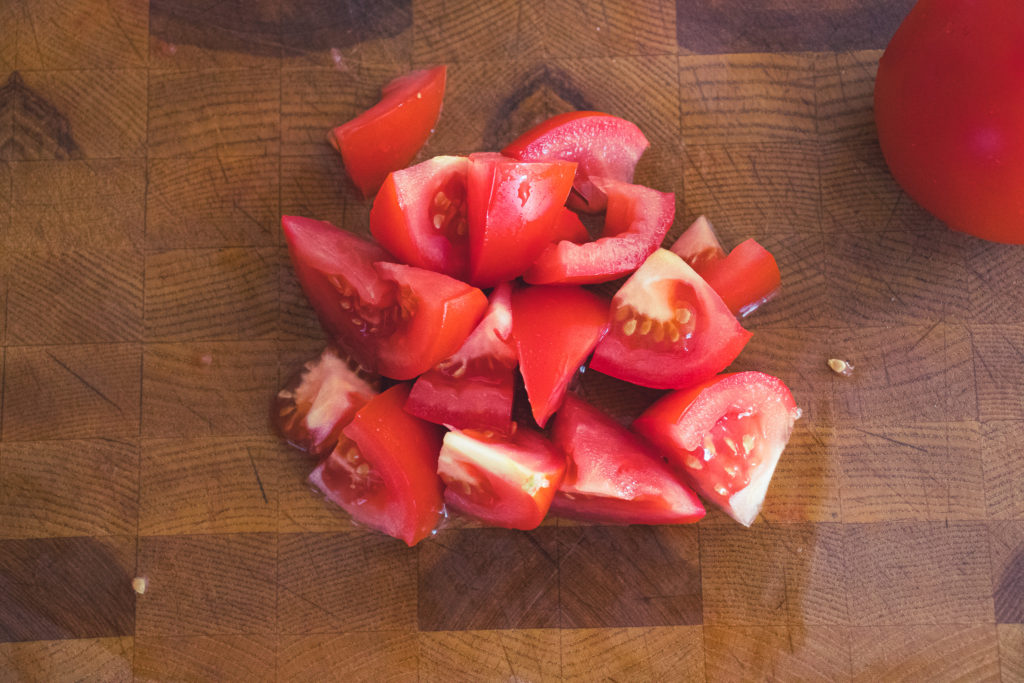
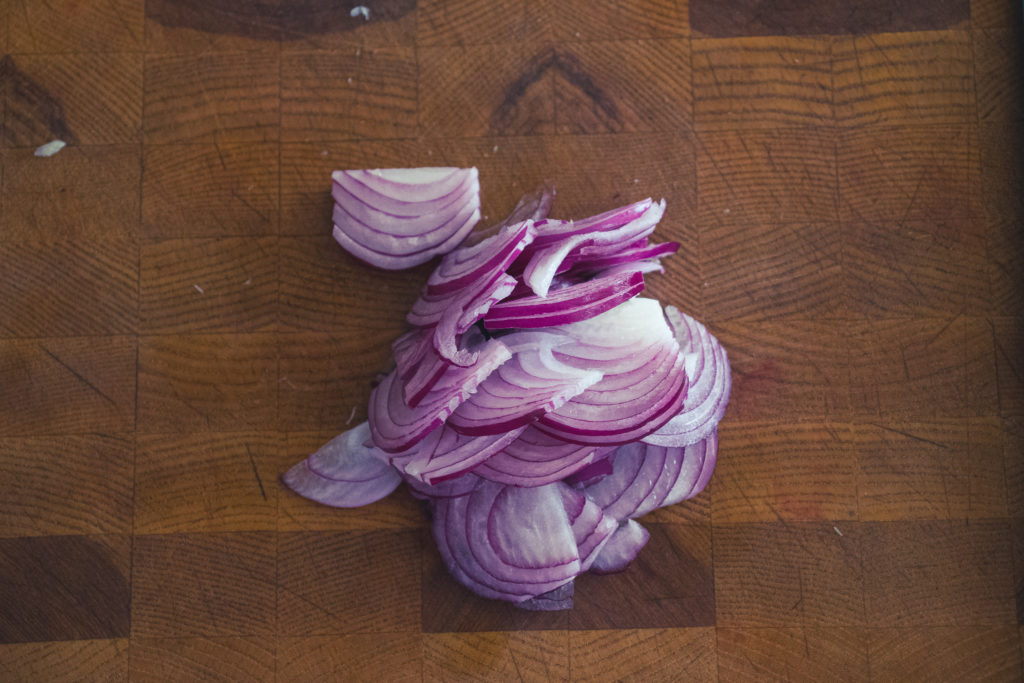
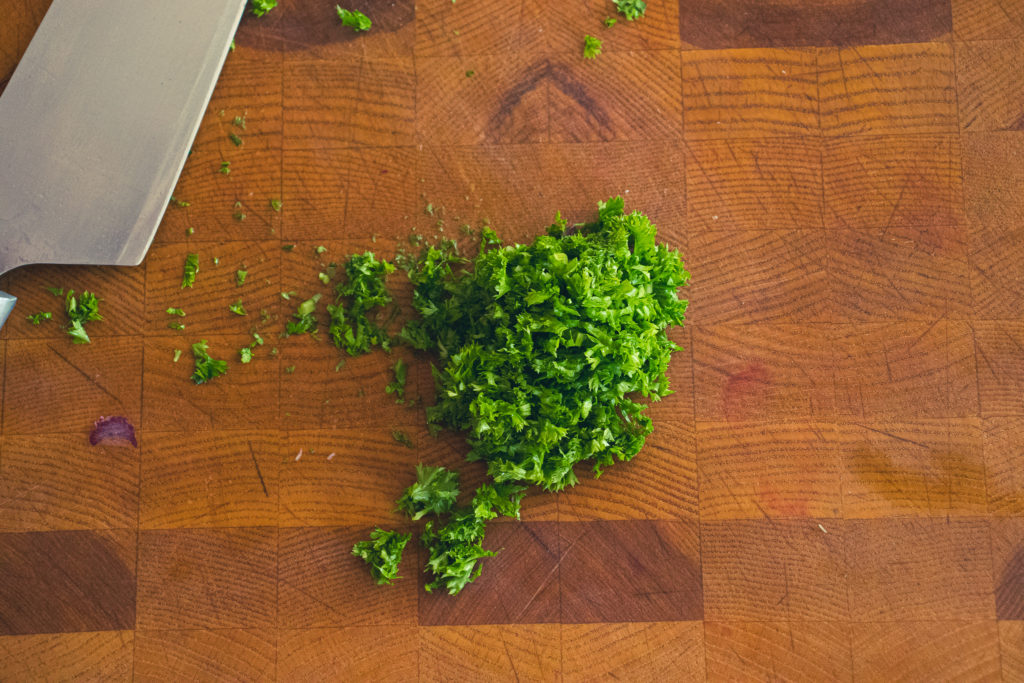
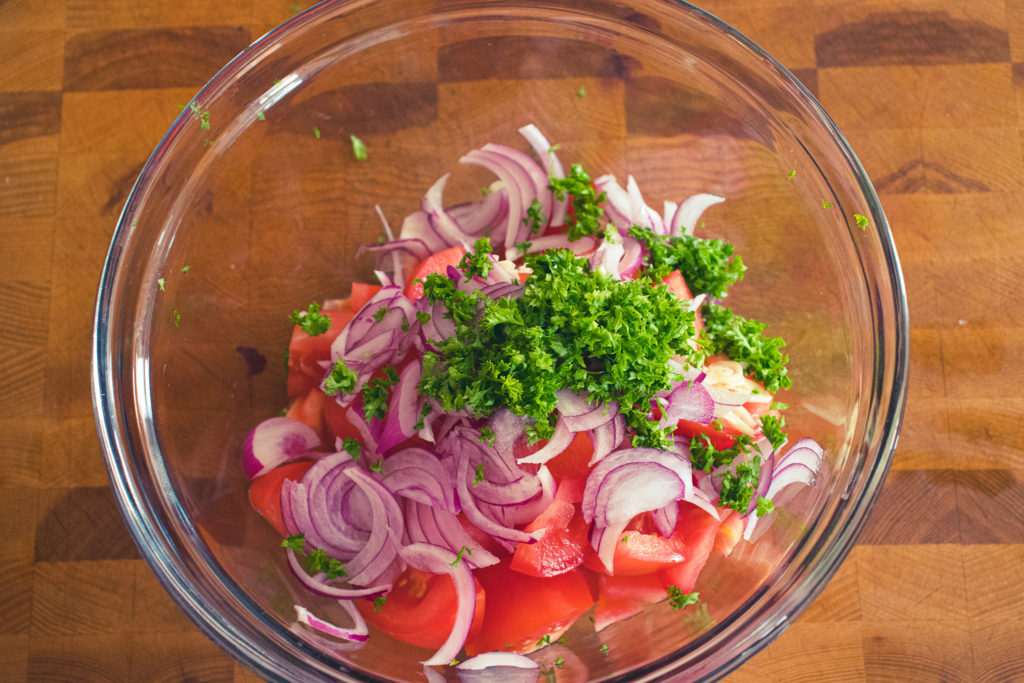
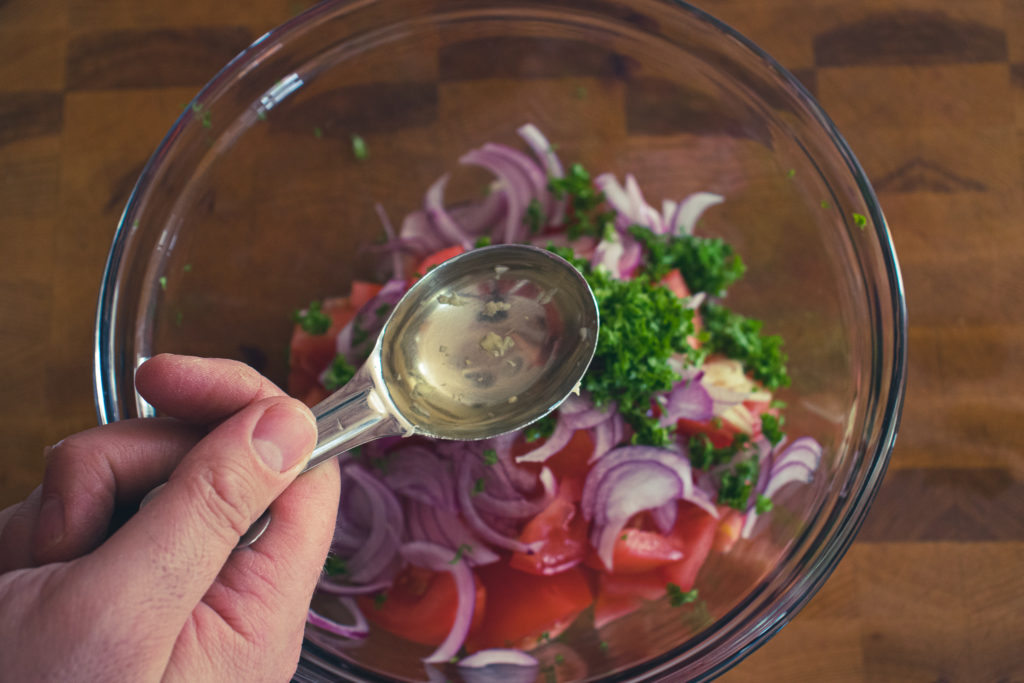
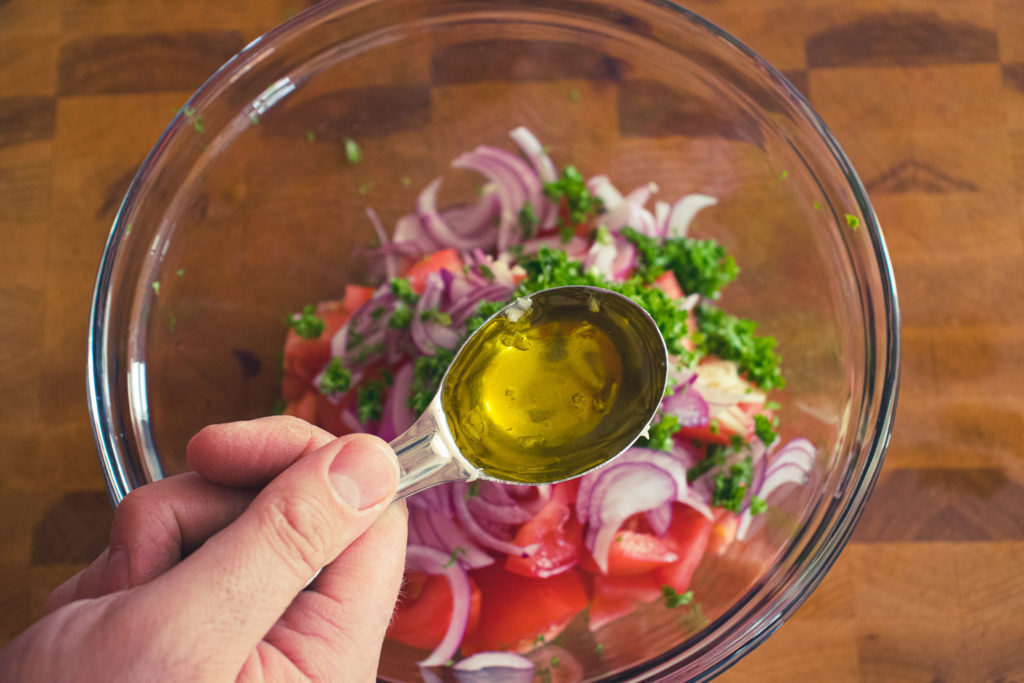
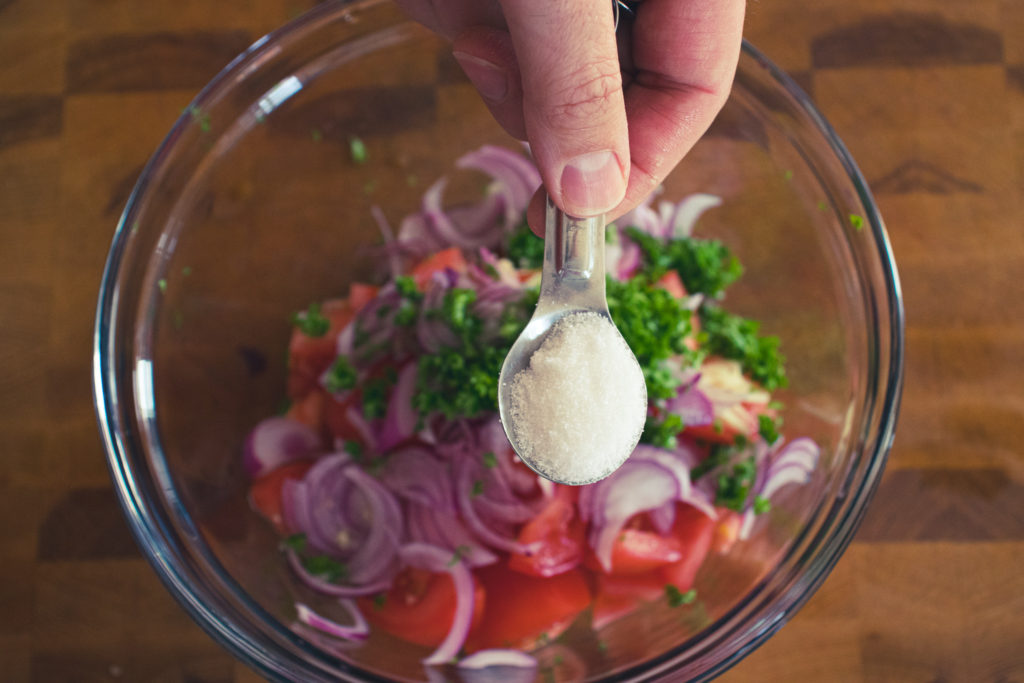
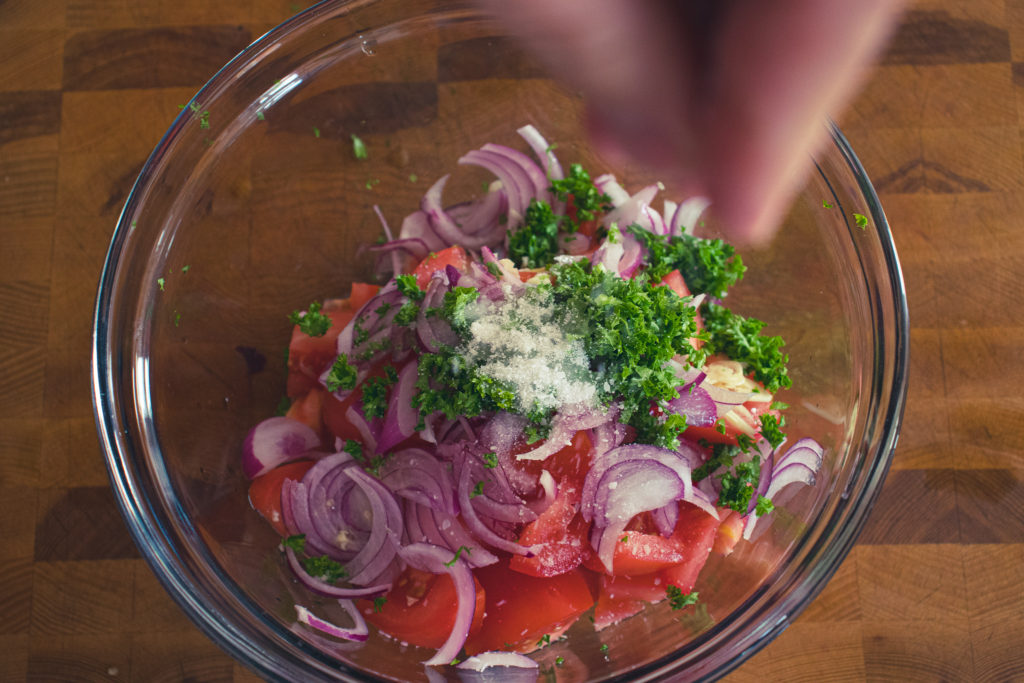
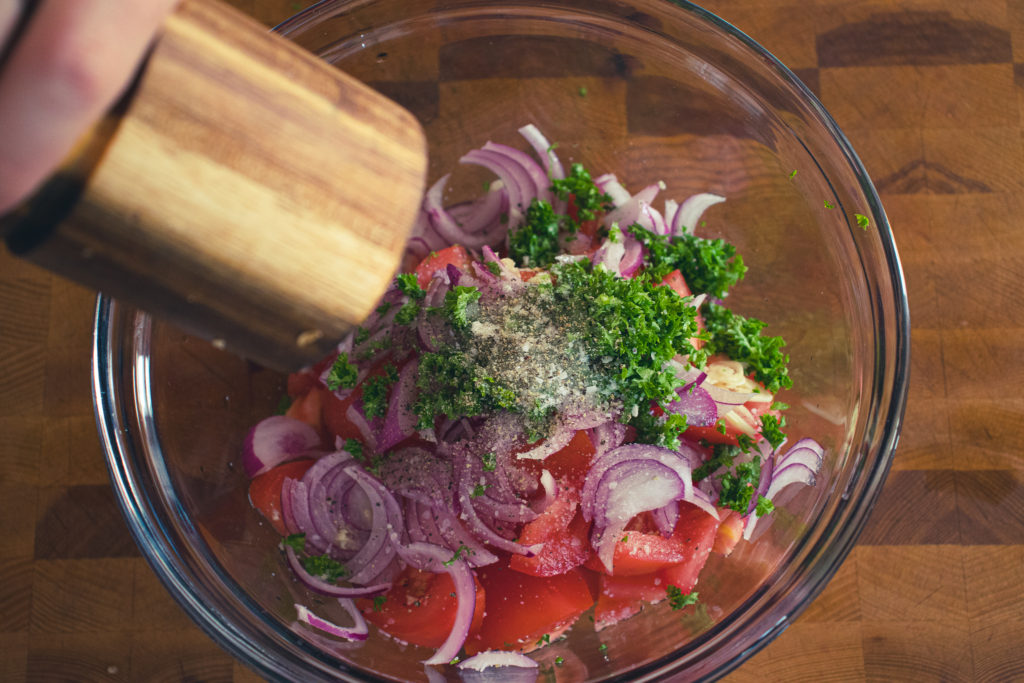
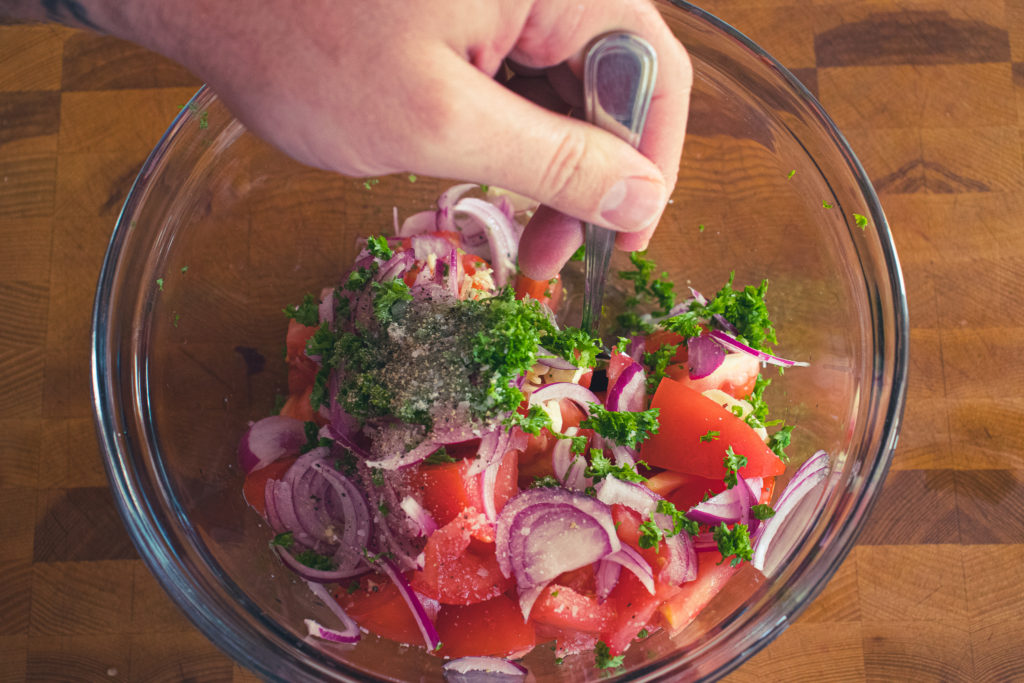
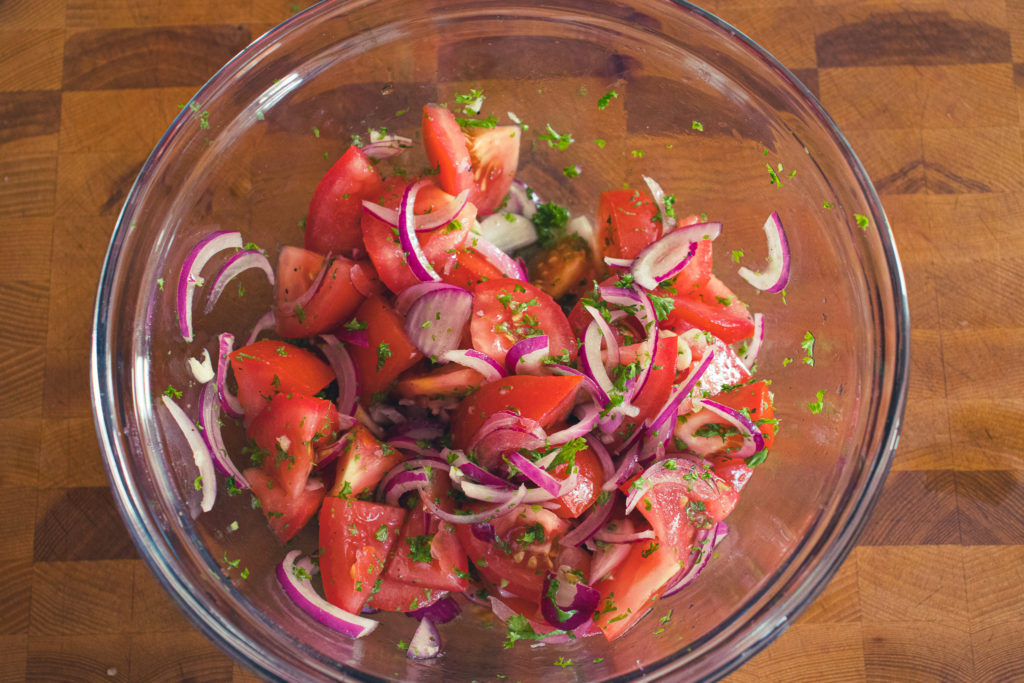
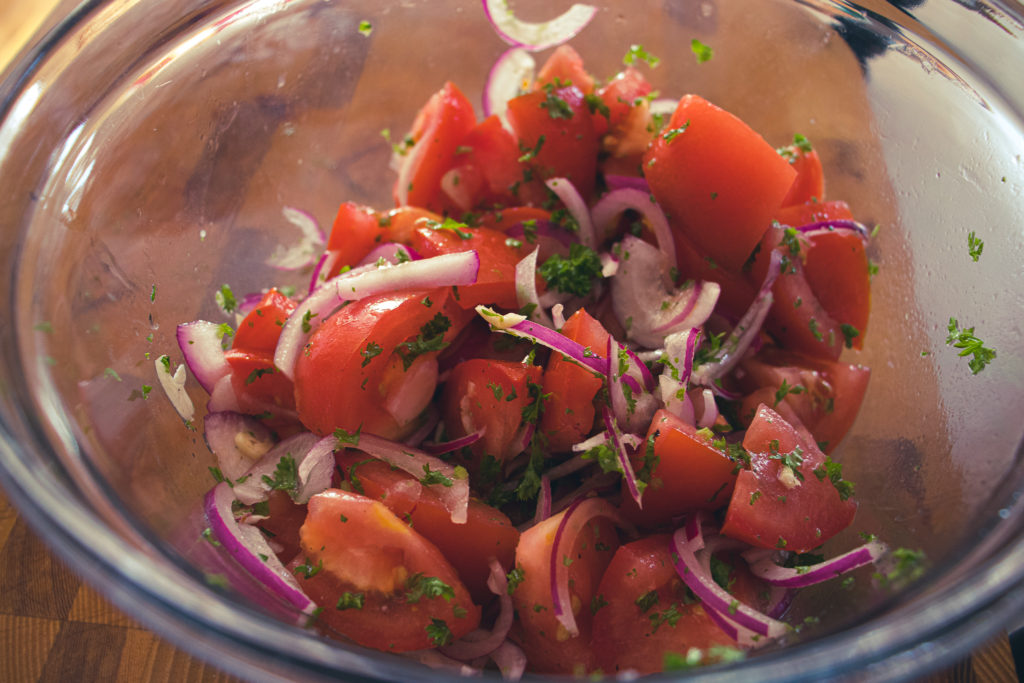
Tomato and Onion Salad
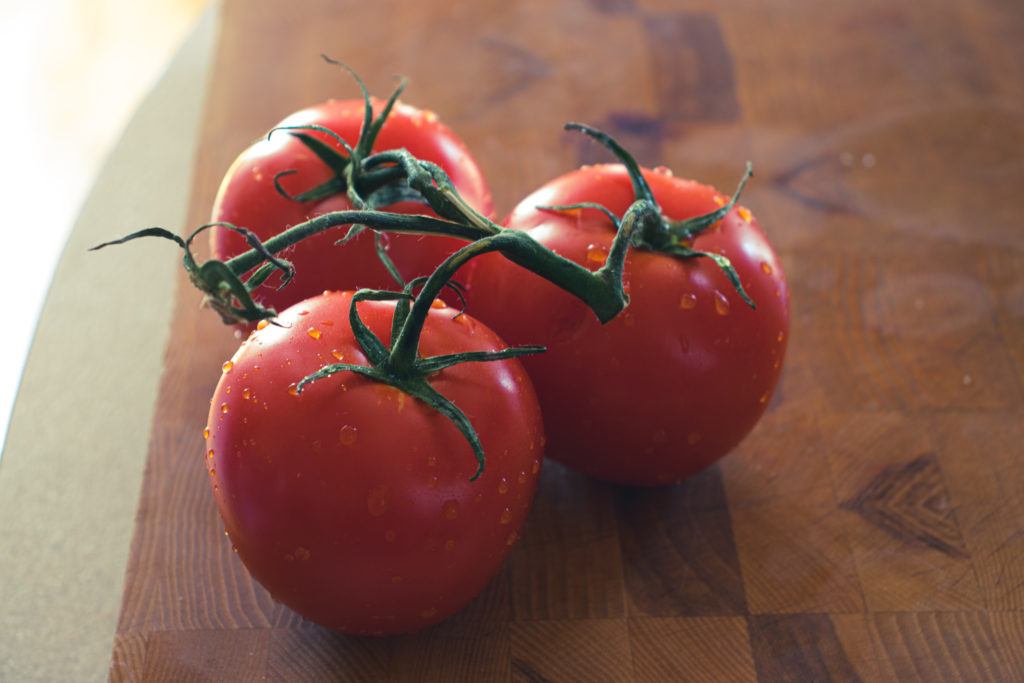
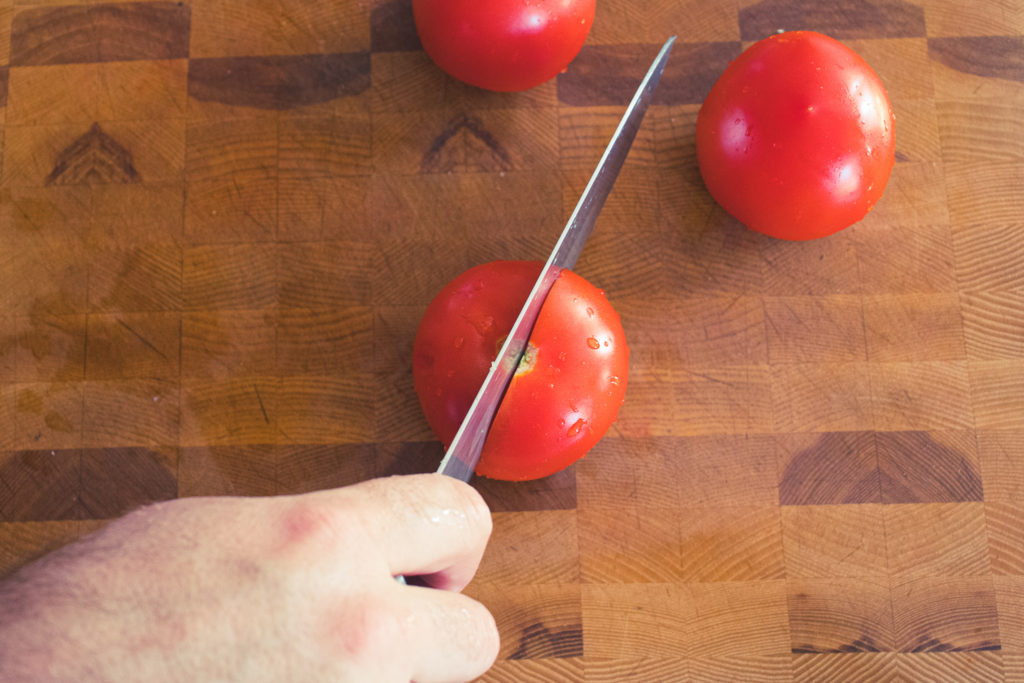
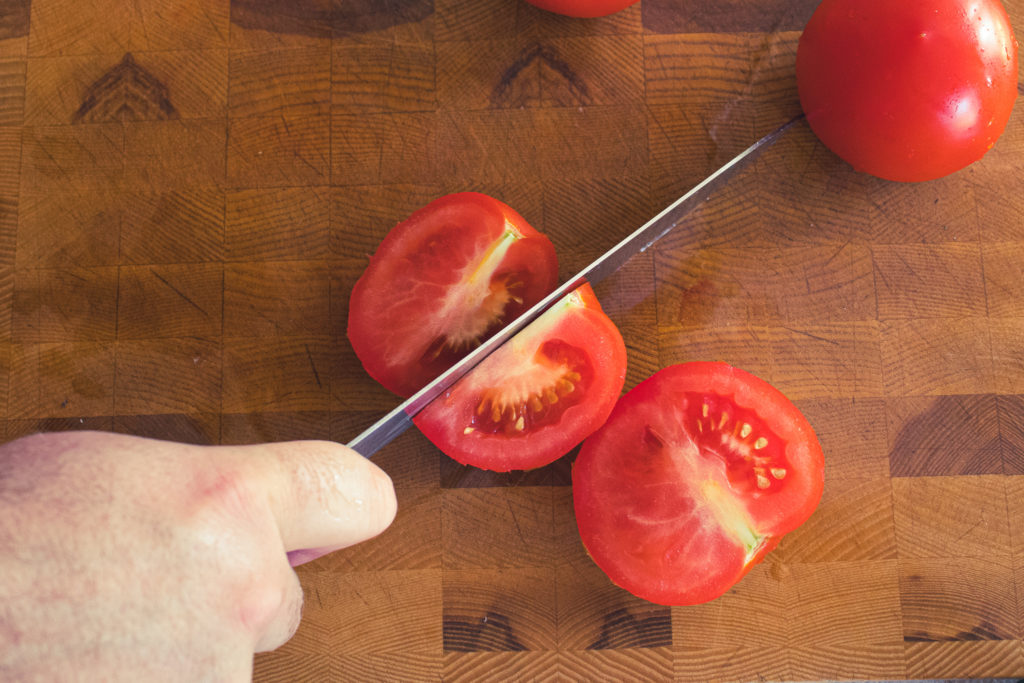
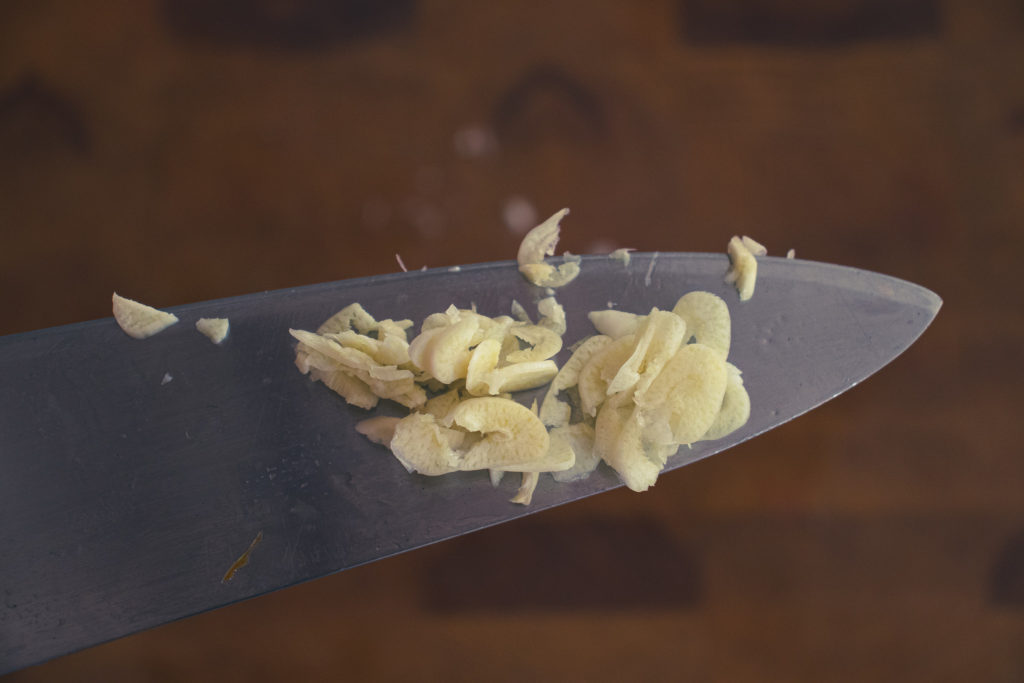
I have to tell you, the surprise breakout star of this meal is by far this really simple tomato and onion salad. I loved the Donair Kabobs, the Garlicky Yogurt sauce was fantastic, but this salad was amazing! Fresh vine-ripened tomatoes with garlic, red onion, parsley, white wine vinegar, olive oil, sugar, salt and pepper. That’s all there is to it, and I wouldn’t be surprised if this becomes one of your new favourite summer side dishes. It has become one of mine. Just like with the sauce, mix all the salad ingredients, cover the bowl, and let it sit in the fridge for an hour before serving for best results.
Putting It All Together
All the components of this meal are good on their own, but when you take a bite with a bit of the meat, some of the salad, and a touch of the sauce, that is when the magic happens. The flavours come alive, and you really get that Halifax Donair experience. Minus the hangover and sauce dripping all over your hands, arms, and clothes.
The Warp Up
I’ve wanted to make this for a long time, and I am so happy that I finally got the opportunity. It was well worth the wait. I think you’ll be happy if you make any of the components of this meal, but I think if you make them all and serve it all together, you will be over the moon. Try it for yourself. You’ll be happy you did.
Thanks for reading, and remember to check out my brand new cookbook, “The How-To Cookbook For Men” It comes out on August 10th and is available for preorder here.
Never miss a post again. Put your email address in below and receive chef’s notes in your inbox.
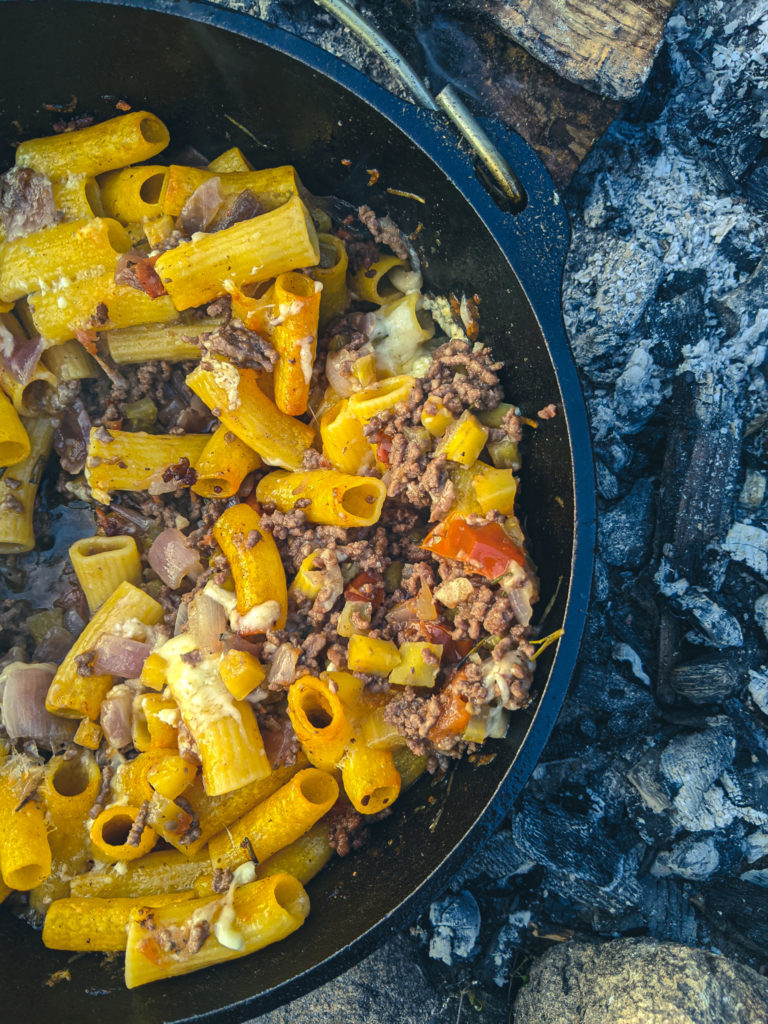
Imagine it. You’re out in the woods, and the tent is all set up, there’s a nice breeze, so the bugs aren’t too bad, you’re looking out over the forest eating a bowl of smoky, cheesy campfire pasta bolognese. If that doesn’t excite you, nothing will. If you aren’t the camping type, don’t worry. I’ve added a note to the recipe so that you can make this indoors just as easily as outdoors. And full disclosure, I made this in my backyard, not out in the woods, and you can too. As always, the recipe is directly below, but keep reading past it for more detailed information. Let’s get to it!
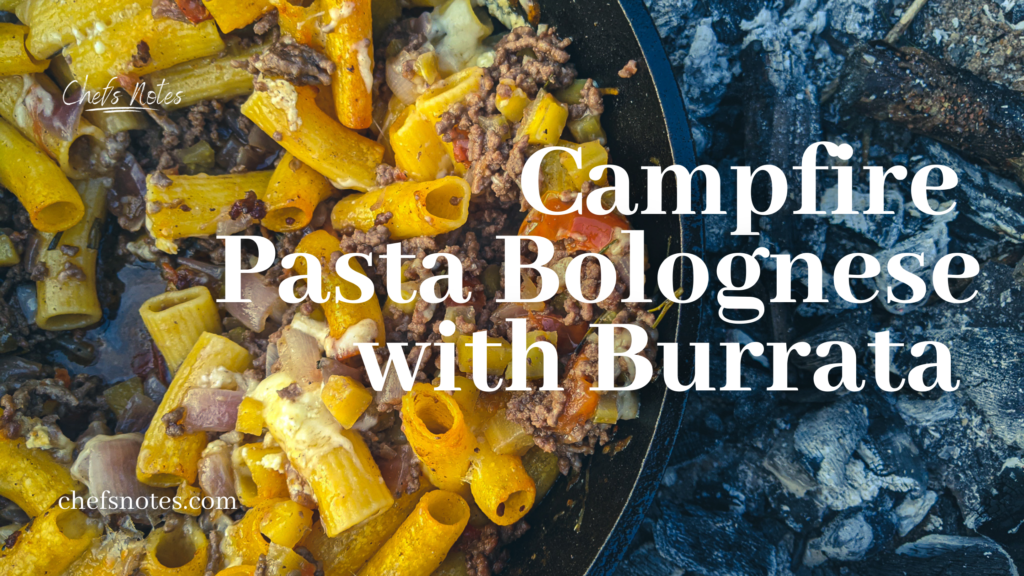
Campfire Pasta Bolognese with Burrata
Are you tired of eating the same thing every time you going camping or cook over a fire? Well, this campfire bolognese is just the thing you need to fuel yourself for a long night in the woods.
340gDried Gluten-Free Rigatoni. cooked340 g is the dried weight
Instructions
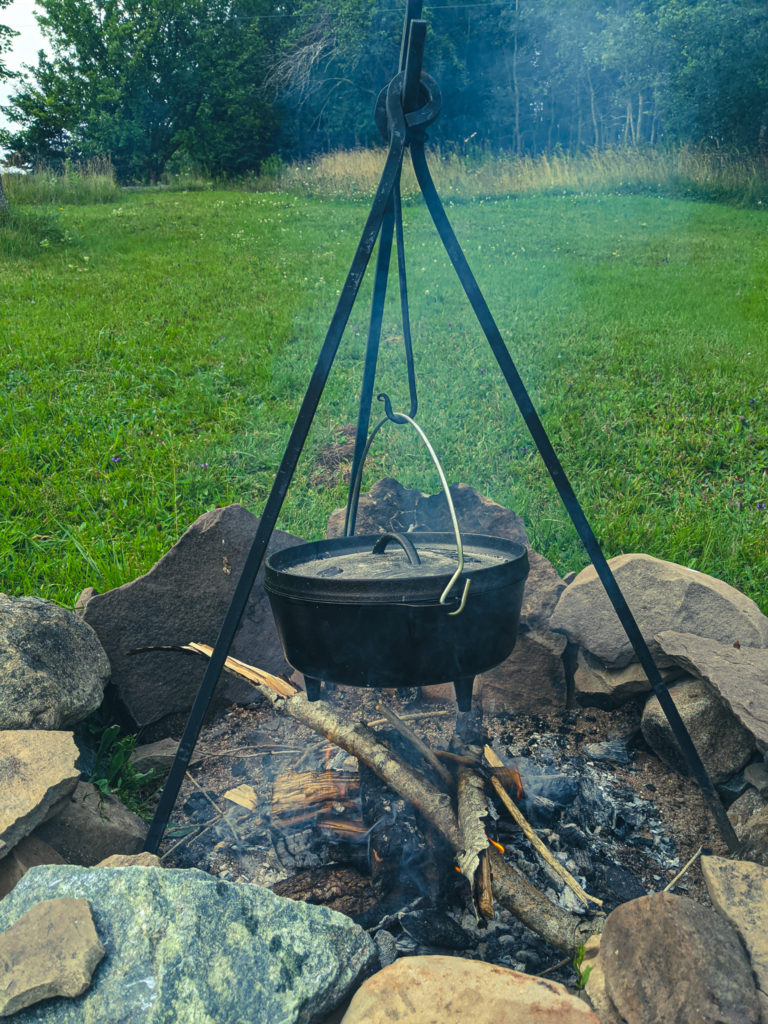
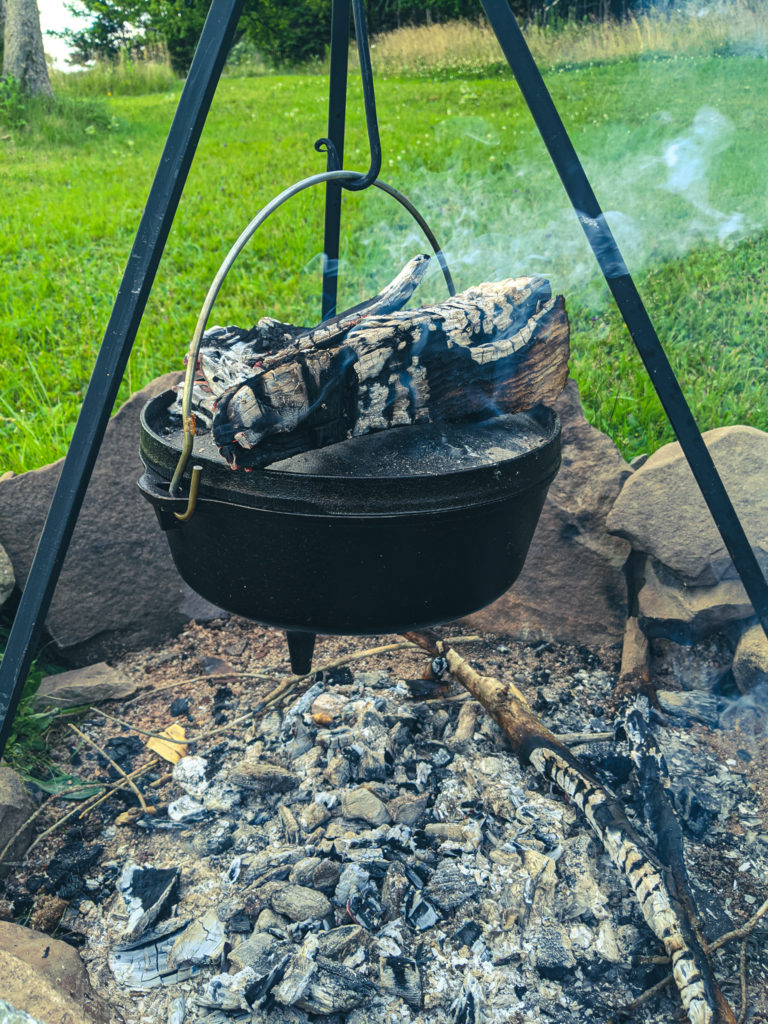
Get a good fire going and let it burn down so there are some hot coals.
Set a castiron dutch oven over the coals and let it get hot for about 5 minutes.
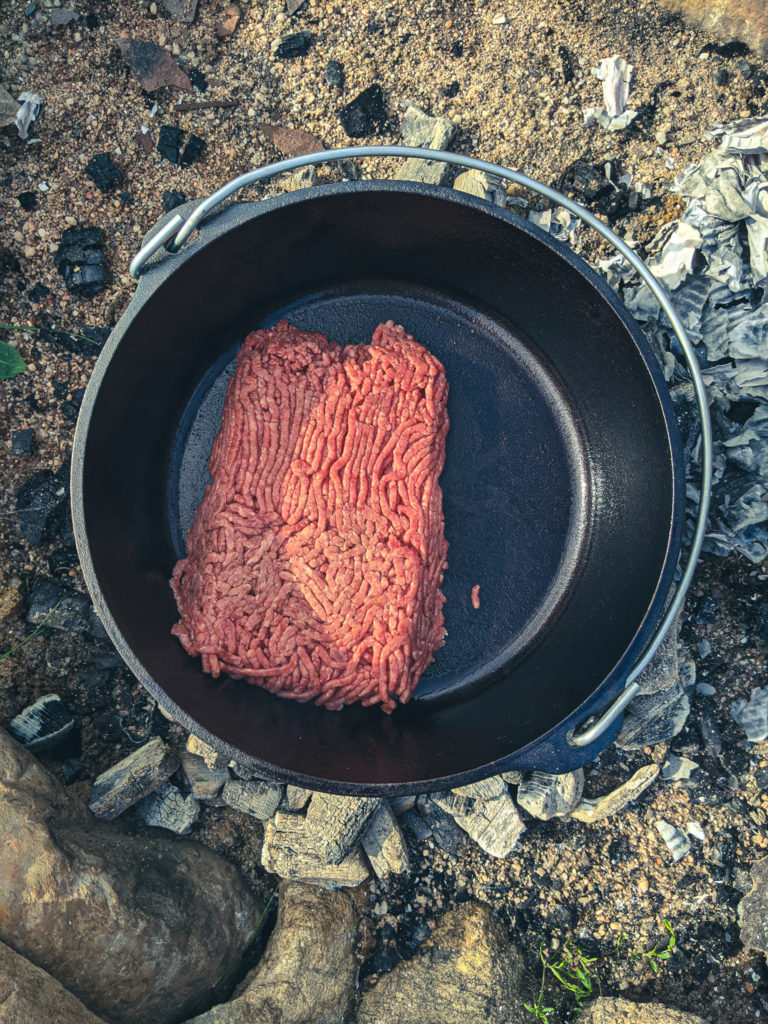
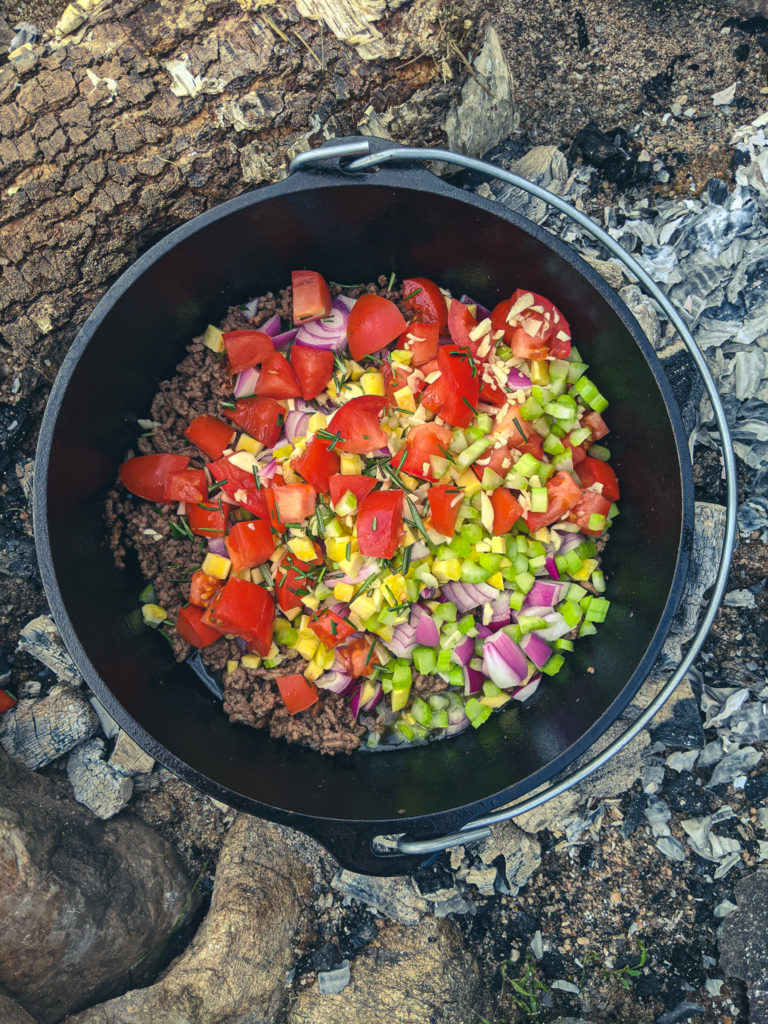
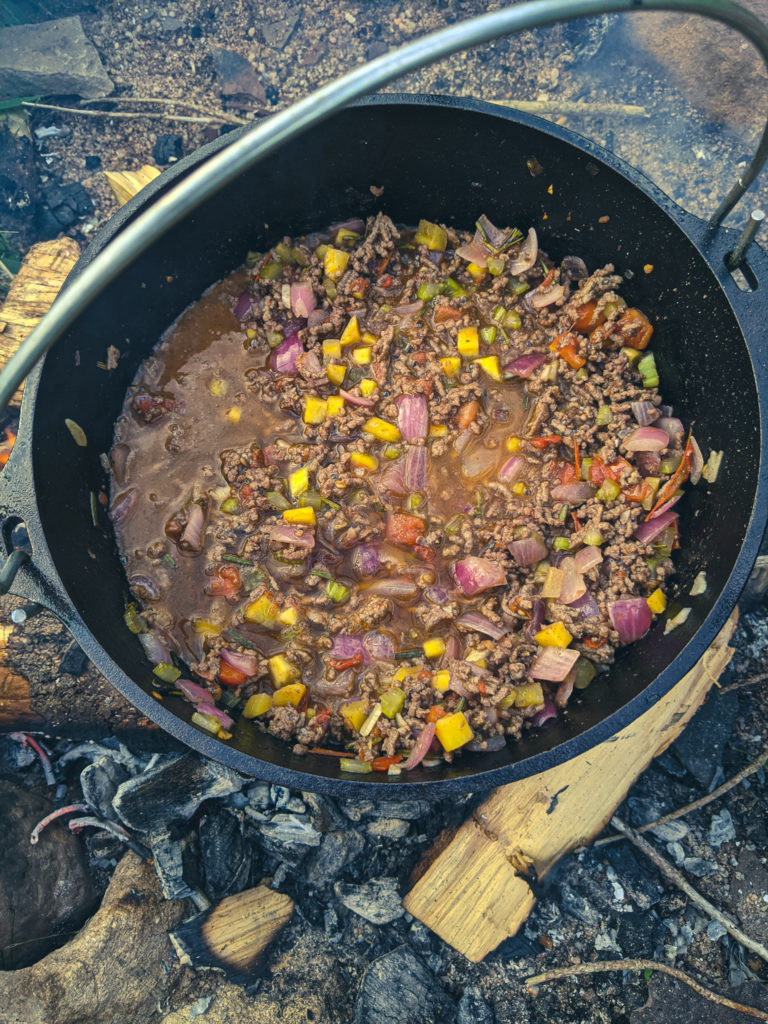
Pour the olive oil into the pot and add the ground beef. Cook until the ground beef is browned, about 5 to 10 mnutes.
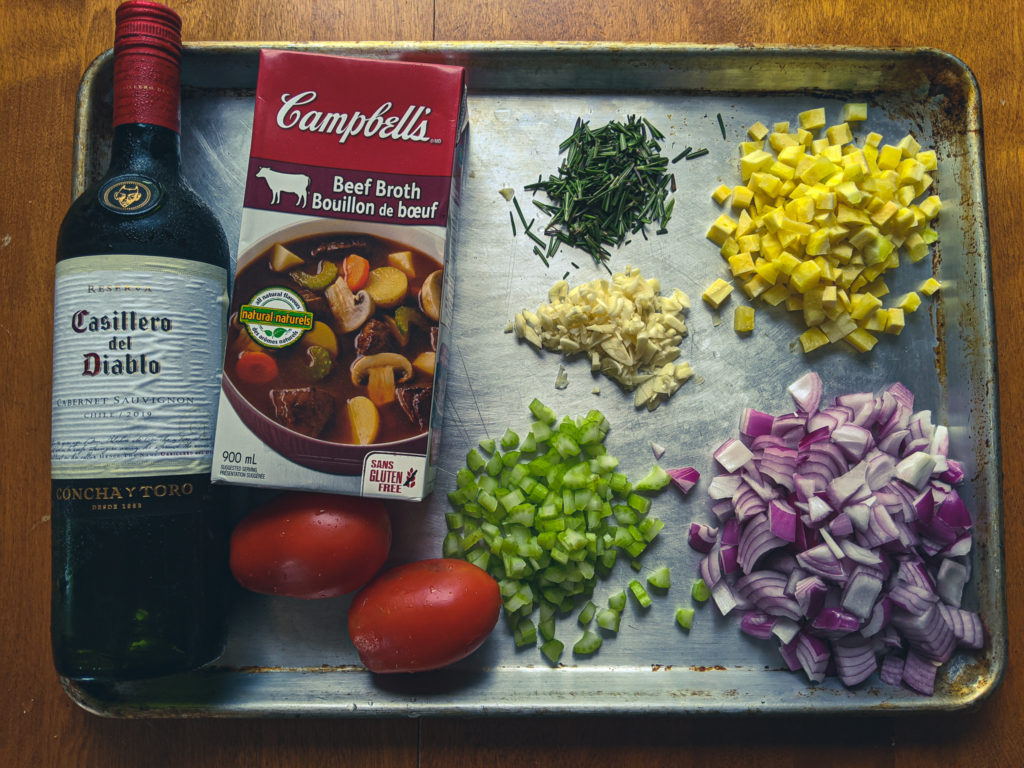
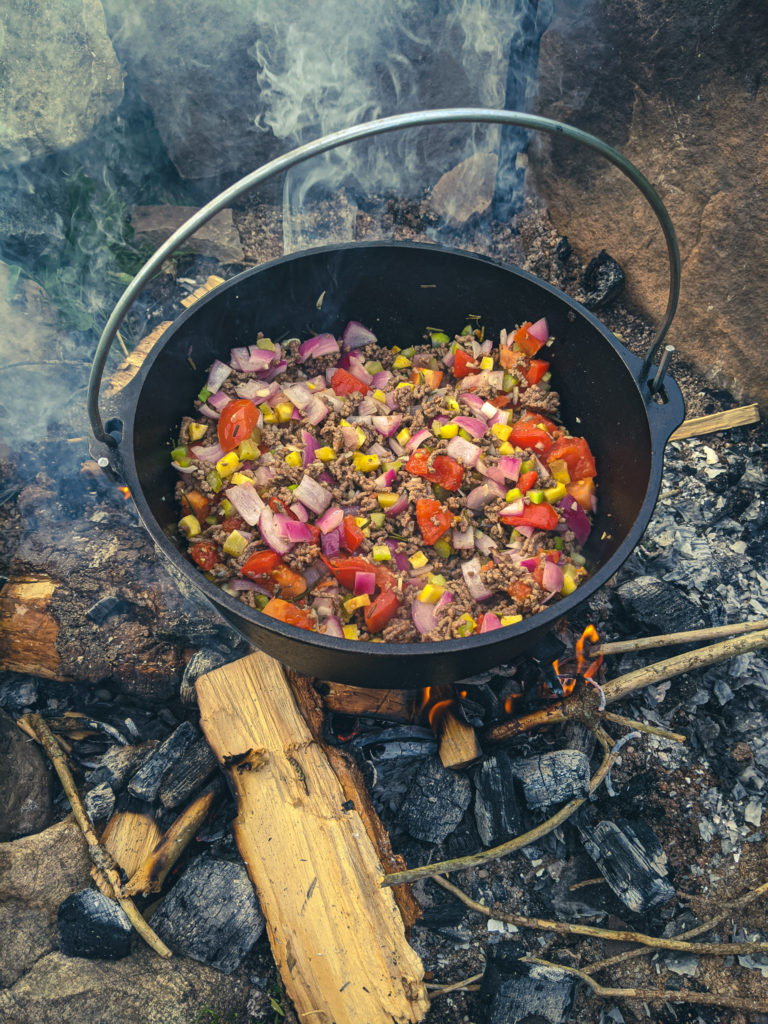
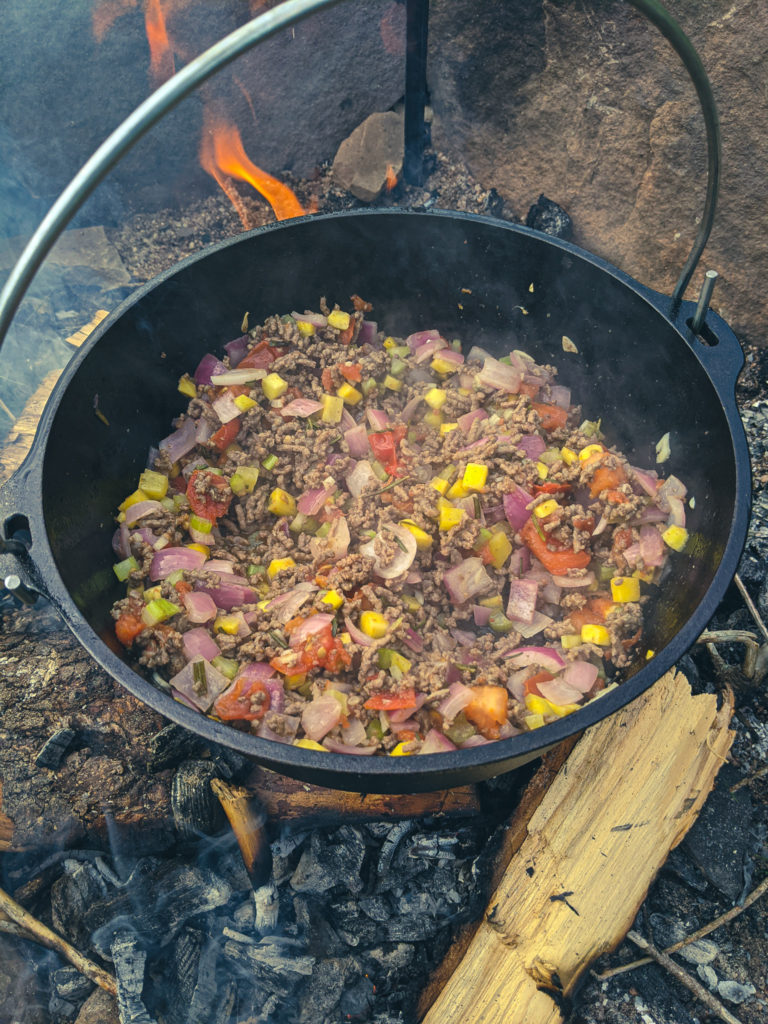
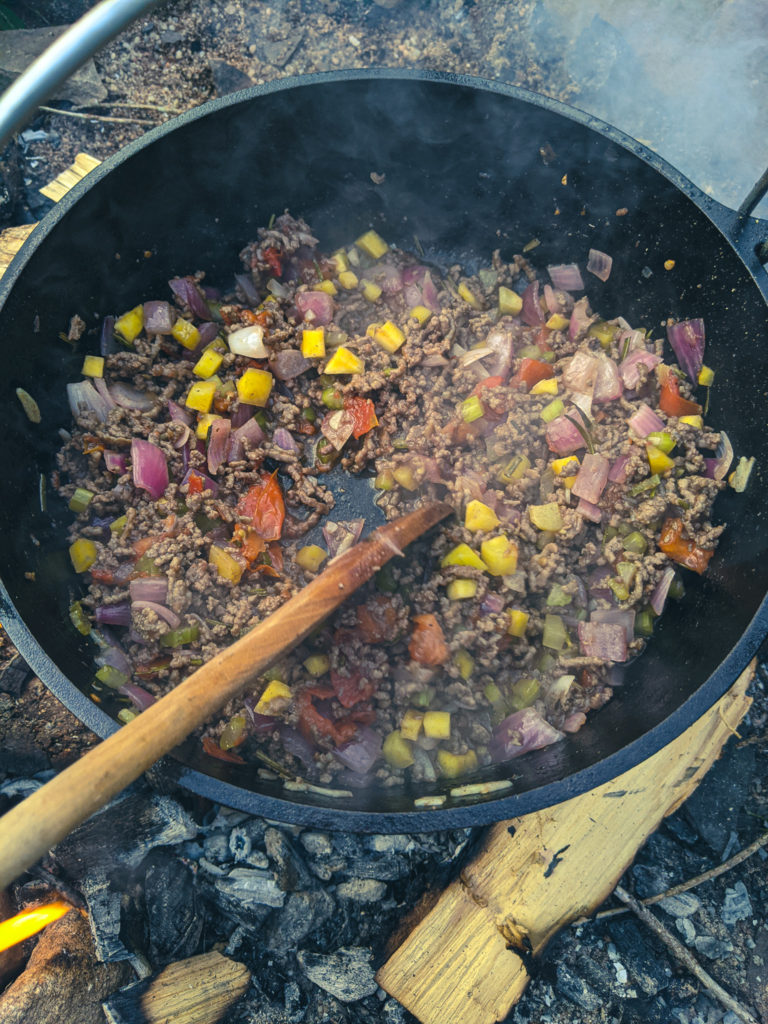
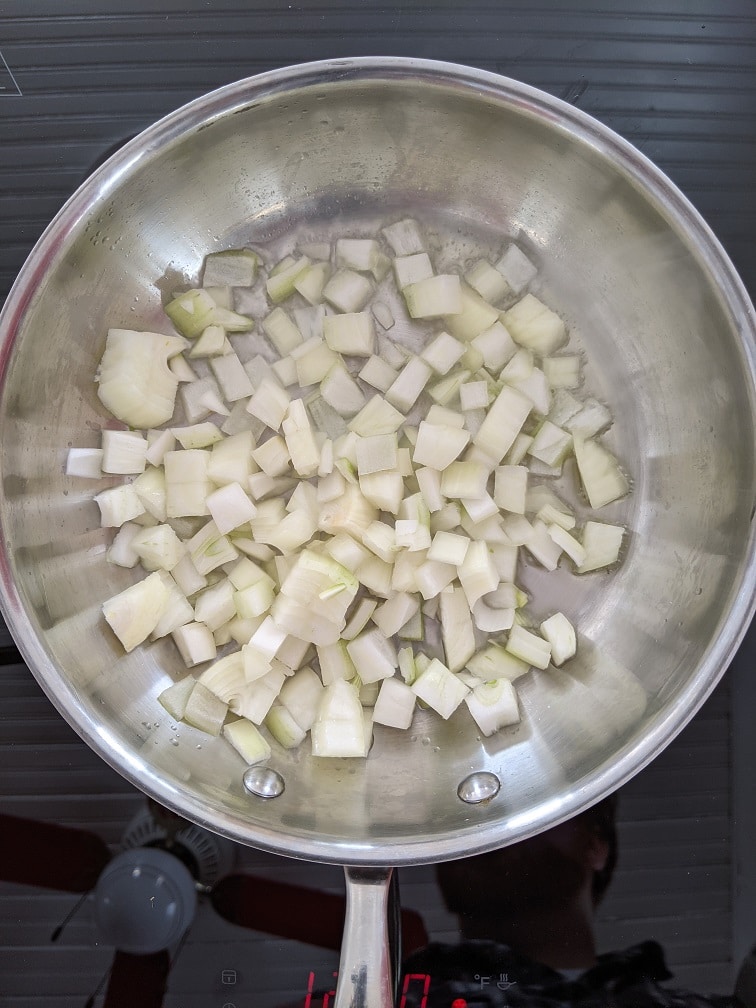
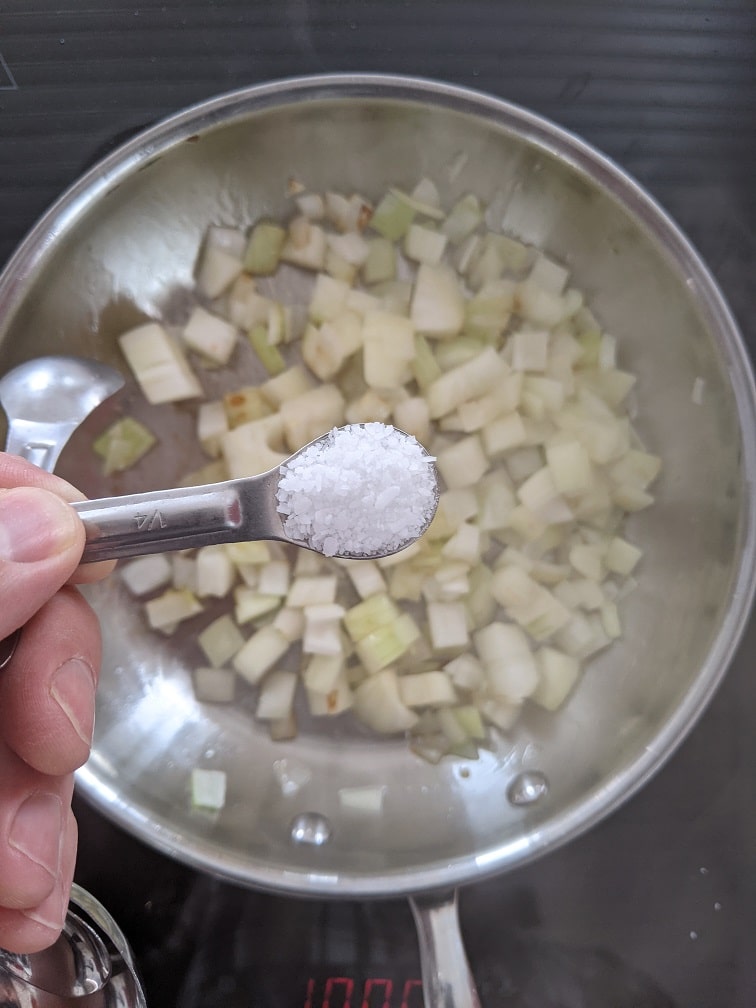
Add the onion, carrot, celery, tomato, garlic, and rosemary to the pot. Cook, stirring for 10 to 15 minutes or until the onions and celery have softened.
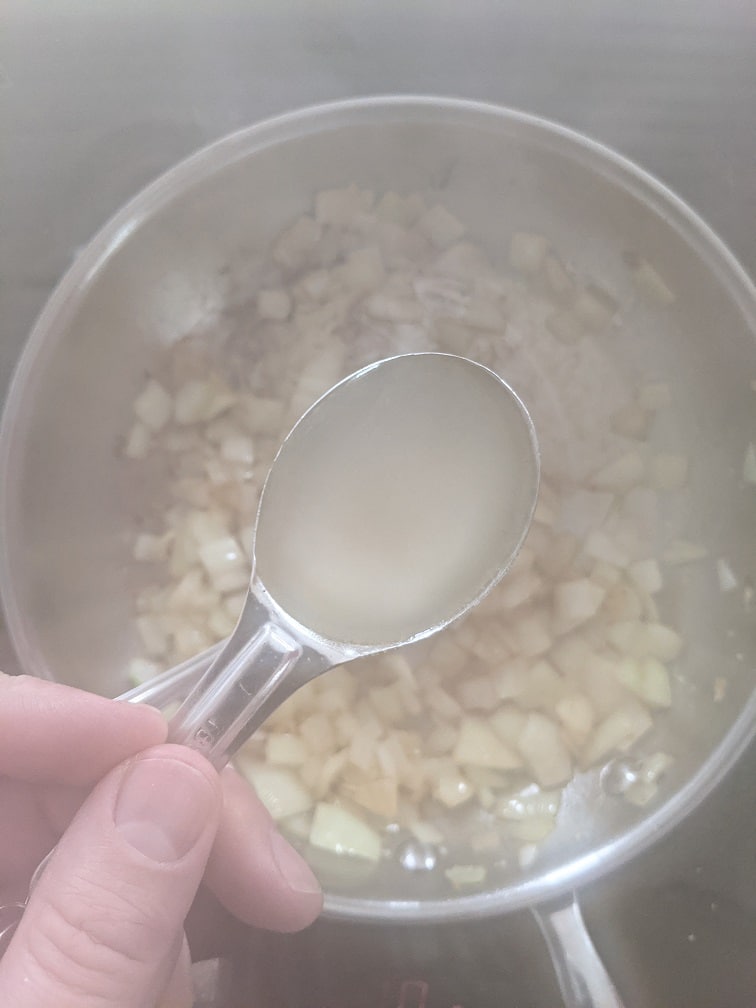
Pour the red wine into the pot and cook for 2 to 3 minutes or until the wine has almost all evaporated.
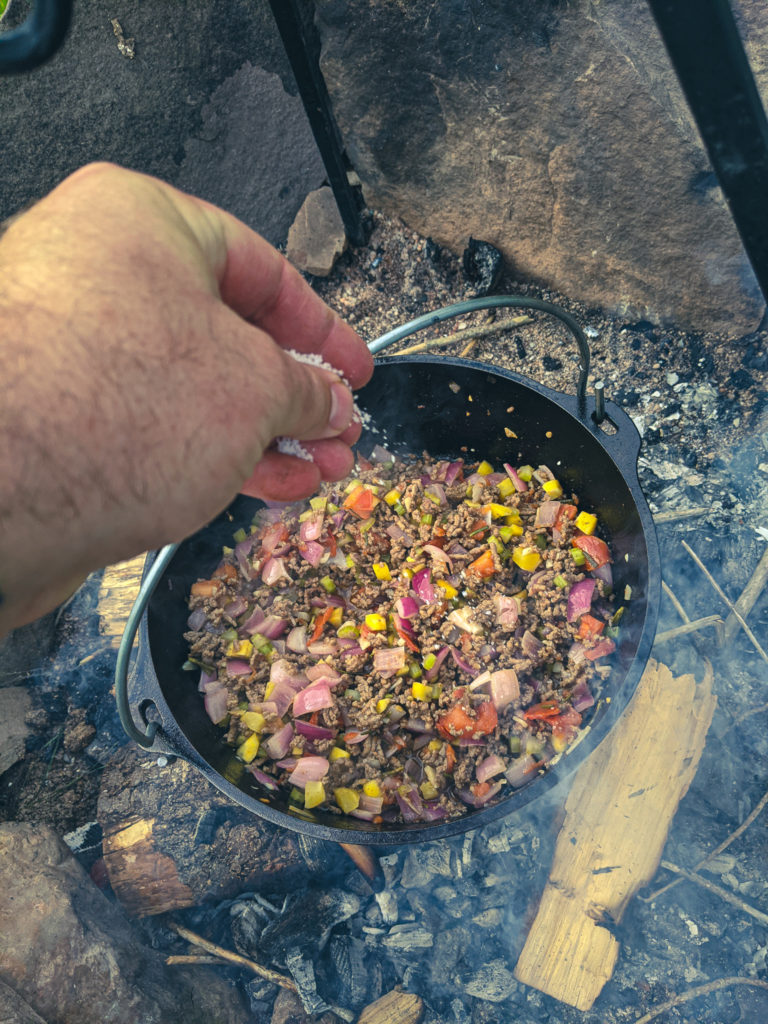
Add the beef stock and season with salt and pepper.
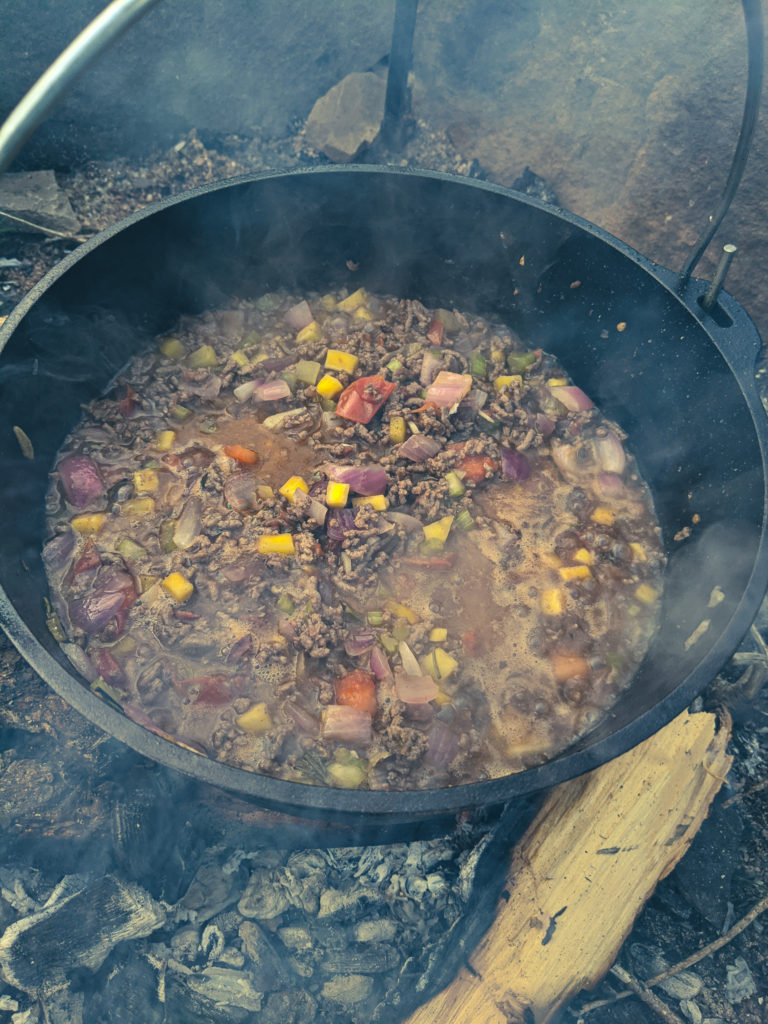
Bring the pot to a boil, put a lid on it, and hang it about 6 to 8 inches above the fire.
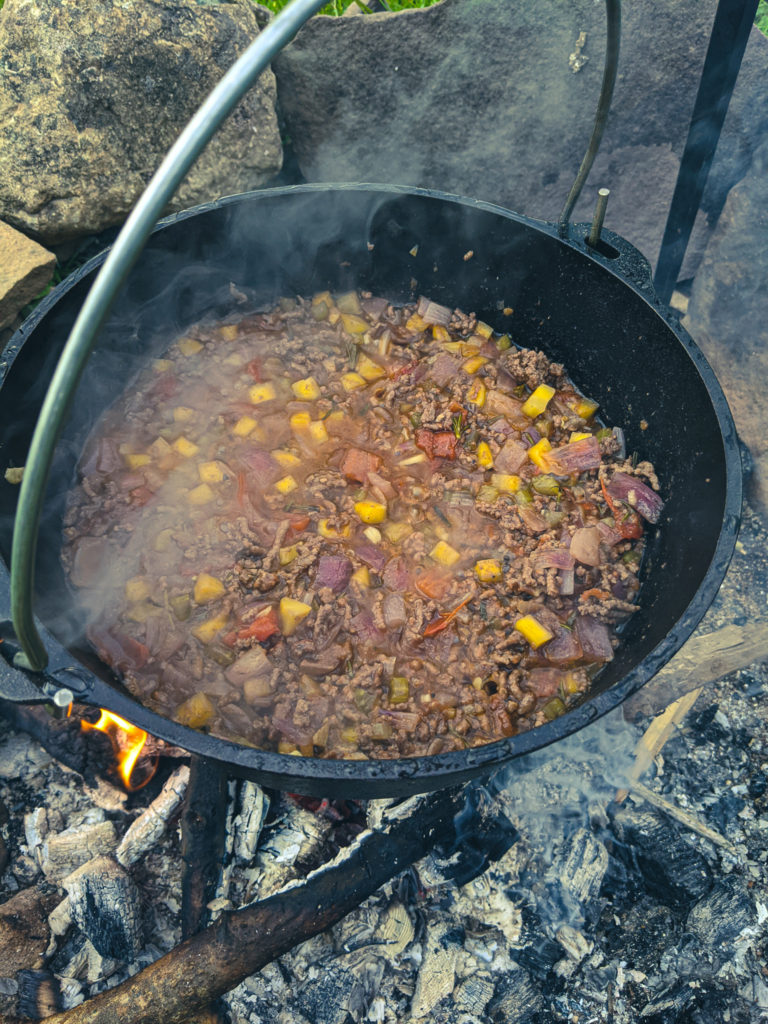
Let the sauce simmmer for about 35 to 45 minutes.
Taste the sauce and adjust the seasoning as needed.
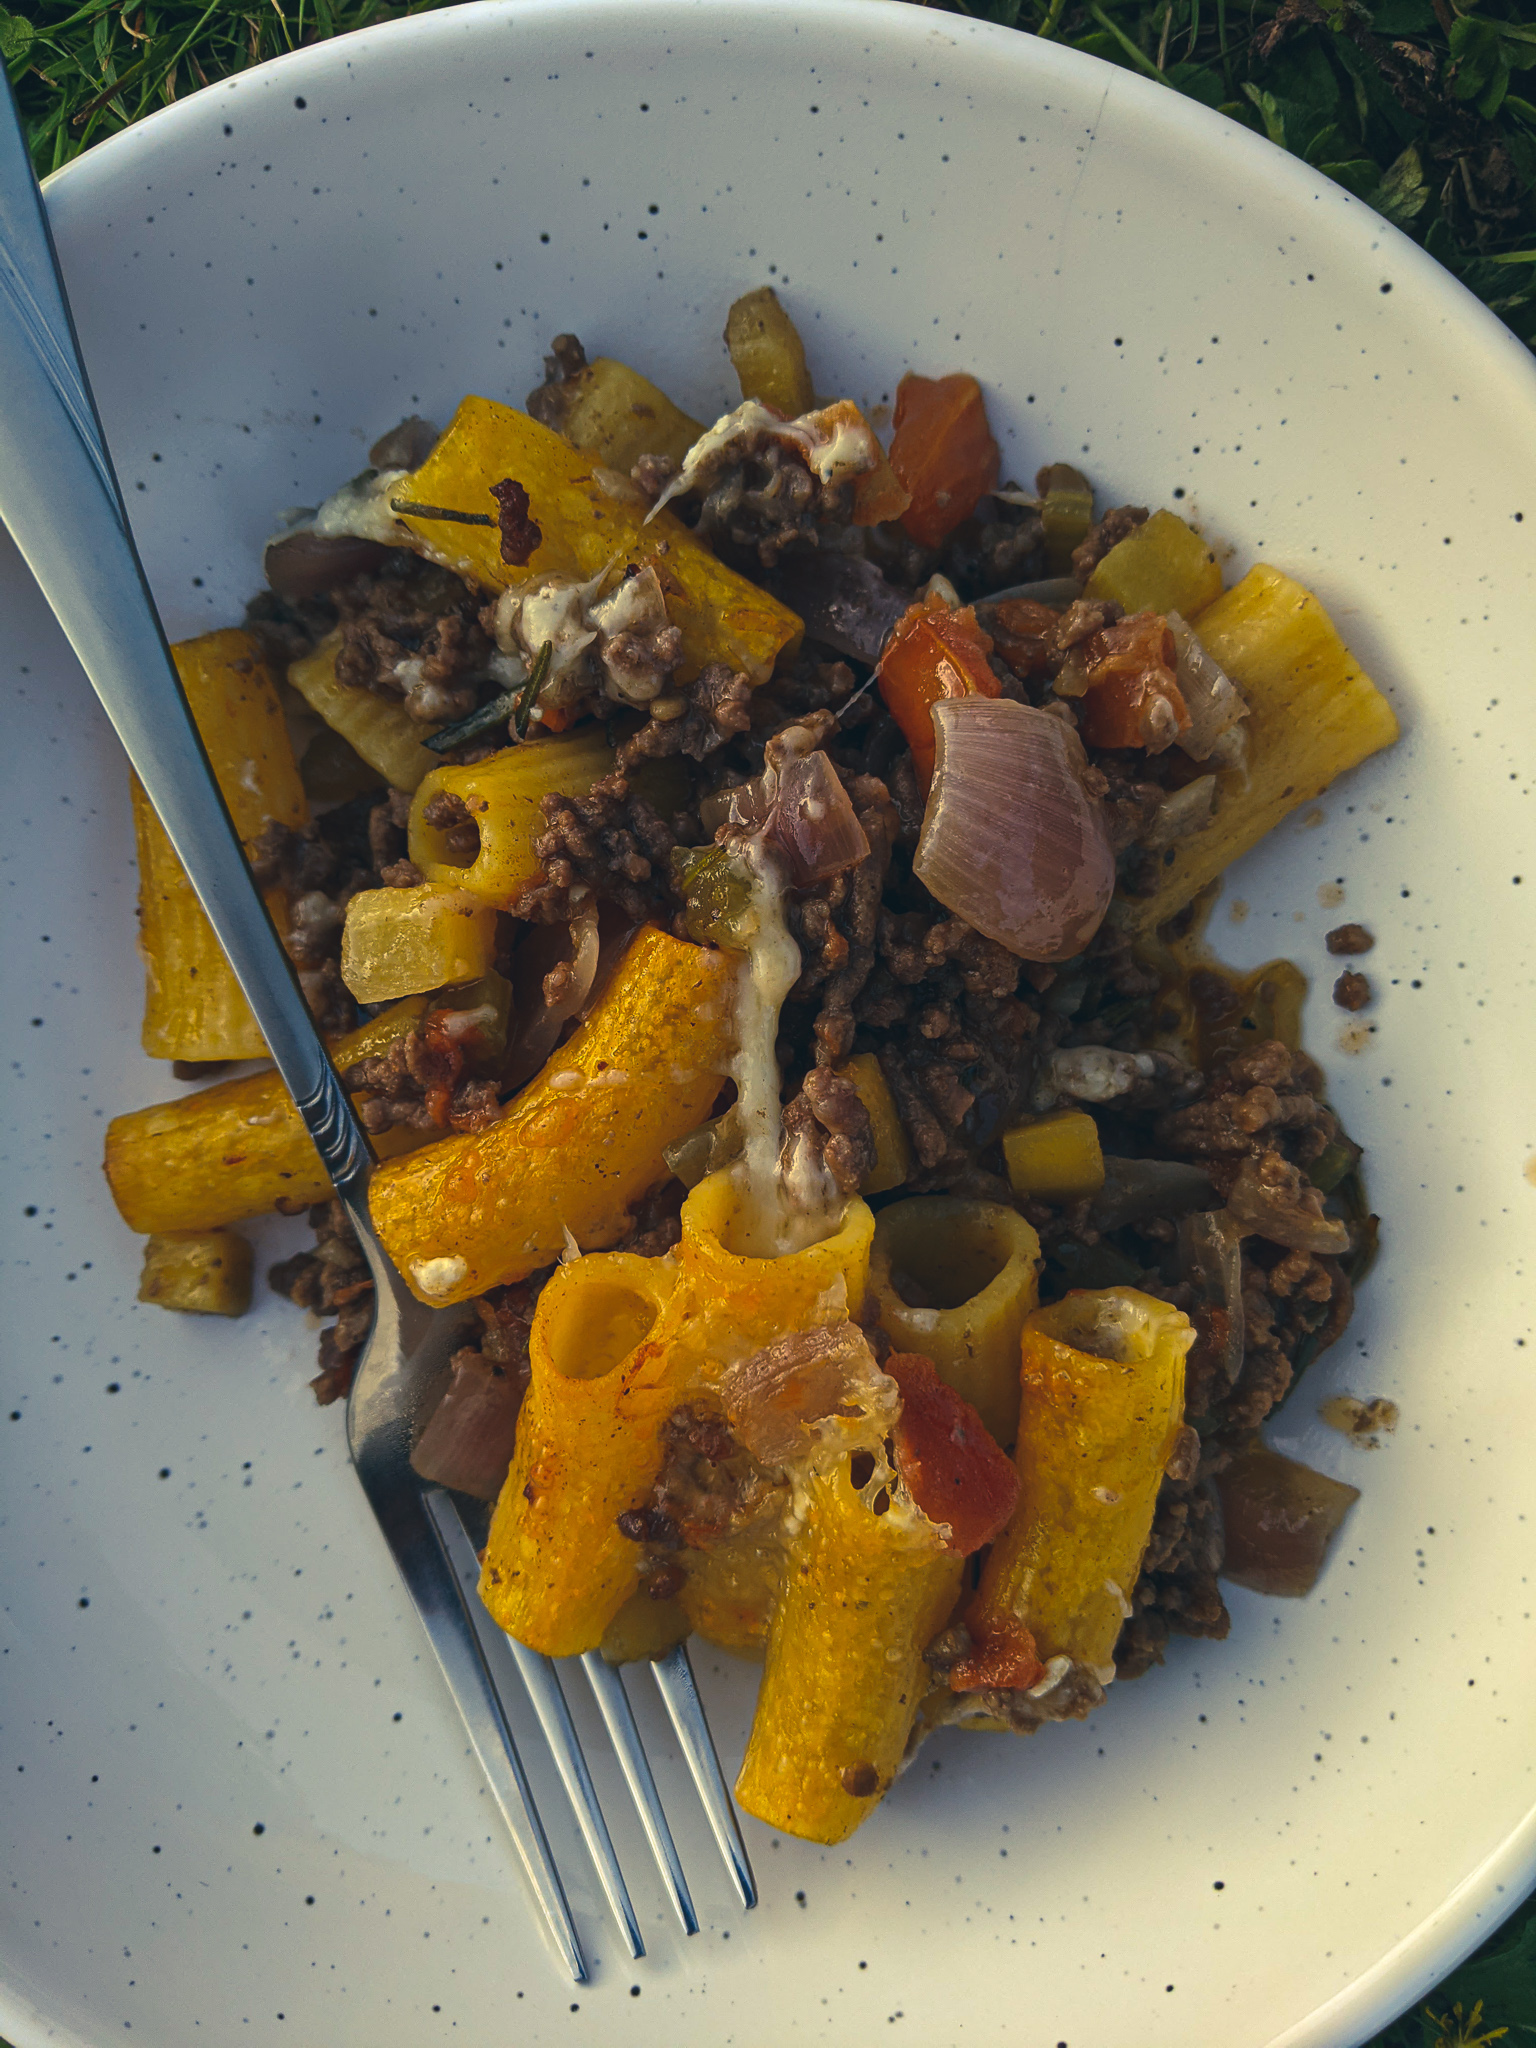
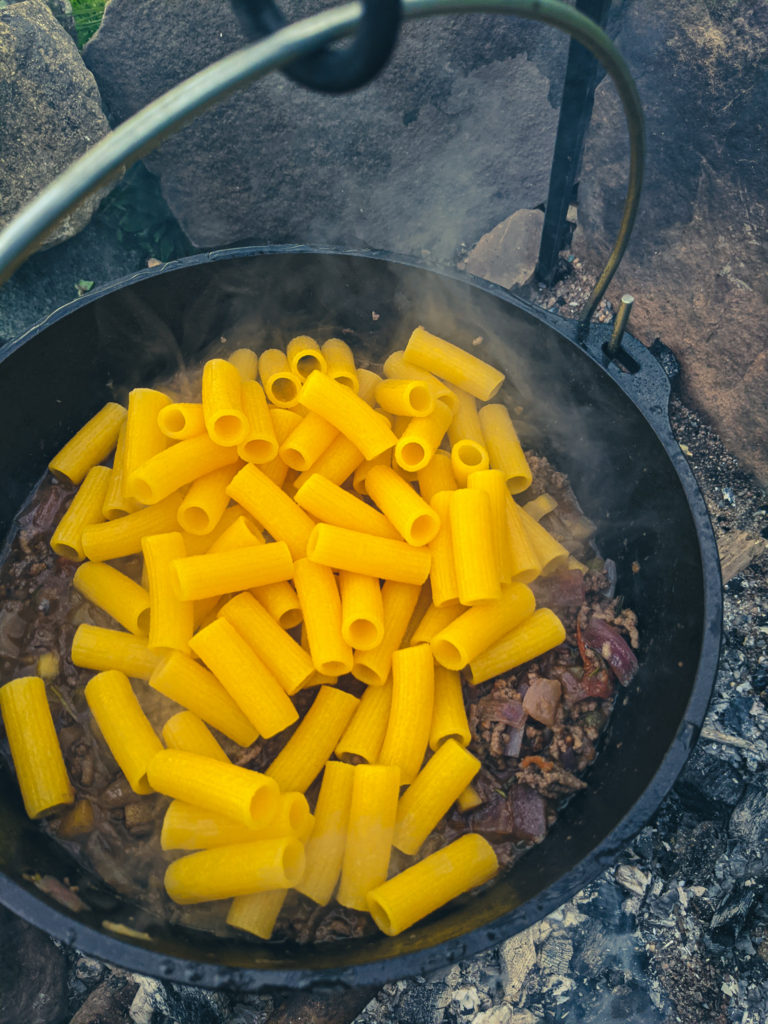
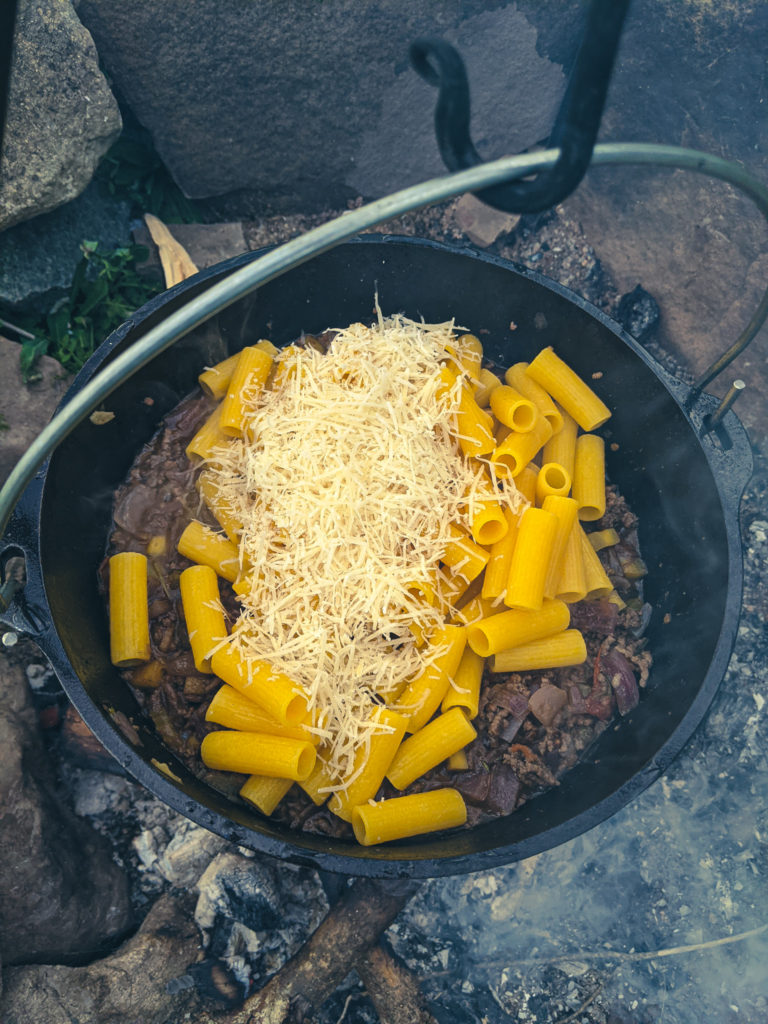
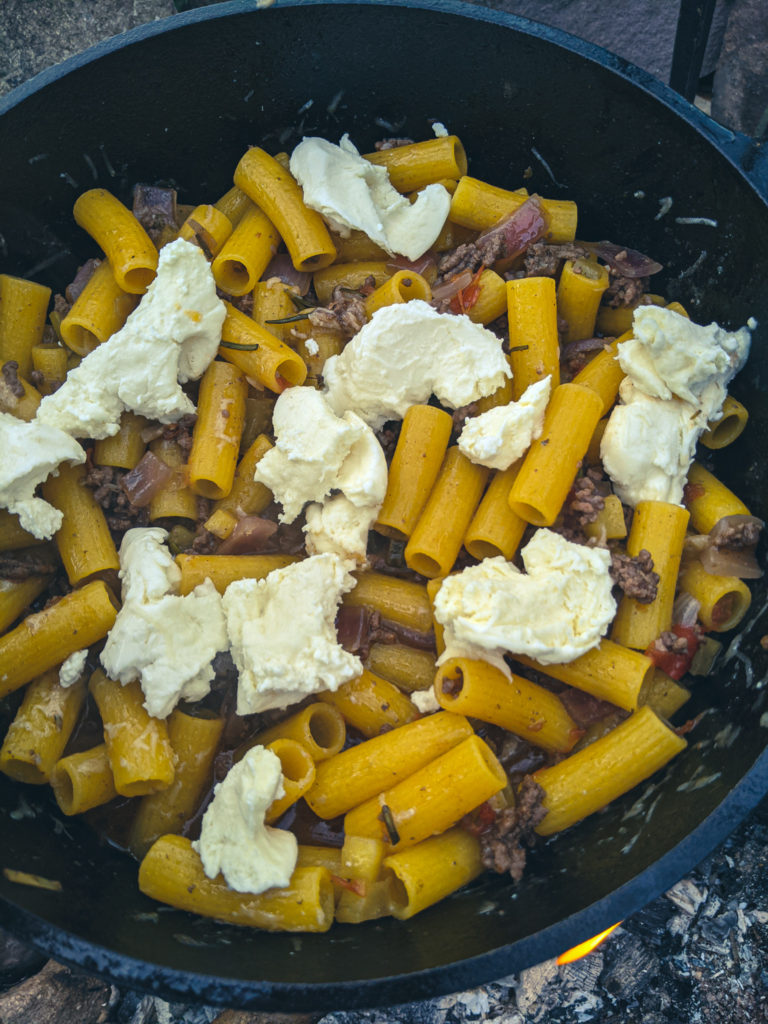
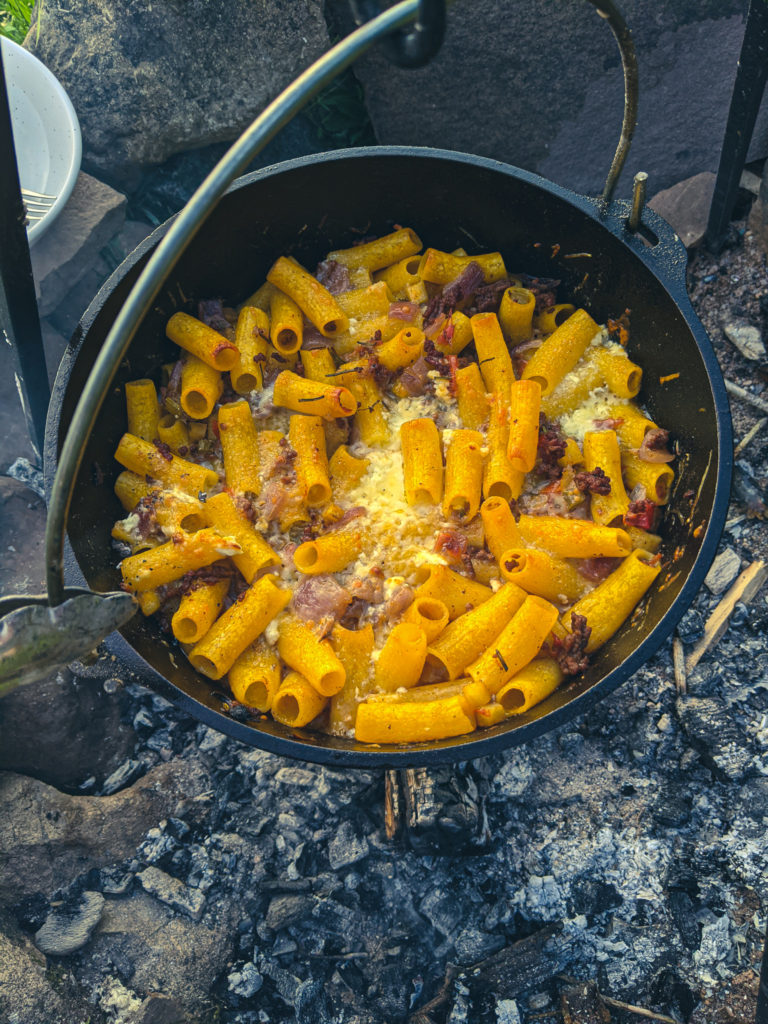
Stir the cooked pasta and parmesan into the sauce. Pull the burrata apart into small pieces and place it on top of the pasta. Put the lid on the pot and cover with hot coals. Let it cook for another 10 minutes or until the cheese melts and just starts to brown. Serve.
Notes
This recipe can be easily translated to indoor cooking. Start the beef on medium-high heat until brown. Add the vegetables, rosemary and garlic, cook, until the onions soften. Deglaze with red wine, add the stock, season to taste. Turn the heat down, cover the pot and simmer for 30 minutes. Stir in the cooked pasta and parmesan, top with the burrata and broil for 3 to 4 minutes or until the cheese is browned. Done and done.
The ingredients for this Campfire Pasta Bolognese are pretty straightforward. They are ground beef, onion, carrot, celery, tomato, garlic, rosemary, salt, pepper, red wine, beef stock, pasta, parmesan cheese, and burrata cheese. We’ll talk about what exactly burrata cheese is in a minute. Now, you may expect this recipe to have tomato sauce because that is what most of us are used to as a bolognese. However, traditional bolognese has little to no tomato in it. The sauce is wine and stock-based. I generally prefer to add a bit of tomato paste to add richness and a bit of that tomato flavour, but I didn’t have any, so I left it out. Honestly, the recipe isn’t missing it. It tasted great as it is.
What is Burrata Cheese?
Have you ever had fresh mozzarella cheese? I’m not talking about the name-brand blocks you get at the grocery store. I mean real fresh mozzarella. What about ricotta cheese? Well, burrata is pretty much a ball of fresh mozzarella stuffed with ricotta. Sounds good, right! If you can’t find burrata, you can use regular mozzarella, but I had some, and I thought this would be a great use for it. I wasn’t wrong.
Campfire cooking
To cook this pasta over a campfire, you need two things. Firstly, you need a pot that can withstand the heat of the fire. I used a Lodge Castiron Dutch Oven. Secondly, you need something to hang the pot off of. I have a castiron tripod, specifically for this purpose, but you can tie three equal-length sticks together and make a tripod that way if need be. As a bit of a side note, this is the first time I’ve had a chance to use either the dutch oven or the tripod, so it was a pretty exciting day for me.
Cooking the Campfire Pasta Bolognese
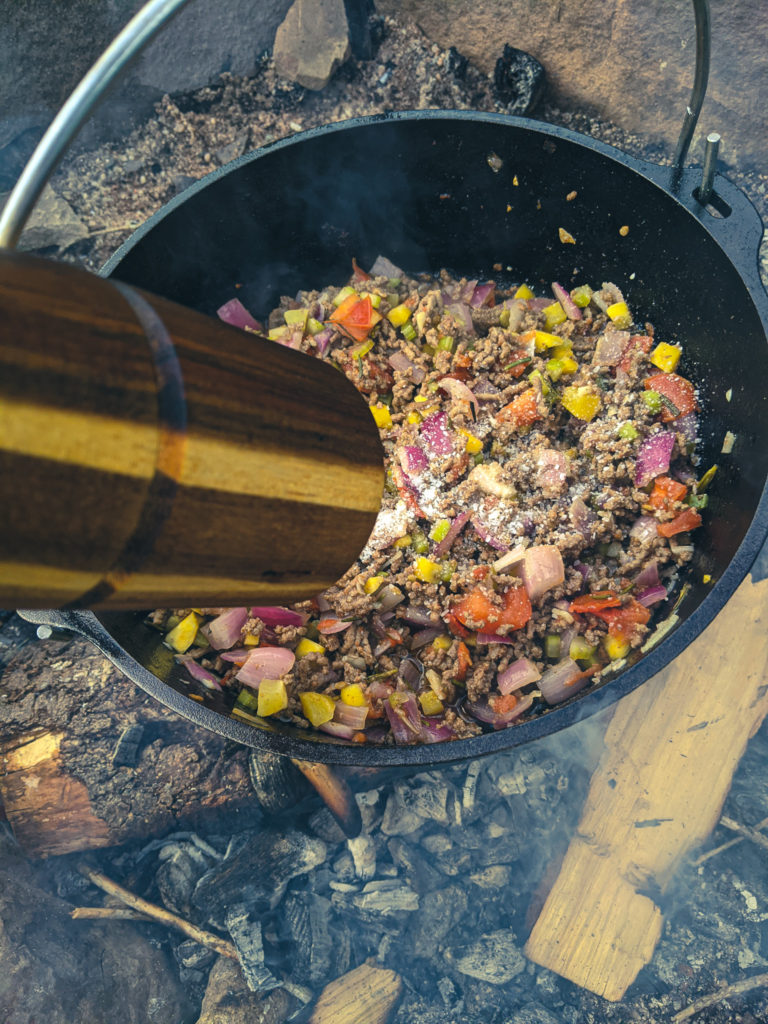
The first step in any campfire cooking is obviously to get a fire going. You have to light the fire and let it burn down until you have some nice hot coals to cook over. Next, place the pot over the coals and let it heat for about five minutes. Add a touch of olive oil to the pot along with the ground beef and cook until browned.
Adding the vegetables
Once the beef is brown, add the vegetables, garlic, and rosemary. Cook for five to ten minutes or until the onion and celery have softened.
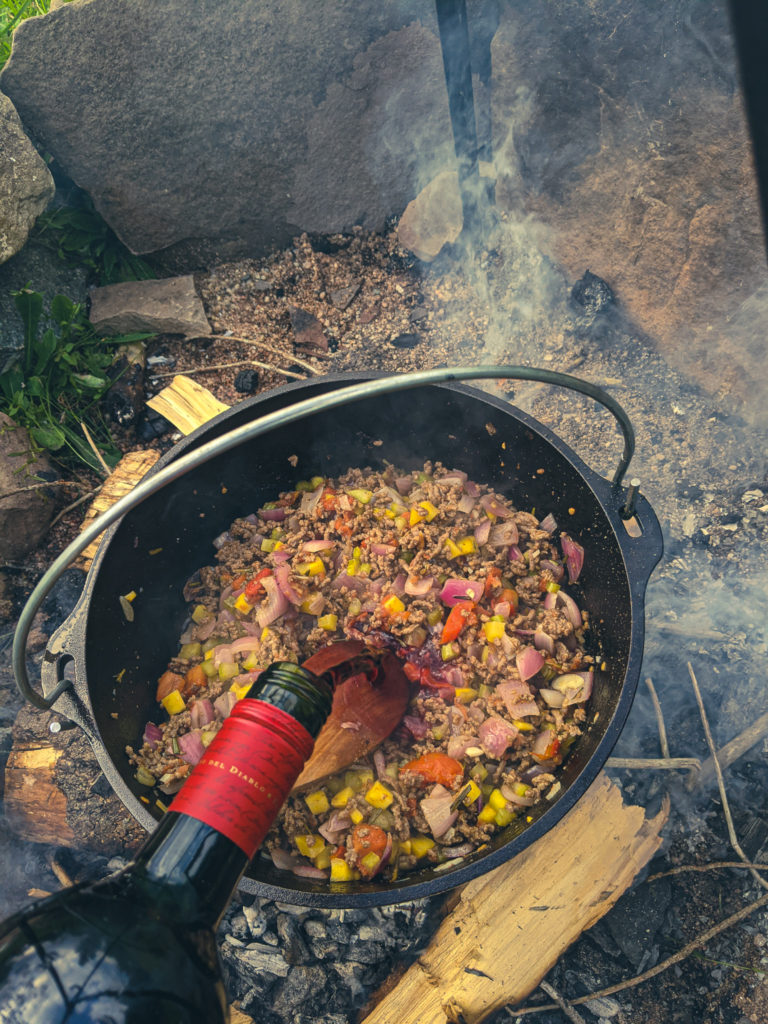
Season and deglaze
Season the sauce with salt and pepper and pour in the red wine to deglaze the pan. Let the wine cook until it has almost all evaporated. This should only take about two to three minutes.
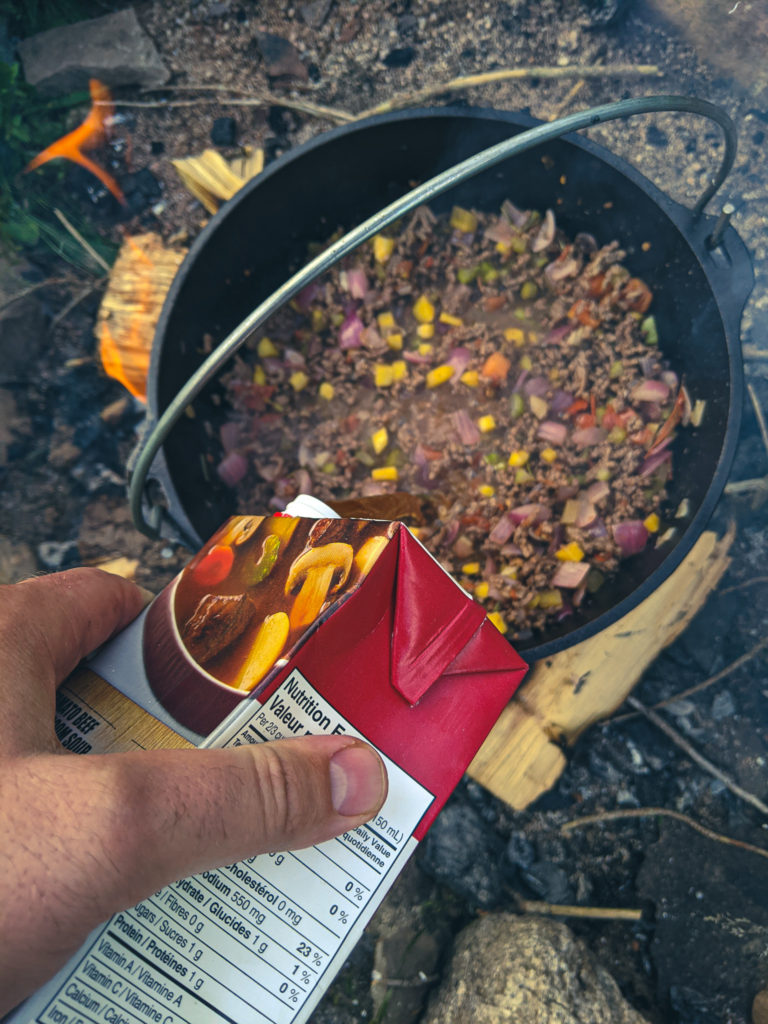
Add the beef stock
The final step in building the sauce is to add the beef stock. Pour it into the pot, then wait until it comes to a boil. Put a lid on the pot, and lift it off the fire. Set the pot about six to eight inches above the fire and let it simmer for about 35 to 40 minutes.
Finishing the Campfire Pasta Bolognese
After the sauce has had some time to simmer, take the lid off, and taste the sauce. Add salt and pepper as needed. Now, stir in the cooked pasta and parmesan cheese. Pull the burrata apart and place it on top of the pasta. Return the lid to the pot and cover it with hot coals. Let the pasta sit for about ten minutes. Carefully remove the coals from the lid, then remove the lid from the pot. The burrata should be melted and just starting to brown. That’s when you know the pasta is perfect.
Serve the Campfire Pasta Bolognese
All that’s left to do is serve the pasta. This should make enough for four to six people depending on how hungry everyone is. If you want to stretch it a bit further, serve it with a green salad and some toasted bread.
The Wrap Up
If you’re sitting around a fire and someone hands you a bowl of this Campfire Pasta Bolognese, you’ll want to give them a big hug because that’s exactly what they just gave you. This pasta is like a big hug in a bowl. It’s everything you love about pasta bolognese but with a hint of smoke and that special je ne sais quoi that only comes from cooking something over an open fire. Again, you can make this in the house, and it will be delicious, but if you get the chance to cook this on a fire, take it. Becasue this delicious pasta will then truly become something extraordinary.
Thank you for reading, and remember to subscribe below, so you never miss a post.
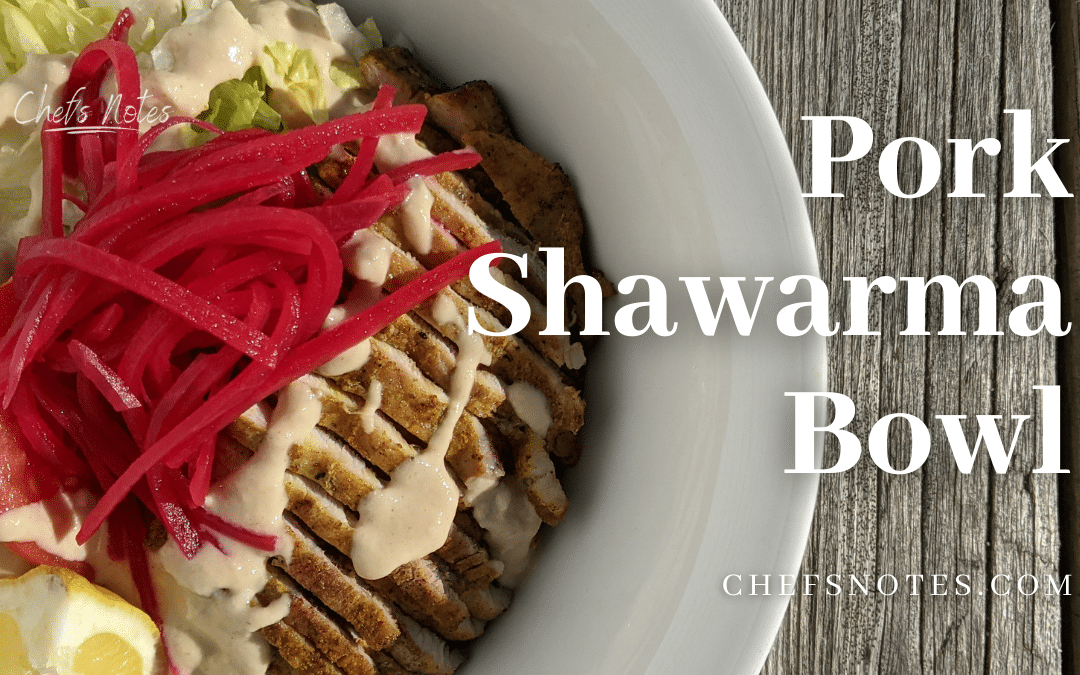
Tender grilled pork seasoned with homemade shawarma spice served with quinoa tabouleh, homemade pickled turnip and tahini dressing. Is this the exact meal you need? I think we both know the answer to that. So, fire up the grill, sharpen those knives and let’s get cooking. This is my grilled pork shawarma bowl with homemade pickled turnip.
Where have I been?
Before we get too deep into today’s post, I want to talk a little about where I’ve been and why there haven’t been any new posts on Chefsnotes.com in over a month. Near the end of April, I decided to take a week off to spend some time with my family, rest and reset. The day before I was supposed to get back to work, I hurt my shoulder, neck, and back. More accurately, I aggravated an old injury. Since then, the pain has ebbed and flowed but has mostly been bad enough that I could not cook or even type. The few times it’s felt okay, it was set off again by something simple like opening the fridge. I’m sure you can imagine my frustration. I’ve been doing everything I’m supposed to be doing and have been seeing some minor improvements. But enough is enough. I am dying to work, so that’s what I’m going to do. I am getting back to work, however, on a limited schedule. Rather than posting three days a week, I’m only posting once, which should be manageable. I want to thank you all for sticking by me and for your understanding. This is an incredibly frustrating time, and I am happy to be back to work.
What’s to come?
When I had to stop working, I had two series that I was working on. The casserole series and the bowl series. This post is the last in the bowl series and was supposed to be posted about a month ago. I am also ending the casserole series early. If I’m only posting once a week, I want to make sure that the one post really counts. So, all the upcoming posts will be one-offs, and when I’m able to get back to work full time, I’ll jump back into some different series.
Pickled Turnip
Pickled turnip is a classic topping for shawarma and falafel, but it works just as well on pork chops or a grilled chicken sandwich. And, because it is pickled, it will last in the fridge for about a month. To make it first, julienne about one cup of turnip. You can do this by hand or use a julienne peeler. Then do the same thing to one beet until you have about half a cup of julienne beet. Put the beets and turnip in a medium pot with two cups of water, half a cup of red wine vinegar, two tablespoons of sugar and one teaspoon of kosher salt. Bring the contents of the pot to a boil and cook for five minutes. Take it off the heat and cool it to room temperature before using or storing it in the fridge.
Pickled Turnip
Pickled turnip is a classic topping for shawarma or falafel and its easy to make. Serve it with pork chops, or grilled chicken breast too.
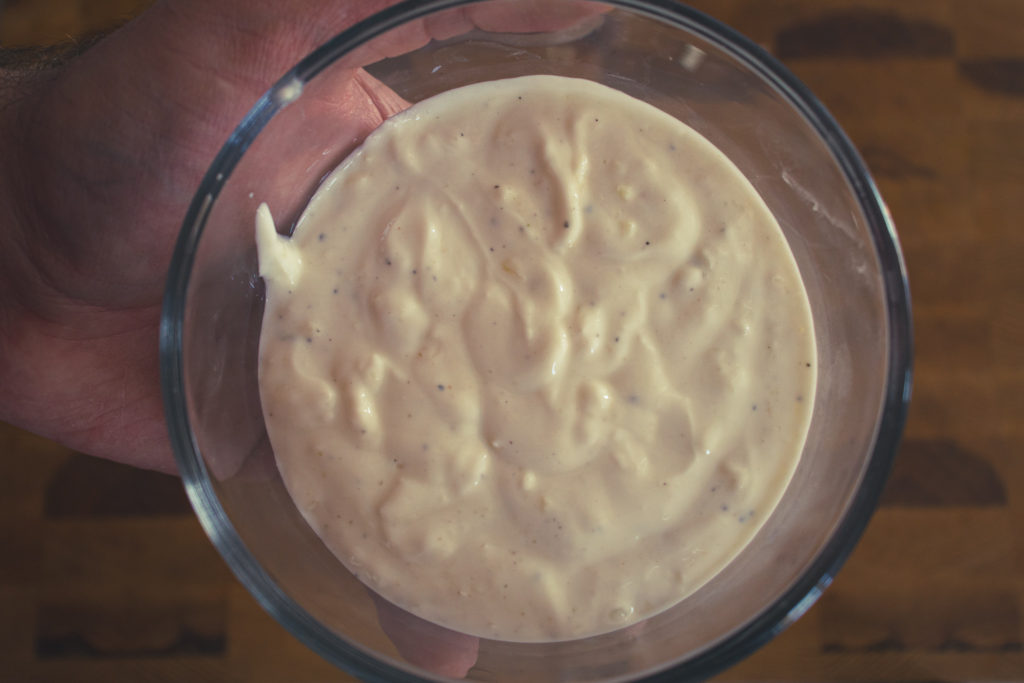
Tahini is a spread made of sesame seeds. Essentially, tahini is sesame butter (like peanut butter), and you can find it in the health food section of most grocery stores. It has a great flavour that makes the perfect sauce for our pork shawarma bowl. To make it combine half a cup of tahini with half a cup of hot water, one tablespoon of minced garlic, the juice of one lemon, a quarter teaspoon of cumin, three-quarters of a teaspoon of kosher salt and half a teaspoon of honey. Mix until smooth. You can use the tahini dressing right away or store it in the fridge in an airtight container for up to a week.
Tahini Dessing Recipe
A simple and delicious tahini dressing recipe that works as well on a salad as it does a pita sandwich, a shawarma or a falafel.
Tabouleh is a salad from the Levantine region of the world. It is traditionally made of parsley, tomatoes, mint, onion, bulgur wheat, olive oil and lemon juice. This simpler version substitutes the bulgur wheat with quinoa to make the salad gluten-free and a little more nutritious. Quinta Quinoa gave me this bag of quinoa to try. What interested me about this specific brand is that it is produced in Canada. I didn’t even know that we produced quinoa in Canada. And I have to say, as far as quinoa goes, this was an excellent quality one. Worth checking out for sure.
How to make quinoa tabouleh
To make the quinoa tabouleh, we first have to cook the quinoa. Start by measuring out one cup of quinoa. Rince it and drain it well. Combine the one cup of rinsed quinoa with one and a quarter cup of water. Bring the quinoa and water to a boil over high heat, turn the heat down to low, cover the pot and let it simmer for fourteen minutes. Take the pot off the heat and let it sit, covered for five minutes. Put the cooked quinoa in a medium mixing bowl and combine it with one cup of chopped parsley, one tablespoon minced garlic, the zest and juice of one lemon, one tablespoon olive oil, and a quarter teaspoon of kosher salt. Mix well and serve.
Quinoa Tabbouleh
A great side dish or base of a salad bowl. Also works well as a garnish inside a pita wrap sandwish.
Put the quinoa in a medium pot and cover with 1 1/4 cup of water. Stir and slosh the quinoa around, then drain it very well.
Return the quinoa to the pot and add the remaining 1 1/4 cup of water. Put the pot on the stove and bring to a boil on high heat. Once the pot starts to boil, turn the heat to low, cover the pot and let it sit for 14 minutes.
Take the pot off the heat, leaving the lid on and let it sit for 5 minutes before fluffing it with a fork.
In a medium mixing bowl, combine the cooked quinoa, parsley, lemon zest and juice, olive oil and salt. Mix well.
Taste the tabouleh and season with additional salt as needed.
Shawarma spice is something I’ve used before on this blog because I love it. You can buy it in most grocery stores now, but I find no comparison to homemade. The full recipe is below.
For the pork shawarma, I used pork loin (1 kg). You could use pork shoulder or tenderloin if you’d prefer. If you do use tenderloin, cut it after it is cooked, not before. Start by slicing the pork loin into thin pieces (about 1/8 inch). It helps if the meat is partially frozen while you are cutting it. Then, in a medium mixing bowl, combine the meat with the shawarma spice and a few tablespoons of olive oil. Mix well. At this point, you can grill the pork right away or put it in the fridge to marinate for up to a day.
How to cook pork shawarma
Traditionally, shawarma is cooked on a vertical spit. I’m guessing you don’t have one of those, and neither do I, so our shawarma is going to be grilled. If you don’t have a grill, you can cook it in a hot pan with a bit of oil or in a 400°f oven for 12 to 15 minutes. To grill the pork, preheat your grill to 400°f, lay each piece of pork down in a single layer and grill for 2 to 3 minutes per side or until it is cooked. Finish the pork by squeezing some lemon juice over it and serve.
Pork Shawarma
Serve the pork shawarma as is with rice and vegetables, wrap it up in a pita with vegetables and sauce, or serve it in a shawarma bowl.
In a medium mixing bowl, combine the shawarma spice and olive oil, then add the meat and stir to coat it.
You can let the meat marinate in the fridge for up to 24 hours or grill it right away.
Heat your grill to 400°f for 10 minutes. Lay the pieces of pork loin on the grill and cook for 2 to 3 minutes per side with the lid down. Once the pork is cooked, squeeze the juice out of the lemon over the pork and serve.
First things first, grab the biggest bowl you have. Put about half a cup of the quinoa tabouleh in the bottom of the bowl and top with a little bit of sliced iceberg lettuce. Besides the lettuce, add a few tomato slices. Take a few pieces of the pork shawarma, thinly slice them and put them beside the lettuce. Top meat and vegetables with a tablespoon or two of the tahini dressing and finish with the pickled turnip and a lemon wedge. It is absolutely delicious and actually pretty healthy.
The Wrap-Up
There are obviously many components to this shawarma bowl, but it is well worth the effort. If you do want to cut down on prep, you can substitute the picked turnip for some sliced dill pickle if you’d prefer. It won’t have the same flavour, but it will be delicious nonetheless. Thanks for reading, and man, is it good to be back. See you next Wednesday.
Remember to share this post on Facebook or Pinterest if you enjoyed it. Thank you for reading, and have a great day! Remember, there are new Chef’s Notes posts every Monday, Wednesday, and Friday, and you can subscribe below, so you never miss one.
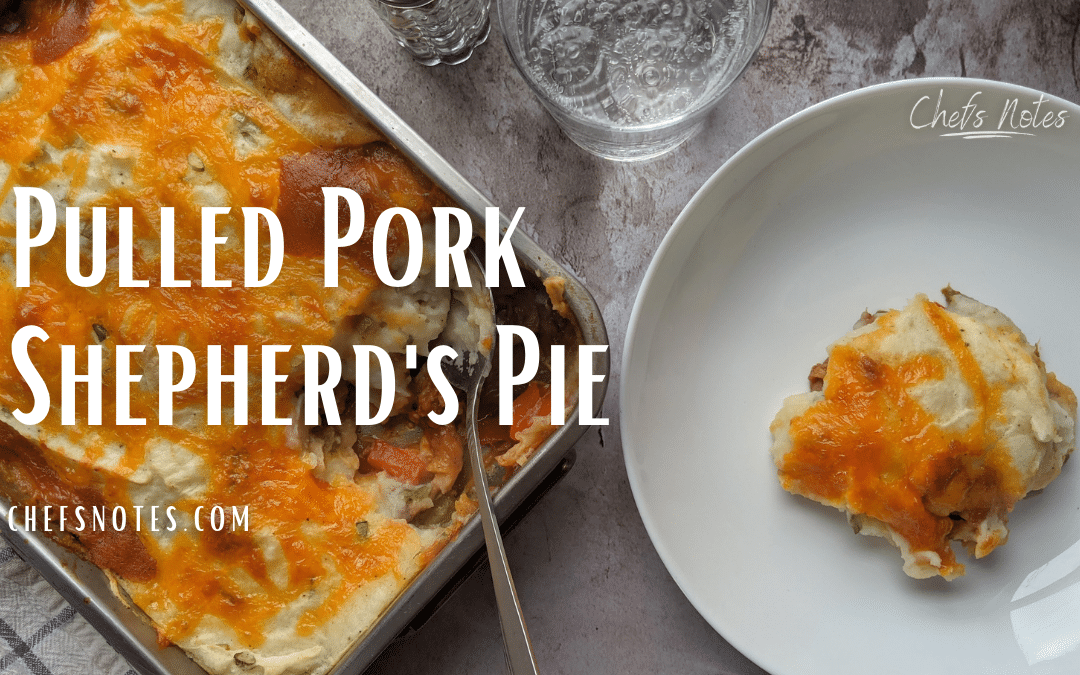
Is there anything more comforting than digging into a big helping of Shepherd’s Pie? I don’t think there is. In fact, Shepherd’s Pie has been one of my favourite foods for as long as I can remember. This Shepherd’s Pie recipe gives you that comforting feeling you love but with a barbecue pulled pork twist. And yes, it is as good as it sounds. The pulled pork is mixed with sautéed onion, bell pepper, jalapeno, and barbecue sauce and is then topped with sour cream and scallion mashed potatoes and cheddar cheese. It is amazing. Now, let’s get to it.
Minor Rant
Before someone inevitably points out that Shepherd’s Pie is supposed to be made with lamb, I will say I know that. But I also know that the term Shepherd’s Pie has transcended its humble origins to become a broad term used to describe anything topped with mashed potatoes and baked like the French word Parmentier. Language is fluid, and as time passes, words develop new and different meanings. I think we can all agree that at this point, a Shepherd’s Pie is whatever we want it to be.
Ingredients
The ingredients for this Pulled Pork Shepherd’s Pie are pretty straightforward. They are red onion, red and green bell pepper, jalapeno, pulled pork, barbecue sauce, potatoes, butter, cream, sour cream, scallions, cheddar cheese, and of course, salt and pepper. To be clear, this is not a recipe for pulled pork. This is a recipe made using leftover pulled pork. I’ve only just now realized that I’ve never done a post about pulled pork, so I’ll have to do that soon. In the meantime, any pulled pork you have will work. You can find a great pulled pork recipe in my new cookbook, which you can get here. You can always make this same recipe using pulled chicken, turkey, or beef.
Sour Cream and Scallion Mashed Potatoes
Making Mashed Potatoes
Start things off by making the mashed potatoes. While the potatoes are cooking, you can put the Shepherd’s Pie base together to cut down on prep time. I’m sure you know how to make mashed potatoes, but I also know that some people out there don’t, so I’ll walk through this first step for them. For the potatoes, use 4 to 5 fist-sized russet potatoes. Peel them, dice them, and rinse them until the water runs clear. Put them in a pot with hot, salted water, bring to a boil and cook for 10 to 15 minutes or until tender. Pour the potatoes into a strainer, add 2 tablespoons of butter and a 1/4 cup of cream to the pot, and put it back on the burner until the butter melts and the cream just starts to boil. Using a food mill, ricer, or masher, mash the potatoes into the cream and butter.
Flavouring The Mashed Potatoes
Add 2 tablespoons of full-fat sour cream (I said this was delicious, not healthy) and 3 diced scallions to the potatoes. Season the with salt and pepper to taste. The potatoes should be creamy but not watery, and they should have a fresh onion flavour. You have to use full-fat sour cream so that it doesn’t split in the oven.
Prepping The Shepherd’s Pie Filling
While the potatoes are cooking, thinly slice half a red onion and dice half a red and green bell pepper. In total, you want about half a cup of each. If you have a little more or less, it won’t hurt anything. Also, dice one jalapeno. You can remove the seeds if you don’t like too much heat.
Cooking The Shepherd’s Pie Filling
Heat a large skillet over medium-high heat and add in 1 tablespoon of cooking oil (canola, olive, peanut, grape seed, avocado…). Add the onion, bell pepper, and jalapeno and cook for 3 to 4 minutes or until the onions start to soften. Add the pulled pork (about 500g or just over a pound) along with 1 cup of water and 1 cup of barbecue sauce of your choice. Simmer for 2 to 3 minutes or until the sauce coats the back of a spoon.
Assembling the Pulled Pork Shepherd’s Pie
Pour the pulled pork mixture into a small roasting pan or casserole dish. I use the small roasting pan from IKEA, which is about 8-by-10-inches. Spread the mixture out into an even layer so that it covers the bottom of the dish. Top with the mashed potatoes and finish with about 1/2 cup of grated cheddar cheese.
Baking and Serving the Pulled Pork Shepherd’s Pie
Bake the Shepherd’s Pie in a 425°F oven for 15 to 20 minutes or until the cheese has melted and starts to brown. Take the Shepherd’s Pie out of the oven and let it rest for 5 to 10 minutes before serving. Serve with a side salad…or don’t.
Pulled Pork Sheperd’s Pie
Classic Pulled Pork mixed with sautéed peppers and onions, and finished with barbecue sauce. Topped with sour cream and scallion mashed potatoes, and cheddar cheese then baked to perfection.
700grusset potatoes 4 to 5 fist-sized russet potatoes
2tbspbutter
1/4cupwhipping cream
2tbspsour cream
3scallion, diced
salt and pepper to taste
1/2cupgrated cheddar cheese
Instructions
Filling
Heat a large skillet over medium-high heat.
Add the cooking oil to the pan along with the onion, bell peppers, and jalapeno. Sauté for 3 to 4 minutes or until the onions soften.
Add the pulled pork, sauté for 1 minute then add the water and barbecue sauce. Cook, stirring every 30 to 45 seconds for 2 to 3 minutes.
Taste the filling and season with salt and pepper as needed. Put the filling in an 8×10 roasting pan or casserole dish.
Potatoes
Peel and dice the potatoes.
Rinse the potatoes in cold water until the water runs clear.
Put the potatoes in a medium pot and cover them with hot water. Season the water with salt and put it on high heat. Bring the potatoes to a boil and cook for 10 to 15 minutes or until the potatoes are tender.
Drain the potatoes. While the potatoes are draining, put the pot back on the stove and add the butter and cream. Cook just until the cream is warm and the butter is melted.
Using a food mill, ricer, or masher, mash the potatoes and mix well with the cream and butter.
Stir in the sour cream and scallion. Taste the potatoes and season with salt and pepper as needed.
Assemble
Heat your oven to 425°F
Spread the potatoes in an even layer on top of the pulled pork filling. Top the potatoes with cheddar cheese.
Bake the shepherd's pie for 15 to 20 minutes or until the cheese melts and browns.
Let the shepherd's pie cool for 10 minutes, then serve.
Notes
To speed up the process, start cooking the potatoes before the filling.
When I had originally conceived this recipe, I meant to put corn and black beans in it, but I completely forgot and left them out when it came time to cook. I’m glad I did because I don’t know that they would have added to the dish, and in fact, may have taken away from it. I think it is great as it is, but you be the judge. Feel free to play with the recipe, change out of the protein, add whatever you want to it, and really, make it yours.
On a personal note, I have not been posting for over two weeks. The first week I was on vacation. The second week, I hurt my neck and shoulder or aggravated an old injury, to be more precise and couldn’t really do anything. Even now, it isn’t 100%, but it is feeling much better and well enough for me to work. This is the longest I’ve gone without posting in a long time, and I really missed it. I want to say thank you to everyone for all the support and well wishes. It means the world to me.
Remember to share this post on Facebook or Pinterest if you enjoyed it. Thank you for reading, and have a great day! Remember, there are new Chef’s Notes posts every Monday, Wednesday, and Friday, and you can subscribe below, so you never miss one.
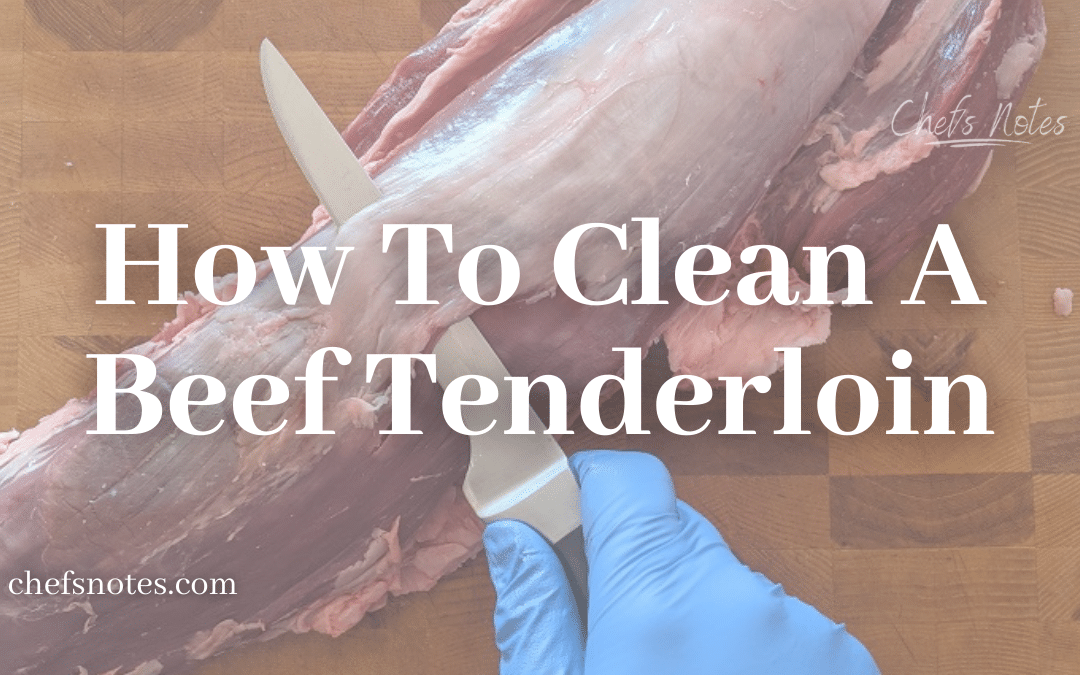
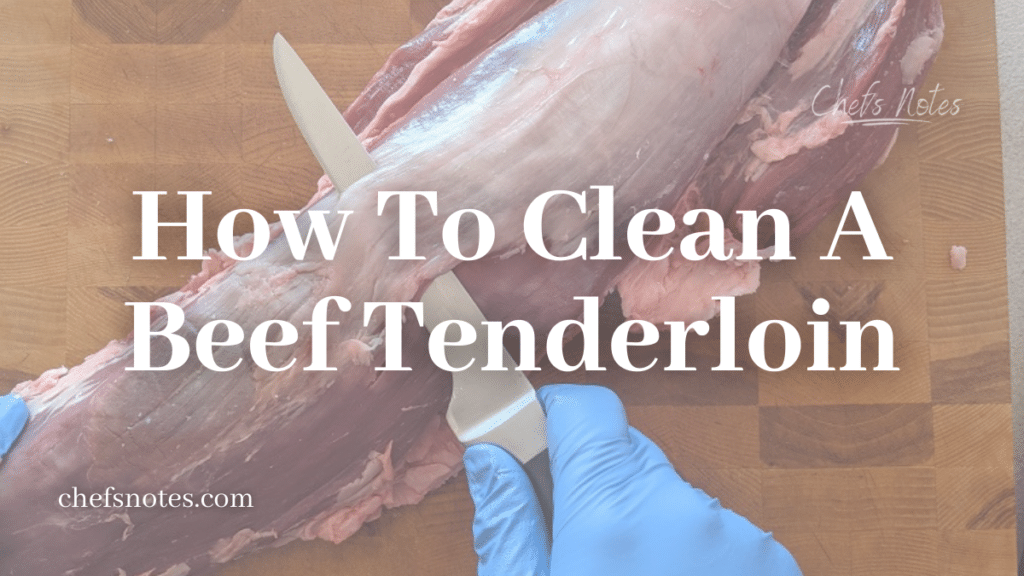
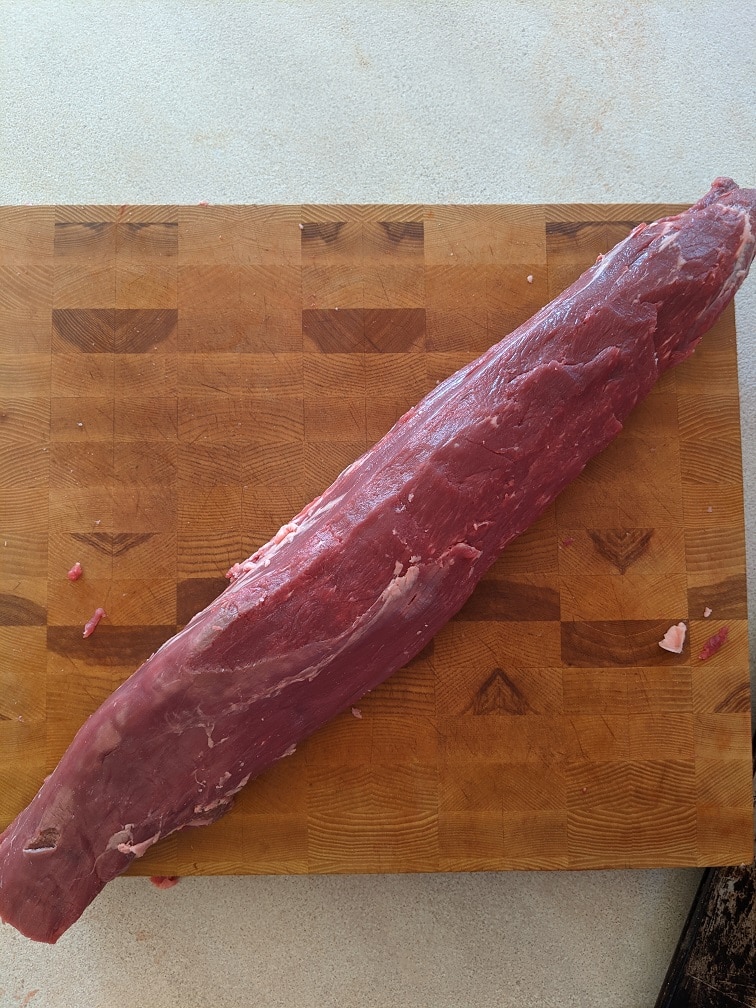
Welcome to the comprehensive guide on how to clean and prepare a whole beef tenderloin. As a personal chef, my experience has shown that a perfectly roasted beef tenderloin is a crowd-pleaser at any gathering. Today, I’ll share with you the essential steps to transform a whole tenderloin into a culinary masterpiece.
Cleaning the Tenderloin
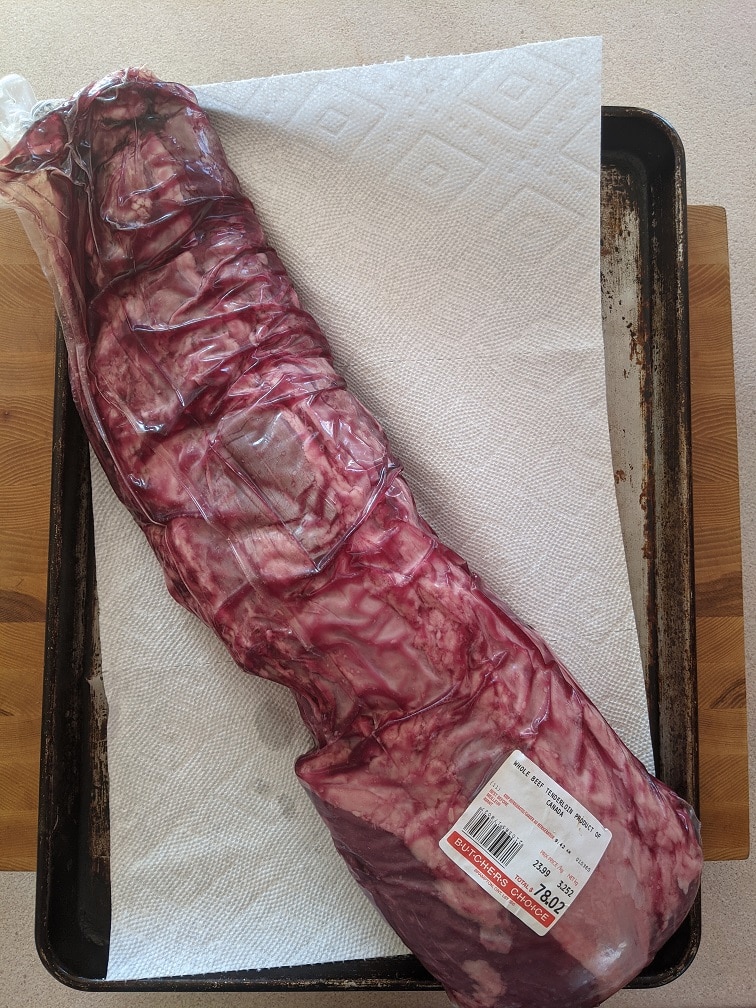
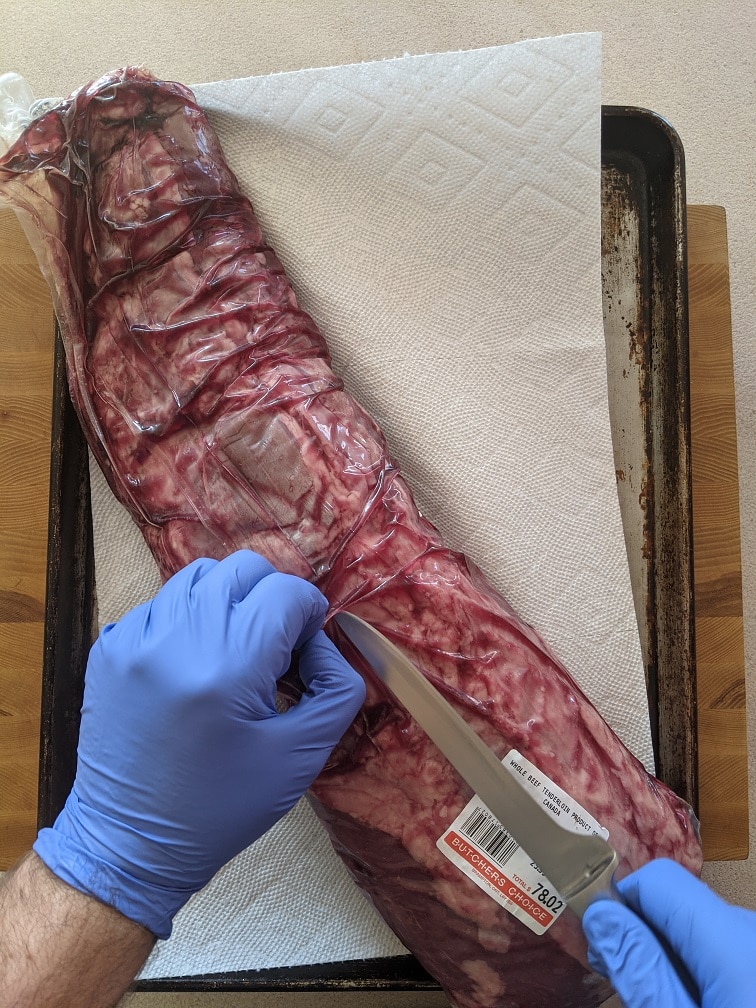
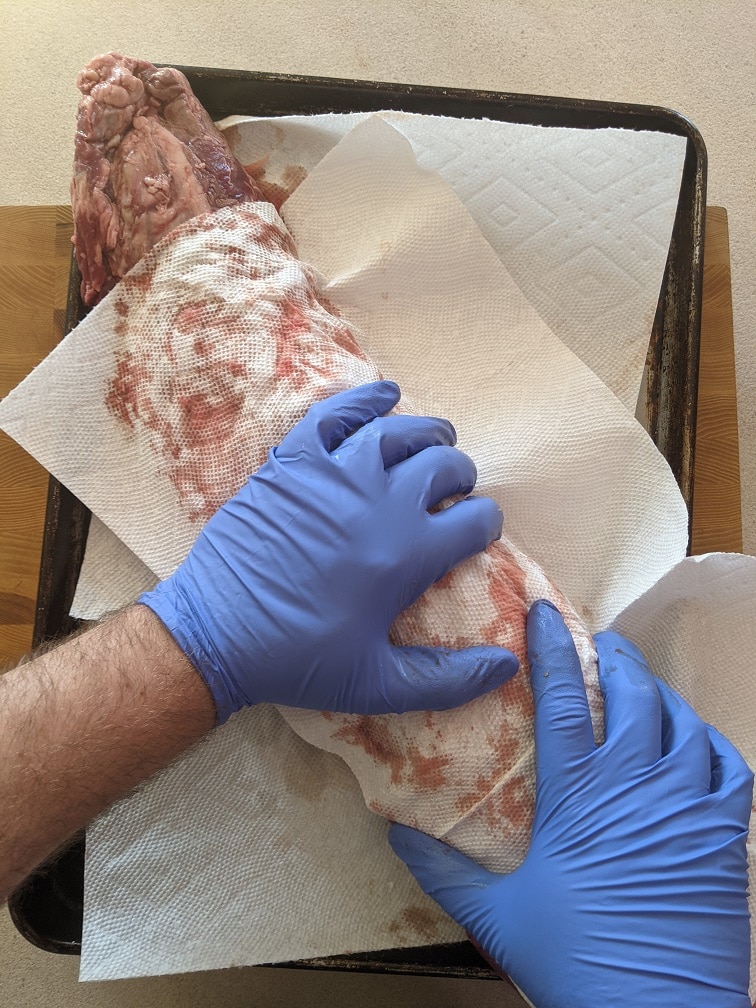
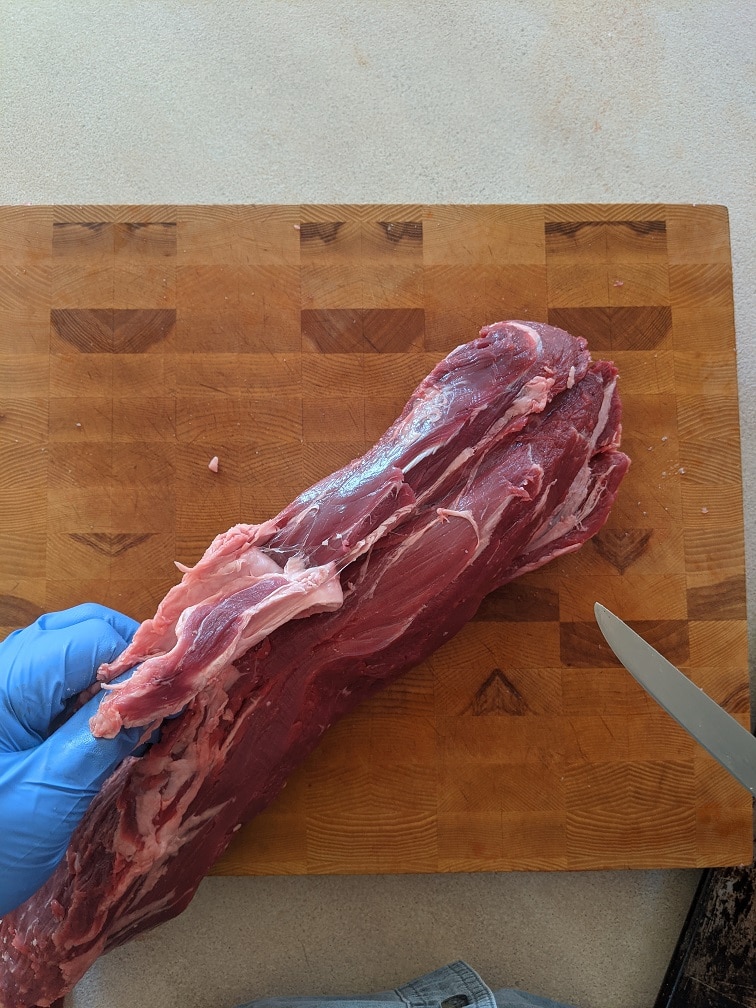
Begin by removing your whole beef tenderloin from its vacuum-sealed packaging. Expect some blood within the package; this is normal. Carefully line a baking sheet with paper towels, place the tenderloin on top, and pat it dry. Ensure to cut the packaging carefully, avoiding any accidental nicks in the meat.
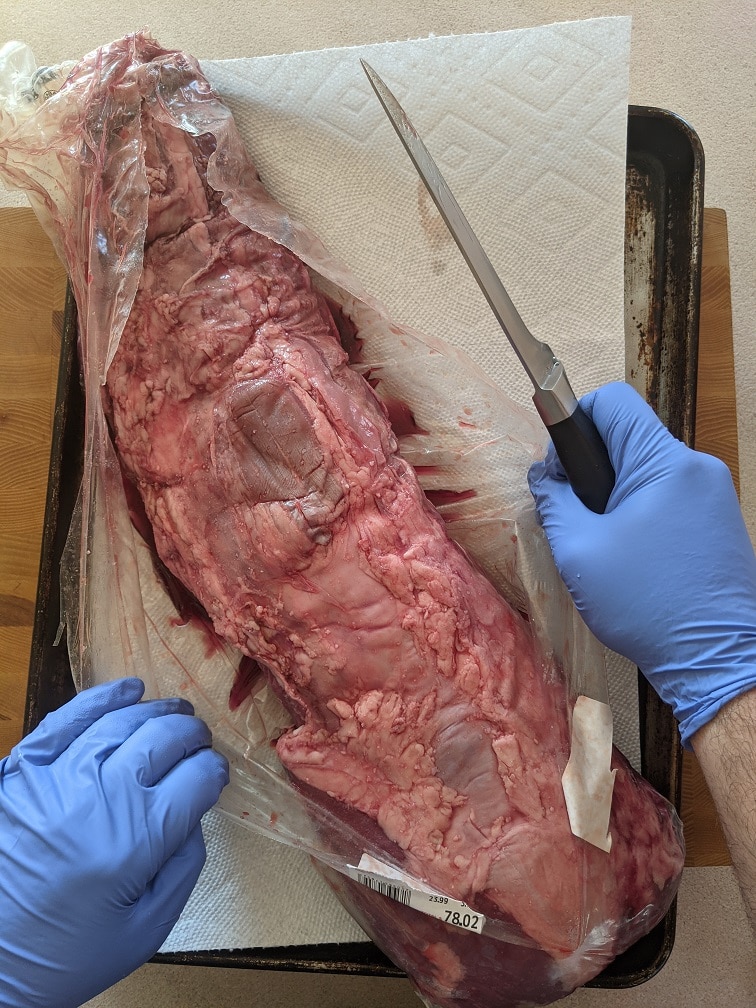
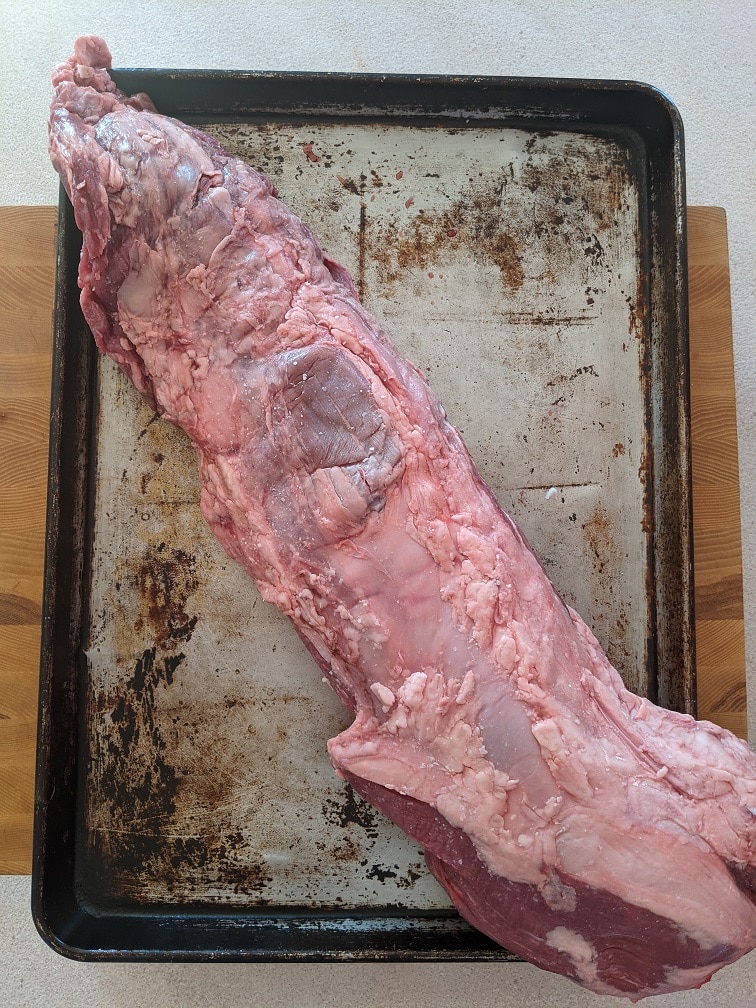
Removing Excess Fat and Sinew
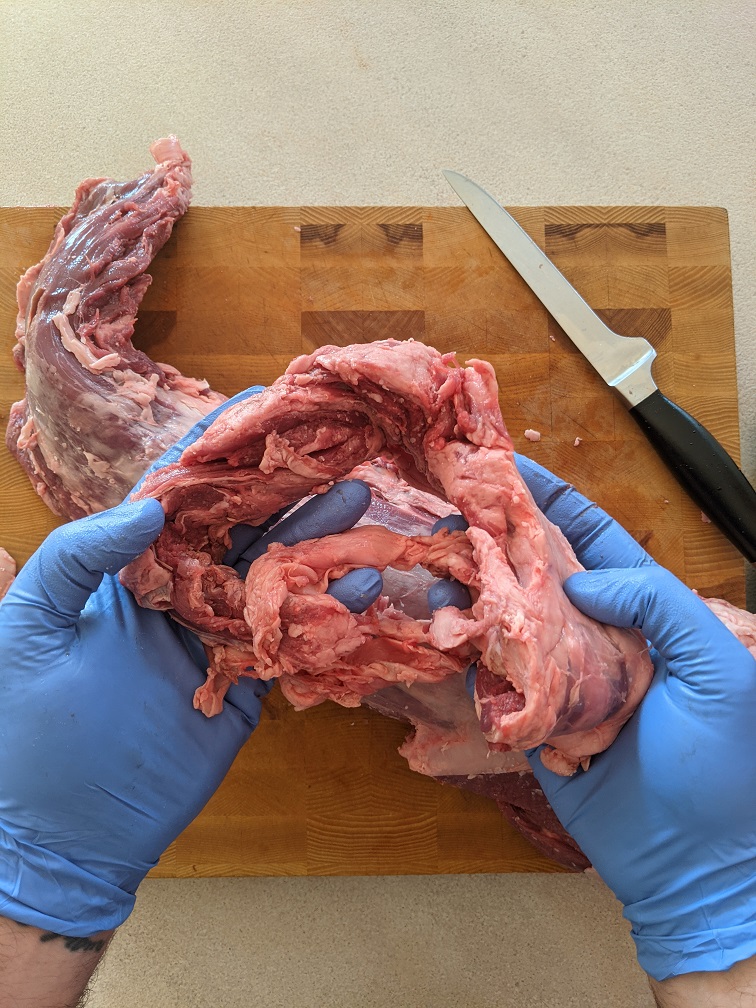
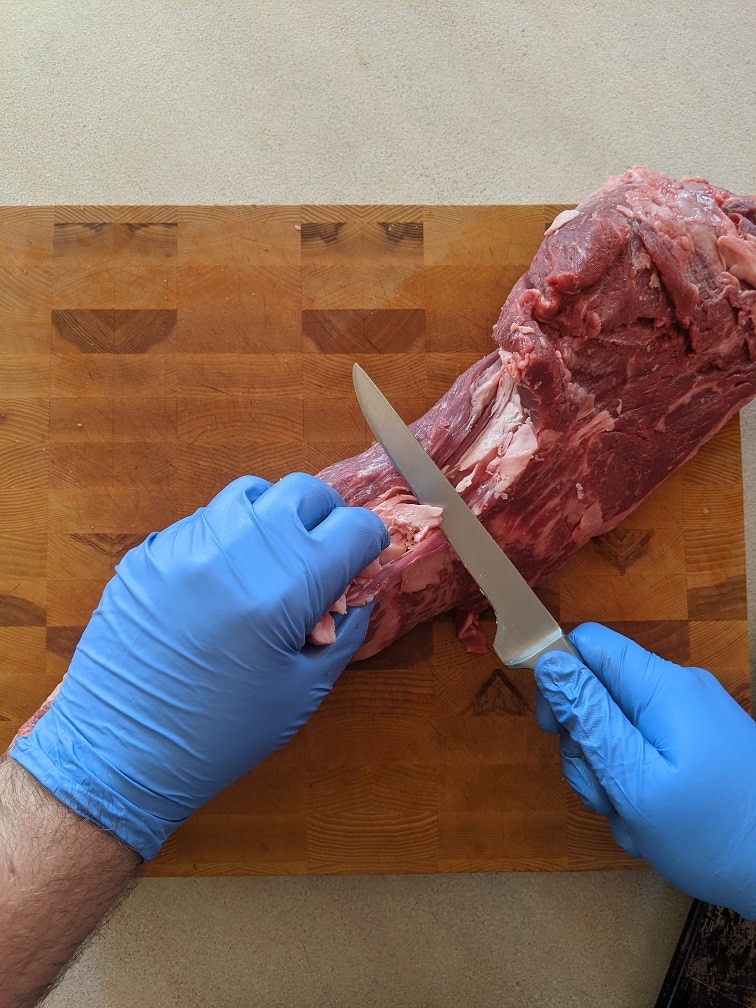
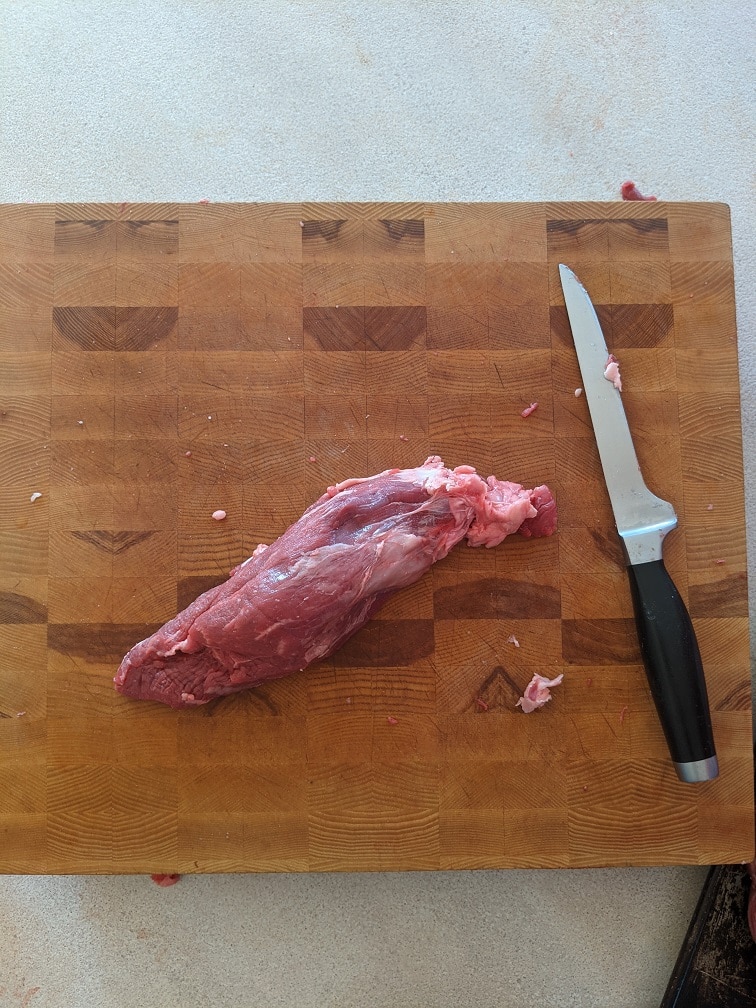
The key to a tender and flavorful beef tenderloin lies in removing the excess fat, sinew, and connective tissue. Pay particular attention to the ‘chain’, a strip of meat and fat running along the side of the tenderloin. While not suitable for direct consumption, it’s excellent for broths or can be trimmed further for skewers.
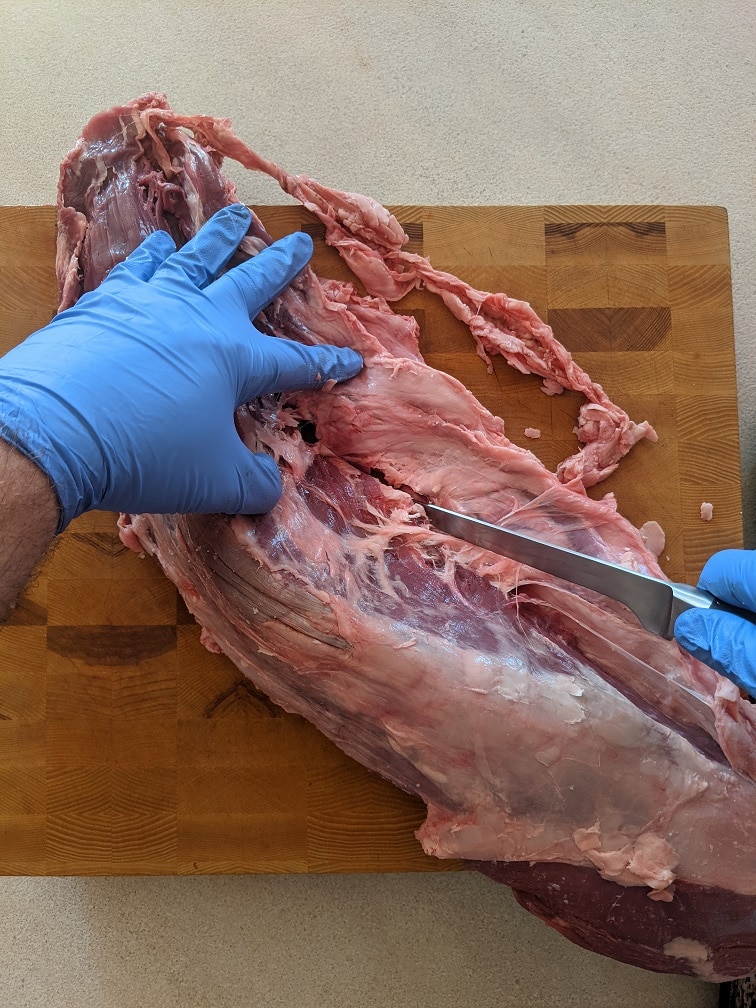
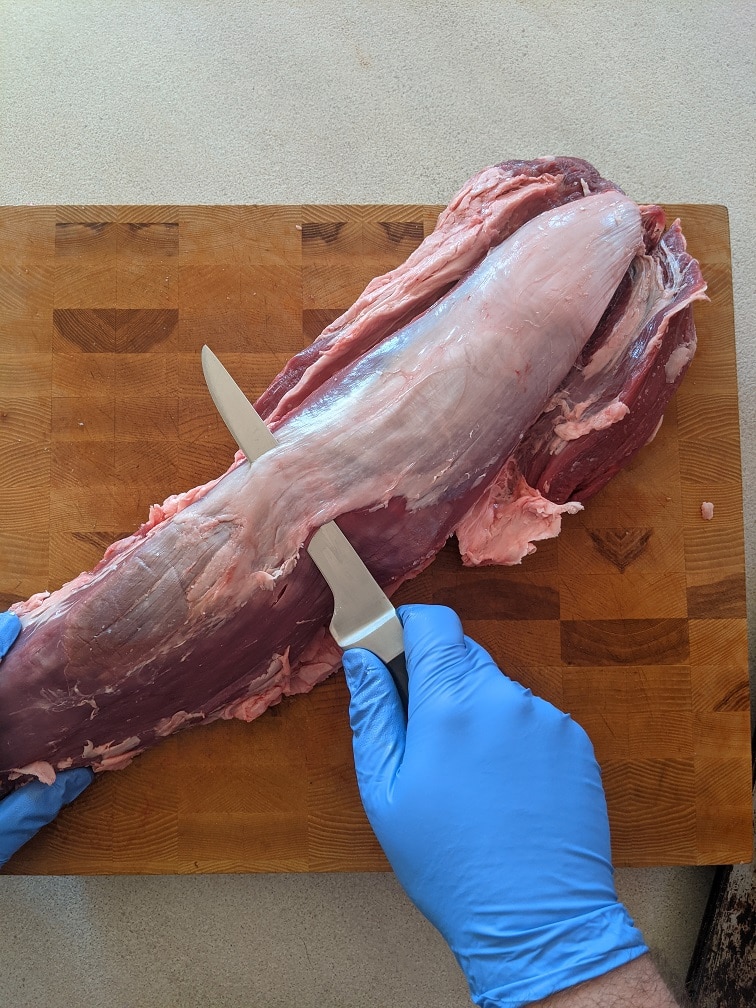
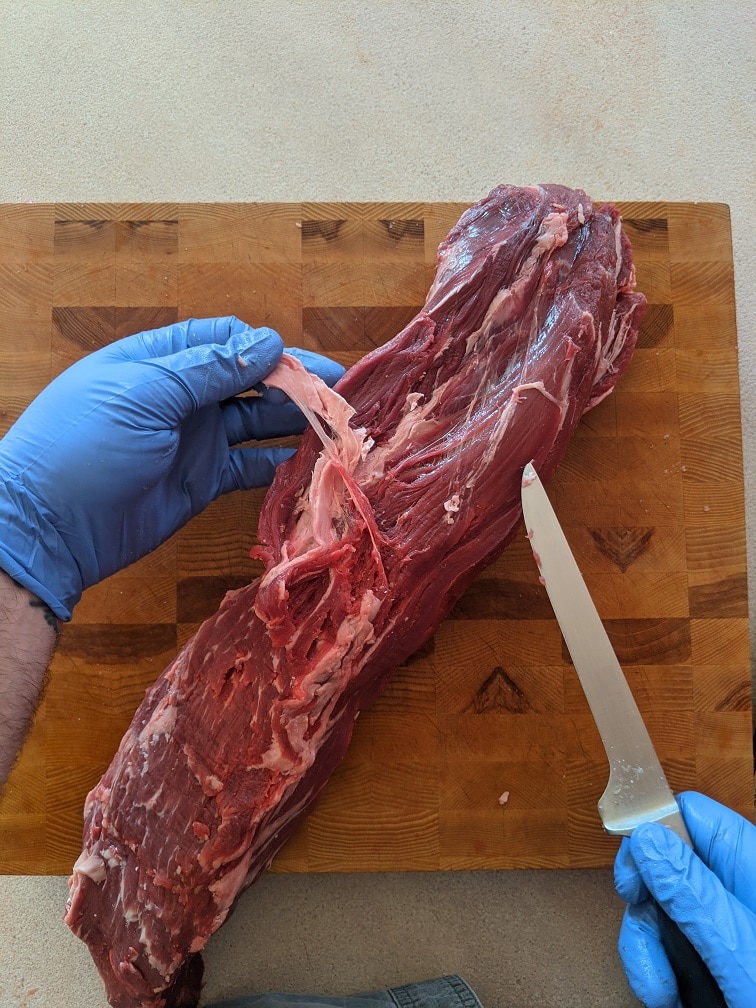
Eliminating Silver Skin
Silver skin is a tough connective membrane that doesn’t soften upon cooking, making it necessary to remove. Using a boning or fillet knife, gently slide the blade under the silver skin and strip it away in thin layers. While this process may result in a slight loss of meat, it’s crucial for ensuring the tenderness of your dish.
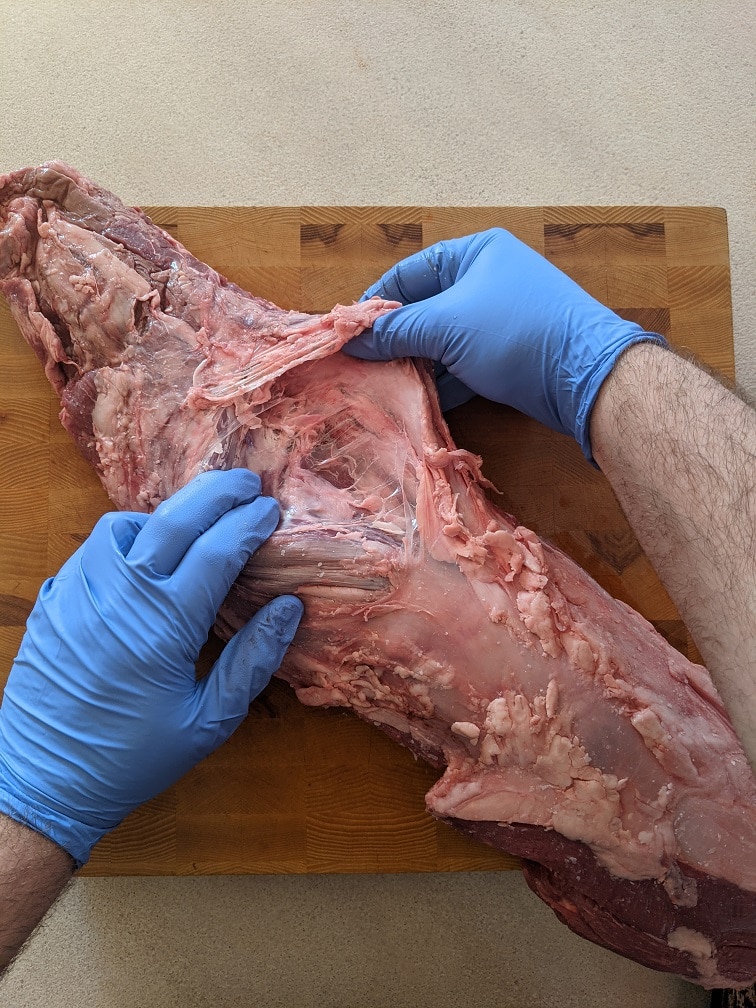
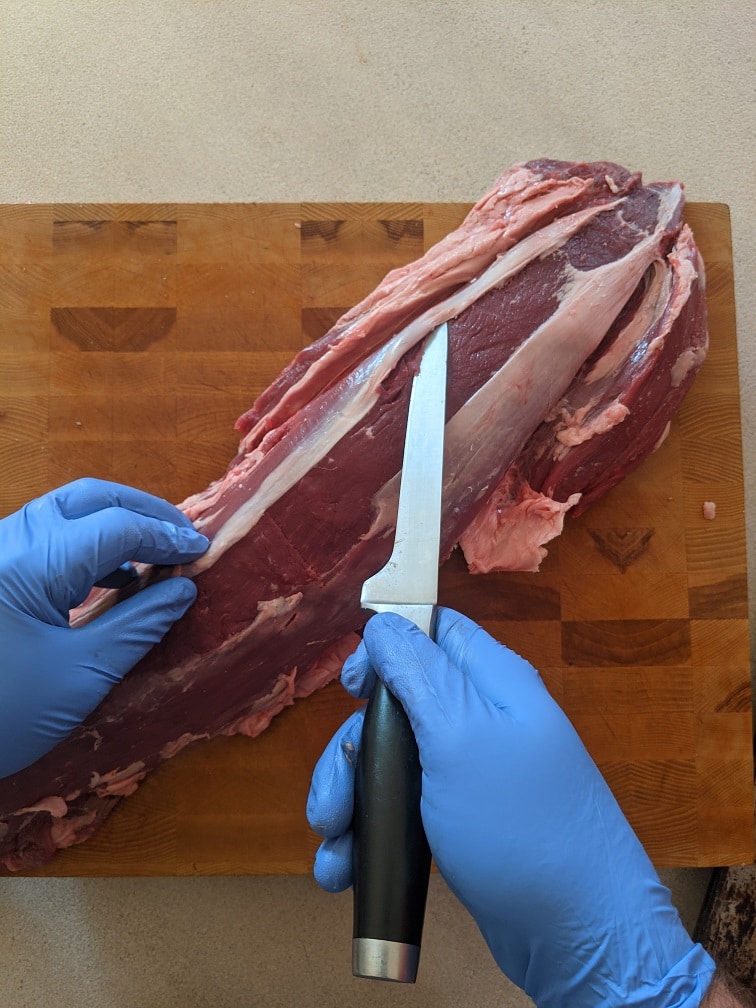
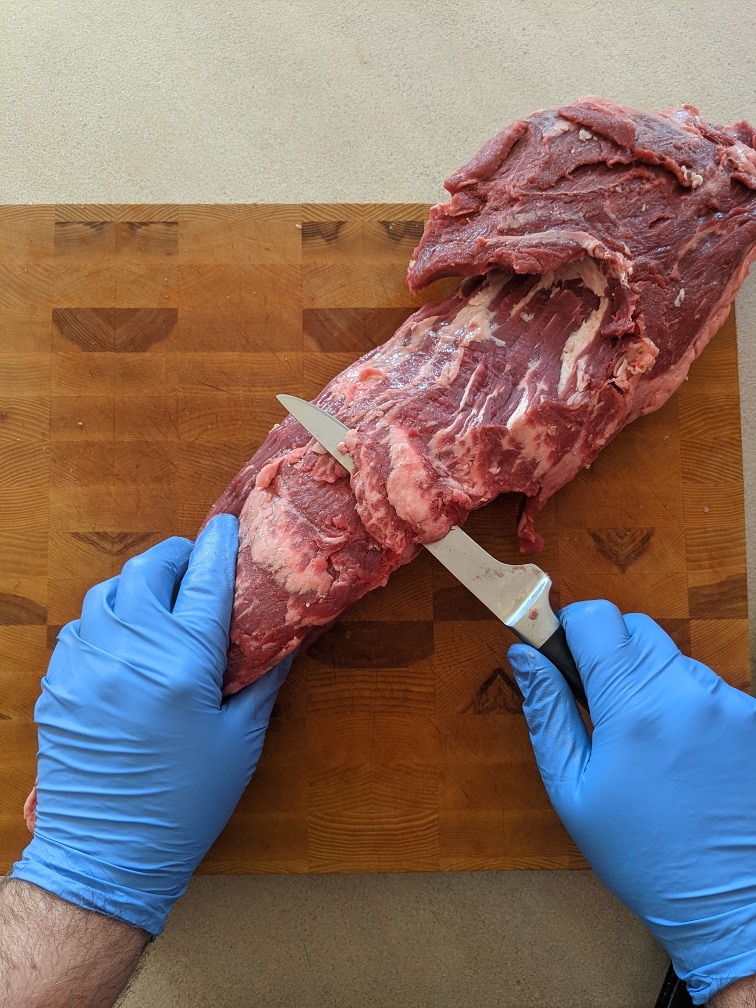
Flip the tenderloin
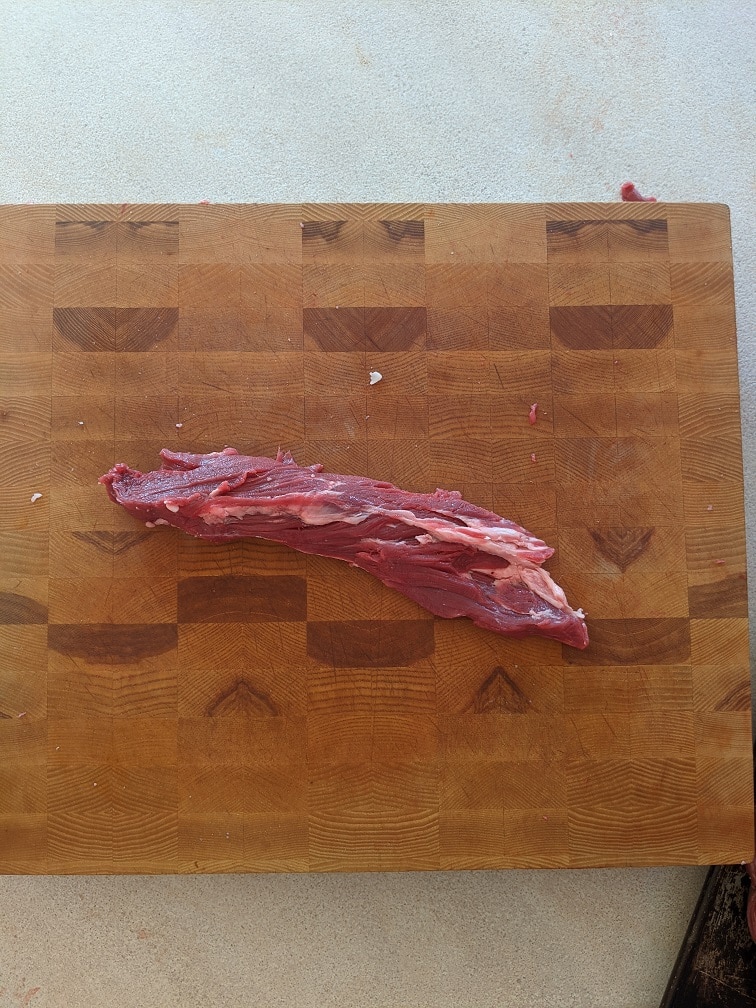
Once the silver skin is cut away, flip the tenderloin over. On the underside of the tenderloin, there’s going to some flaps of meat and fat. This is where the tenderloin is connected to the skeletal structure of the animal. This needs to be cleaned up too. All you can really do is cut it all away. Keep your knife as flat as possible and make long, smooth slices until the flaps are removed. The flaps can be used to make skewers or broth, so they aren’t going to waste.
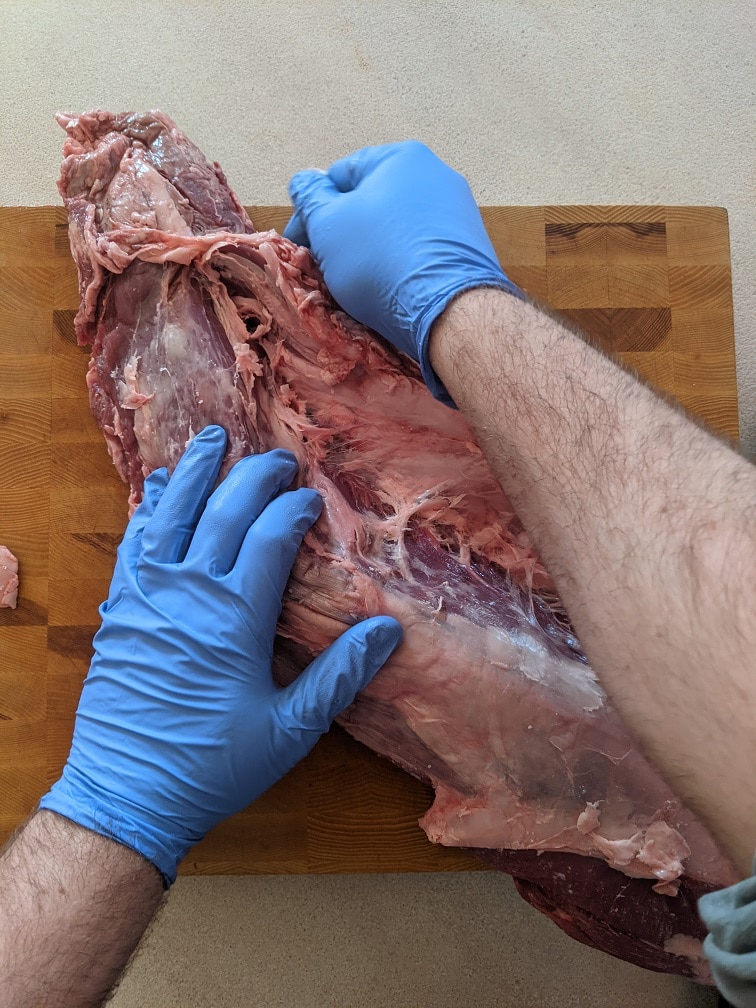
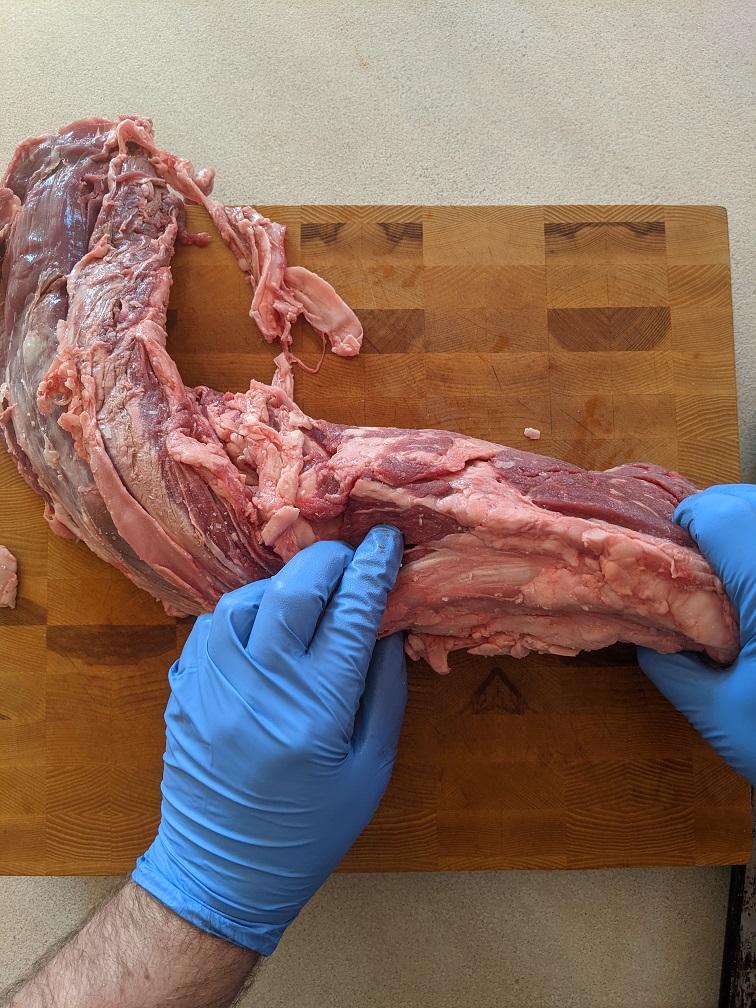
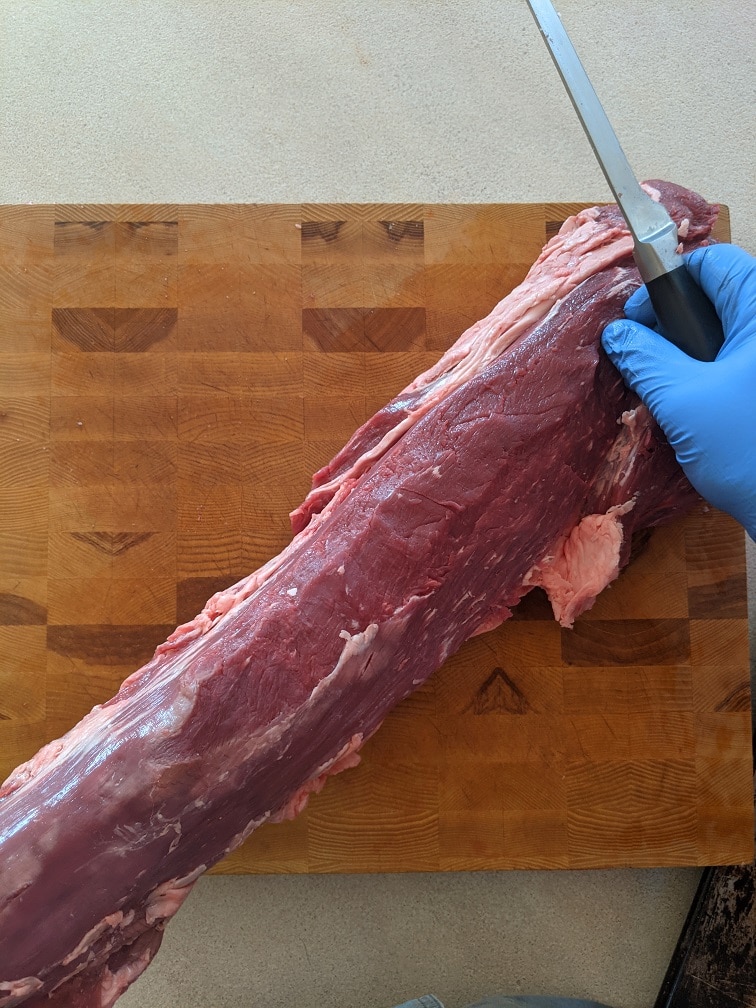
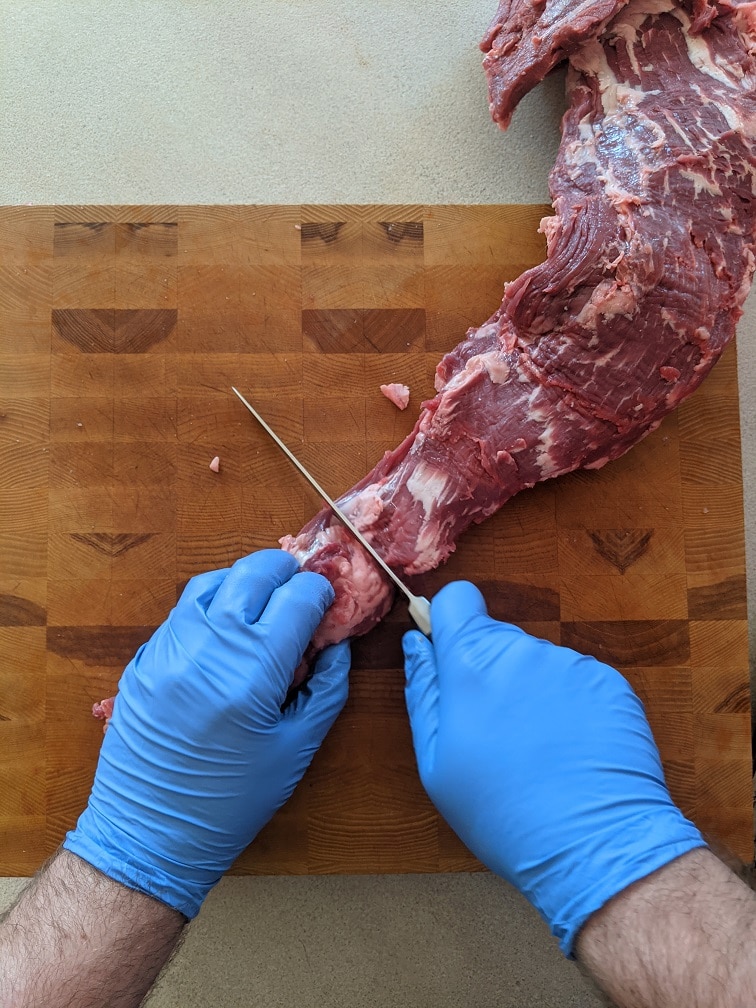
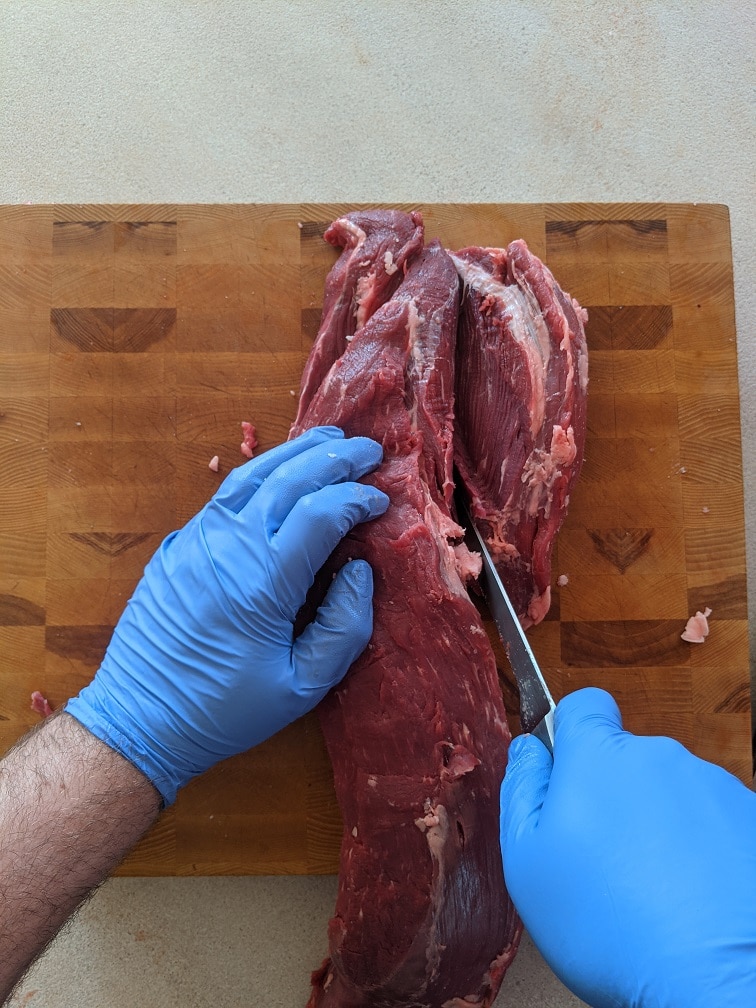
What to do with the extra pieces
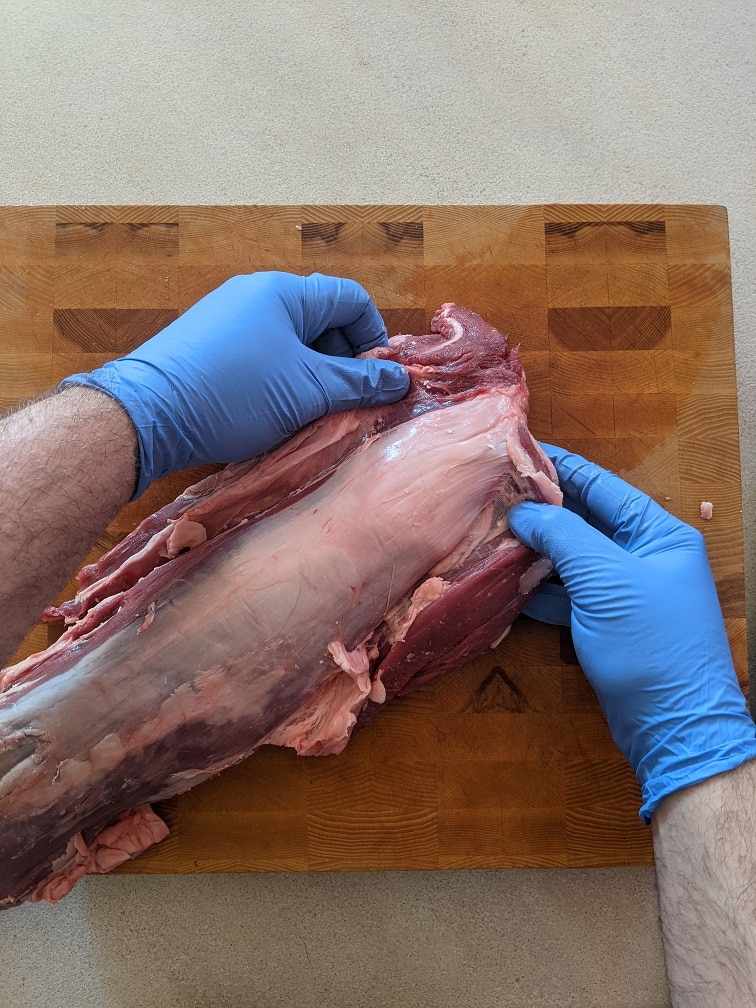
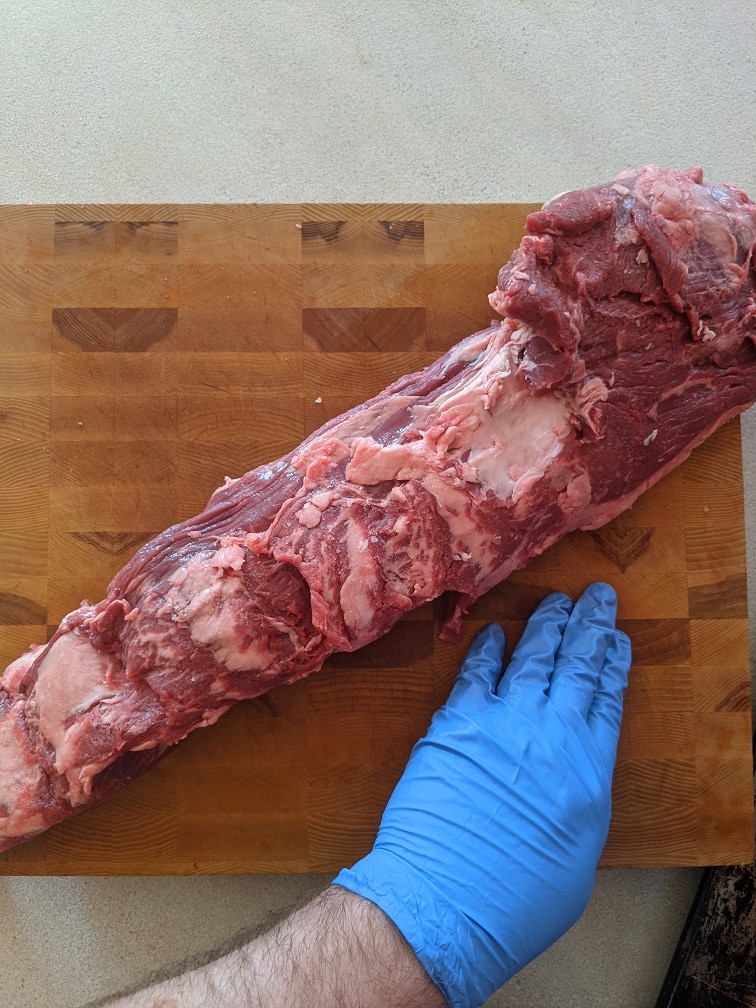
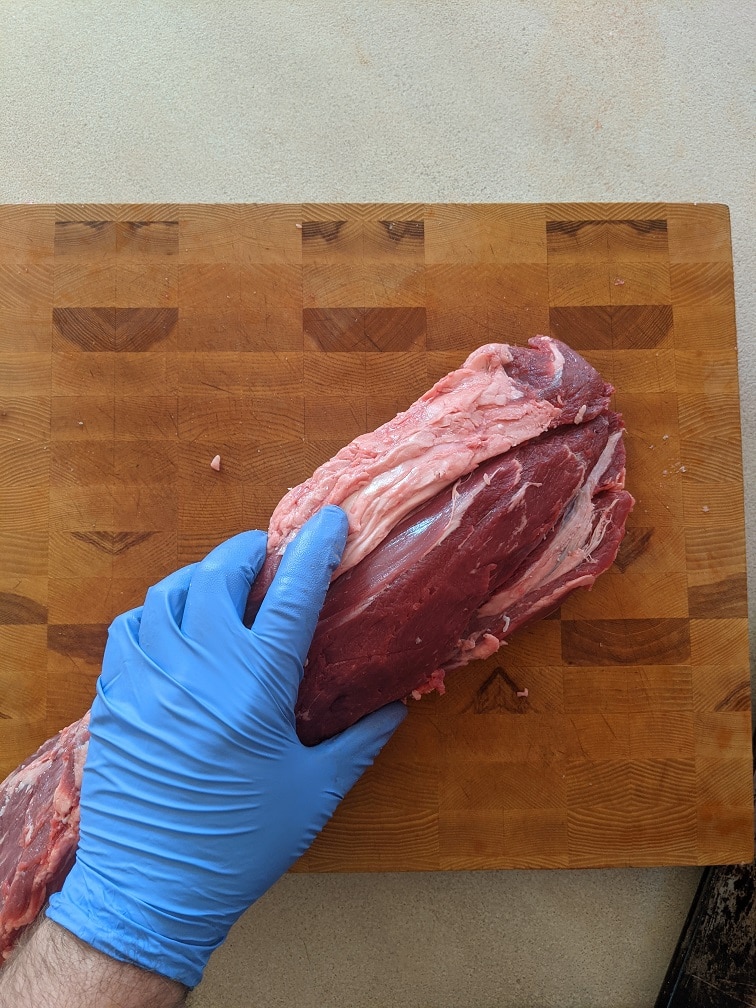
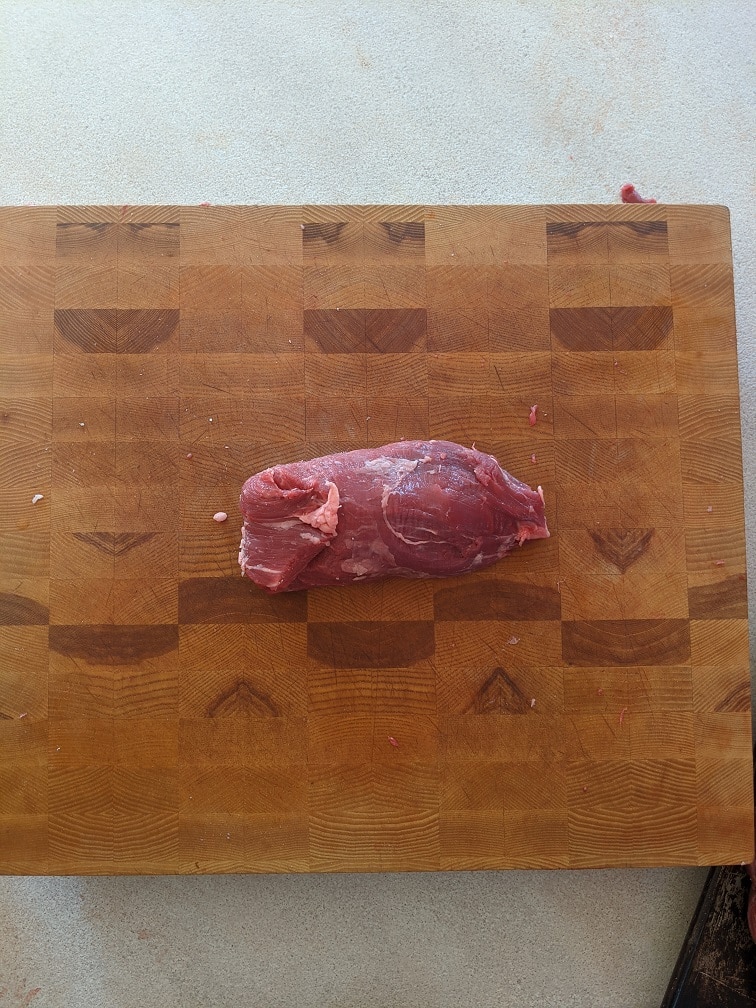
At one end of the beef tenderloin, there are two extra pieces of meat. These can be left on, but in the interest of even cooking, it’s better to take them off, but of course, they aren’t going to go to waste. To cut the pieces away, use your knife and make long, smooth slices down the outside edge of the tenderloin. The separation between the tenderloin and the other meat pieces will be more obvious with the smaller piece than the bigger piece, but it shouldn’t be too difficult either way. What you should have once those pieces are cutaway is a fully cleaned beef tenderloin.
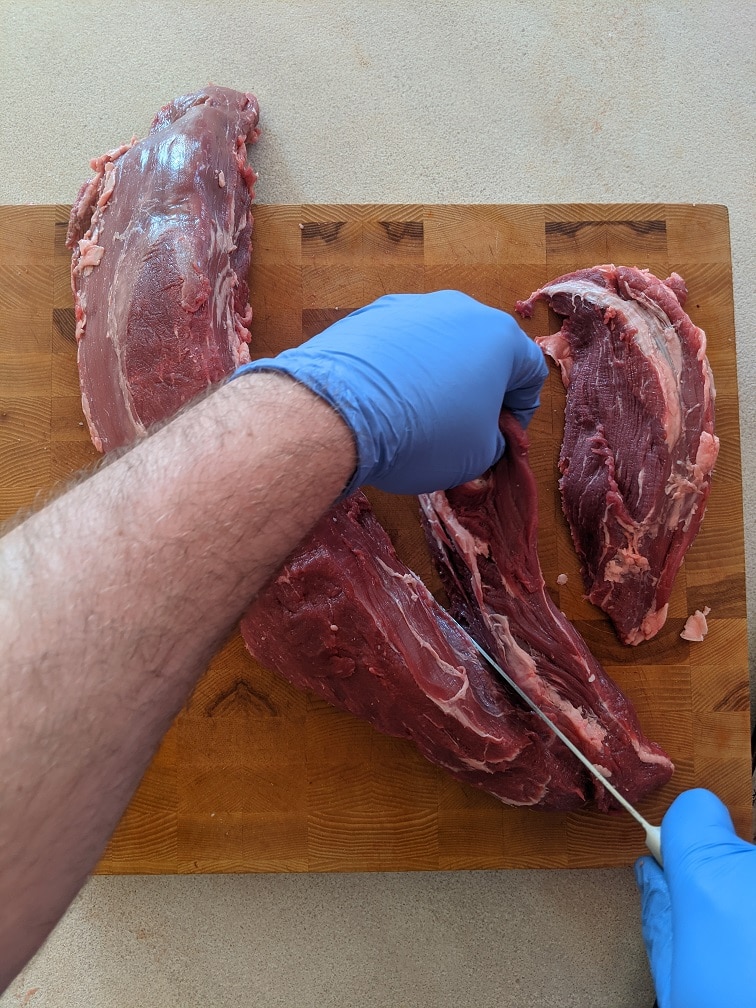
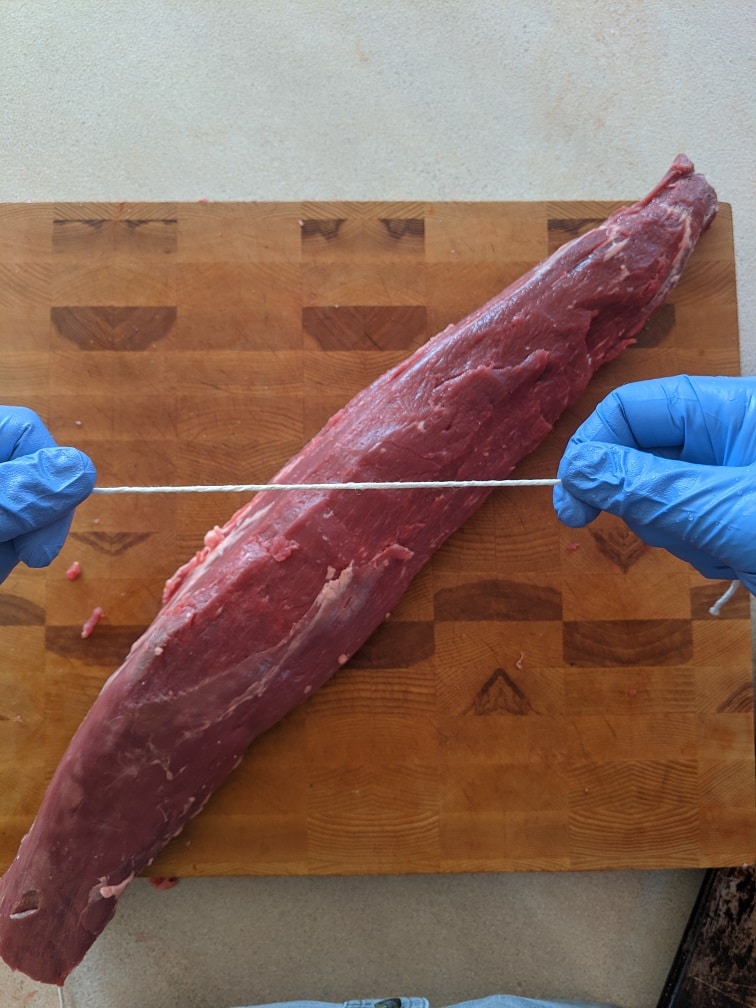
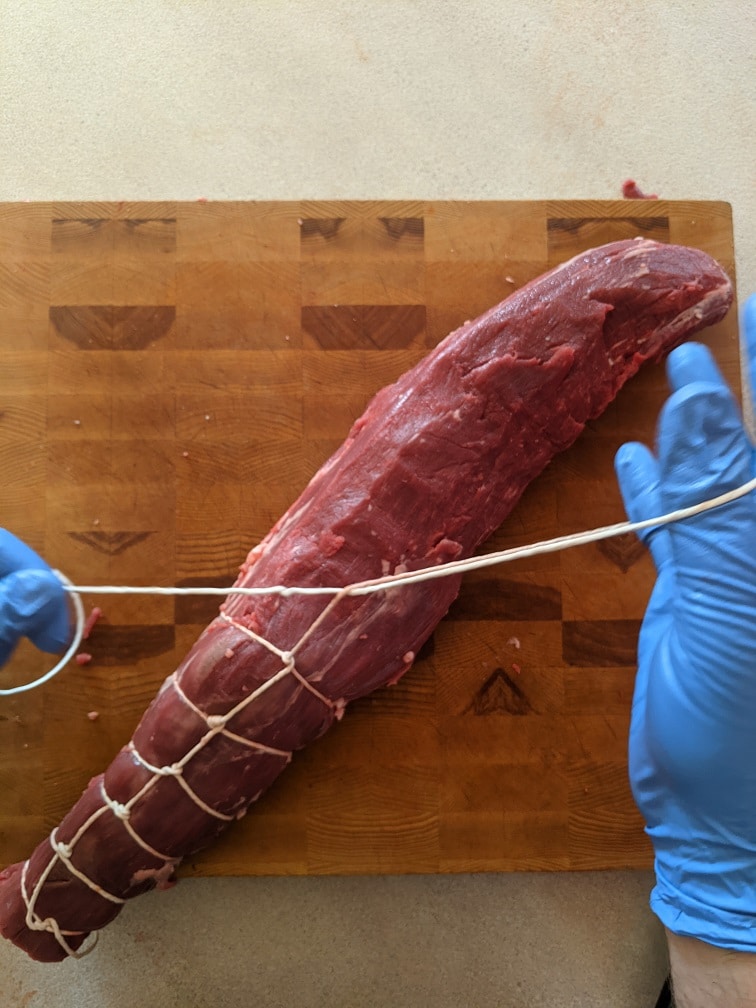
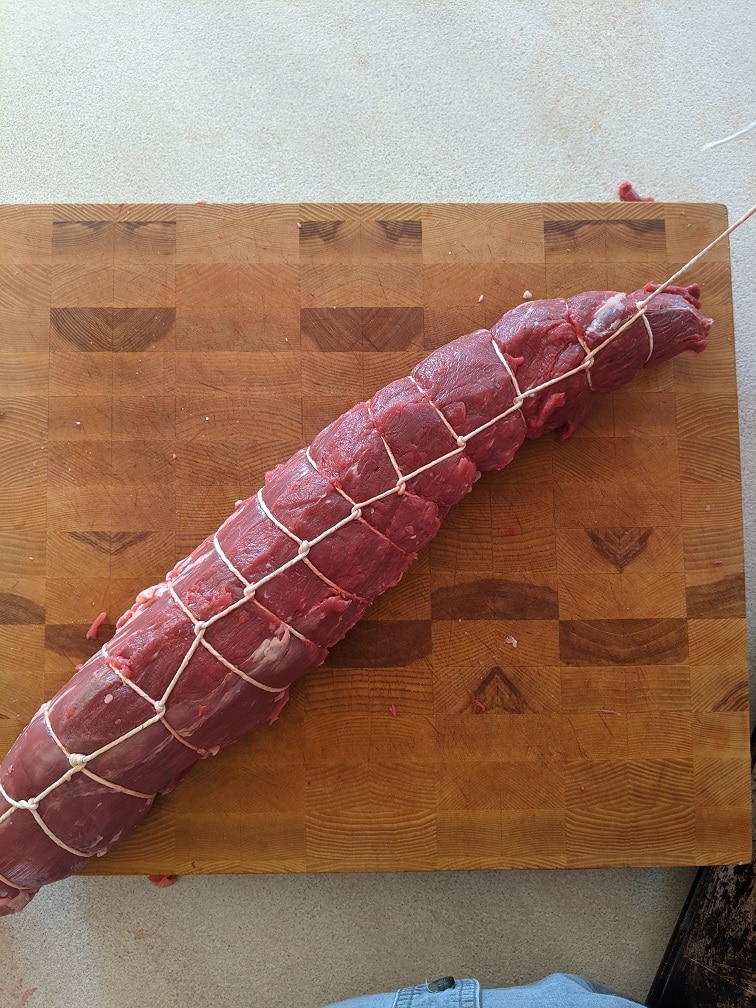
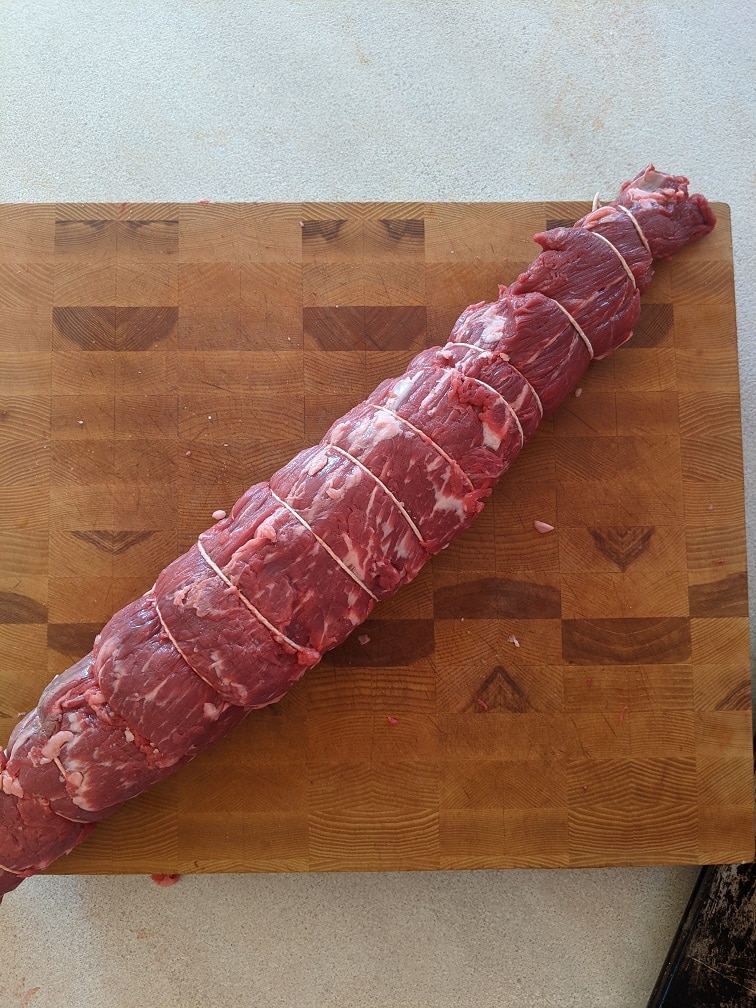
To Tie or Not To Tie
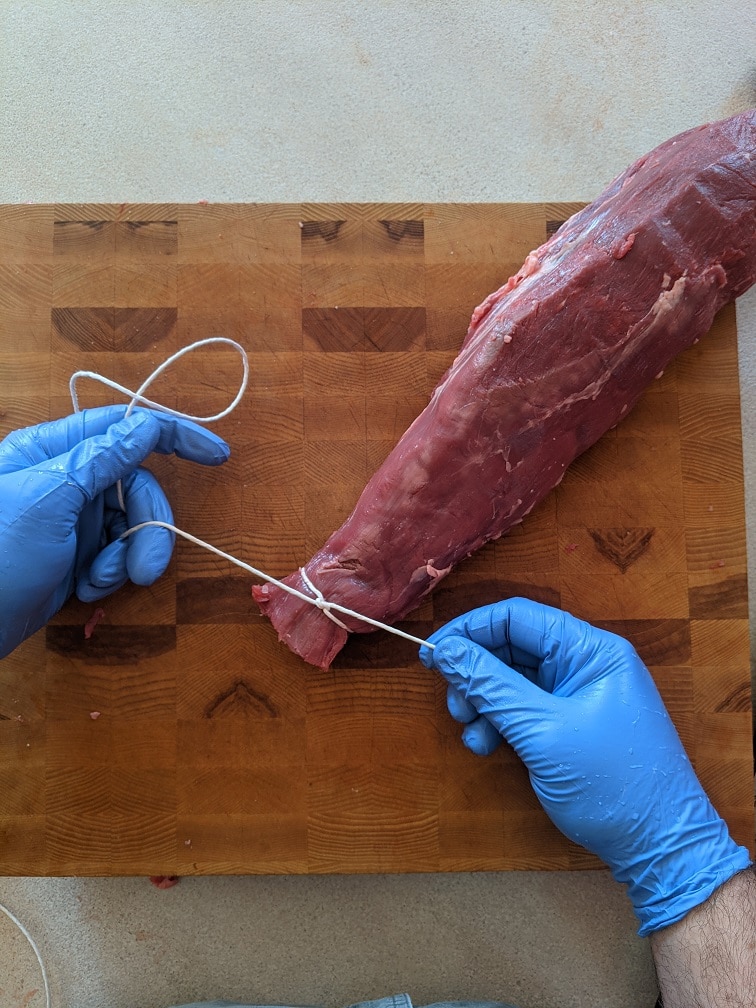
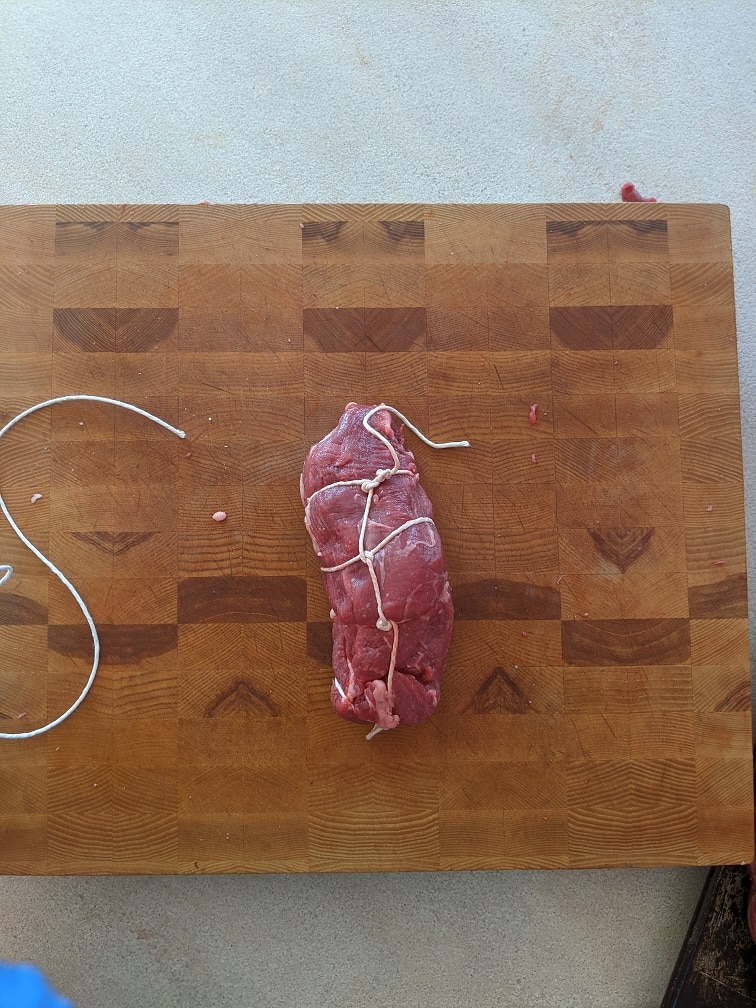
At this point, you can cut the tenderloin into steaks or tie it to be cooked whole. If you are cutting it into steaks, trim the tapered ends and add them to the scrap pile. This will help you get more equally sized steaks. If you are roasting the tenderloin whole, as I prefer to do, you are going to want to tie it. This isn’t strictly necessary, but it helps the tenderloin keep its shape when cooked and helps it cook more evenly. Use butcher’s twine to tie the tenderloin. Butcher’s twine is a 100% cotton string that you can buy in most grocery stores.
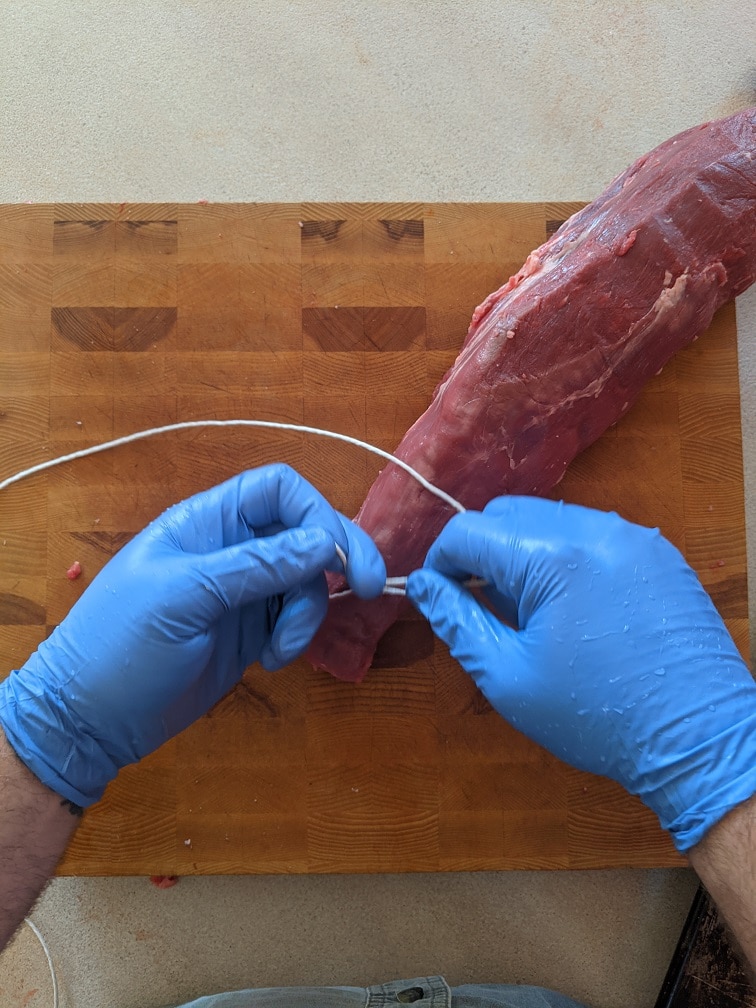
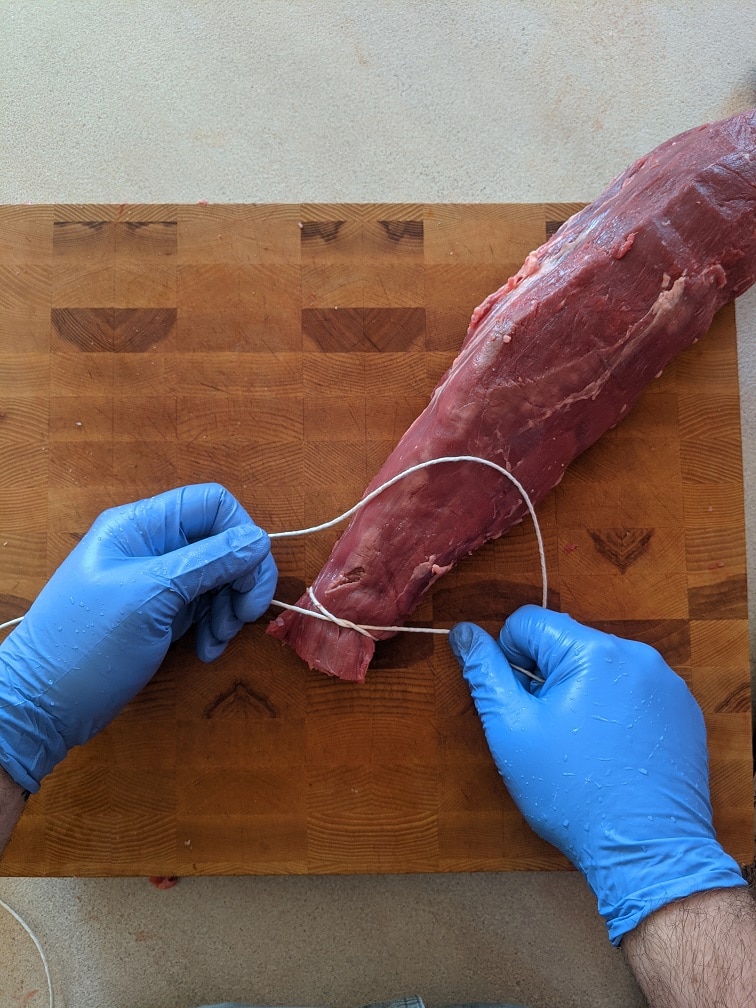
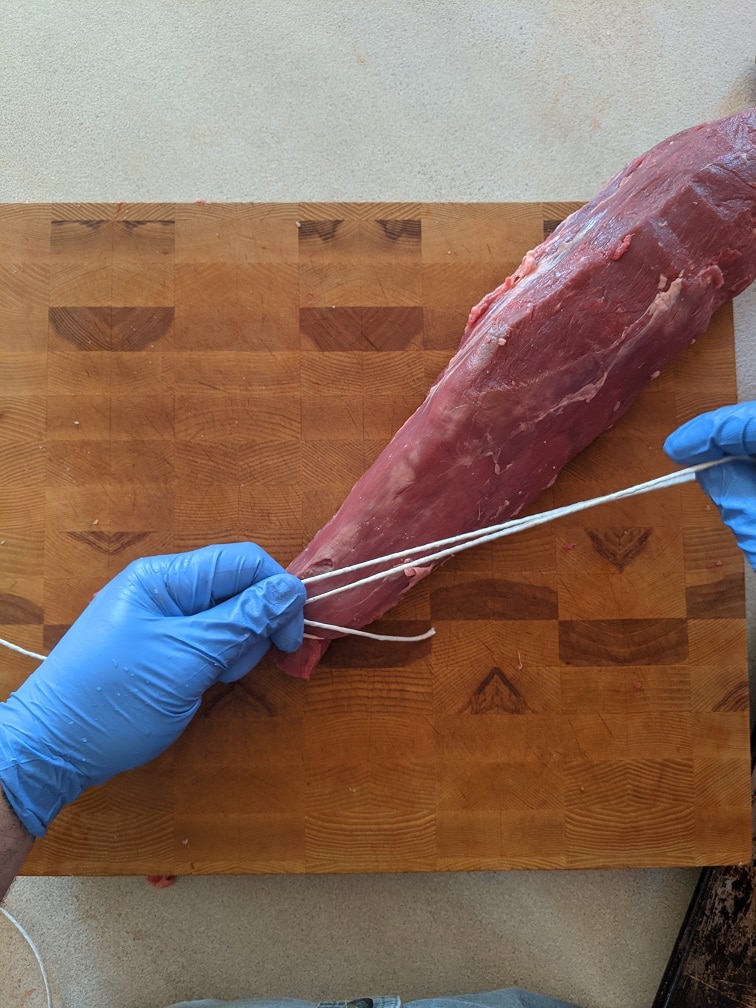
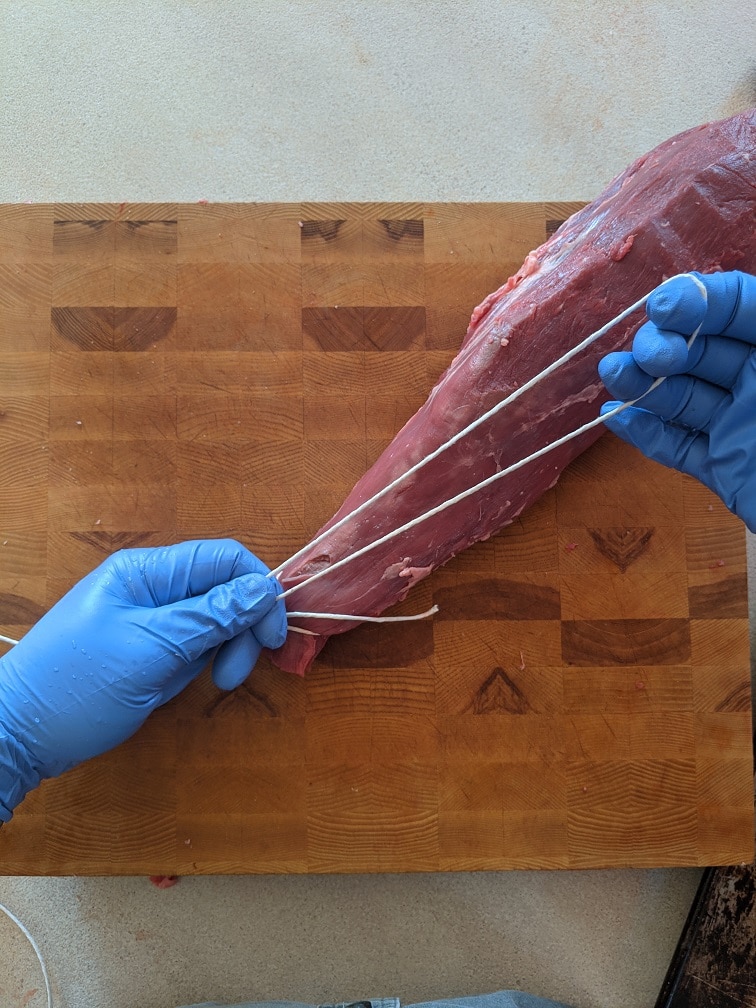
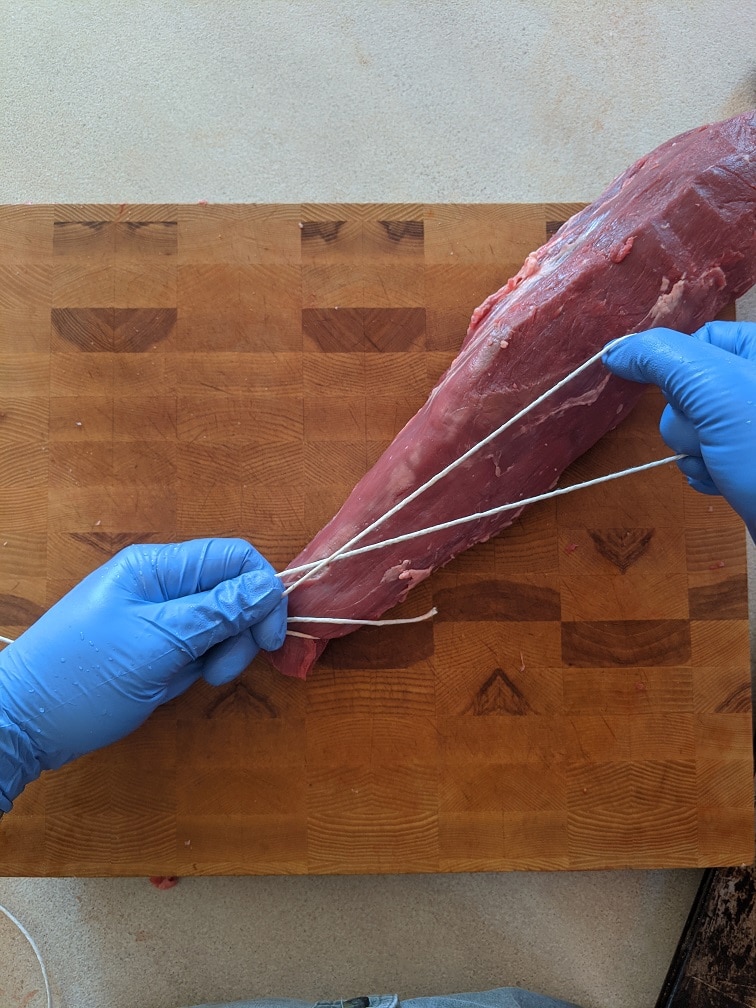
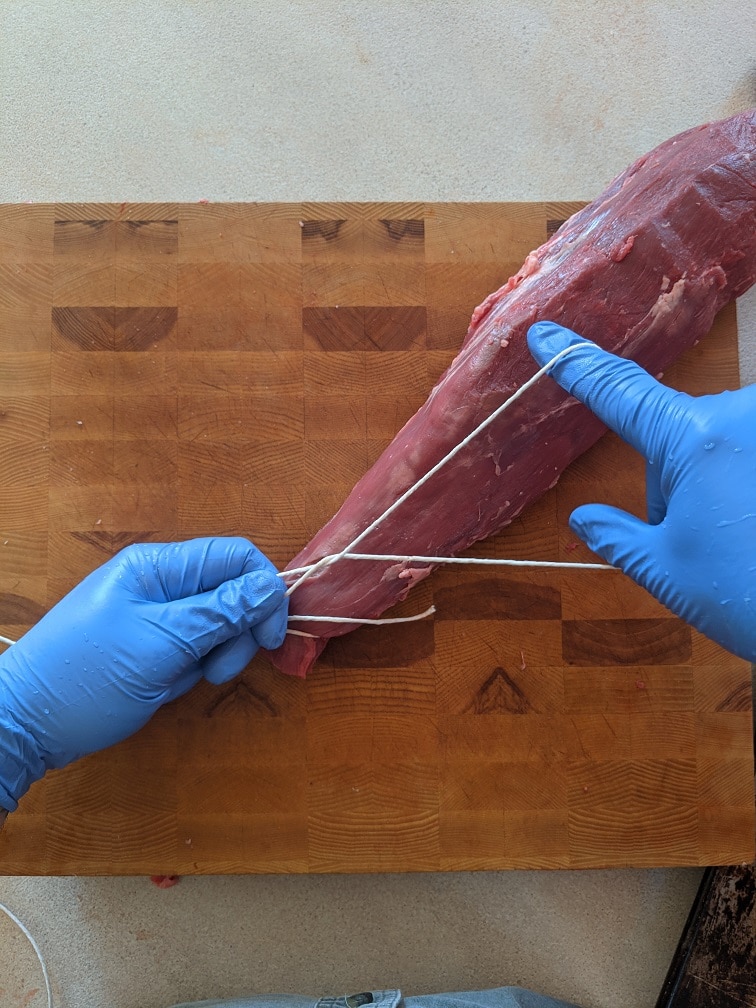
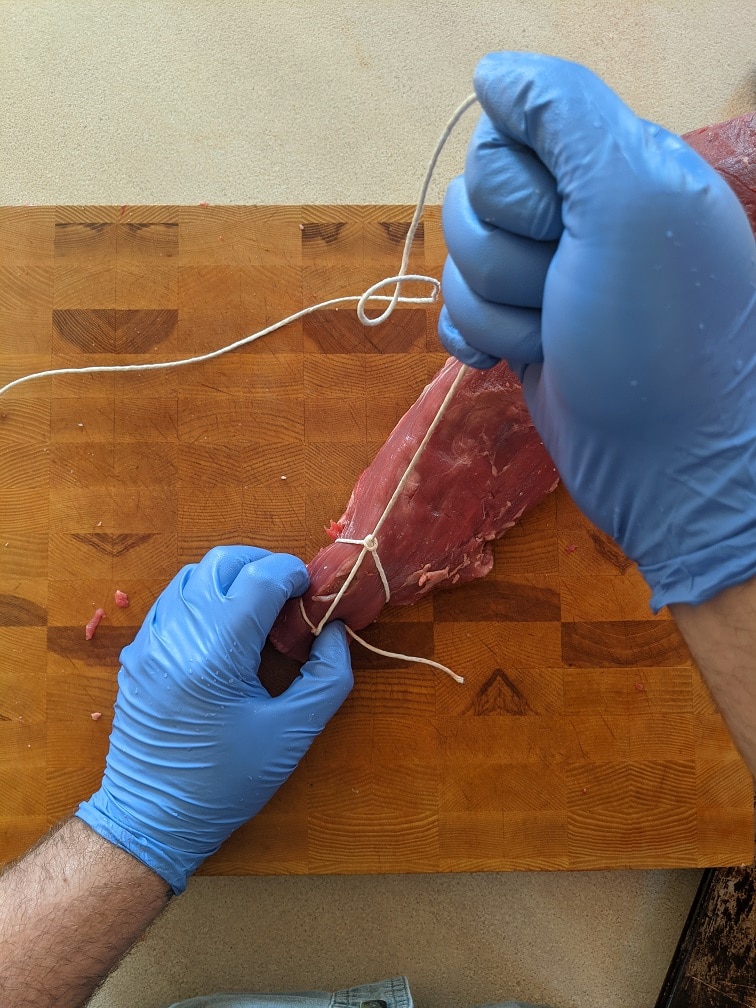
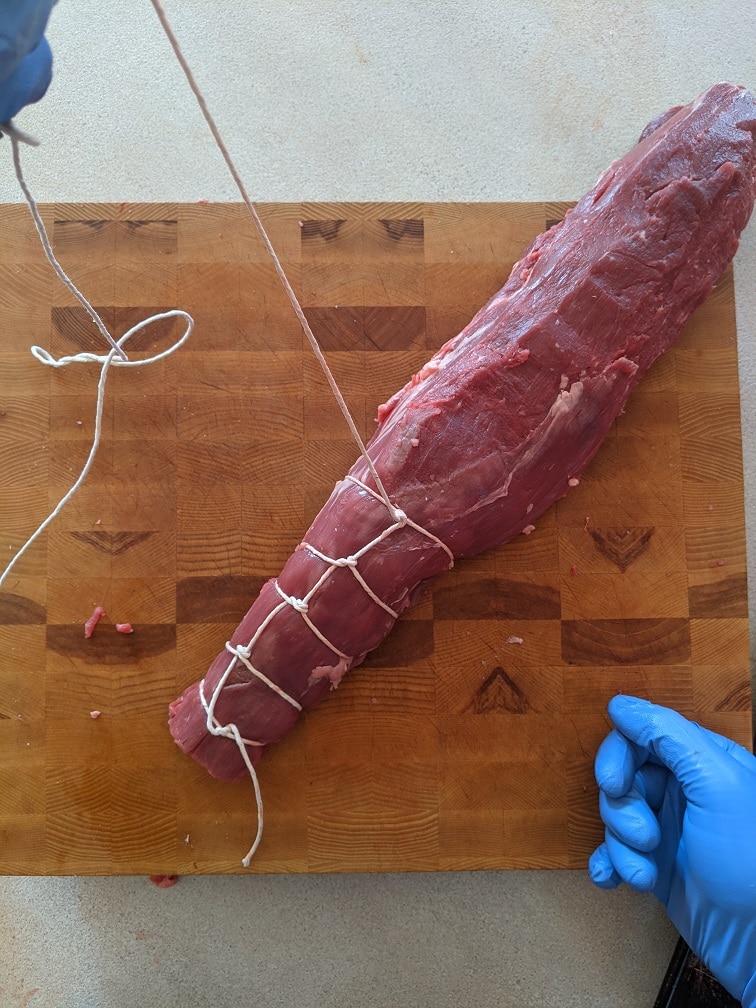
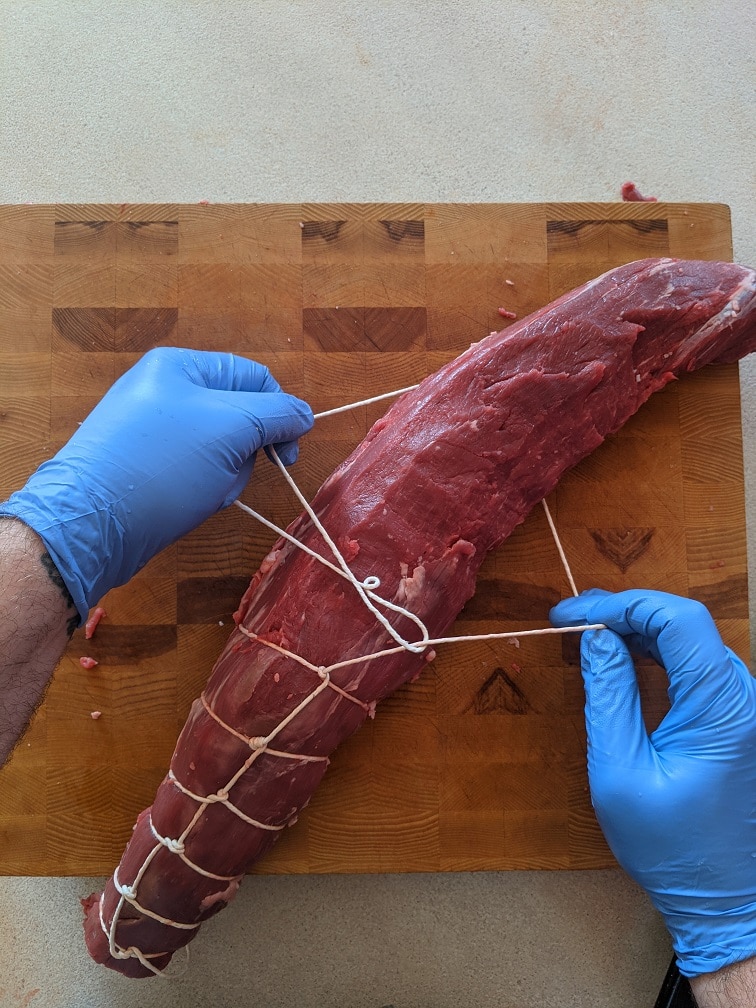
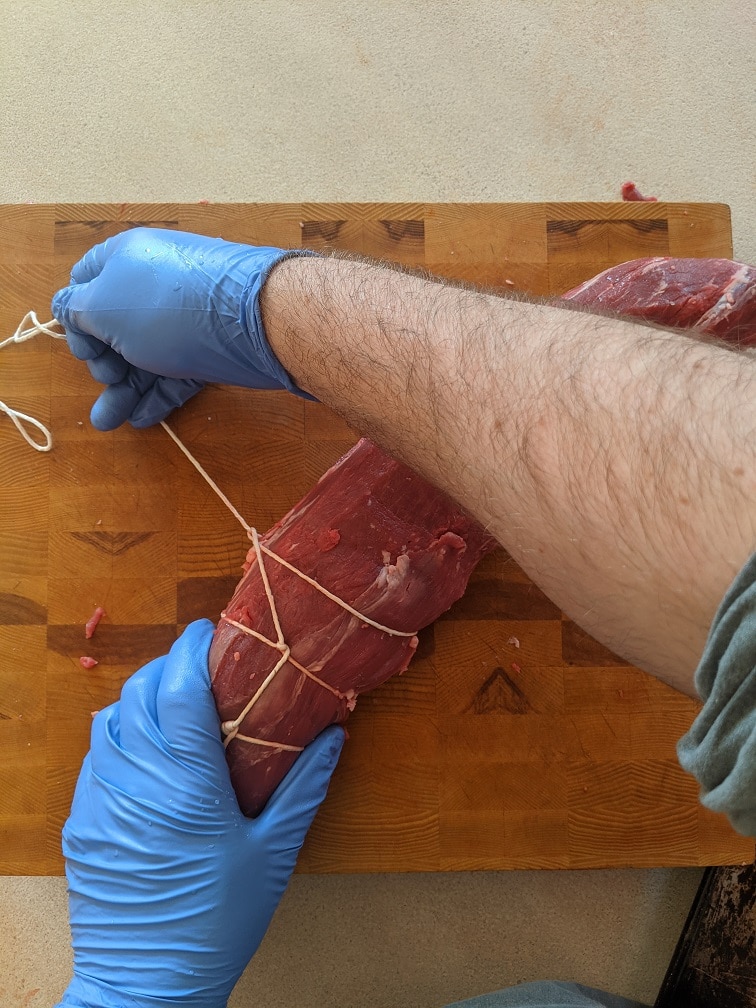
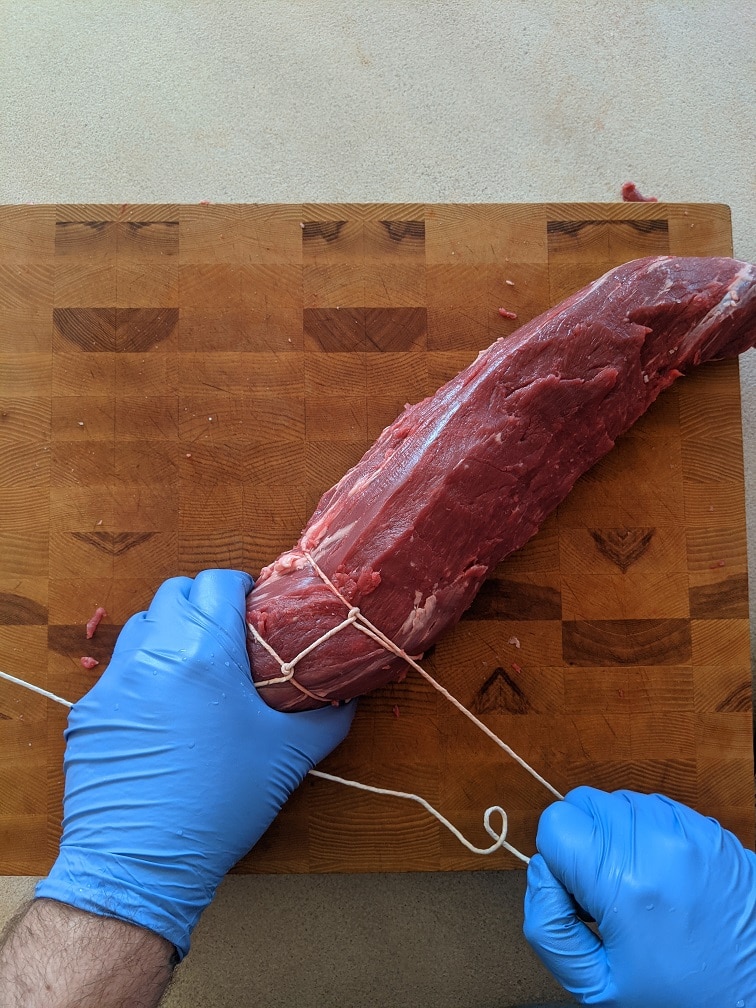
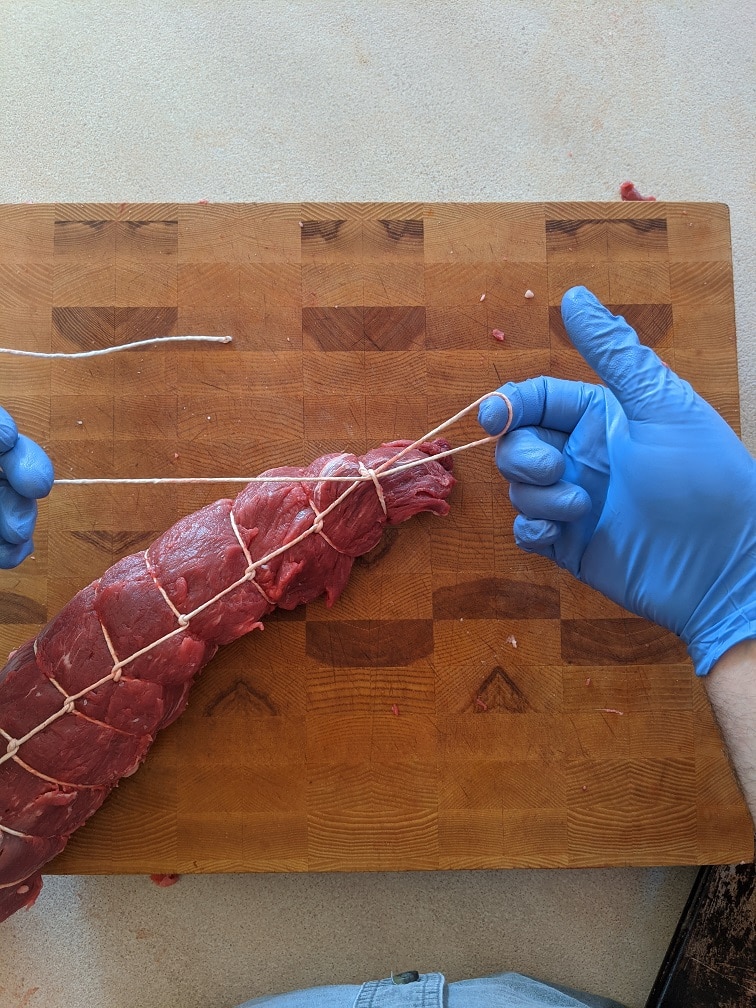
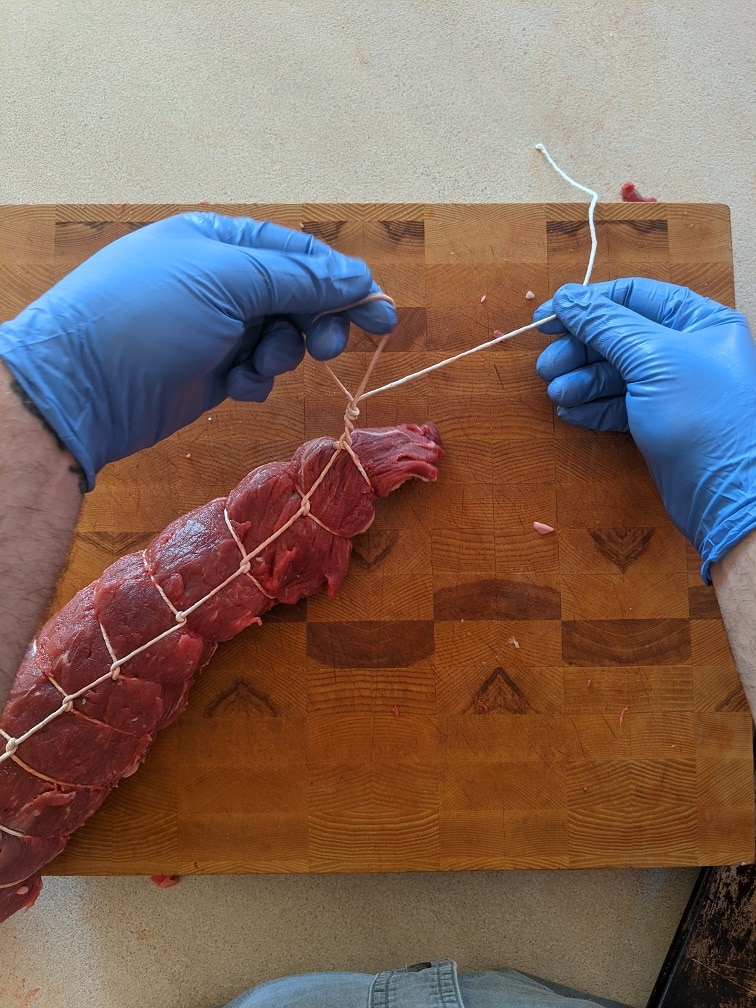
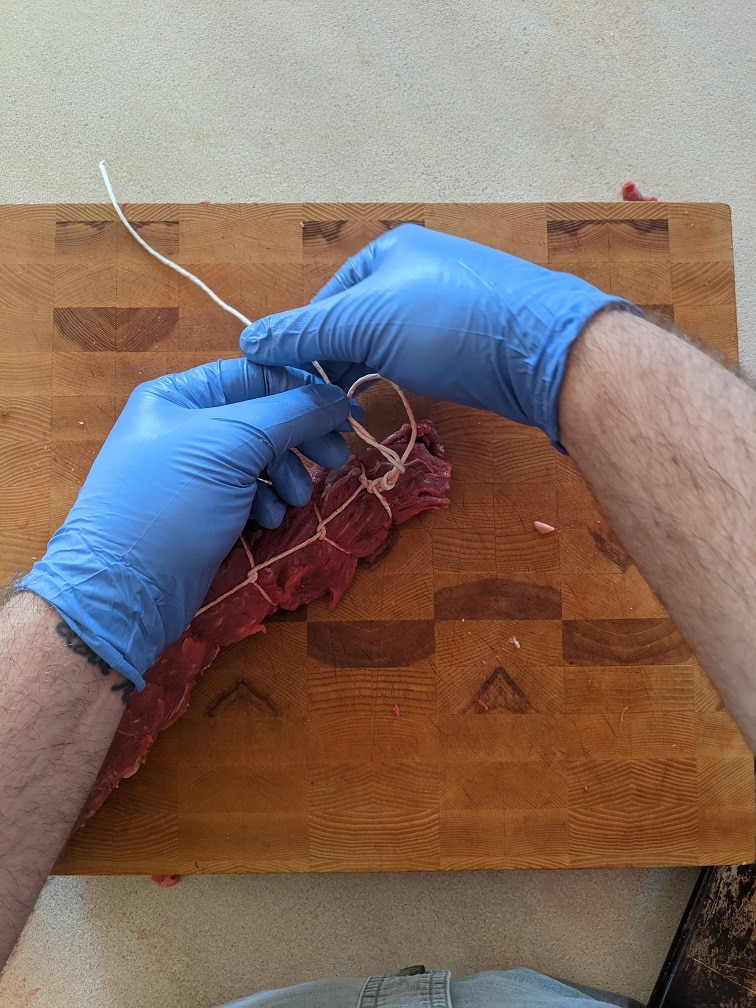
Tieing the Tenderloin
There are a few ways to tie the tenderloin. The first way is to cut 12 10-inch pieces of twine and tie each one evenly around the tenderloin. The second way and the one I prefer is to use butcher’s knots. Tie one end of the twine around one end of the tenderloin. Make a big loop with the twine and twist it twice. Thread the tenderloin through the loop and pull it tight. The loop will tighten around the tenderloin. Do the same thing again and space the second loop out from the first one by about an inch. Repeat until the whole tenderloin is tied, then cut the string and tie it off with any basic knot. This technique takes some practice, but once you get the hang of it, it becomes the easiest way to tie any roast.
The Scraps
Waste not! The scraps from your tenderloin, including the chain and trimmed fat, are perfect for making stocks or other dishes like skewers, stir-fries, or stroganoff. Every part of the tenderloin can contribute to a delicious meal.
Cooking the Tenderloin
Though this post focuses on cleaning, a basic cooking method involves rubbing the tenderloin with a mix of herbs, olive oil, salt, and pepper. Roast in a preheated oven or on a barbecue, ensuring you achieve the perfect internal temperature for your desired doneness.
Storing Beef Tenderloin
If you plan to store the tenderloin, it can be frozen either cleaned or uncleaned without losing quality. For optimal results, consider using a vacuum sealer or the original packaging.
Conclusion
Understanding how to properly clean and prepare a beef tenderloin can transform your culinary experience. Not only does it make for a more enjoyable meal, but it’s also cost-effective, allowing you to feed more people with a single purchase. Share this guide with fellow cooking enthusiasts, and don’t forget to subscribe for more tips and tricks. Happy cooking!
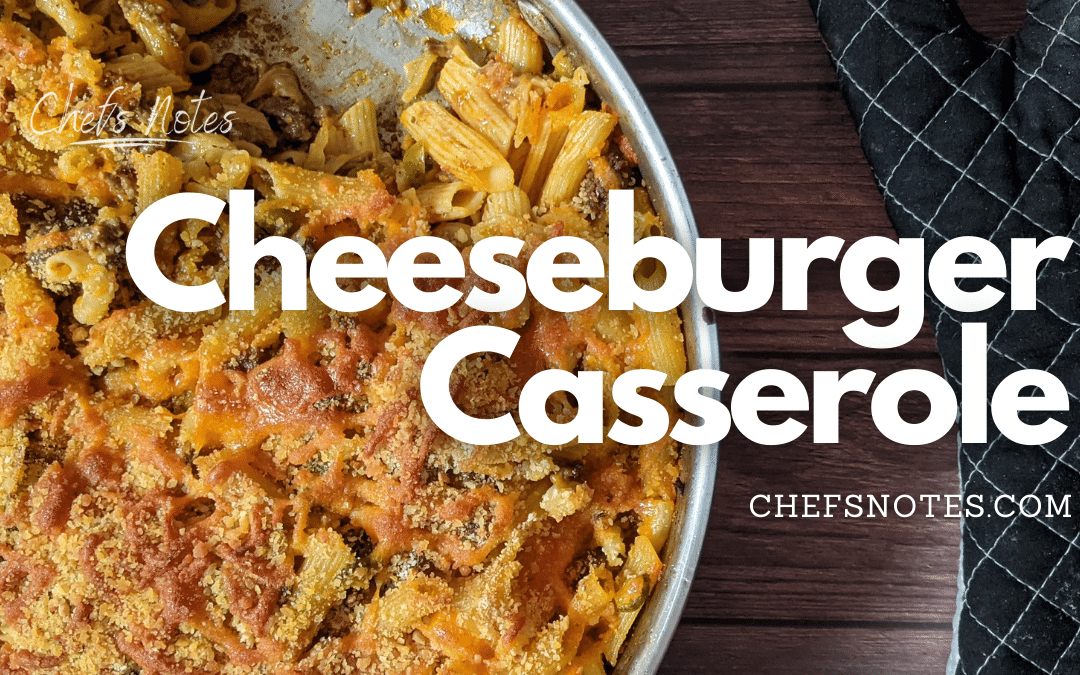
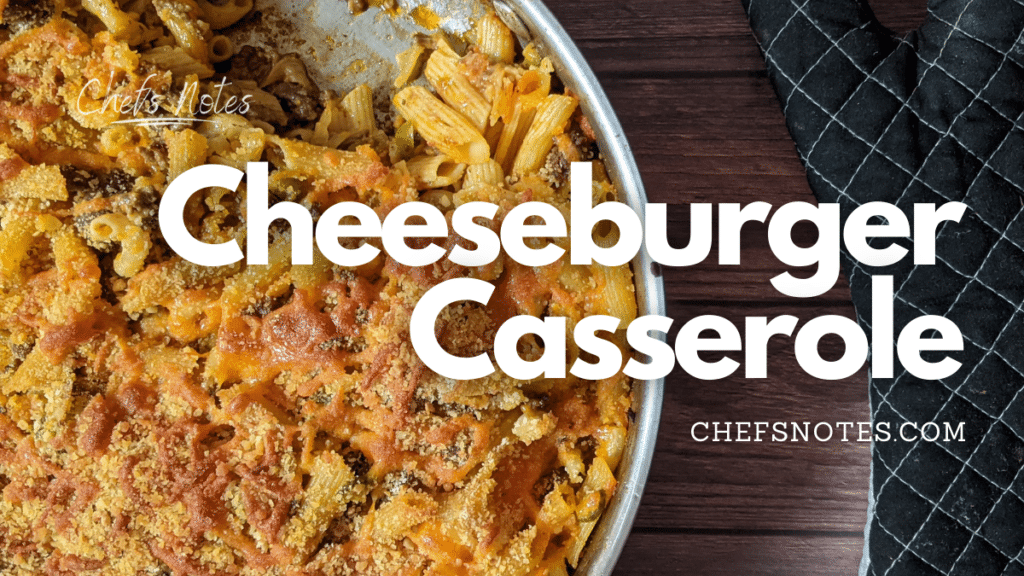
Imagine everything you love about a cheeseburger but in a casserole. Guess what; you don’t have to imagine it becasue it’s a real thing. And now, you can have whenever you’d like. And yes, it is as good as you think it would be. But don’t take my word for it. Make this cheeseburger casserole for dinner and see for yourself. Alright, let’s get cooking.
Ingredients
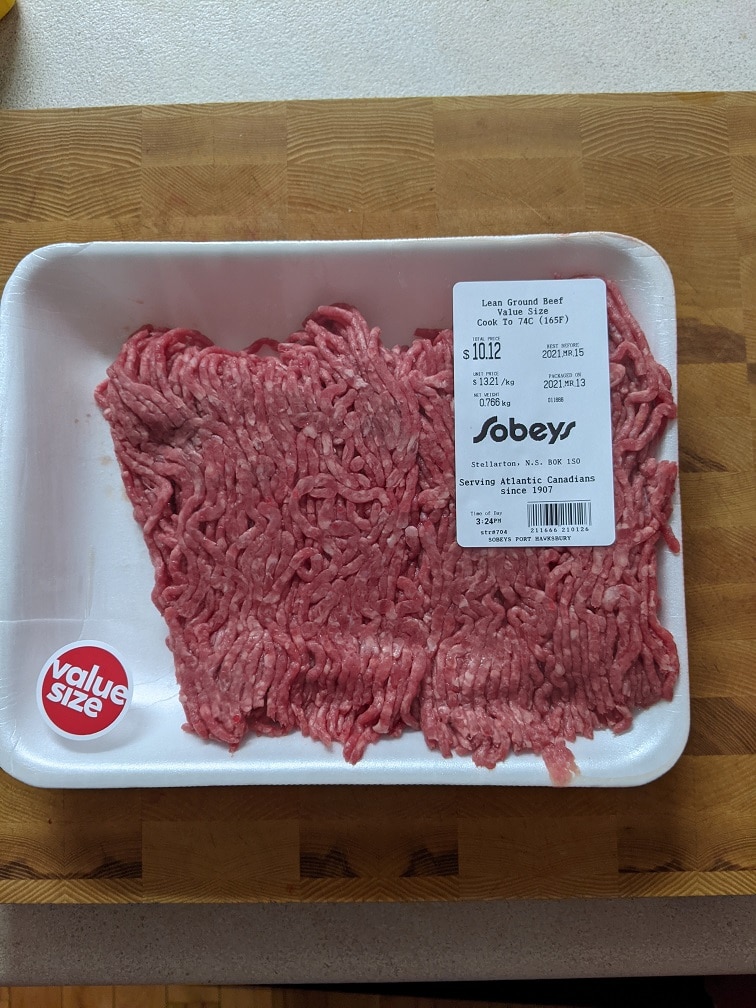
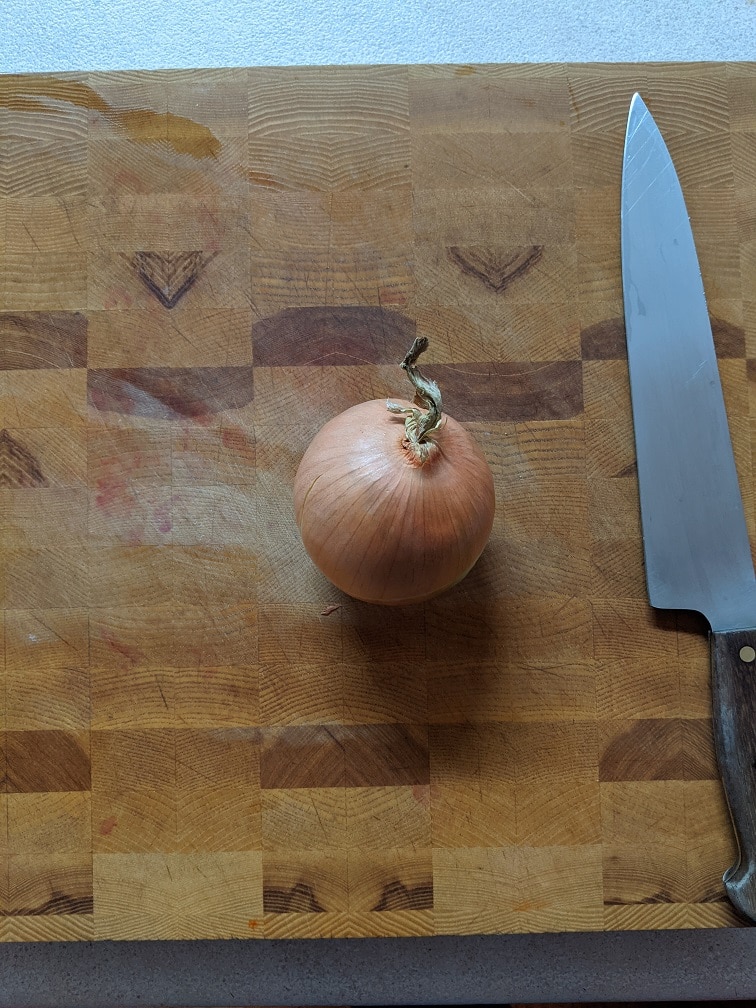
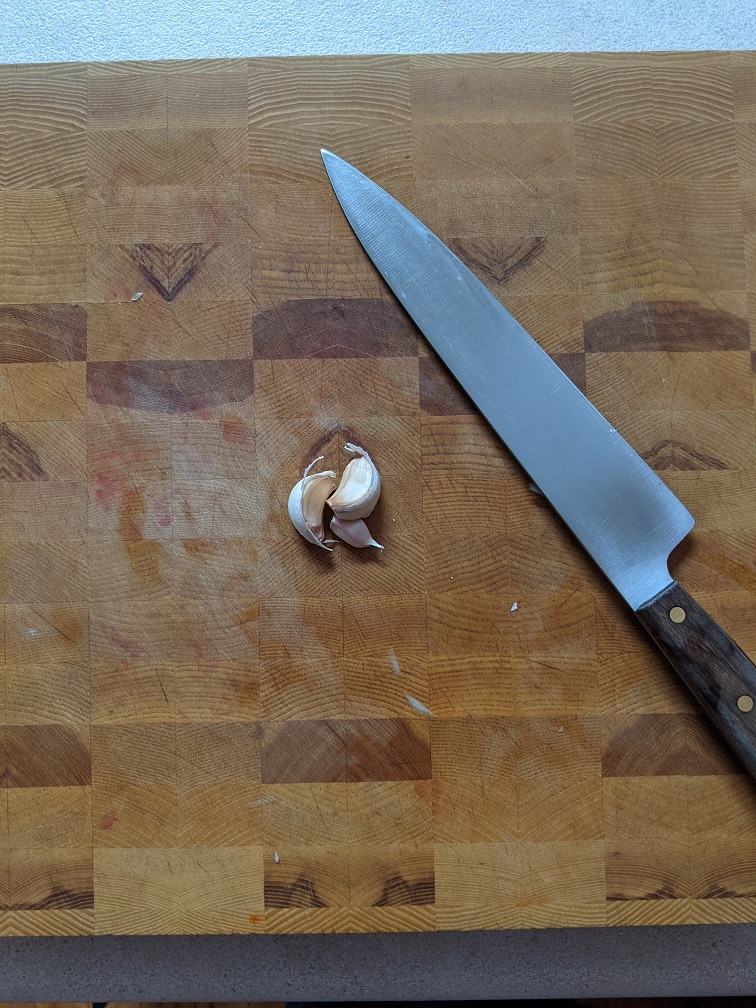
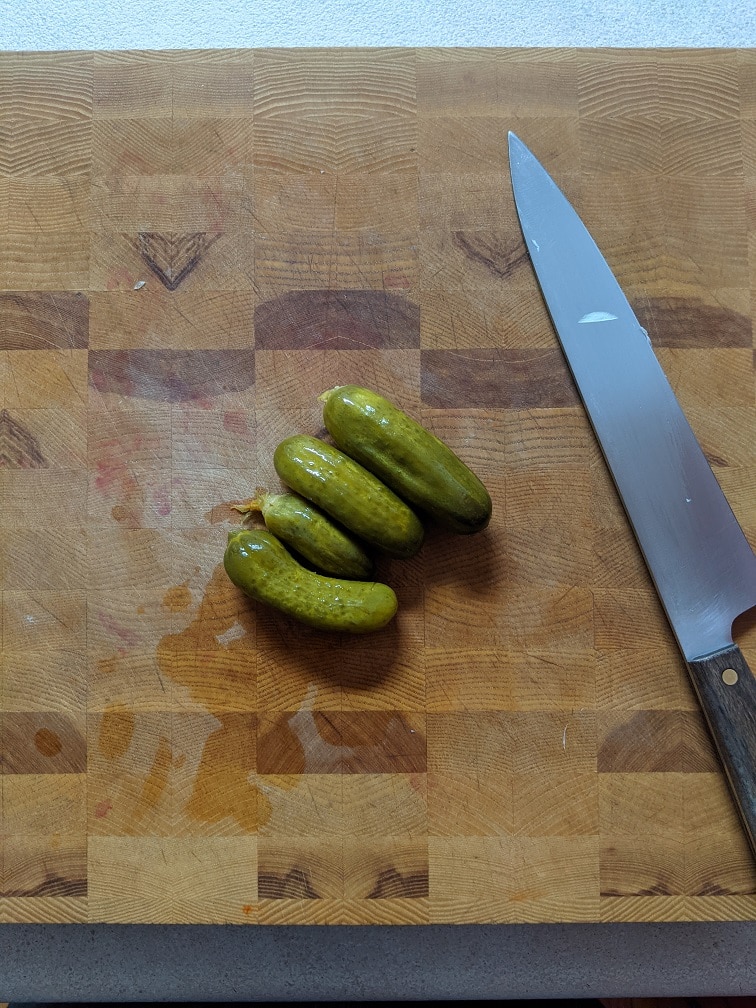
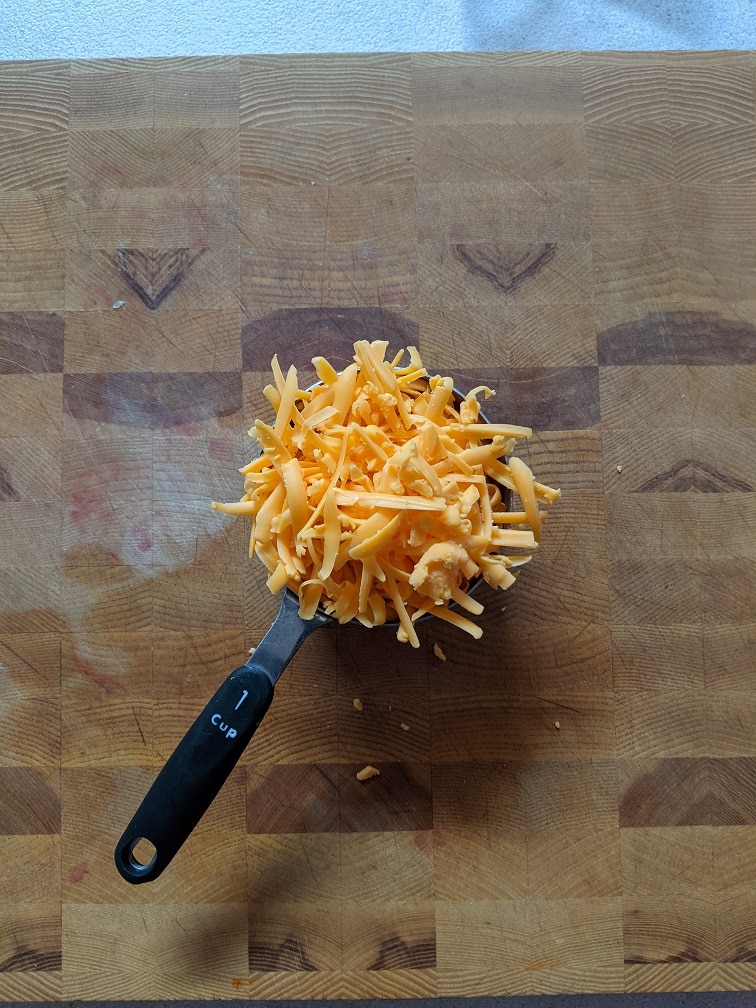
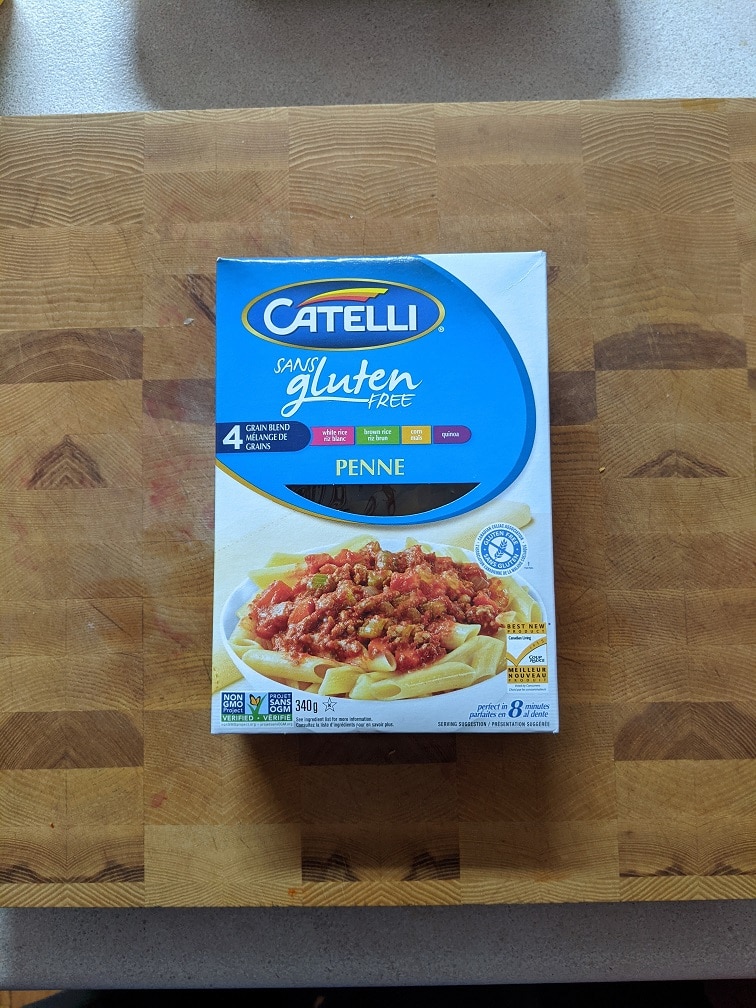
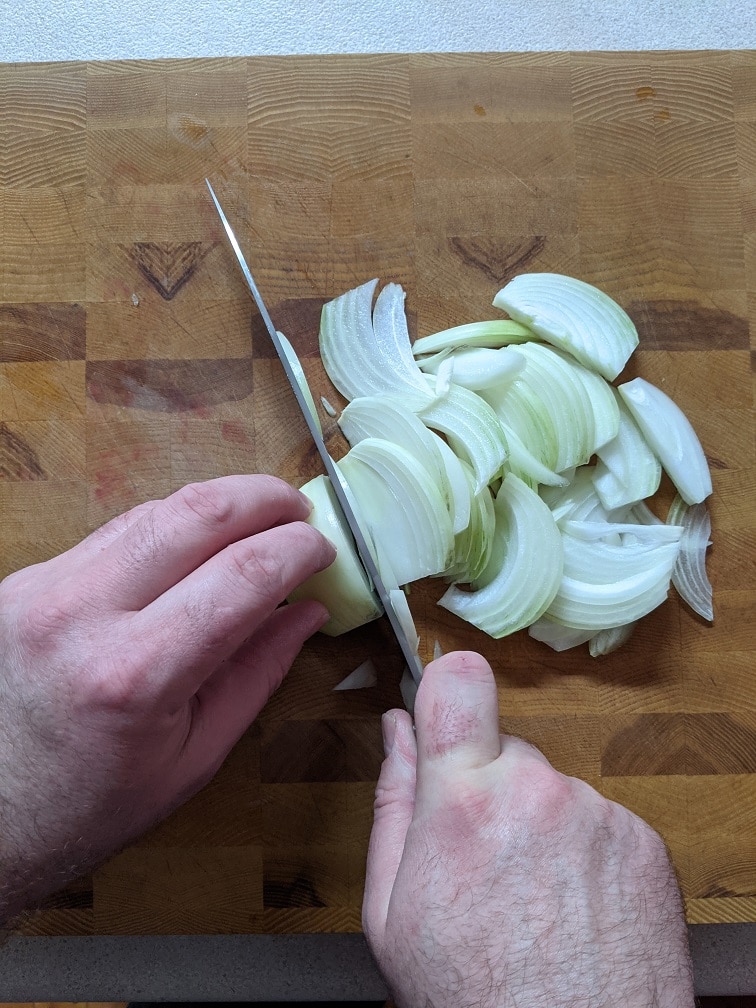
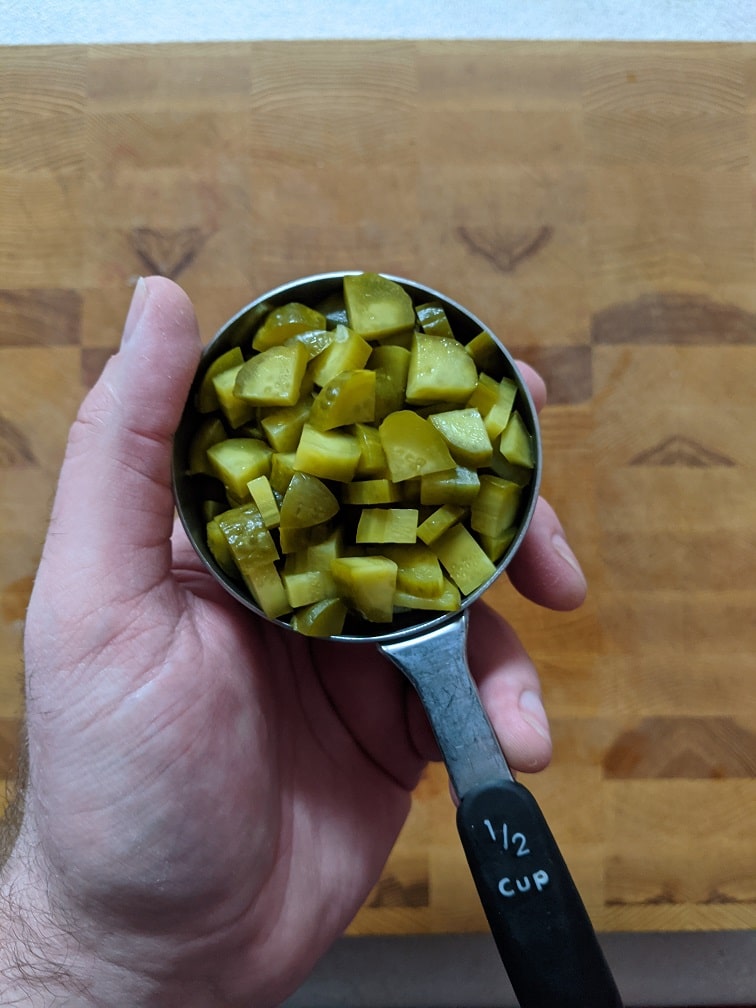
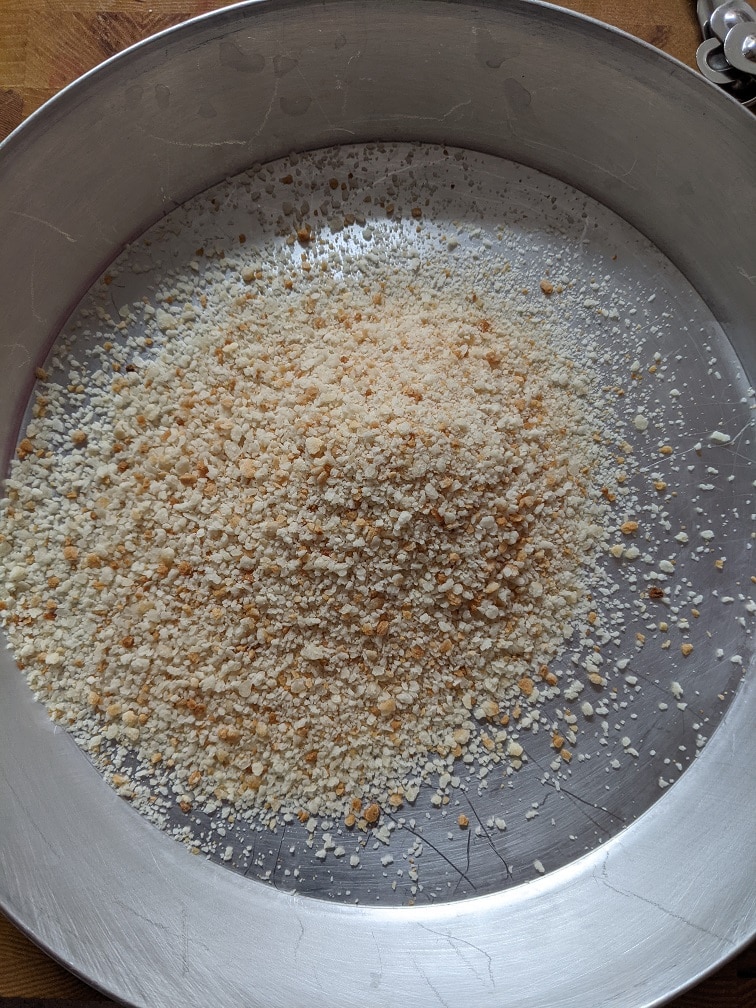
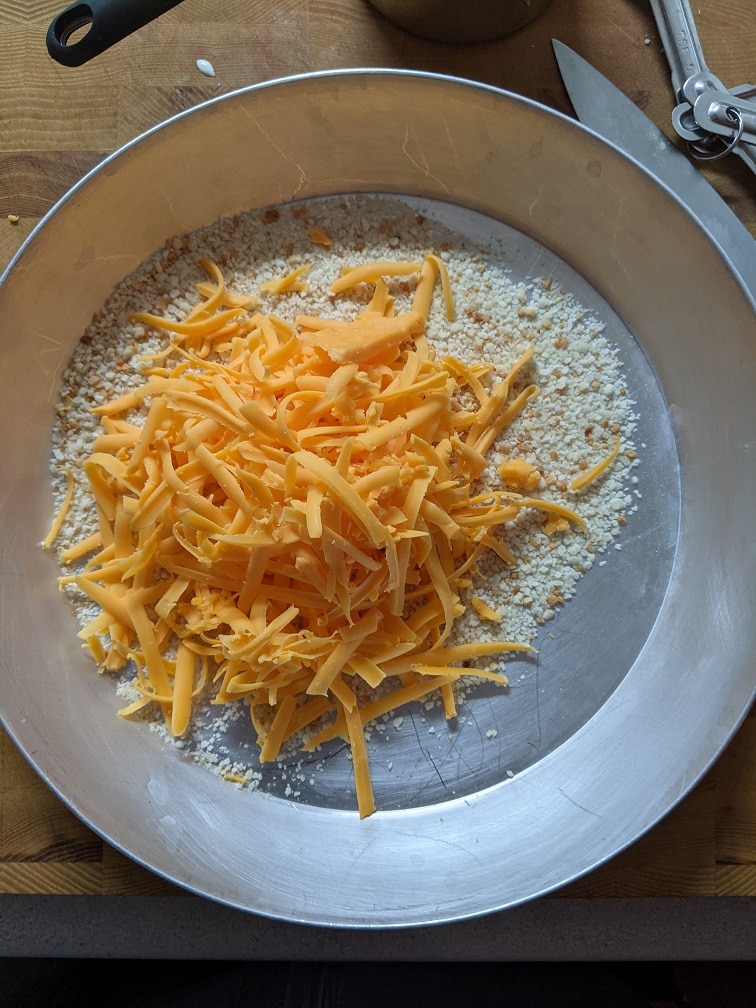
The ingredients for the Cheeseburger Casserole are 2 pounds of lean ground beef, 1 onion, 2 to 3 cloves of garlic, 2 tablespoons tomato paste, 3 to 4 dill pickles, 2 tablespoons yellow mustard, 1 1/2 cups beef stock, 1 1/2 cups heavy cream, 1 teaspoon kosher salt, 1/2 teaspoon black pepper, 1 teaspoon sugar, 340 g box dried penne pasta, 1 cup grated cheddar cheese, 1/2 cup of bread crumbs, and 1/2 cup ketchup.
Prepping The Ingredients
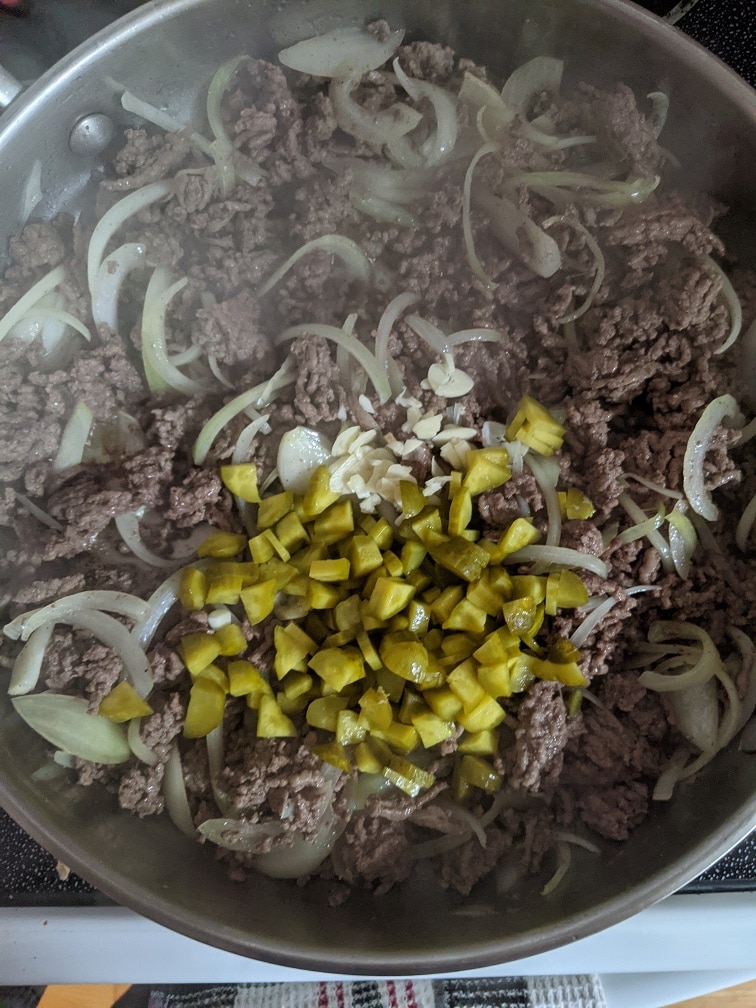
Start by thinly slicing the onion, garlic, and pickles. In total, you want 1 cup of sliced onions, 1 tablespoon of sliced garlic, and 1/2 cup of sliced pickles. If you added a few extra pickles to the mix, it wouldn’t be a bad thing. Bring a large pot of water to a boil and cook the pasta for 1 minute less than the package instructions indicate. Drain the pasta and rinse under cold water for a minute. Set the pasta aside until you are ready to add it to the cheeseburger casserole.
Cooking The Cheeseburger Casserole
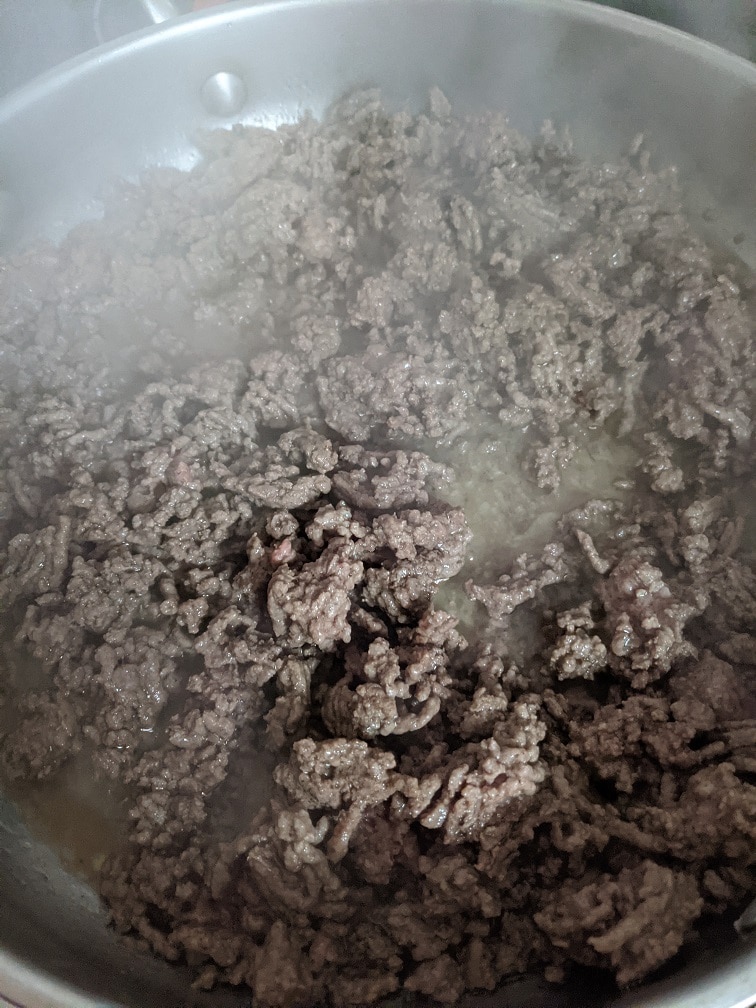
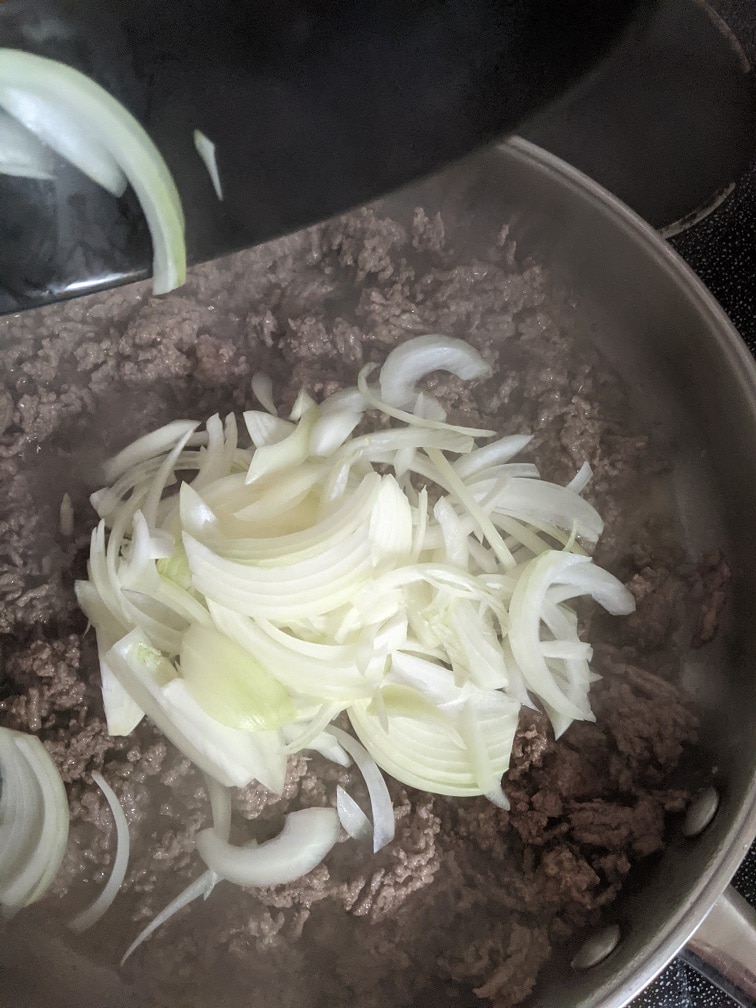
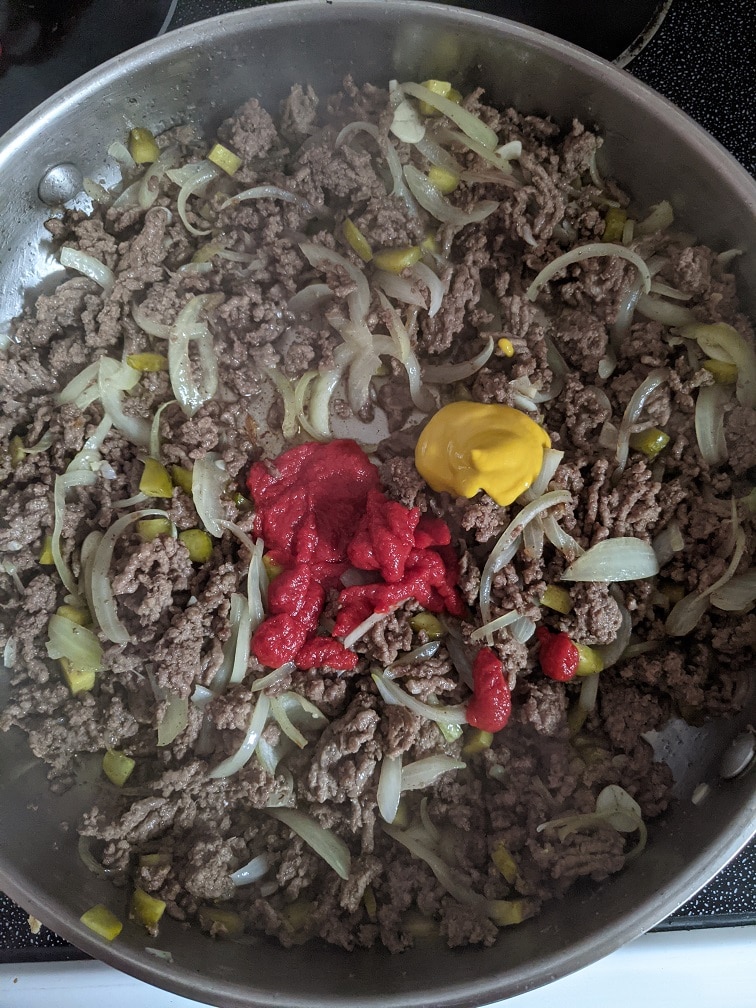
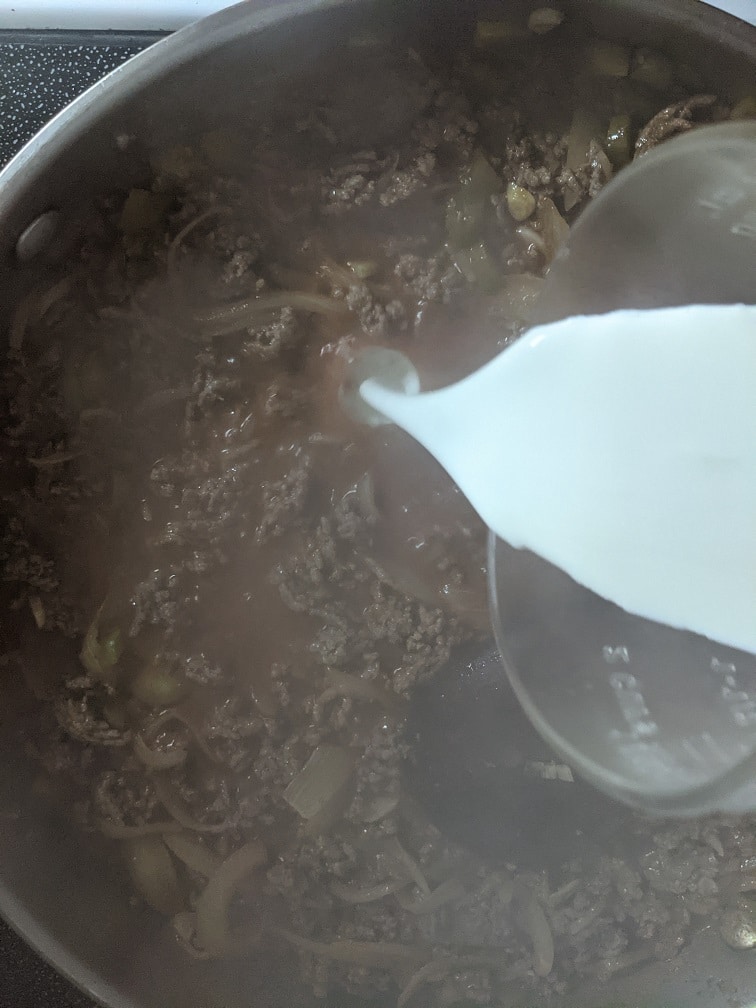
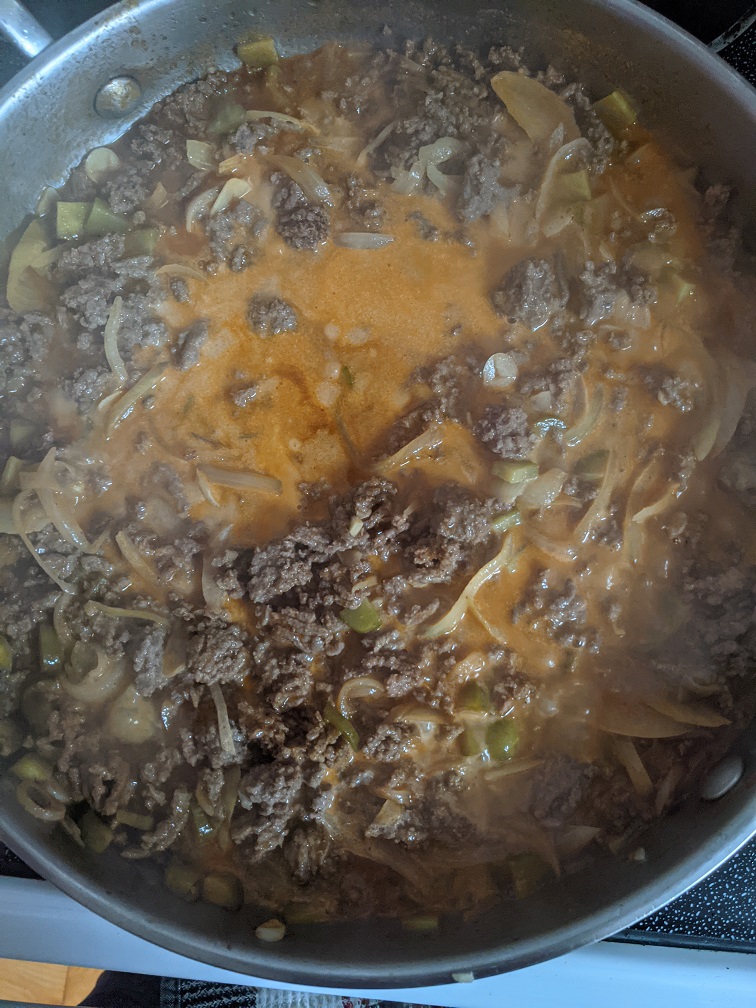
Heat a large oven-safe skillet over medium-high heat. Add in 2 teaspoons of canola oil along with the beef and cook until the beef is browned. This should take between 5 and 10 minutes. Add the onion and cook for 3 more minutes, then add the pickles and garlic and cook for another 2 minutes. Mix in the tomato paste and mustard, cook for 2 minutes, then add in the beef stock. Bring to a boil and cook for 3 minutes.
Finishing The Cheeseburger Casserole
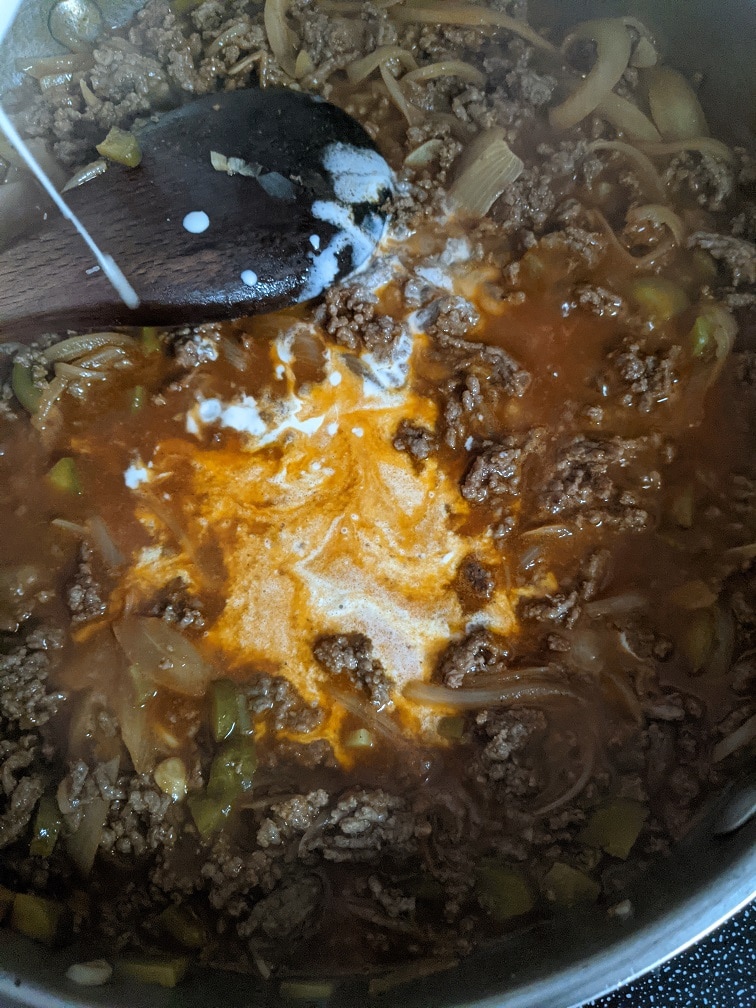
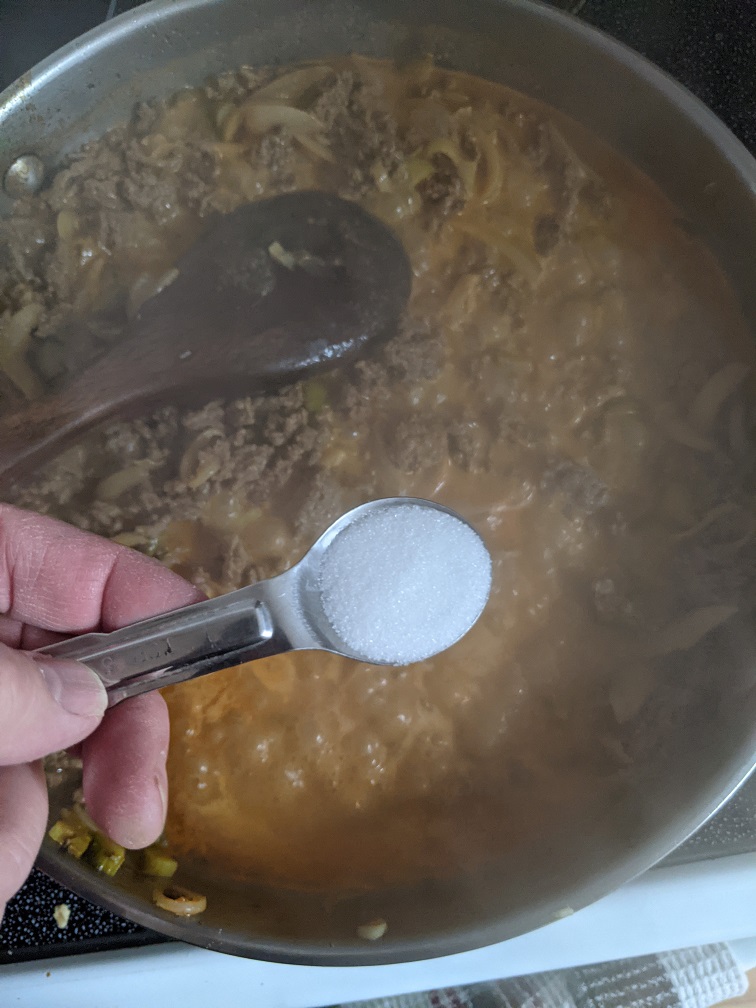
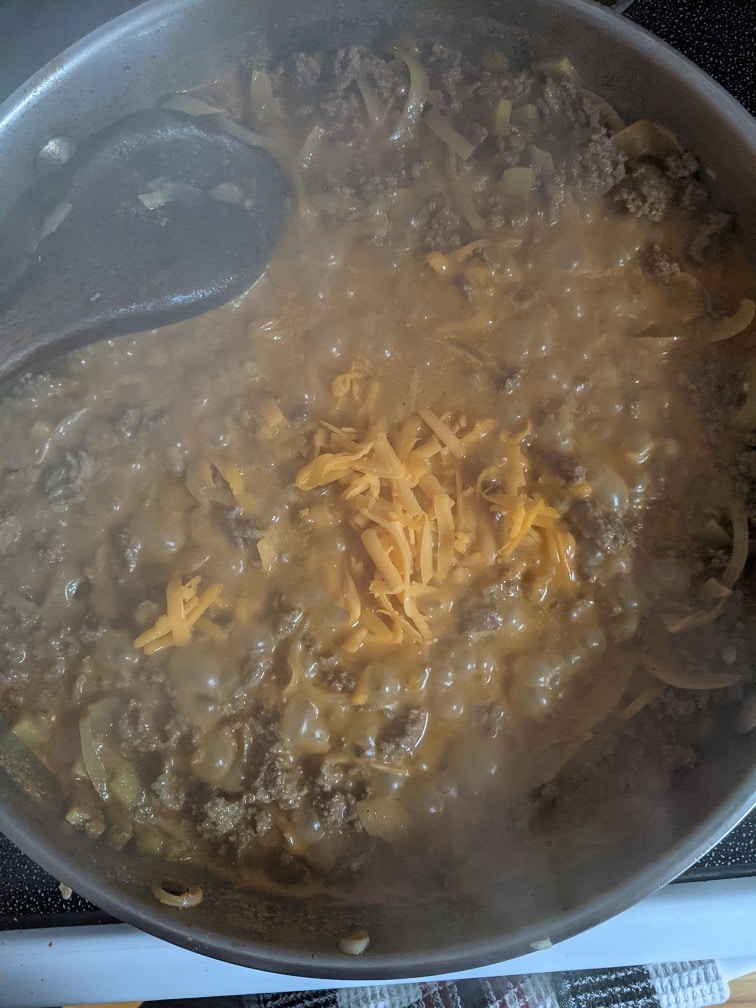
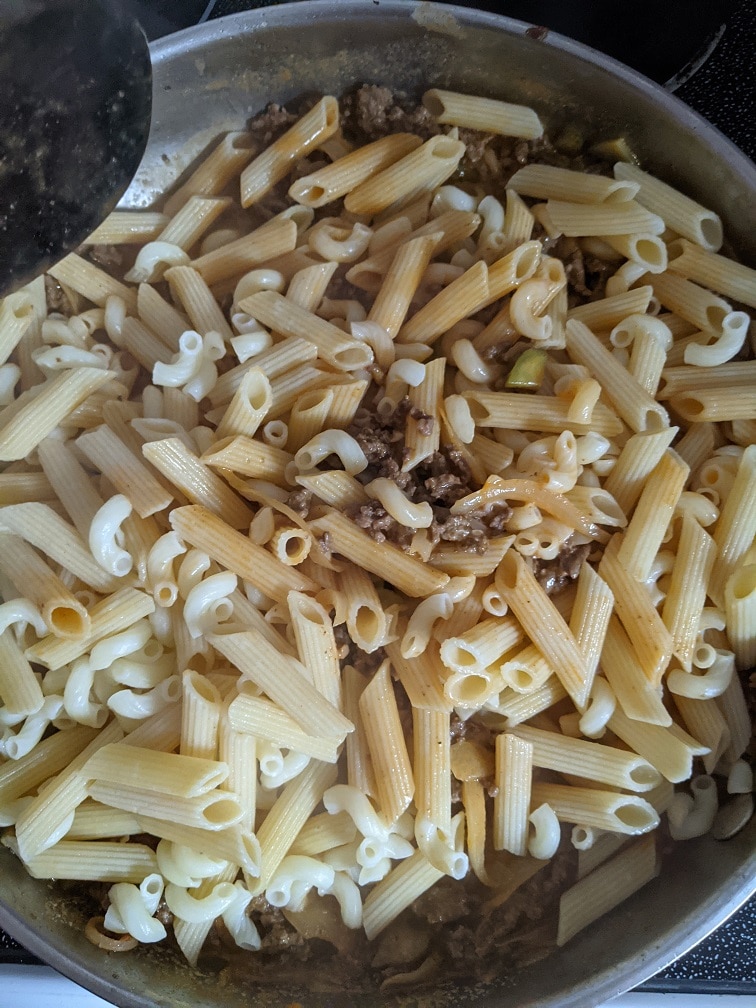
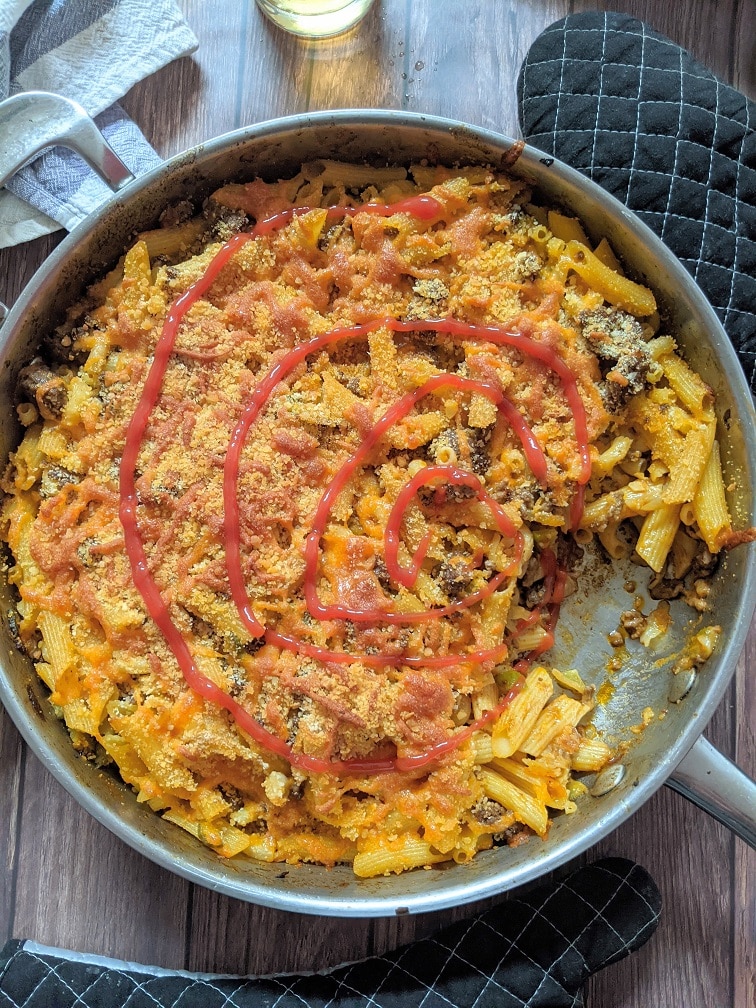
To finish the cheeseburger casserole, add the cream, bring it back to a boil, then add the sugar, pepper, and mix in half the cheddar cheese. Taste the mixture and add the salt as needed. Depending on the beef stock you use, you may need to add more or less salt than the recipe says. Add the pasta to the sauce (Don’t mind that I used different pasta shapes. I had a few boxes with a little bit left in them), and mix well. Combine the remaining half cup of grated cheese with the breadcrumbs and sprinkle over the casserole. Cover the pan with a lid or foil and bake for 15 minutes at 350°F, then take the lid off and bake for another 10 minutes.
The Finished Cheeseburger Casserole
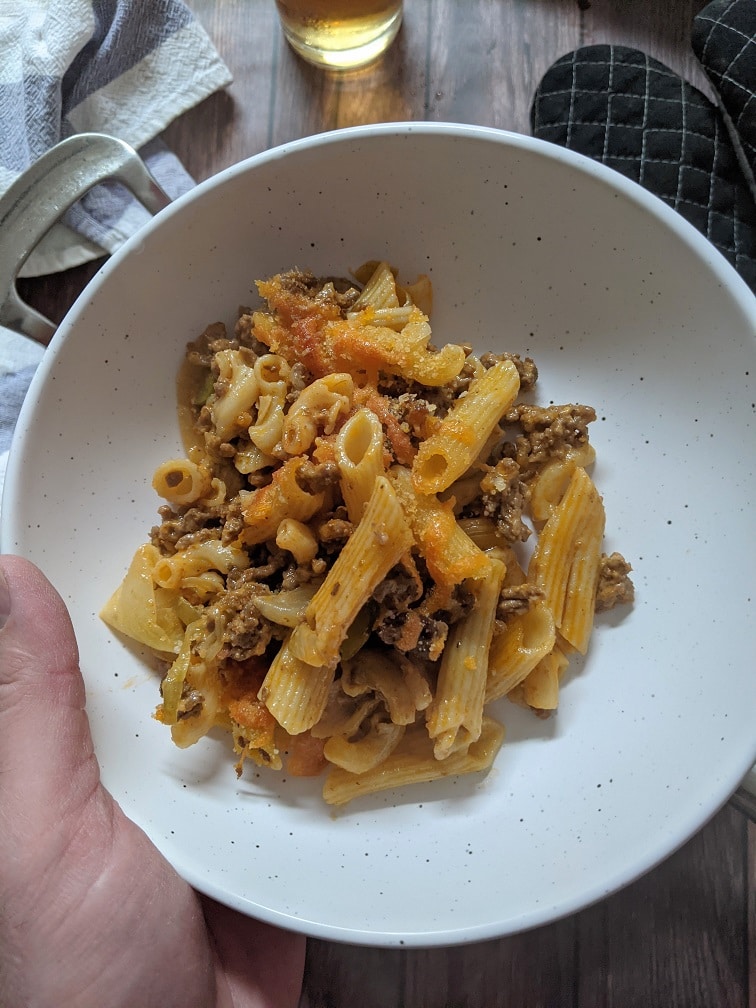
This might sound crazy, but top the casserole with ketchup and serve. It is a “cheeseburger” casserole, after all—the ketchup kind of ties the whole thing together.
Cheeseburger Casserole
Everything you love about a cheeseburger, but in a casserole.
Bring a large pot of water to a boil and cook the pasta for 1 minute less than the package instructions indicate. Drain the pasta, rinse under cold water, drain again, and set aside until you are ready to add it to the sauce.
Heat a large oven-safe skillet over medium-high heat. Add in 2 teaspoons of canola oil along with the beef and cook until the beef is browned. This should take between 5 and 10 minutes.
Add the onion and cook for 3 more minutes, then add the pickles and garlic and cook for another 2 minutes. Mix in the tomato paste and mustard, cook for 2 minutes, then add in the beef stock. Bring to a boil and cook for 3 minutes.
Add the cream, bring it back to a boil, then add the sugar, pepper, and mix in half the cheddar cheese.
Taste the mixture and add the salt as needed. Depending on the beef stock you use, you may need to add more or less salt than the recipe says.
Add the cooked pasta to the sauce and mix well.
Combine the remaining half cup of grated cheese with the breadcrumbs and sprinkle over the casserole.
Cover the pan with a lid or foil and bake for 15 minutes at 350°F, then take the lid off and bake for another 10 minutes.
Take the casserole out of the oven, let it rest for 5 minutes, top with the ketchup and serve.
I know that some of you read this recipe and thought everything sounded great until I mentioned putting dill pickles in it. But the dill pickles are key. That little bit of acidity breaks up the richness of the dish. Getting that pop of dill pickle in every bite, to me, is what really makes this cheeseburger casserole special. But again, don’t take my word for it. Try it for yourself.
Remember to share this post on Facebook or Pinterest if you enjoyed it. Thank you for reading, and have a great day! Remember, there are new Chef’s Notes posts every Monday, Wednesday, and Friday, and you can subscribe below, so you never miss one.
Lamb gyro is a Greek dish, cooked and served like shawarma or donair. Gyro is traditionally cooked on a vertical spit, but this recipe miniaturizes it into individual portions, which are cooked on bamboo skewers. The gyro skewers are served with rice, salad and a wedge of lemon. The lamb gyro bowl makes a perfect lunch or light dinner. If you’d like to make your own, check out the recipe below.
Lamb Gyro Skewers
Mixing The Meat
The lamb gyro ingredients are ground lamb, garlic, black pepper, cayenne, onion powder, oregano, and kosher salt. Put all the ingredients in a bowl and mix well.
Prepping The Pan
To cook the gyros in the oven, line a broiler pan with foil, then put the broiler rack in place. If you don’t have a broiler pan, a sheet pan and a stainless steel cooling rack will work just as well. If you’d prefer, you can grill the gyros, but make sure to soak the skewers in water for at least an hour before skewering the meat. This will help prevent them from catching fire on the grill.
Skewering and Roasting The Meat
Divide the meat in half, then split those two halves into three. Take one of the pieces of meat and squeeze it around a 12-inch bamboo skewer. Leave an inch or two of the skewer uncovered to use as a handle once the lamb is cooked. Put the lamb in a 400°f oven for 10 minutes, flip and cook for 5 more minutes.
Tip: Wear gloves or wet your hands with cold water while forming the meat around the skewers, so the meat doesn’t stick to you.
Lamb Gyros
A flavourful lamb skewer perfect for roasting in the oven or cooking on the grill.
Divide the meat into six evenly sized portions and wrap around the bamboo skewers leaving two inches of the bottom of the skewer exposed to act as a handle.
Put the skewers on a rack set above a broiler pan and roast in the oven on 400°f for 10 minutes. Flip the skewer and cook for another 5 minutes.
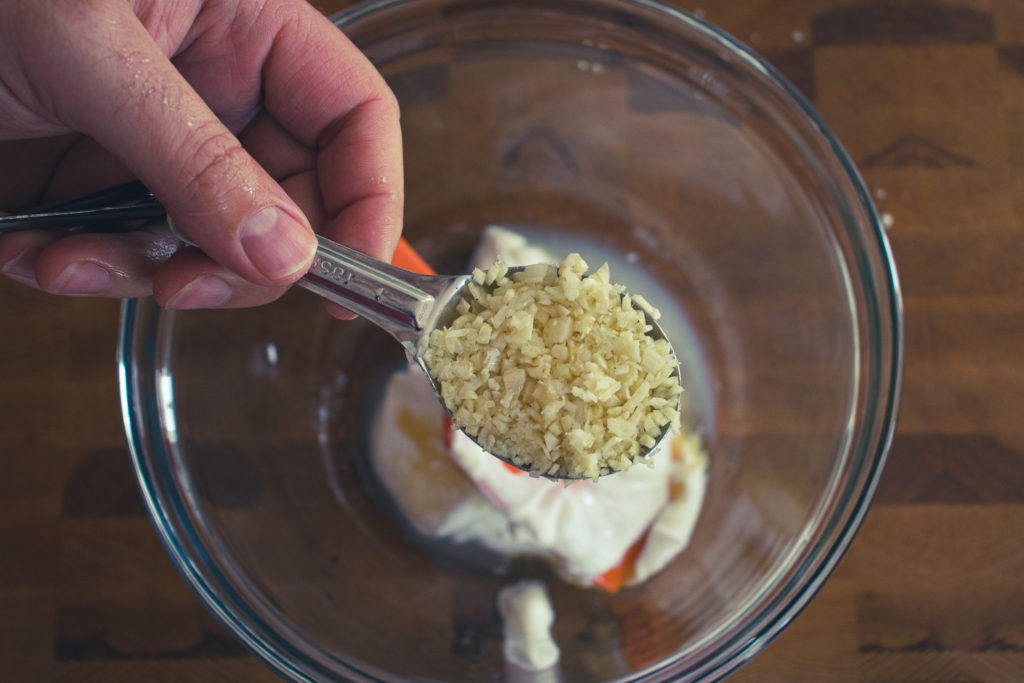
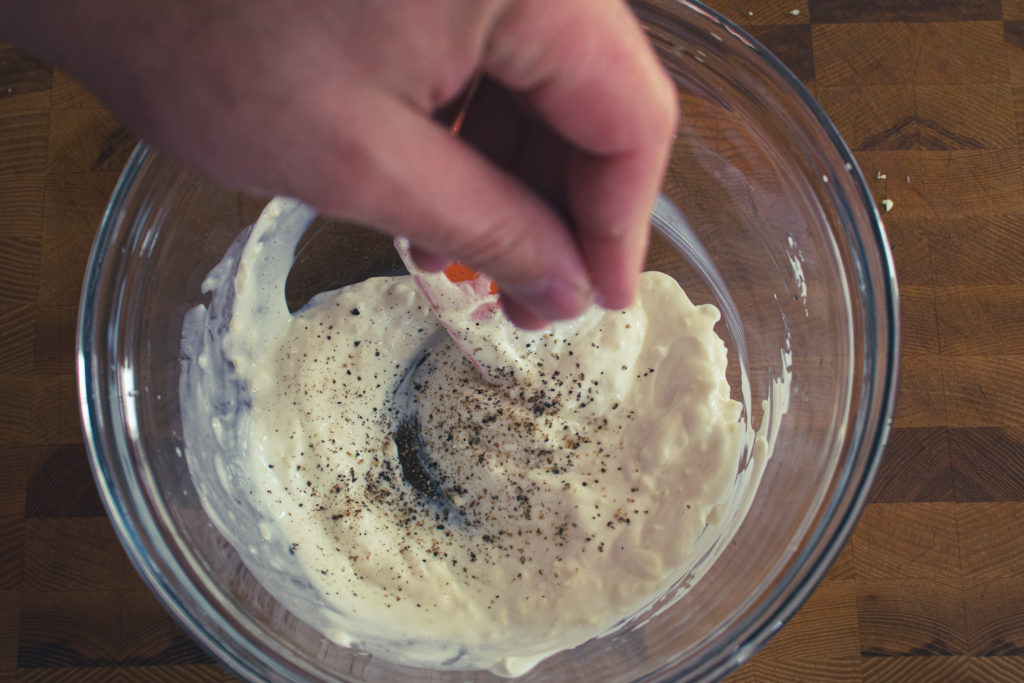
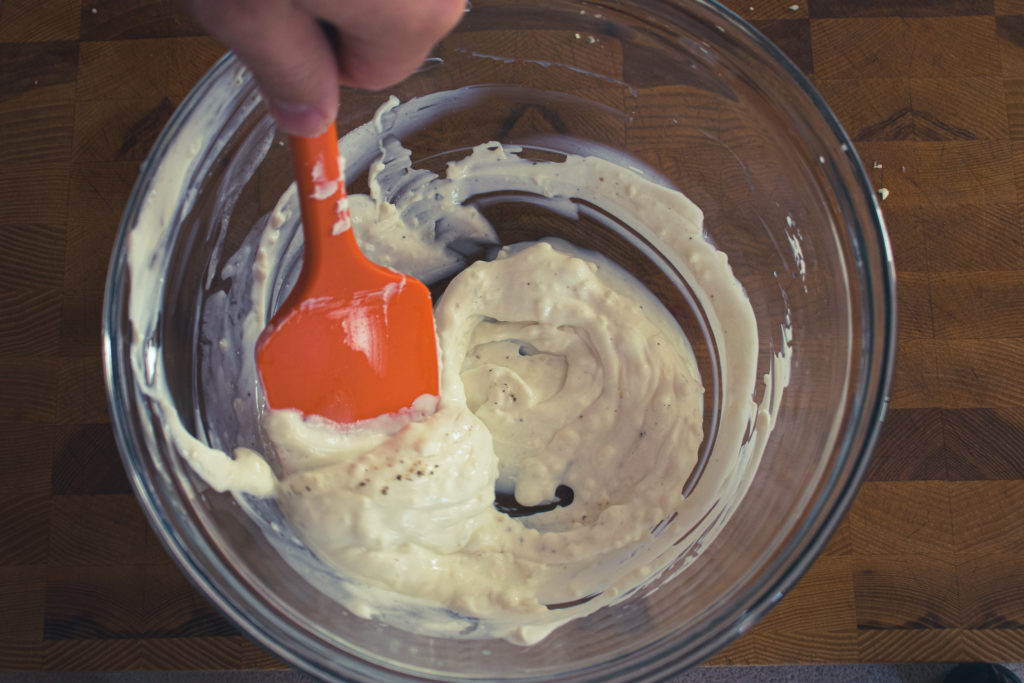
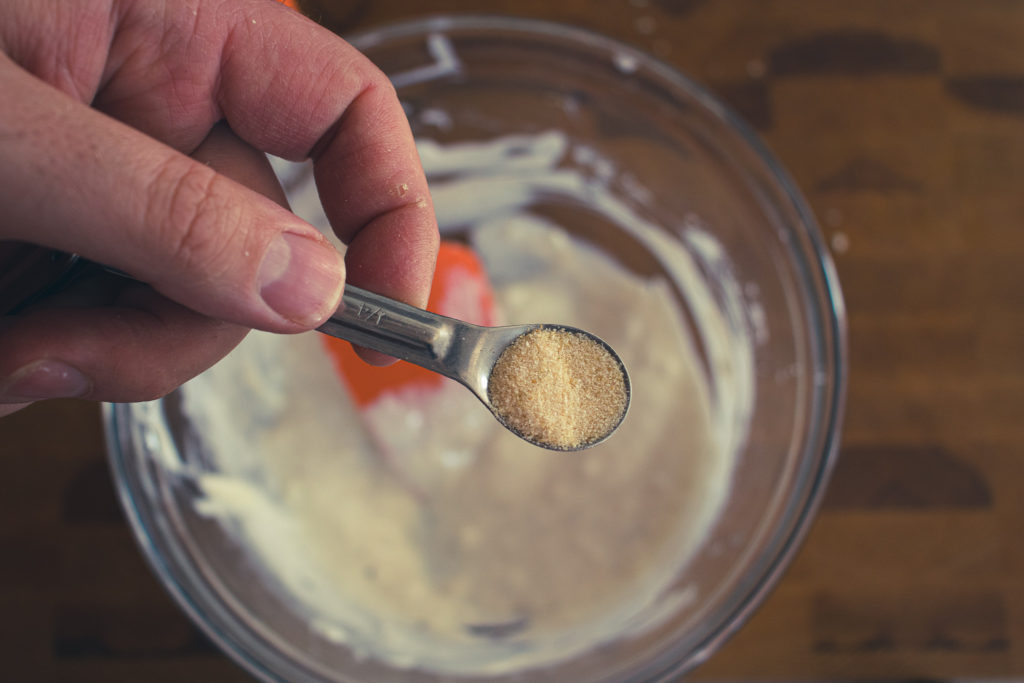
The sauce for the salad is a very loose garlic aioli. When you see aioli on a menu at a restaurant, it is most often just flavoured mayonnaise. A true aioli is made with only garlic and oil. The garlic and oil are emulsified to create a mayonnaise-like texture. When making a large batch of aioli, like a cup or more, a food processor works really well. You purée the garlic, then slowly drizzle in the oil while the blade spins around. Really though, you do not need to make that much, and it isn’t something you want to keep around for very long.
You can make aioli in a mortar and pestle, as I demonstrate in the pictures below. To do so, put three cloves of garlic in the mortar with a half teaspoon of kosher salt and mash it into a pulp with the pestle. Mix in three tablespoons of oil. As I said, this is a loose aioli. It is meant to be a dressing rather than a spread, but you will see how creamy it gets as you make it. If you don’t have a mortar and pestle, purée the garlic as I demonstrate in this video, then whisk it with the oil in a small mixing bowl.
The salad combines halved grape tomatoes, sliced dill pickle, thinly sliced red onion, chopped parsley, and aioli. Put all the ingredients in a bowl and mix well, then season with salt and pepper to taste. Cucumber and green bell pepper make good additions to the salad.
Did you know that I wrote a cookbook? It’s called the 5-Ingredient Cookbook for men (of course, it is for everyone). The kindle version is officially on sale now and the physical version goes on sale March 16th, but you can preorder it now from Amazon in Canada here, and Amazon in the US here.
Making The Lamb Gyro Bowls
To assemble the bowl, start with a half cup of cooked basmati rice, topped with a quarter cup of sliced iceberg lettuce, half the salad, a lamb gyro skewer, and finally, a wedge of lemon to squeeze over the bowl before eating.
Lamb Gyro Salad Bowls
A salad bowl composed of rice, salad, lettuce and a lamb gyro skewer.
I’m really happy with how these lamb gyro bowls came out, and I think you will love them. If you don’t like lamb, that’s not a problem because you can switch it out for beef or bison if you’d prefer. This recipe marks the halfway point for the bowl series. You can check out the other three posts in the series here, and come back next Friday, for the next bowl recipe. And remember, there are new Chef’s Notes posts every Monday, Wednesday, and Friday and you can subscribe below so you never miss one. Have a great weekend!
A steak burrito bowl is everything you love about a burrito but in a bowl rather than a tortilla. I think that makes it a salad, which makes it healthy for some reason. The truth is, this burrito bowl has everything you need to keep you going, and it tastes great. What else does it need to do or be? You can do most of the prep for this burrito bowl a day ahead, so it can come together really quickly when you are ready to eat. Speaking of which, I’m starving. What about you? Let’s get to it.
Steak Burrito Bowl Ingredients
The Steak Burrito Bowl’s main ingredients are steak, black beans, corn, sweet potato, sour cream, green onion, jalapeno Jack cheese, lettuce, and rice. Other ingredients include lime juice, cumin, salsa, honey, olive oil, salt and pepper. I used an 8-ounce or 226g inside round steak to make two burrito bowls. If you don’t want to use inside round, you can use striploin, sirloin, tenderloin, or ribeye instead. You could also use pulled pork or roasted chicken breast if you want to go a completely different direction. You can also substitute the jalapeno Jack cheese for a nice cheddar, mozzarella, or whatever other cheese you’d like. If you wanted to get really crazy, you could switch the sour cream for yogurt.
Getting Started
Sweet Potato
The first thing you need to do is peel, slice, and roast enough sweet potato for two people. My sweet potatoes were tiny, so I used two. If you have a big sweet potato, use one. Don’t worry if you end up with extra roasted sweet potato. It makes a great snack, side dish, or addition to a lot of dishes. Once the sweet potato is peeled, slice it into one centimetre thick rounds. Put the sliced sweet potato on a parchment-lined sheet pan and drizzle with olive oil, then season with salt and pepper. Flip the sweet potatoes and do the same thing on the other side, then put in a 400°f over for about 20 minutes or until the sweet potatoes are tender. Flip halfway through cooking.
Rice
Once the sweet potatoes are in the oven, get your rice cooking. I used Jasmine rice and aimed to have a half cup per burrito bowl. You can use any rice you’d like. Burrito bowls are a great way to use leftover rice. So, if you have any rice in the fridge cooked from last night’s dinner, put it in a bowl, heat it in the microwave for a minute, and you are set. Otherwise, cook your rice as per the instruction on its package.
Sour Cream
While the sweet potatoes are cooking, make the sauce cream-based sauce. To do that, get a small bowl and in it combine a 1/4 cup sour cream, 1/4 teaspoon cumin, 1/4 teaspoon kosher salt, and 1/2 teaspoon honey. Mix it well, and put it in the fridge, covered until you are ready to use it. If you have a squeeze bottle, it could even be a cleaned out mustard bottle, put the sauce in there. It will make it easier to add to the burrito bowl later, and the thin line of sauce from the squeeze bottle will look nice.
Corn and Beans Pt. 1
The next step is to start preparing the corn and beans. I used 3/4 cup of frozen corn becasue that’s what I had. I boiled it for about 2 minutes, then drained it. You can skip this step by using canned corn. I also used a 398 ml can of black beans, which I drained and rinsed. The last step in this bit of prep is to thinly slice 2 green onions. Set the corn, beans, and green onion aside for a few minutes.
Cooking The Steak
Heat a medium pan over medium-high heat. Add a teaspoon or two of oil, then season the steak on both sides with salt and pepper and cook for 2 to 3 minutes per side or until the steak has reached your desired doneness. Remove the cooked steak from the pan and set it aside to rest.
Beans and Corn pt. 2
Put the steak pan back on the heat and add in the corn, black beans and sliced green onions. Cook for 2 to 3 minutes, season with a 1/4 teaspoon of kosher salt and the juice of half a lime then cook for 1 more minute. Finish the corn and beans by pouring any steak juice into the pan.
The other ingredients
The last few things to do are grate the cheese. You want a quarter cup in total. Slice the lettuce as thinly as you can. You want about a quarter cup per person. Thinly slice the rested steak. Finally, cut 12 grape tomatoes in half.
Putting The Steak Burrito Bowls Together
Let’s make the burrito bowls! First things first, get out two nice bowls. Put a half cup of cooked rice in the bottom of each bowl. Divide the corn and beans among the two bowls and plate off-center. Divide the sweet potato slices among the two dishes fanning them out across the top of the bowls. Put the sliced steak beside the sweet potato—the grape tomatoes beside the steak, and finally the lettuce. Put the grated cheese in the middle of the bowls topped with a spoonful of your favourite salsa. Finish with the sour cream sauce and some fresh cilantro or sliced green onion for garnish.
Steak Burrito Bowl
Steak, sweet potato, corn and black beans, rice and tomato make this Steak Burrito something that you will remember. I think it is delicious but don't take my word for it. Try it for yourself.
1largeSweet potato, peeled and sliced into 1 cm thick rounds
1tablespoonolive oil
1/2teaspoonkosher salt
1/8teaspoonblack pepper
Sour Cream Sauce
1/4cupsour cream
1/4teaspooncumin
1/4teaspoonkosher salt
1/2teaspoon honey
Steak
8ounceinside round steak
1/2 teaspoonkosher salt
1/4teaspoonblack pepper
2teaspoon canola oil
Corn and Beans
398ml can black beans, drained and rinsed
3/4cupfrozen corn, boiled for 2 minutes then drained
2green onions, thinly sliced
1/2lime
1/4teaspoonkosher salt
beef drippings
Bowl
1 cupcooked rice
1/4cupgrated jalapeno Jack cheese
2tablespoonssalsa
12grape tomatoes, cut in half
1/2cupshredded iceberg lettuce
1tablespoonchopped cilantro
Instructions
Sweet Potato
Heat your oven to 400°f
Line a sheet pan with parchment paper and lay the sliced sweet potato on it in a single layer. Drizzle half the olive oil over the sweet potato and season with half the salt and pepper. Flip the sweet potato, and cover with the remaining olive oil and seasoning.
Roast the sweet potato for about 20 minutes, or until tender, flipping halfway through.
Steak
Heat a medium skillet over medium-high heat.
Season the steak on both sides with salt and pepper. Add the oil and the steak to the pan. Cook for 2 – 3 minutes per side or until the steak has reached the desired doneness. Take the steak out of the pan and set it on a plate to rest.
Once the steak has rested for 5 minutes, cut it into thin slices.
Corn and Beans
Put the steak pan back on the heat and add in the corn, beans, green onion, and salt. Cook for two minutes. Squeeze the lime juice into the pan. Finish the beans and corn by adding in any juices that have accumulated under the steak.
The Steak Burrito Bowl
Get two large bowls and place the rice in the bottom of them.
Put the corn and beans on the rice slightly off-center.
Fan the sweet potato around the top of the bowl.
Put the sliced steak beside the sweet potato, followed by the grape tomatoes and the lettuce.
Put the salsa on top of the other ingredient in the centre of the bowl. Top with the cheese and the sour cream sauce. Garnish with the chopped cilantro and serve.
I’ll be the first to admit that there is a fair amount of prep that goes into making this Steak Burrito Bowl. Really though, the rice and sweet potato can be leftovers or cooked a day ahead. The sauce and the corn and beans can be made a day too. Even if you make everything from scratch the day of, it shouldn’t take more than 45 minutes to an hour to make. It is absolutely worth the effort, but don’t take my word for it, try it for yourself. If you do try it come back and give the recipe a rating.
I can finally announce that I have written a cookbook. It’s called the 5-Ingredient Cookbook for men (of course, it is for everyone). It officially goes on sale on March 16th, but you can preorder it now from Amazon in Canada here, and Amazon in the US here.
Thank you for reading this post. Please share it on Facebook, Pinterest, or Twitter to help Chef’s Notes grow. Subscribe to Chef’s Notes below, and you will never miss a post again.
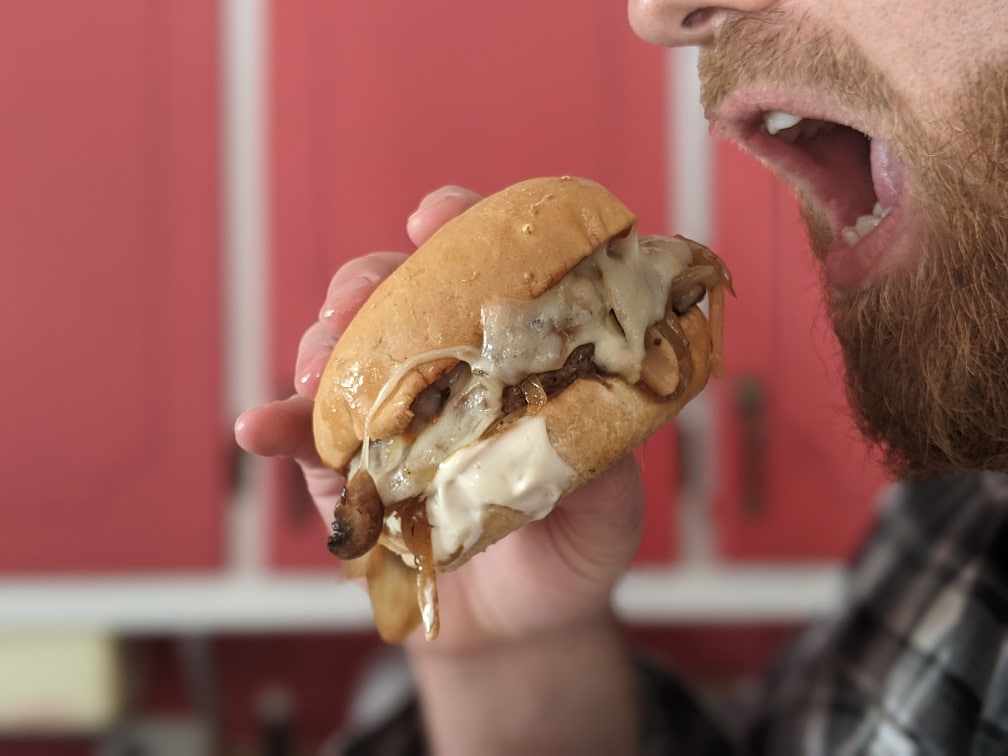
Sometimes in life, you get a craving that won’t go away until you satisfy it. It nags at you constantly like a siren’s songs calling you to the rocks. You know you shouldn’t. You know it’s bad for you. But you can’t help yourself. You awaken with a shot in a foggy dream-like haze. You’re in a well-used kitchen, dirty pots and pans surround you. The smell of cooked onion and ground beef fills your sinuses. You feel a weight in your right hand. Your eyes glance down as your hand lifts a burger to your mouth. You see it happening in slow motion. You feel yourself take that first bite, fighting the urges. “No!” You say quietly to yourself. “I’m a good boy.” but you can’t stop yourself. Before you know it, you are left with nothing but grease-covered hands and a dumb satisfied look on your face. Was it a dream? Was it a nightmare? No. It was a Philly Cheesesteak Burger. Craving satisfied. Let’s get to it.
The Burger Patties
All joking aside, this Philly Cheesesteak Burger is wicked good. The patties are a combination of cooked onion, ground beef, garlic, salt and pepper. They are cooked in a pan, topped with fried mushrooms and onions, and provolone cheese. The burger is finished with a little mayonnaise and barbecue sauce, and a delicious bun. Yes, it is as good as it sounds. The first step in making these burgers is to cook some onions.
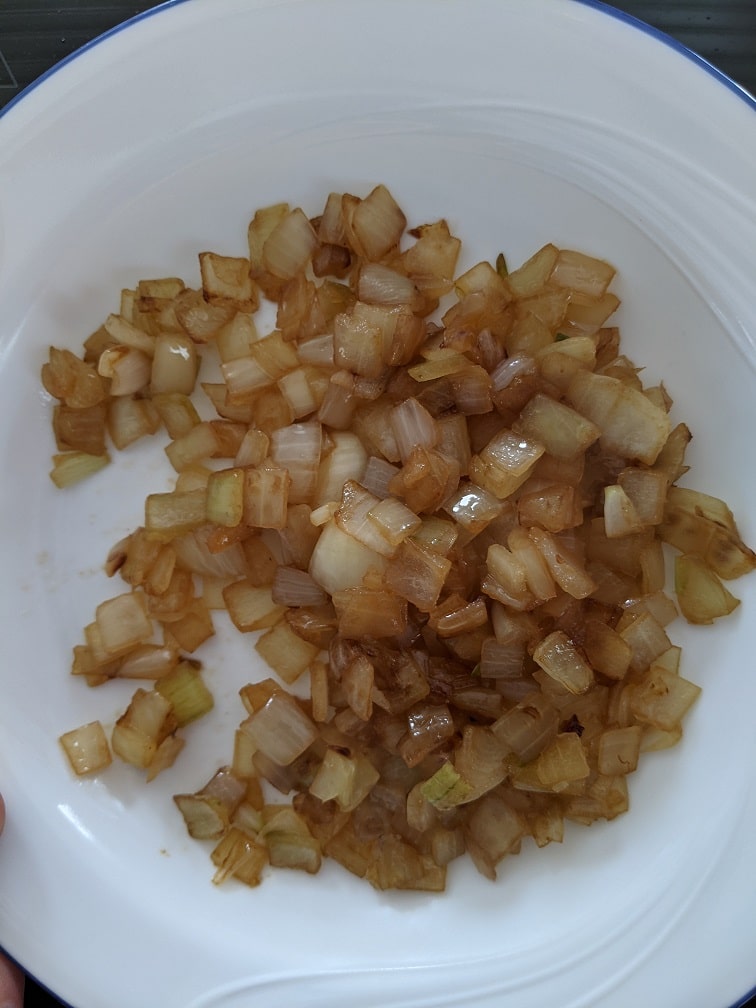
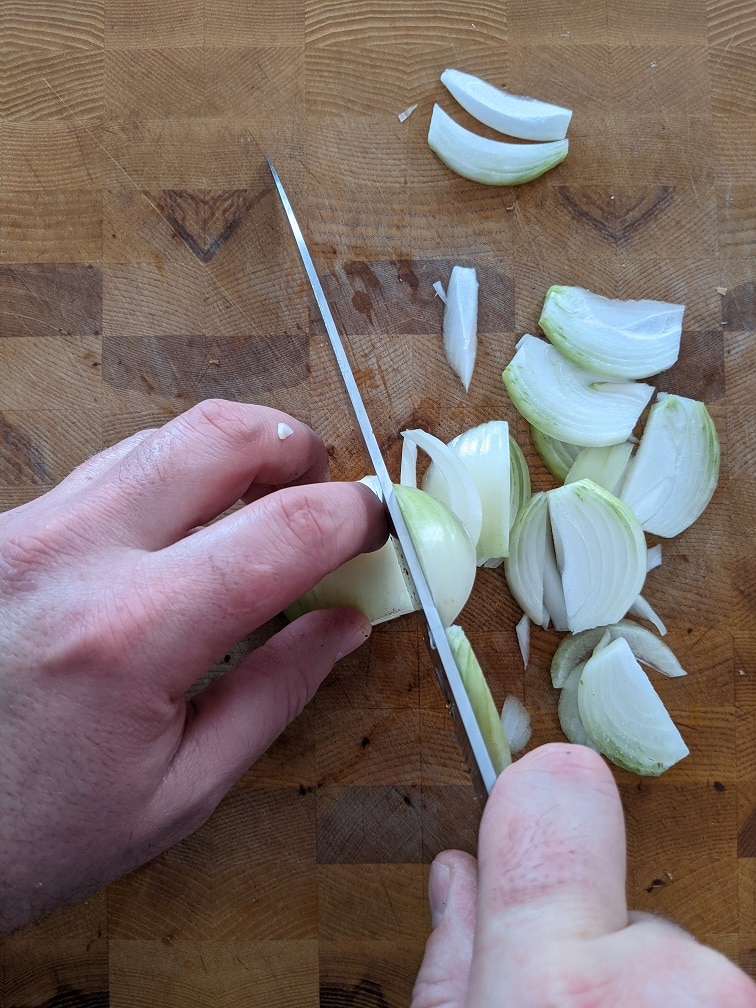
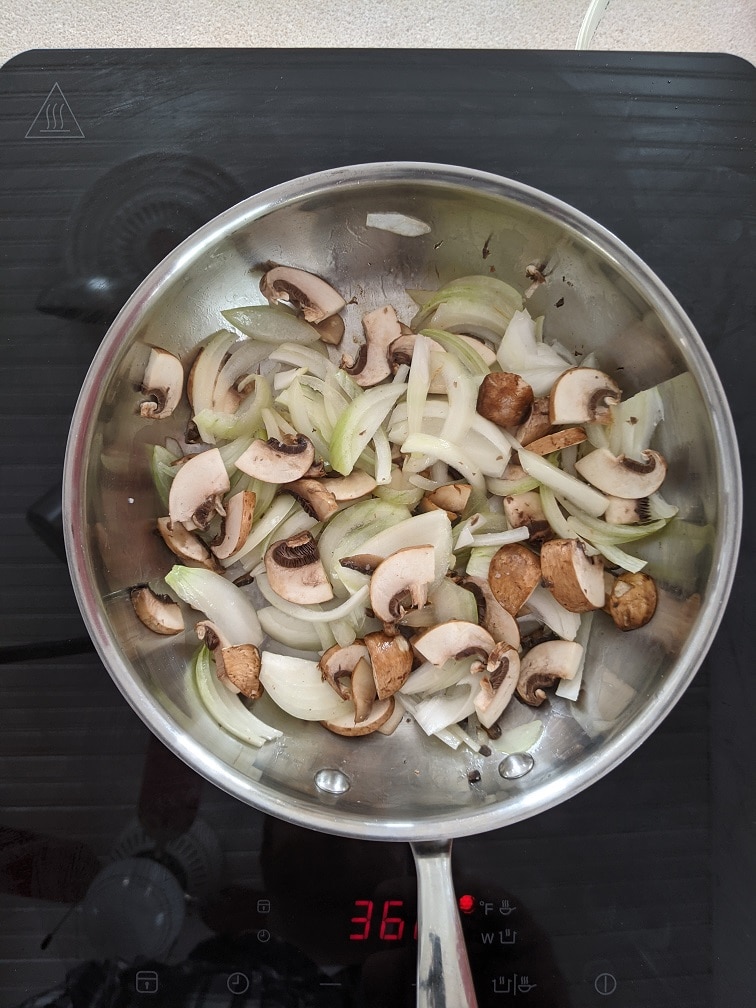
Onions
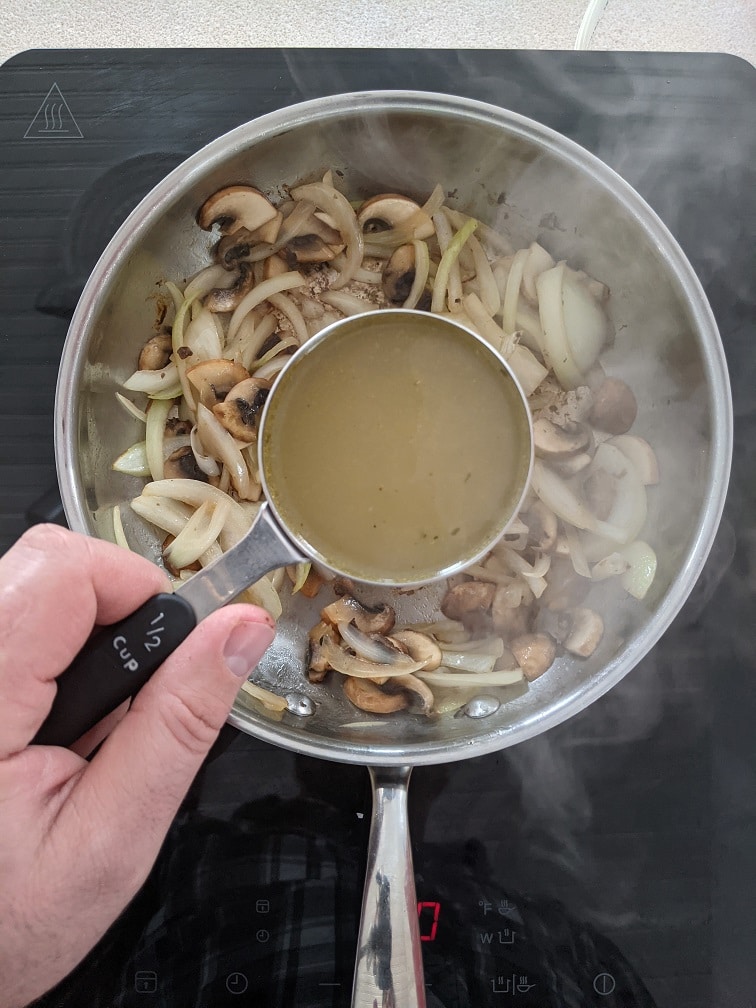
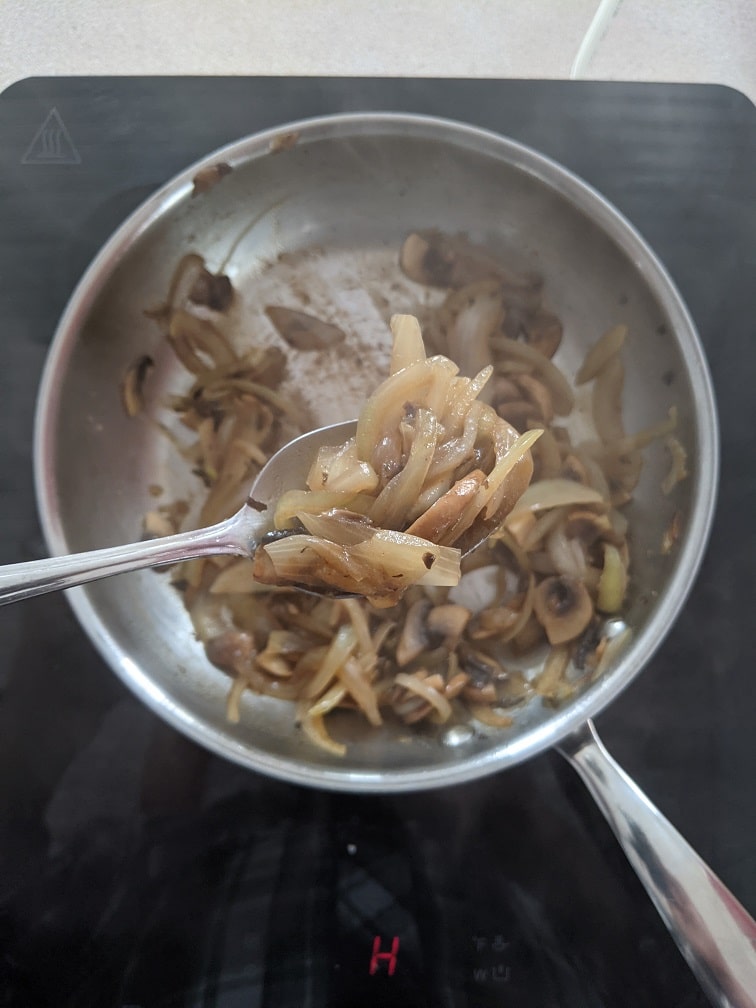
Dice one onion. You want about a cup of onion in total. Heat a small frying pan over medium-high heat and add a teaspoon or two of oil (canola or olive). Add a quarter teaspoon of Kosher salt to the onions and cook until they soften and start to brown. Add two tablespoons of beef stock to the pan and cook until it has completely evaporated. Take the onions out of the pan, spread them out onto a plate and put them in the fridge to cool for ten to fifteen minutes.
Mixing The Meat
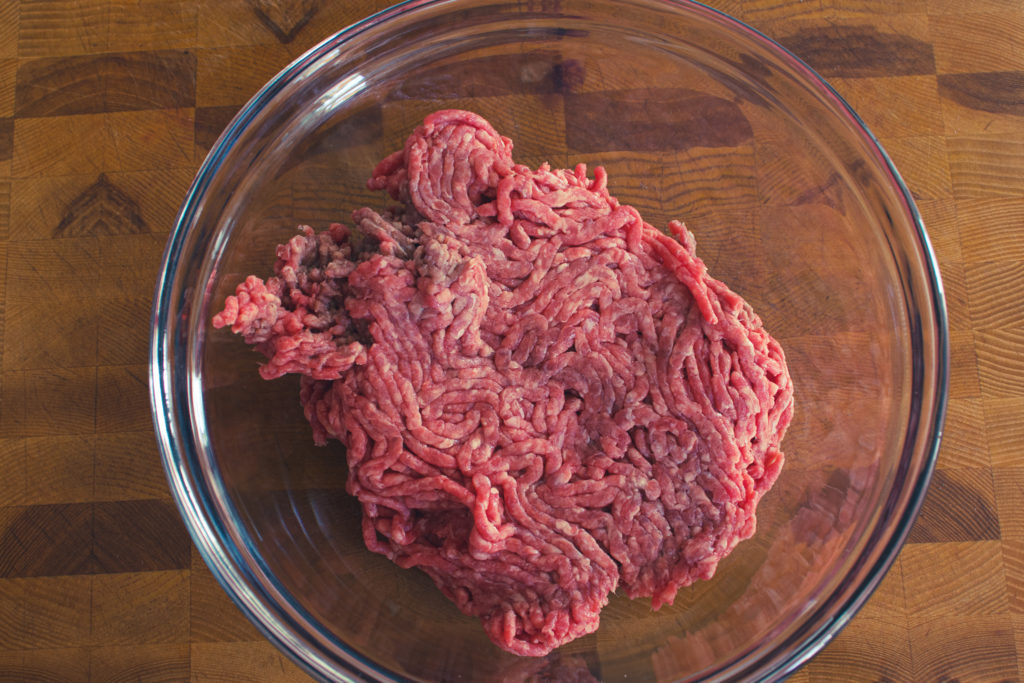
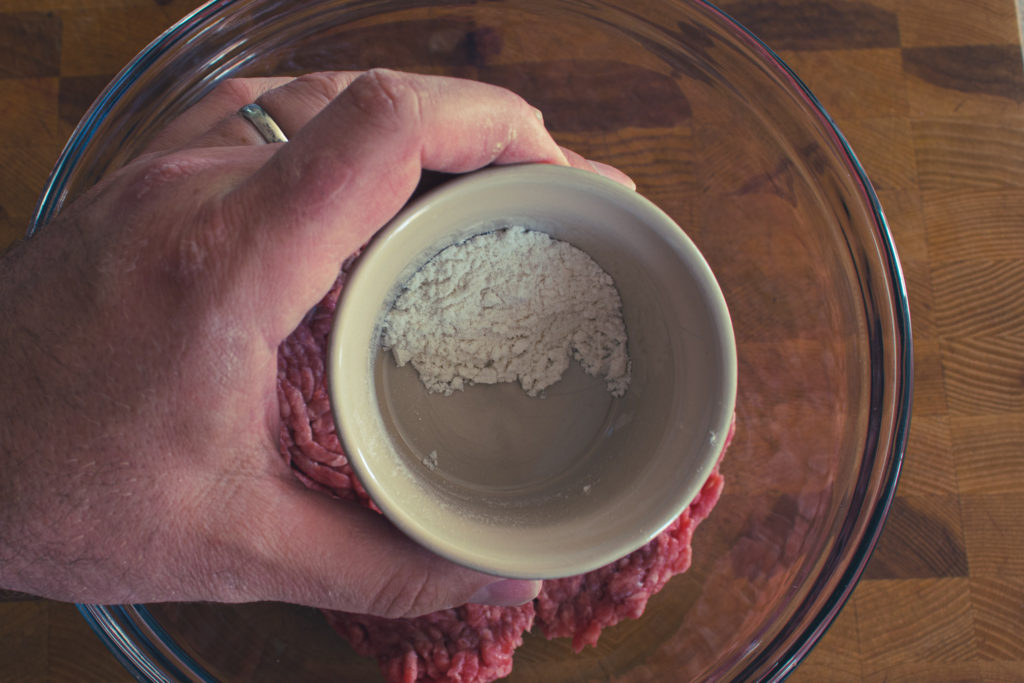
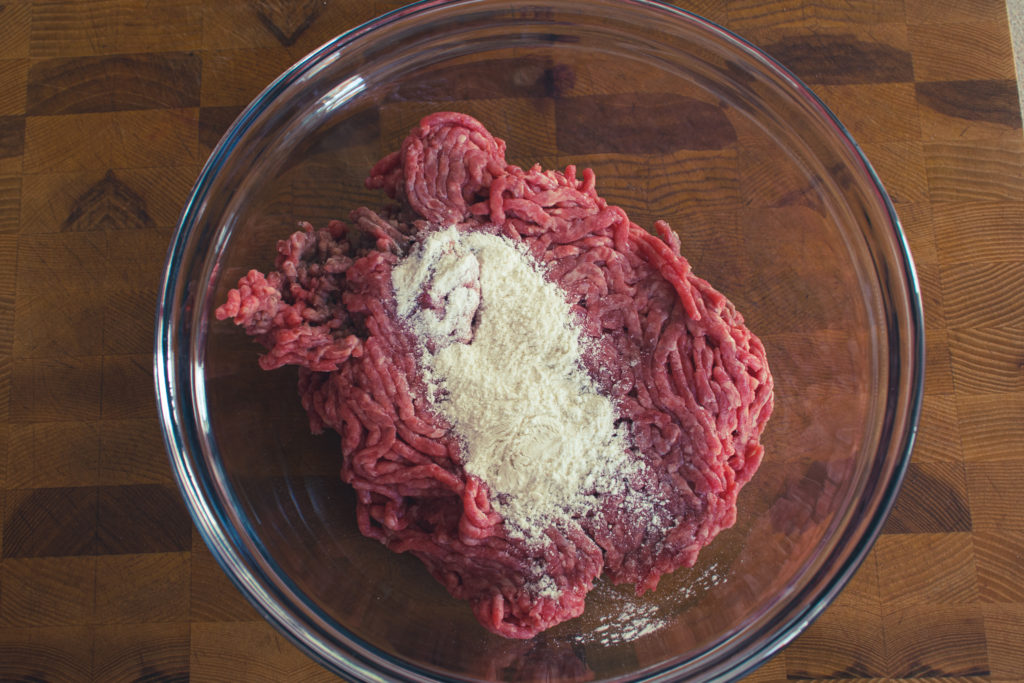
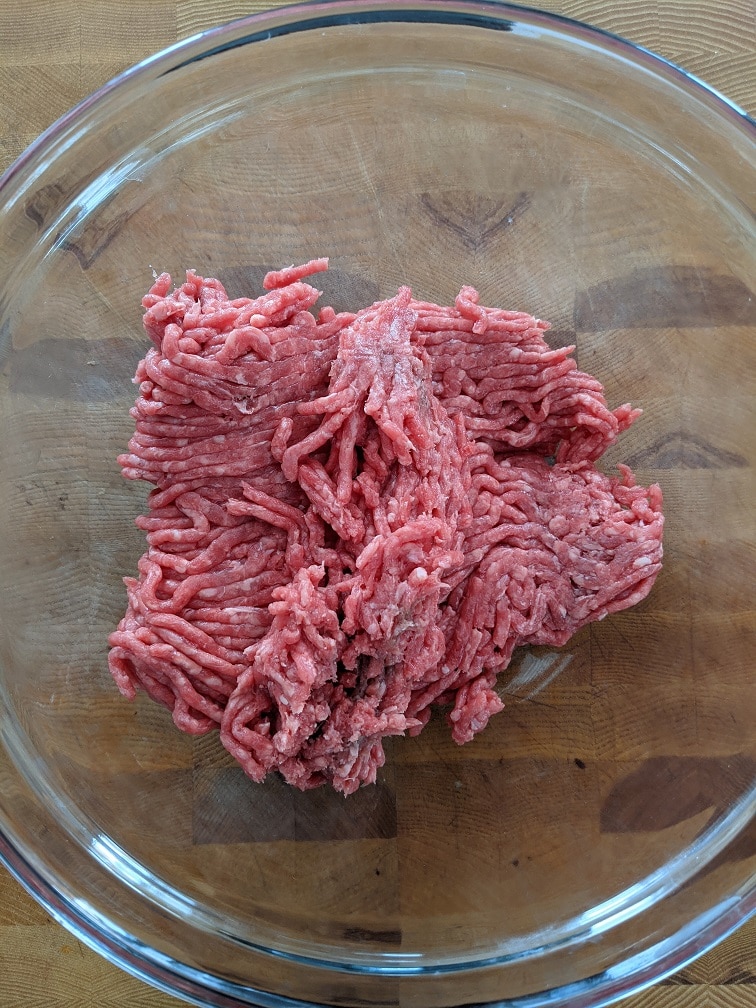
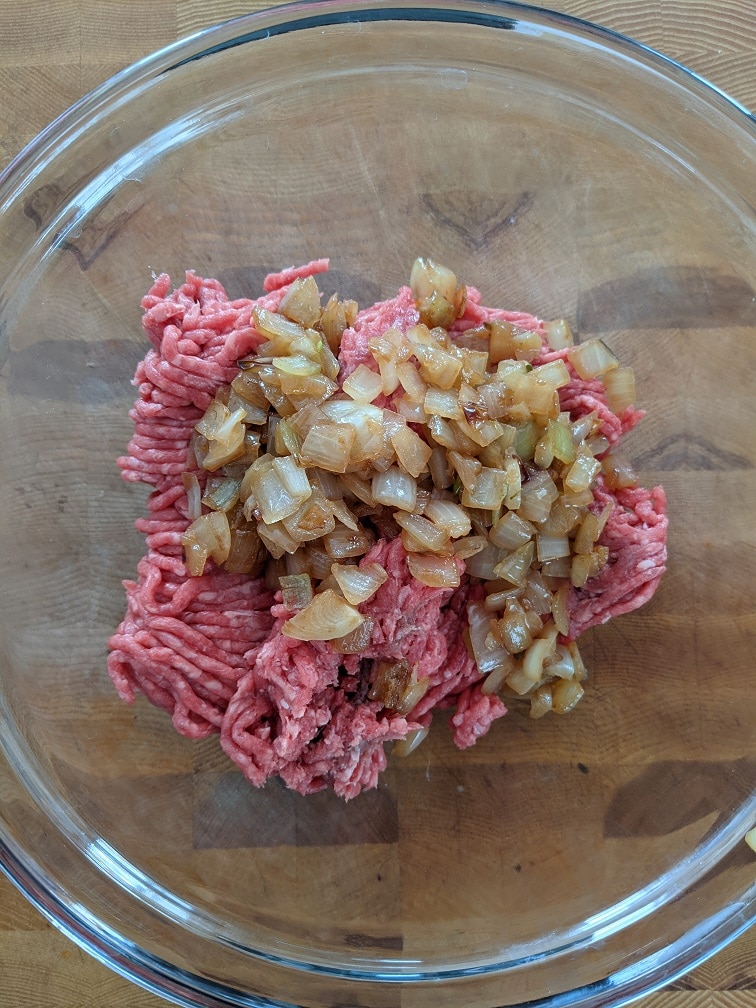
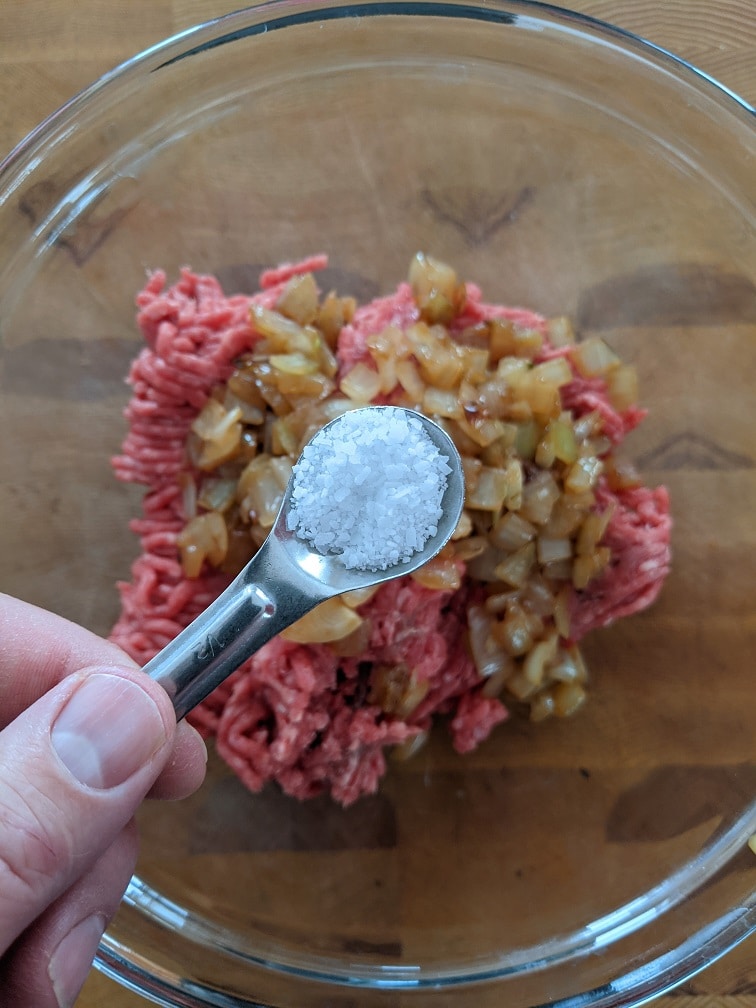
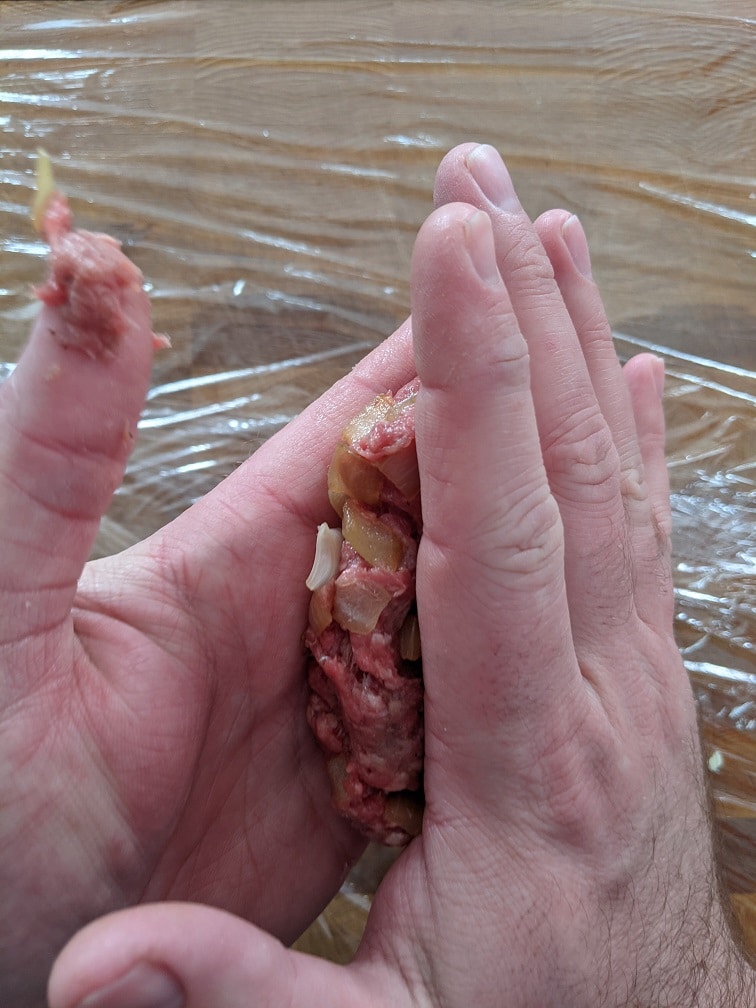
Use one pound (454 g) of lean ground beef. Not extra lean. The burgers will be way to dry. Add the cooked and cooled onions, half a teaspoon of Kosher salt, a quarter teaspoon of black pepper, and a teaspoon of minced garlic. Mix well.
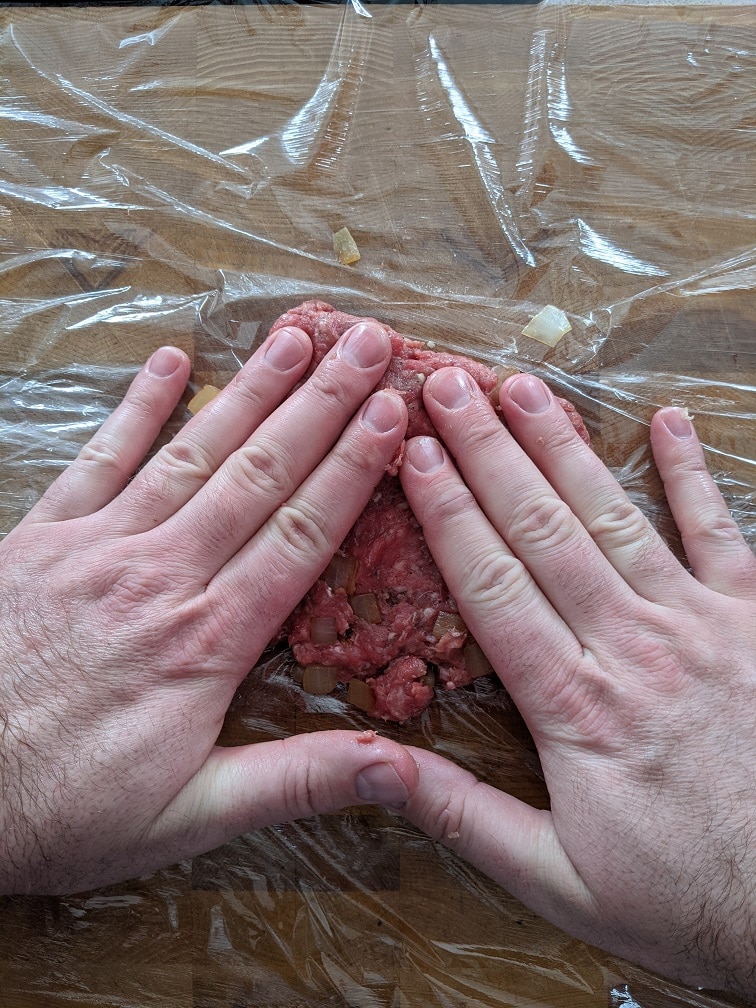
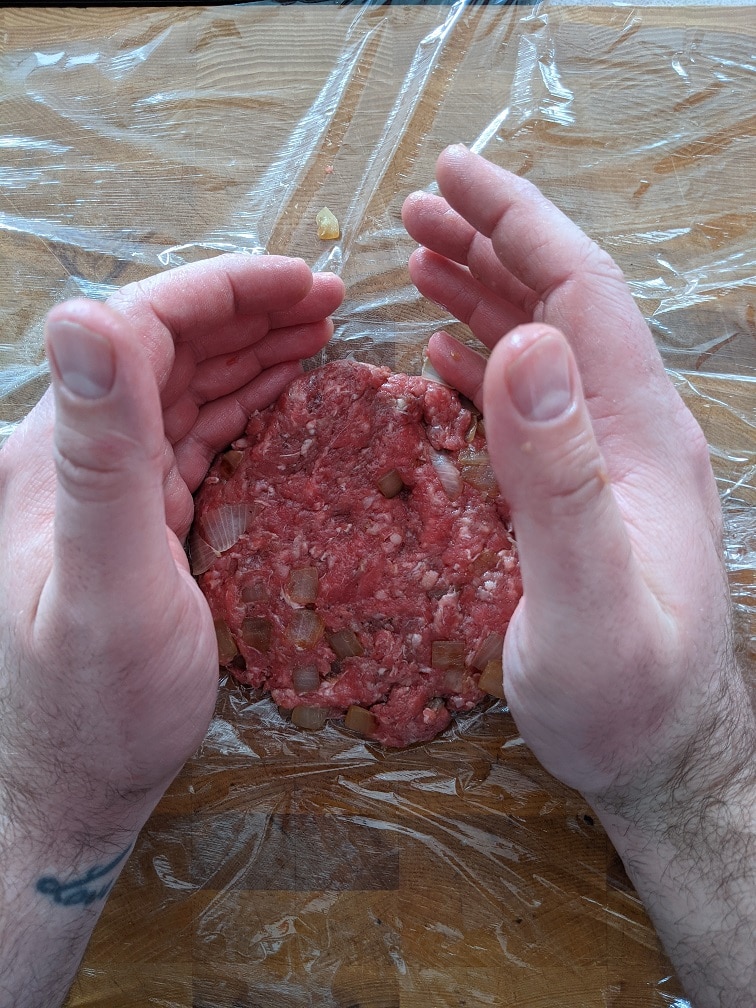
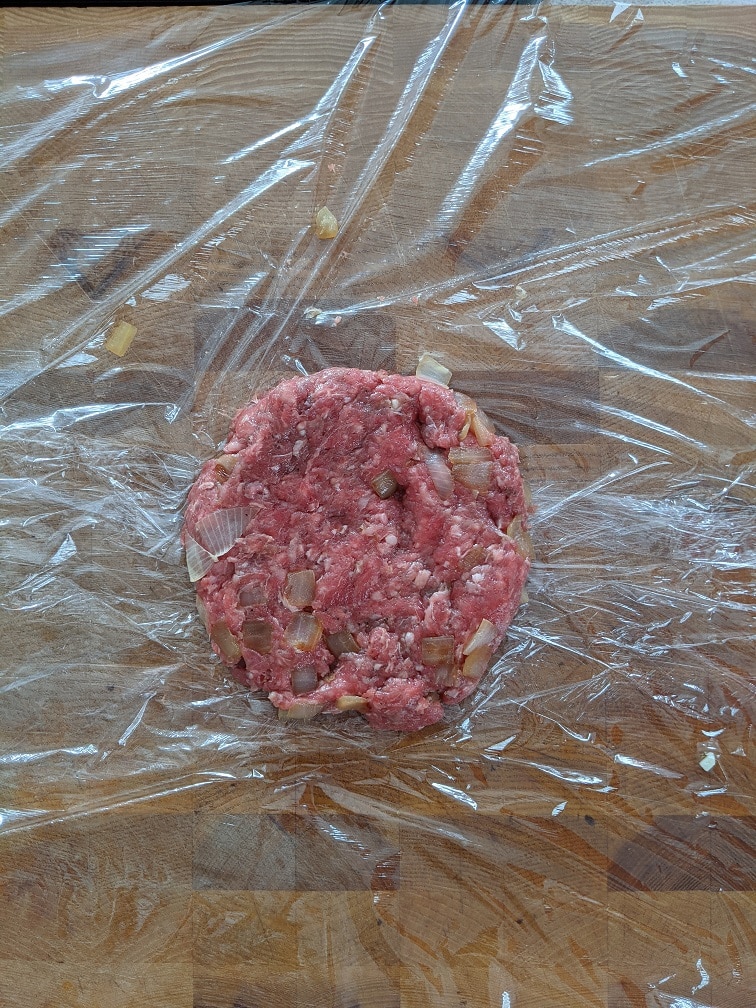
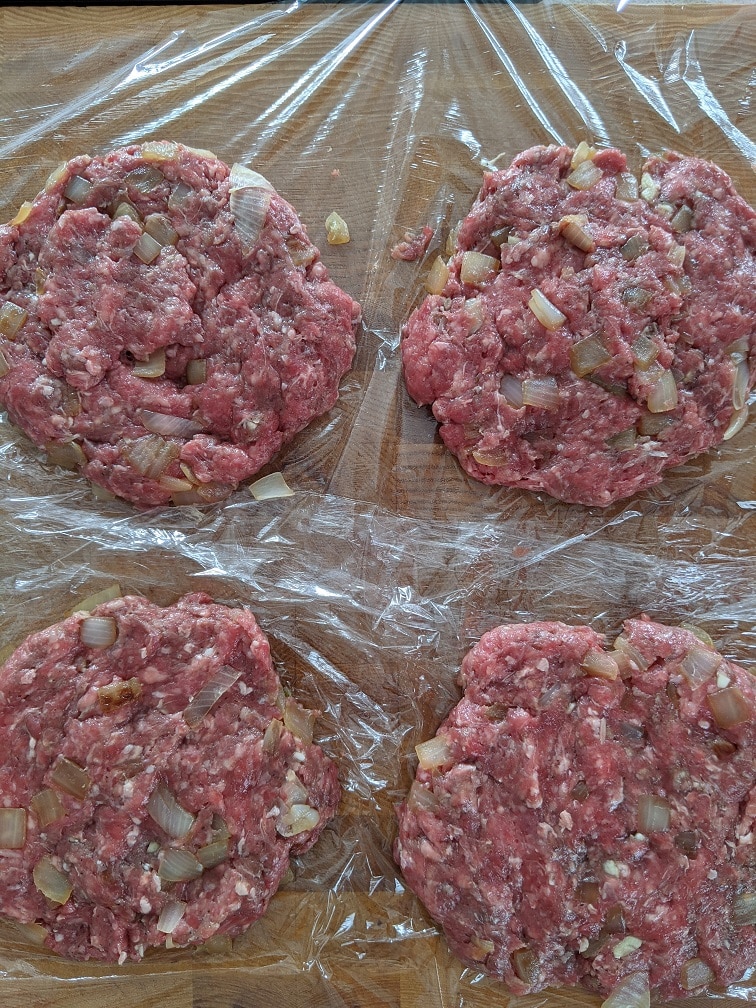
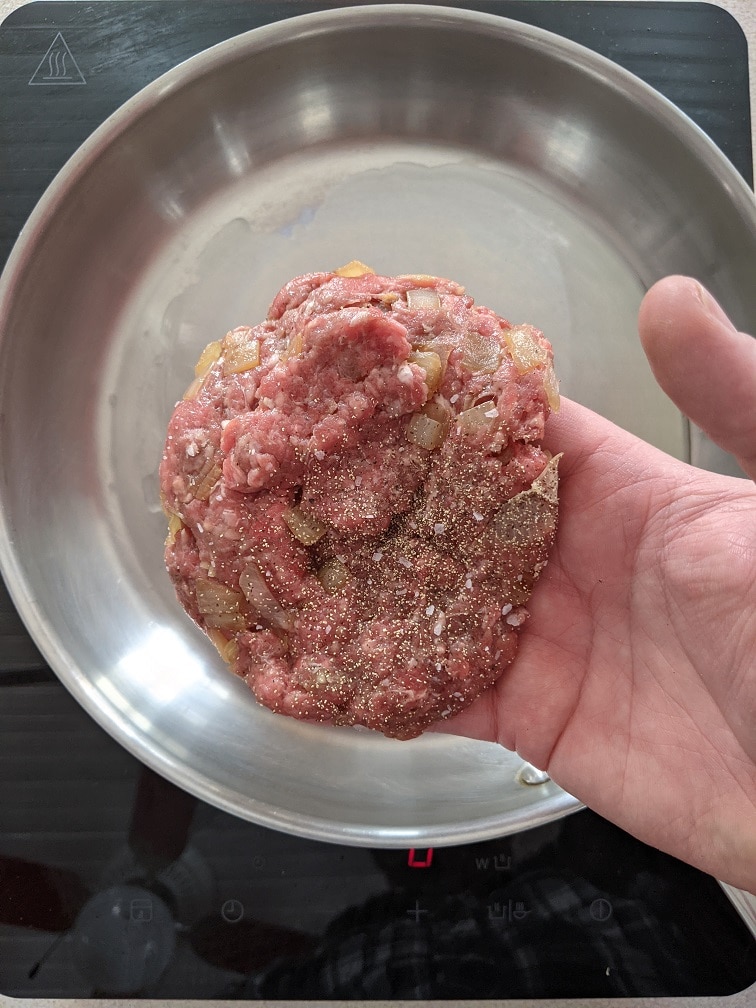
Forming The Patties
Line your cutting board with plastic wrap. Divide the meat into four evenly sized portions. Take one portion and flatten it into a patty. Place the flattened meat on your plastic-covered cutting board and continue to flatten it until it is one centimetre thick. Cup your hands around the patty to make it circular. Repeat with the rest of the meat. If the meat is sticking to your hands, wet your hands with cold water before shaping the next burger. Put the burgers and plastic wrap on a plate and put it in the fridge for ten minutes to firm up a little bit. You can leave the burgers in the fridge, covered for up to two days before cooking them.
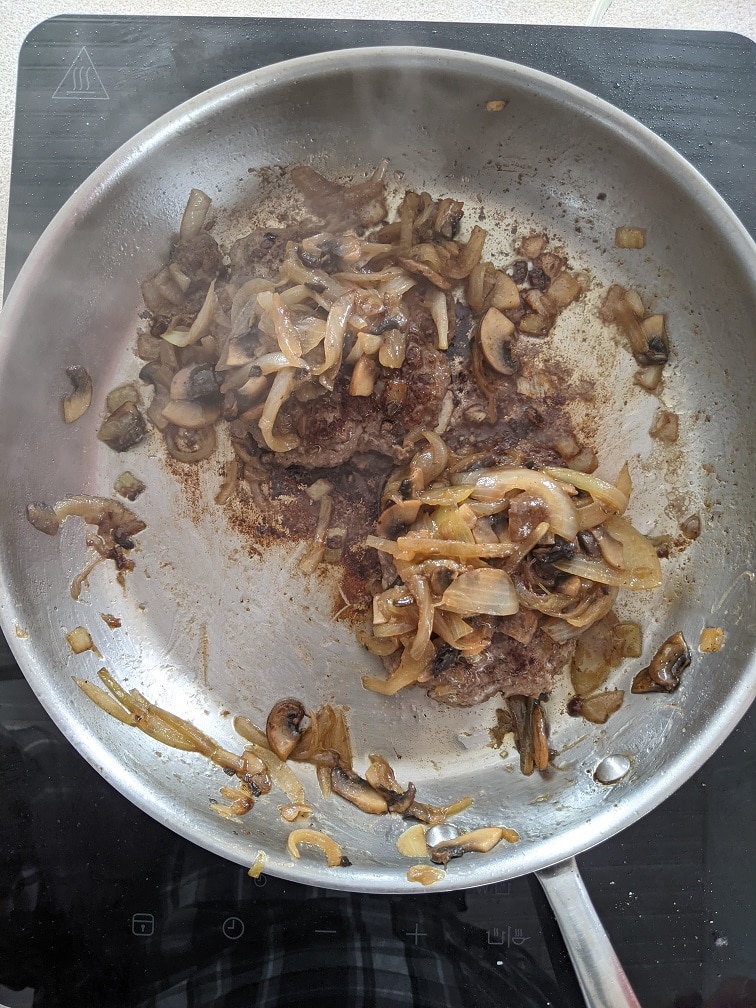
Mushrooms and Onions
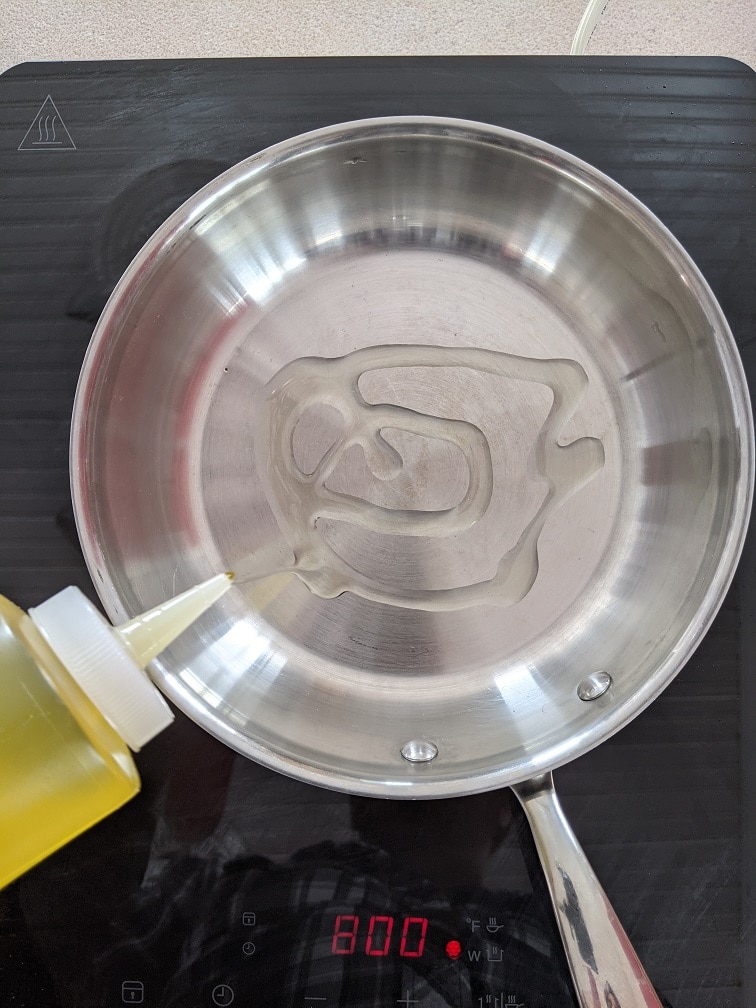
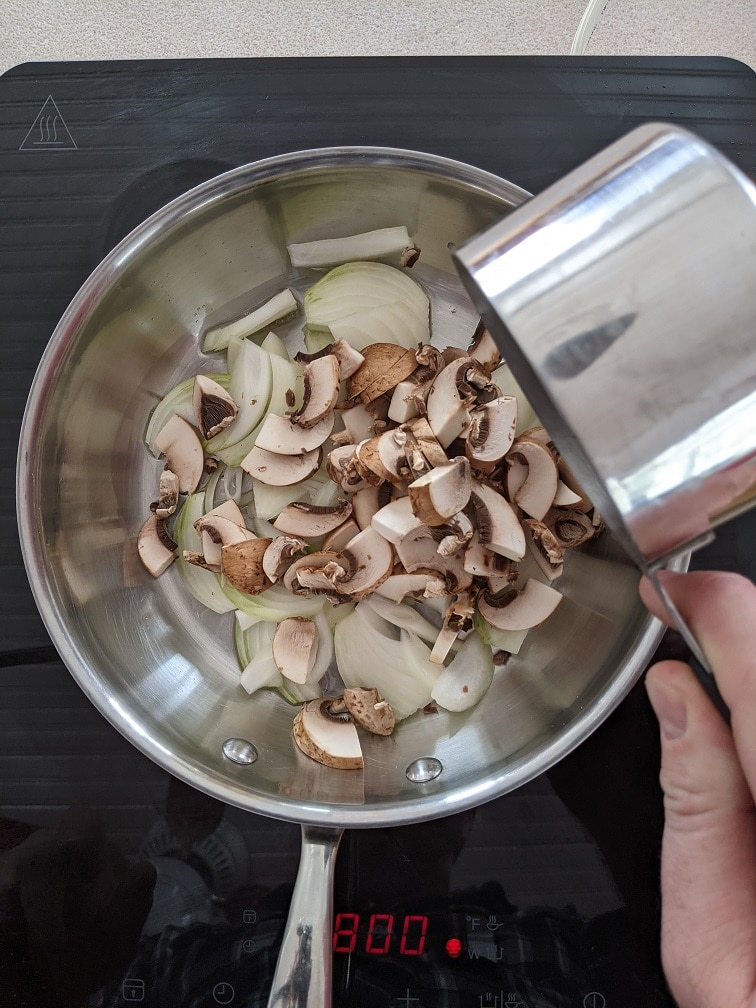
While the burgers are in the fridge, slice two cups of cremini mushrooms and two cups of onion. Heat a frying pan on medium-high, then add in a tablespoon of oil. Put the mushrooms and onions in the pan and cook for three to four minutes or until the onions start to soften. Add half a cup of beef stock and cook until it is fully evaporated.
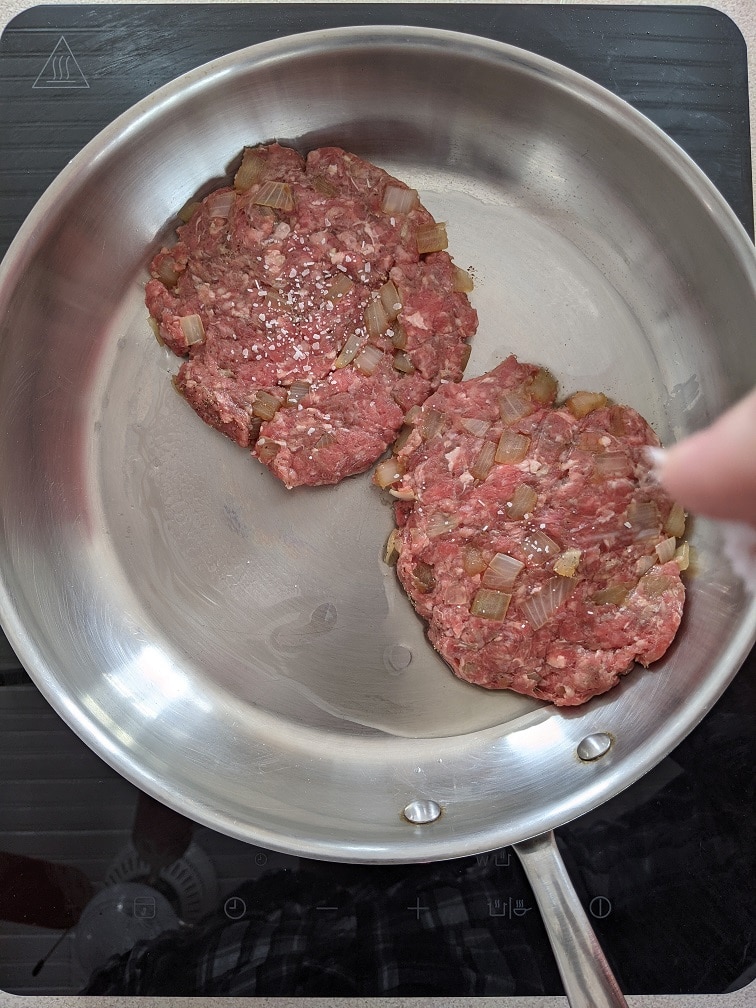
Cooking The Burgers
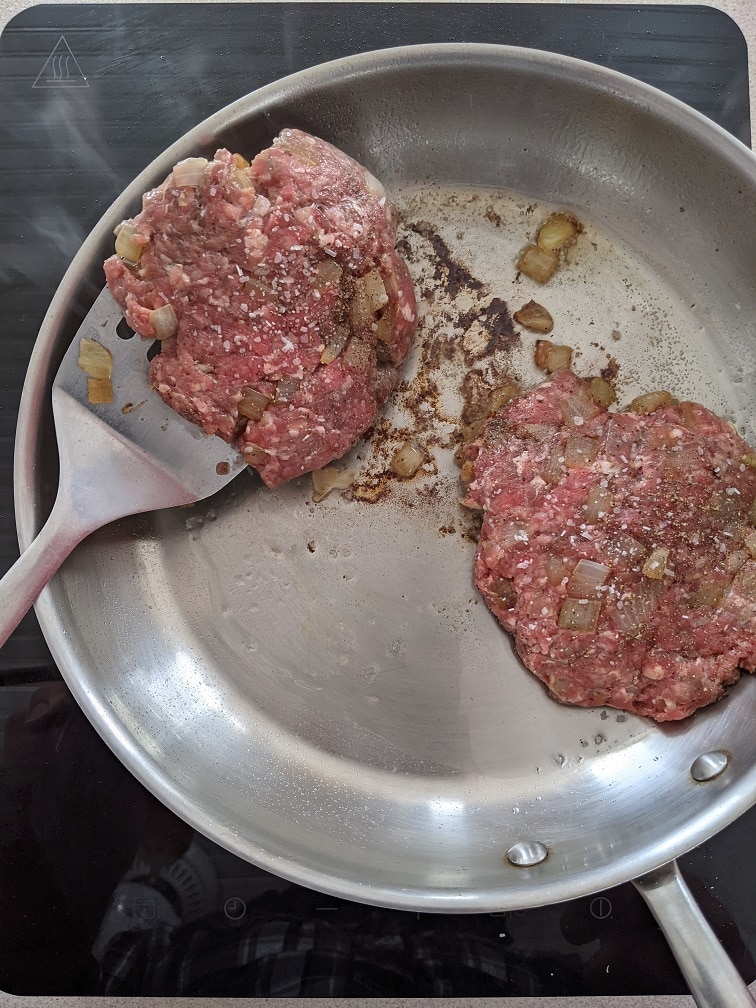
Heat a large frying pan over medium-high heat. Add in a teaspoon or two of oil, then the burgers. I only cooked two burgers because there were only two of us. The other two burgers were left in the fridge for later enjoyment. Cook the burgers for four to five minutes per side, or until the juices run clear when the burger is pressed in the middle.
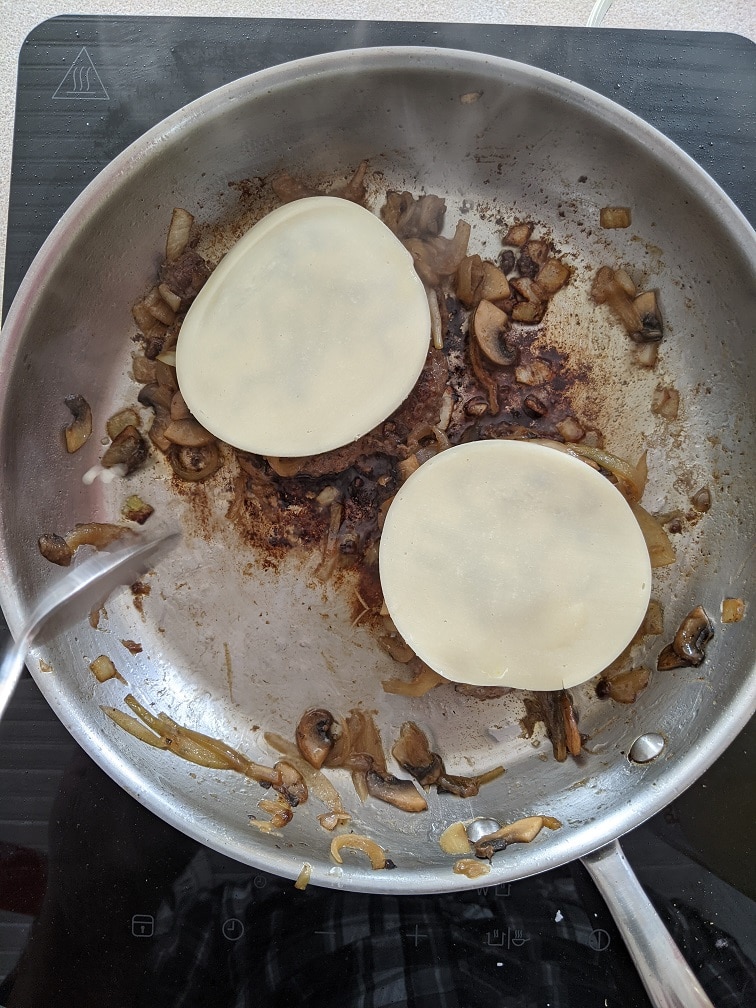
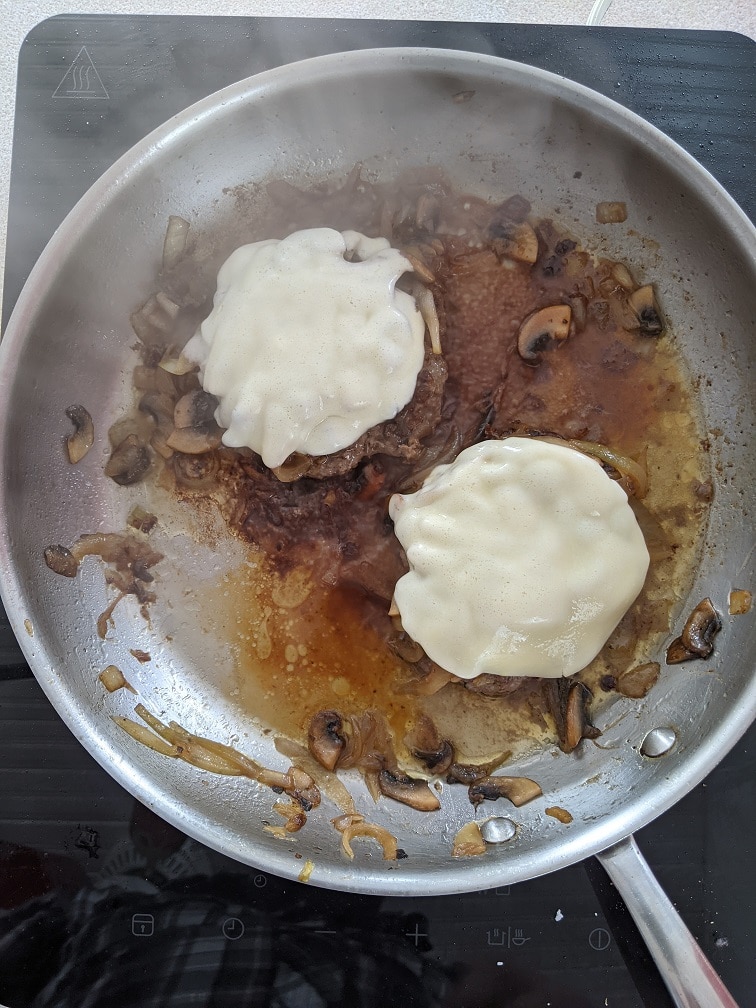
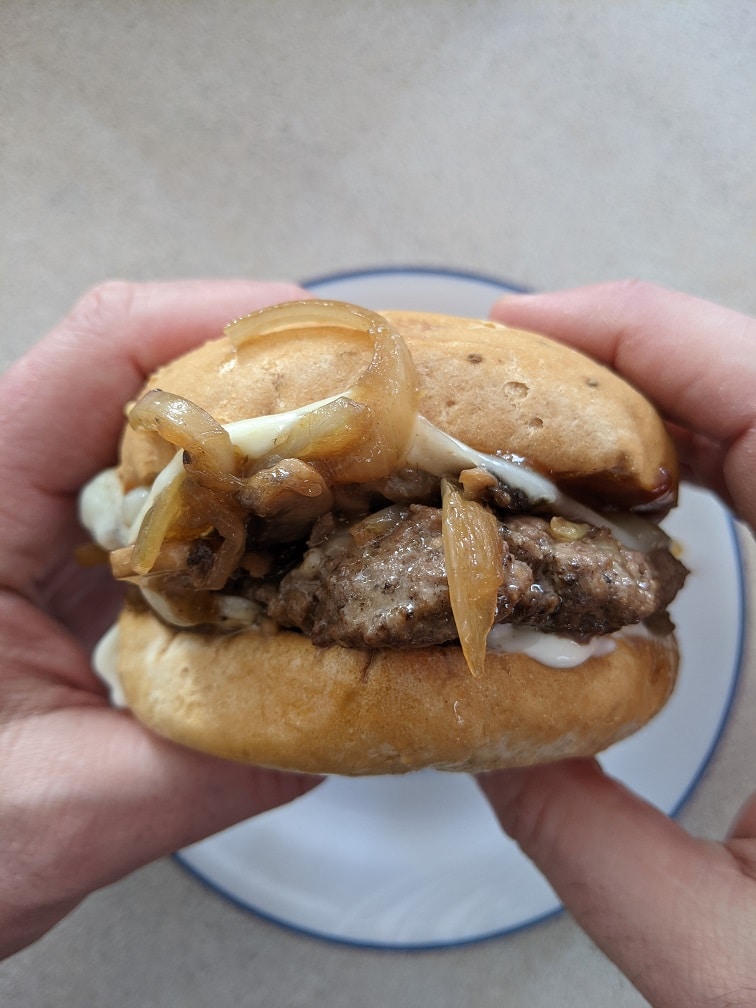
Finishing The Philly Cheesesteak Burger
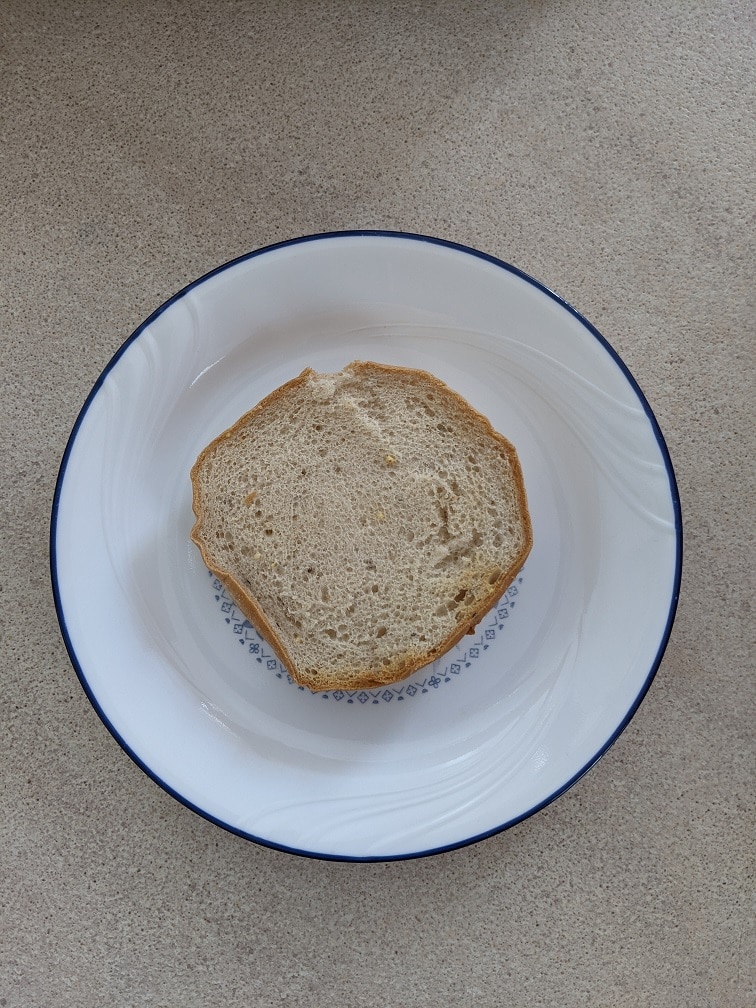
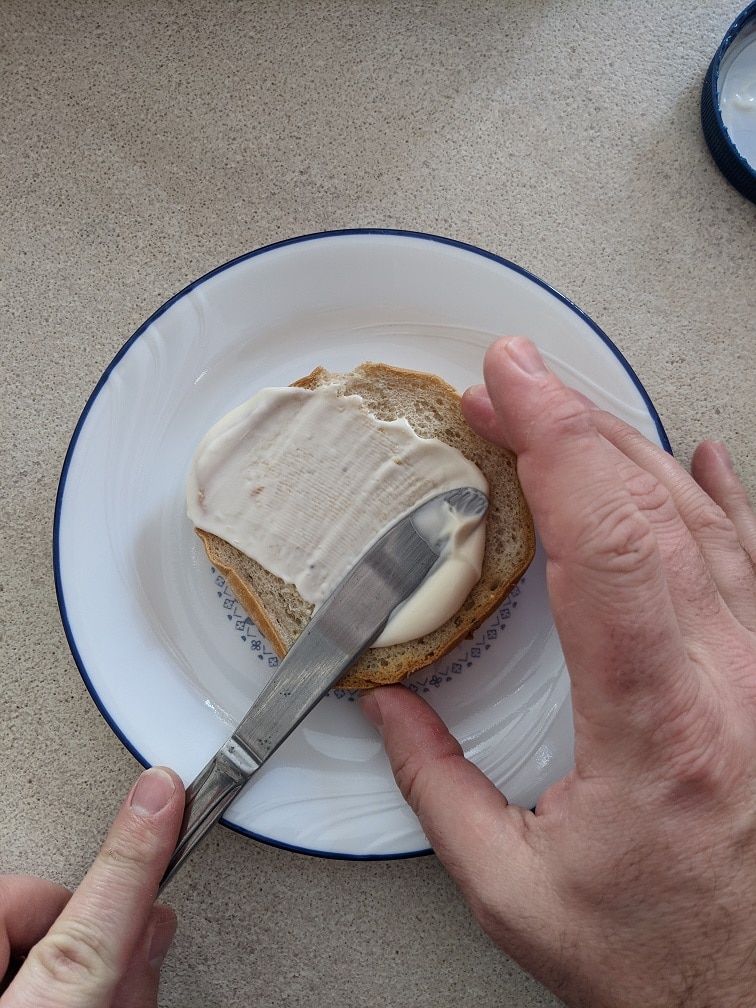
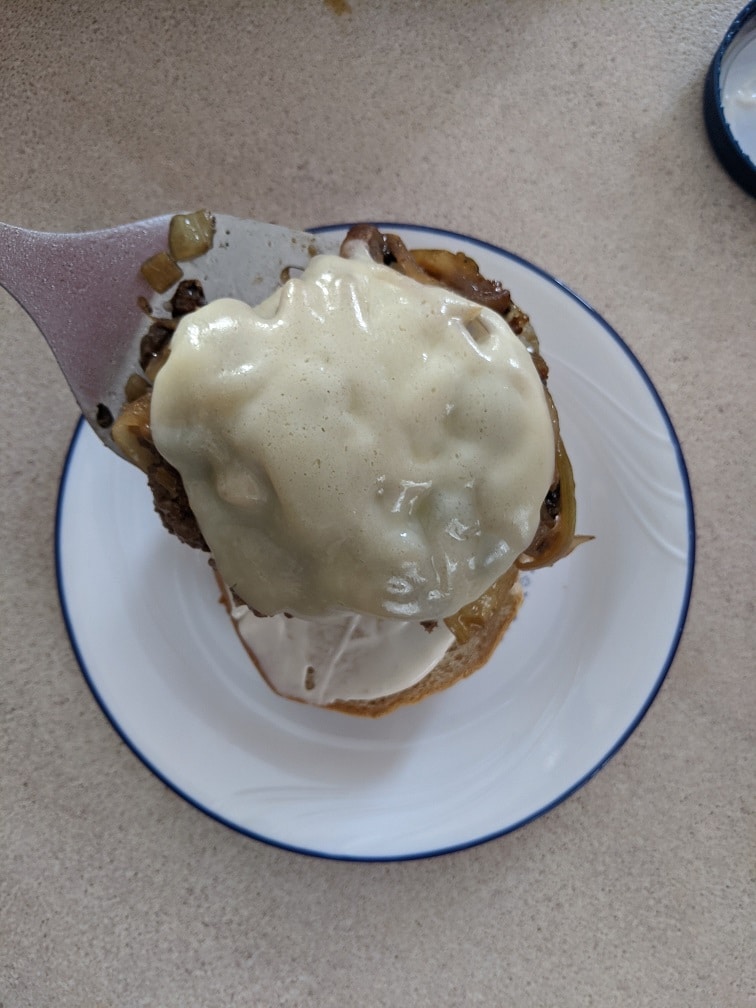
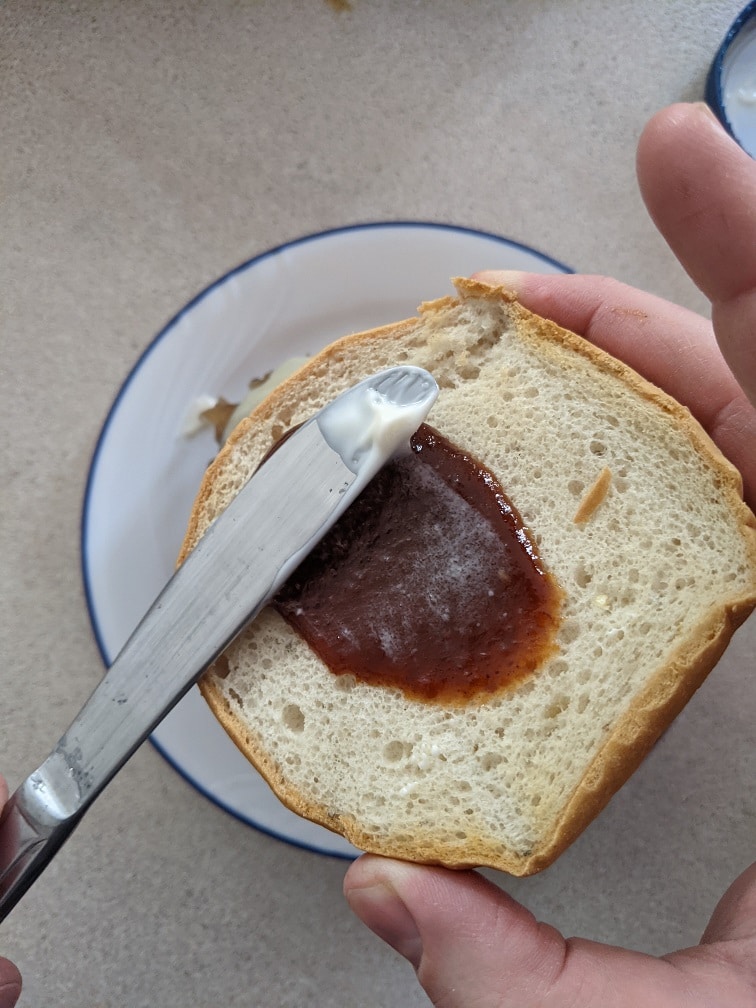
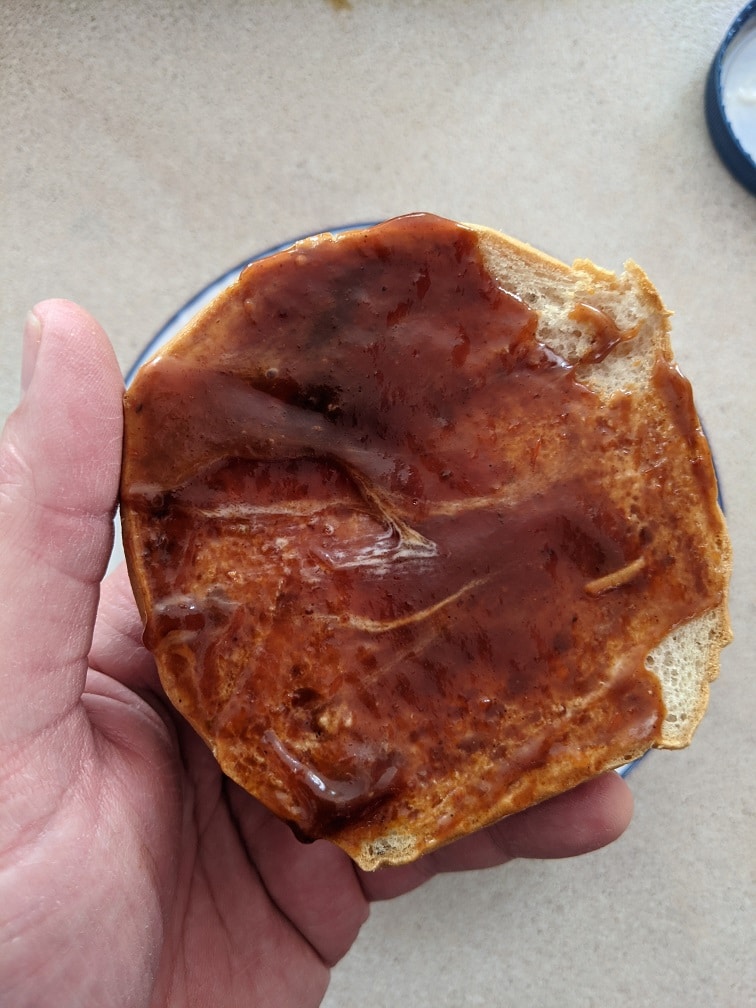
Top the burgers with onions and mushrooms and provolone cheese. Pour two to three tablespoons of beef stock or water into the bottom of the pan and cover with a tight-fitting lid for a minute or until the cheese is melted. Toast the burger buns, then spread a teaspoon of mayonnaise on the bottom and a teaspoon of barbecue sauce on the top. Put the burgers on the buns and enjoy.
Alternative Recipe
It is common for a Philly Cheesesteak to have Cheese Whiz on it. Truth be told, that’s what I was craving, but I don’t typically have Cheese Whiz in the house becasue if I do, I eat the whole bottle. I know it’s gross, I get. But, it’s one of those things. If you want something really special, get rid of the provolone, and add a few tablespoons of Cheese Whiz to the mushrooms and onions once they’re cooked. Spoon the mushroom, onion, and Cheese Whiz mixture over the burger, and enjoy. If you are going to go the Cheese Whiz route, you can get rid of the mayo and barbecue sauce or keep them. That’s up to you.
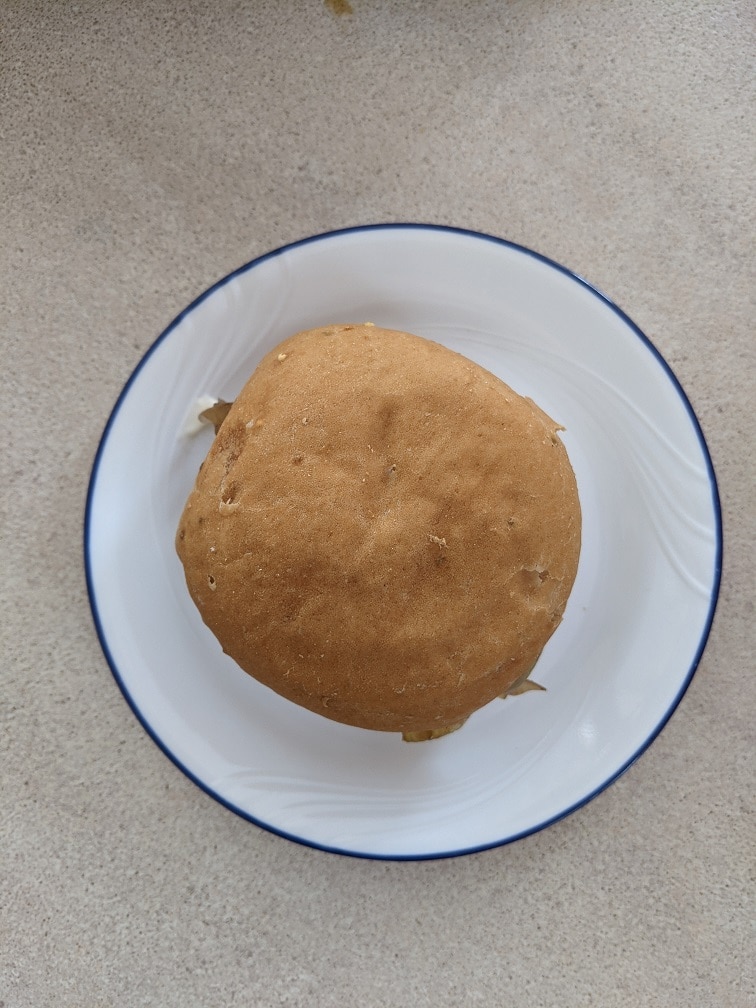
The Philly Cheesesteak Burger
A delicious Philly Cheesesteak-inspired burger that you will love. The burger has sautéed onions in it and is topped with sautéed mushrooms, more onions, and provolone cheese. It's finished with mayo and barbecue sauce.
Heat a small frying pan over medium-high heat. Add in 1 tsp of canola oil and diced onions. Cook for 3 to 4 minutes or until the onions soften and start to brown. Add the beef stock and cook until it is completely evaporated. Spread the onions out onto a plate and put in the fridge to cool for 10 minutes.
In a medium mixing bowl, combine the ground beef with the cooked and cooled onions, garlic, salt, and pepper and mix well. Divide the meat into four and form into 1 cm thick patties. Put the patties in the fridge for 10 minutes to set.
Heat a large skillet over medium-high heat. Season the burgers with salt and pepper. Add in 1 tsp of canola oil to the hot pan along with the burgers. Cook the burger for 4 to 5 minutes per side or until the juices run clear when the middle of the burger is pressed.
Finishing the Burger
Heat a medium frying pan over medium-high heat. Add in 1 tsp canola oil, the sliced mushrroms and onions. Cook for 3 to 4 minutes then add in the beef stock and cook until it has evaporated.
Put the mushrooms and onions on the burgers, top each with a slice of provolone cheese. Put 2 to 3 tablespoons of water or beef stock in the bottom of the hot burger pan, cover and steam for 1 minute or until the cheese is melted.
Toast 4 buns spread the mayo on the bottom bun and the barbecue sauce on the top bun. Put the burgers on the buns and enjoy.
I think we’ve all had cravings that just won’t go away. Thankfully, this burger satisfied a craving that I’ve been having for weeks. If you like Philly Cheese Steaks, I think you will really like this burger. In fact, if you like burgers at all, you are really going to like this burger. I certainly did. What is a food craving you get that won’t go away until it has been satisfied?
I can finally announce that I have written a cookbook. It’s called the 5-Ingredient Cookbook for men (of course, it is for everyone). It officially goes on sale on March 16th, but you can preorder it now from Amazon in Canada here, and Amazon in the US here.
Thank you for reading this post. Please share it on Facebook, Pinterest, or Twitter to help Chef’s Notes grow. Subscribe to Chef’s Notes below, and you will never miss a post again.
We use cookies on our website to give you the most relevant experience by remembering your preferences and repeat visits. By clicking “Accept”, you consent to the use of ALL the cookies.
This website uses cookies to improve your experience while you navigate through the website. Out of these, the cookies that are categorized as necessary are stored on your browser as they are essential for the working of basic functionalities of the website. We also use third-party cookies that help us analyze and understand how you use this website. These cookies will be stored in your browser only with your consent. You also have the option to opt-out of these cookies. But opting out of some of these cookies may affect your browsing experience.
Necessary cookies are absolutely essential for the website to function properly. This category only includes cookies that ensures basic functionalities and security features of the website. These cookies do not store any personal information.
Any cookies that may not be particularly necessary for the website to function and is used specifically to collect user personal data via analytics, ads, other embedded contents are termed as non-necessary cookies. It is mandatory to procure user consent prior to running these cookies on your website.